• Please visit and share your knowledge at our sister communities:
  • If you have not, please join our official Homebrewing Facebook Group!

    Homebrewing Facebook Group

FastFerment

Homebrew Talk

Help Support Homebrew Talk:

This site may earn a commission from merchant affiliate links, including eBay, Amazon, and others.

TexasWine

Supporting Member
HBT Supporter
Joined
Apr 11, 2013
Messages
2,402
Reaction score
688
Location
Houston
I'm sure several of you, my wine making compadres, have entered the HBT giveaway of that fancy FastFerment conical fermenter. But, I'm curious, how would you use it for your wine if you win it?

I was mulling this over because if I don't win it, I would consider buying a few if it makes sense. And after reading some of the old V-vessel testimonials, it seems like lots of folks have used it for wine, with the most common benefit being that it eliminates racking. Whoa! No time spent racking, cleaning the pail, cleaning the carboy. Just a single vessel for all of it. I'm intrigued.

Some of my initial thoughts/skepticism are:

- What about head space? For long term aging this needs to be minimized, but is the head space in this vessel any worse than the oxygen we expose our wines to when we rack from one vessel to the next?
- Overall height? Does the wall mount system make the unit so tall that I'm going to need a step ladder to access the top and do things like stir my wine?
- Any additions that float or are too big to sink into the 1" opening in the bottom ball would require a bag of some sort so you can fish it out when the time comes.
- This thing would look great in the wine closet I'm dreaming of...

I'd love to hear your ideas on this fermenter. Seems reasonable priced, if it makes sense for the home wine makers.
 
I saw a cheap way to determine if it is for you. Something like wonderbrew it was a conical attachment for a brew bucket. I will see if I can find it.

OneDerBrew Delux...looks like its no longer available.
 
Hey TexasWine,

Here are some answers to your questions:

1. What about head space? For long term aging this needs to be minimized, but is the head space in this vessel any worse than the oxygen we expose our wines to when we rack from one vessel to the next?
There is no less exposure than when racking and transferring. As the product ferments it will release CO2 into the head space. Most of the oxygen will be pushed through the air lock as it ferments leaving mostly CO2 in the head space. There is way less contact with oxygen with FastFerment than using standard buckets and carboys.


2. - Overall height? Does the wall mount system make the unit so tall that I'm going to need a step ladder to access the top and do things like stir my wine?
-The unit needs to be mounted just high enough to fit a bottle/keg under the valve when the bottom ball is removed for racking your beer/wine into the bottle. You can mount it low enough so you do not need a step ladder. The top will be approximately 50 inches off the ground.

3. - Any additions that float or are too big to sink into the 1" opening in the bottom ball would require a bag of some sort so you can fish it out when the time comes.
-You can either use a bag or take them out with a small strainer. The best method is using a Muslin Bag.


Stirring Wine
-Yes you can certainly open it up and stir it from time to time. But that will expose it to oxygen so it is not recommended.

Cheers!
Claire
 
Hey Claire, thanks for chiming in! Really appreciate that.

Concerning stirring wine, I stir wine during the initial stages of fermentation to punch down the fruit cap and keep the yeast happy and not stressed out. After a few days I throw an airlock on it an only open things up when I absolutely have to.

Another question. How do you remove the fermenter from the wall mounted stand? Is it simply resting on it and you just pick it up?
 
Well, I just bit the bullet and ordered 4 of these suckers. Figured I might as well go all in and see how things go. Gonna need some stands though. Might buy some plywood, cut some 10" holes in it and attach some legs.

Anybody got ideas of when the accessories (like the stand) will be available?
 
I would not use a conical for wine but that is just my personal opinion. There are fermentation vessels that are designed for wine that have lids with pump up seals. A conical is great for beer but I think it would just be a pain to use for wine. I think a lot of people on here who make wine also brew so I wouldn't worry about it not getting used.
 
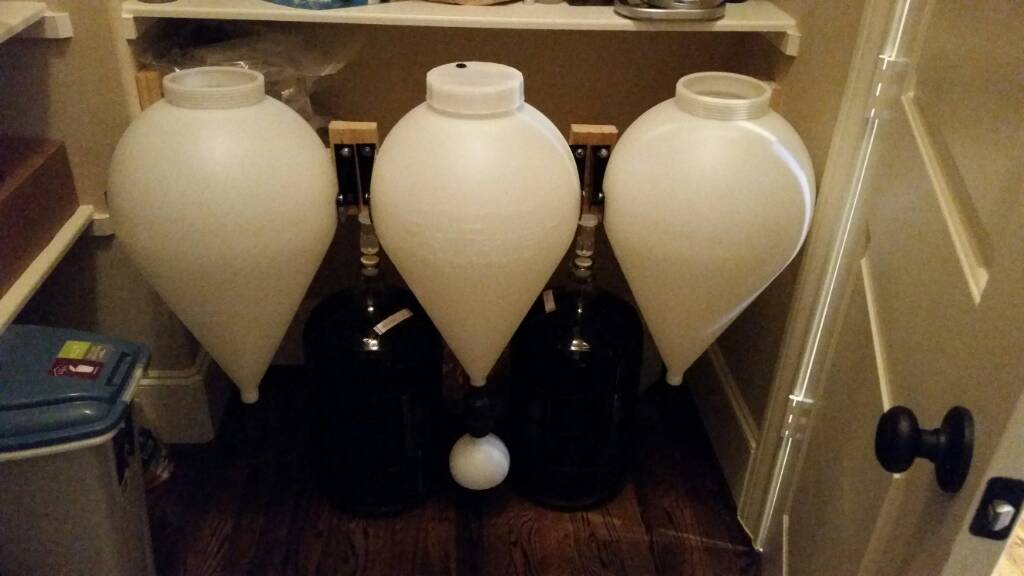
Got mine in the mail on Friday! Built a bracket system to mount them in the pantry. Gotta finish assembling them and then fill them up with fermenting goodness. Pretty excited!

And I've alleviated any concerns I had about head space because I'm going to make sure it stays blanketed with CO2. When I remove the ball I'll purge it with CO2 from my keezer before I reattach it.

Not sure on the required O2 concentration for a BBQ lighter to work, but I also should be able to stick a lit one down into the head space. If it snuffs out then I know there's not enough O2 to support a flame.

1413147681828.jpg
 
So, you have had them for a while now. How do you like them? My LHBS just got some in so I'm looking for feedback before buying.
 
So, you have had them for a while now. How do you like them? My LHBS just got some in so I'm looking for feedback before buying.

Unfortunately life (and making beer) has gotten in the way since that last post. I did finish assembling them. Because I'd read the fit of the lids were sub par, I did a quick leak test. Turns out the fit of the lids do in fact suck. They leak like a sieve.

First I took a sharp knife to each fermenter and trimmed the excess plastic in the threads where the two halves of the mold were joined together. But that didn't fix it. Then I wrapped the threads in Teflon tape. That mostly fixed the leaks, but not totally.

The burr under my saddle is that the top lid has a gasket. That means no Teflon tape should be required to seal that sucker up. Seems like a very basic design flaw that should have been addressed before releasing it for public consumption.

Am I still happy with the purchase? Sure. Just not thrilled that it wasn't ready to use out of the box and required tweaking.

I'll report back when I get my first batch going. Should be before the end of the year. Hopefully my satisfaction with the purchase will climb back to previous levels when I'm not racking wine every couple of months.
 
Today I got two batches going in the Conicals shown on the left of the picture. I'll keep you posted on how things go.

One other note. I took the fermenters and put them upside down, lid off, on my counter top to check how level the top was, figuring that might be part of the problem with the gasket not sealing properly. Sure enough, there was a significant enough variation in the level of the top that I could see straight through into my living room from where I was in the kitchen. I was trying to think of a clever way to level this thing up, but alas my disk grinder would probably be a little aggressive.
 
I was trying to think of a clever way to level this thing up, but alas my disk grinder would probably be a little aggressive.

Get a piece of wet/dry sandpaper and put it on a flat surface -like your countertop. Use a little water between the counter and sandpaper to get it to stay in place. Then place your fastferment mouth side down on the sandpaper and move it on the sandpaper. I'd use a figure 8 stroke and turn the vessel frequently to keep the sanding even on the mouth. I'd likely start at 220 grit and end at 400. Good luck.
 
Get a piece of wet/dry sandpaper and put it on a flat surface -like your countertop. Use a little water between the counter and sandpaper to get it to stay in place. Then place your fastferment mouth side down on the sandpaper and move it on the sandpaper. I'd use a figure 8 stroke and turn the vessel frequently to keep the sanding even on the mouth. I'd likely start at 220 grit and end at 400. Good luck.

That's a good idea! I've got one empty. I'll give this a go before I put anything in it.
 
Best of luck with these. I preordered one as part of the first 1000 to be produced. I cleaned and wrapped all the threads on mine and assembled. Did not pay attention to threads other than they all screwed together.

I loaded it with a stout and let it go. Never did see the airlock move. Did see where all connections below liquid level developed a small leak. Fortunately it was small enough and the beer-to-be was thick enough that the leaks stopped themselves. Unable to remove the collection ball so I racked it to a bucket.

I completely disassembled it, cleaned it and read what I could find. A few here suggested cleaning the threads up and using a lot more Teflon tape. Out comes a small triangle-shaped file and away we go. Now is when I notice that not only are the threads proud along the mold line, but there is also a recess perpendicular to the threads that matches the high parts of the mold line. I cleaned as well as I was able and wrapped the threads... a lot.

Next up was a porter. This time I witnessed airlock activity... and leaks... much smaller but still leaks. Let this one finish and kegged it. Took the fastferment, the stand, carrying strap, the collection ball and tossed it all in the trash.

I still have the other collection balls that I will probably use for their intended purpose. It was interesting that the one ball that came with the fastferment had a collar dimension that was not compatible with extras I bought.

It is pretty clear and not unexpected that the one I received was put together amid early production woes and the various parts experienced some design changes while in production.

These appear to work very well for some here. Mine did ferment beer... it did work. It was just more of a problem than my buckets and not worth any more time or effort on my part.
 
The four I ordered were also a part of the first 1000 produced. Fortunately I haven't had the issues with leaking that you have. I did a leak test with water before putting anything else in it. When I did that I noticed small leaks around the thermowells. The solution? Less tape, not more.

Then I huffed and puffed and blew some air into the head space above the water through the grommet in the lid. That's when I found out the lid doesn't seal properly. I added tape to the lid threads and now only have leaks from the lid at higher pressures. Though I'd still like for the lid to be level.

After adding wine to two of them did have one leak in each, but after tightening things down a bit more they stopped. I had plenty if airlock activity during fermentation.
 
I spoke with their support folks about a problem i was having and they sent me three more gaskets and suggested doubling up on the gaskets in the lid.
Not to hijack this, but have you thought of a way to use a temp probe with this?
 
I spoke with their support folks about a problem i was having and they sent me three more gaskets and suggested doubling up on the gaskets in the lid.
Not to hijack this, but have you thought of a way to use a temp probe with this?

That's a good idea about the gaskets. I'll contact them to see what they can do for me.

The thermowell doesn't do much for me because I'm not trying to control the fermentation temp. However, if I were making beer in these things I'd have them mounted in a fermentation chamber with a temp probe inserted into the thermowell to control the temp.

I don't think the thermowell was meant to be a selling point for wine makers.
 
Small update. I unscrewed the lids a few weeks back in the hopes that all the CO2 produced during fermentation had stuck around and was providing a nice blanket to keep oxygen away from the wine. I was disappointed to discover this was not the case.

I took one of those long BBQ lighters and stuck down in the opening of the fermenter. It's blaze was undeterred by the vapors in the headspace, indicating there was sufficient oxygen content to support combustion.

My solution? Use my CO2 bottle from my keezer to purge the headspace. To do this I loosened the lid, removed the air lock, and simply pressed the CO2 hose against the grommet while simultaneously opening the regulator on the CO2. In theory this would force any oxygen out of the loosened lid.

The result was exactly what I was hoping for. I purged the head space and then completely removed the lid. When I tried to put the BBQ lighter into the fermenter it was immediately snuffed. PERFECT!

Then I reattached the lid loosely, purged the headspace a little more in case I introduced O2 when I removed the lid, reattached the air lock and finally tightened the lid down all the way.

While I was at it I also emptied the collection balls and purged them with CO2. Same test with the same result. I purged them, put the lighter inside, and poof! Snuffed.

The conclusion I have come to is that I would not use one of these for wine making without having a C02 bottle handy for purging the headspace and the collection balls.
 
Best of luck with these. I preordered one as part of the first 1000 to be produced. I cleaned and wrapped all the threads on mine and assembled. Did not pay attention to threads other than they all screwed together.

I loaded it with a stout and let it go. Never did see the airlock move. Did see where all connections below liquid level developed a small leak. Fortunately it was small enough and the beer-to-be was thick enough that the leaks stopped themselves. Unable to remove the collection ball so I racked it to a bucket.

I completely disassembled it, cleaned it and read what I could find. A few here suggested cleaning the threads up and using a lot more Teflon tape. Out comes a small triangle-shaped file and away we go. Now is when I notice that not only are the threads proud along the mold line, but there is also a recess perpendicular to the threads that matches the high parts of the mold line. I cleaned as well as I was able and wrapped the threads... a lot.

Next up was a porter. This time I witnessed airlock activity... and leaks... much smaller but still leaks. Let this one finish and kegged it. Took the fastferment, the stand, carrying strap, the collection ball and tossed it all in the trash.

I still have the other collection balls that I will probably use for their intended purpose. It was interesting that the one ball that came with the fastferment had a collar dimension that was not compatible with extras I bought.

It is pretty clear and not unexpected that the one I received was put together amid early production woes and the various parts experienced some design changes while in production.

These appear to work very well for some here. Mine did ferment beer... it did work. It was just more of a problem than my buckets and not worth any more time or effort on my part.


I have a VERY slow leak, not even fast enough for any dripping, so I didn't notice it on my leak test. I'm wondering if I should expect any contamination. Otherwise it is working well, bubbling well.
 
After some conversation with one of the fine folks at FastFerment (Casey), they shipped me a replacement and I put it to use.

This one is a definite improvement. I put a red in the conical on 23 Apr and kegged today, 04 Jun. Never once did I rack it into another vessel, only had a couple drops of leakage that didn't and don't worry me any at all. Had good activity in the air lock and it cleaned up real easy.

The red ale was brewed on 23 April. Due to some extensive travel, it sat until 21 May when I tossed an ounce of pacific jade in for a bit of flavor. It then went to the fridge to cold crash on 30 May. And, it was kegged on 04 June. This was a nearly six gallon batch and, so far, has left me nothing to complain about. As I said earlier, no racking to and fro. The best bit was being able to just drain it into a keg. Once transferred from brew kettle to conical, the liquid never saw a siphon again.

Thank you for giving me another shot at these Casey.

:mug:

Best of luck with these. I preordered one as part of the first 1000 to be produced. I cleaned and wrapped all the threads on mine and assembled. Did not pay attention to threads other than they all screwed together.

I loaded it with a stout and let it go. Never did see the airlock move. Did see where all connections below liquid level developed a small leak. Fortunately it was small enough and the beer-to-be was thick enough that the leaks stopped themselves. Unable to remove the collection ball so I racked it to a bucket.

I completely disassembled it, cleaned it and read what I could find. A few here suggested cleaning the threads up and using a lot more Teflon tape. Out comes a small triangle-shaped file and away we go. Now is when I notice that not only are the threads proud along the mold line, but there is also a recess perpendicular to the threads that matches the high parts of the mold line. I cleaned as well as I was able and wrapped the threads... a lot.

Next up was a porter. This time I witnessed airlock activity... and leaks... much smaller but still leaks. Let this one finish and kegged it. Took the fastferment, the stand, carrying strap, the collection ball and tossed it all in the trash.

I still have the other collection balls that I will probably use for their intended purpose. It was interesting that the one ball that came with the fastferment had a collar dimension that was not compatible with extras I bought.

It is pretty clear and not unexpected that the one I received was put together amid early production woes and the various parts experienced some design changes while in production.

These appear to work very well for some here. Mine did ferment beer... it did work. It was just more of a problem than my buckets and not worth any more time or effort on my part.
 
Back
Top