• Please visit and share your knowledge at our sister communities:
  • If you have not, please join our official Homebrewing Facebook Group!

    Homebrewing Facebook Group

Element Suggestions for 120V eBIAB setup

Homebrew Talk

Help Support Homebrew Talk:

This site may earn a commission from merchant affiliate links, including eBay, Amazon, and others.
Used the tape and the silicone

I would think it takes quite a few wraps of teflon tape to seal or choke off the threads on the element, you shouldn't need the silicon sealant if done correctly.

https://www.youtube.com/watch?v=5QjkXWE1QI8#t=378

Bobby says liberal use of the teflon tape, more than once, 4.00 minutes in...the nut should have resistance threading on the element with the tape.
 
Ya the problem is one of the two holes they made too big but that one isn't leaking. The one that is leaking is the right size but as I put the element in the pit strips the most of the tape


Sent from my iPhone using Home Brew
 
Used the tape and the silicone us the food grade everyone say to use. It is still leaking though the silicone. I ripped it all out and put new silicone in all I can think to do at this point


Sent from my iPhone using Home Brew

Did you let the silicone cure? I'm sure there's a time period that needs to be waited before it's water tight right? Also, wrap that thing up more with tape! It won't hurt anything.
 
Yes I let it sit a min. of 24hrs after applying so I wont know if redoing the silicone will fix it till tomorrow night. that way it have almost 48hrs
 
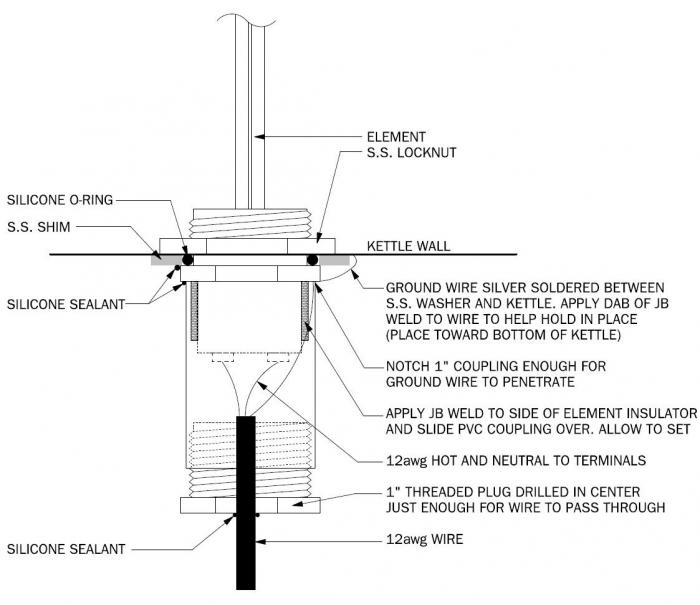
ok got a question. I added the o-ring on inside and on out side my pot but have seen several pic like below.. what way is correct??

ele.jpg
 
I haven't used a threadless element bulkhead before, but I was under the impression that the SS locknut that's used on the interior of the vessel has a knocked interior that allows the silicone o-ring to sit inside of it right? If that's the case, then the o-ring should be on the inside of that locknut and pressing up against the inside wall of the kettle.
 
Welp still leaking so at this point guess I'll try to find a wielder around me that will wield the pot..


Sent from my iPhone using Home Brew
 
I'm going to explain this one more time in case you've done something different.

Wrap the element threads with about 4-5 wraps of teflon tape going clockwise when the element tubes are facing you. If you put the teflon tape on backwards, it will get stripped off while you put the nut on and that's a fail.

Now, with just the teflon tape on the elements and nothing else, push it through the enclosure cap and then through the hole in the pot. Now push your oring over the threads and against the pot and then thread the 1" locknut on with the groove facing the oring. Once you get it touching the oring, turn the locknut so that you have a point on the hex facing directly up. Now hold the locknut still and turn the hex on the heating element until it's nice and tight.

That is very important. If you turn the locknut for tightening, you'll screw up the oring and it will bulge out of place.

The process I described has worked for 250 customers so far.

Do NOT put any gaskets on the outside of the pot. Do not put any silicone sealant on there.
 
I did all but i do have a gasket on the out side I'll remove that and try once more


Sent from my iPhone using Home Brew
 
I think that was the problem. I took the off and it looks so much better. Test is tomorrow and hope that is the fix if not I'm brewing on my stove I have an empty keg lol


Sent from my iPhone using Home Brew
 
Update. It was the extra washer on the outside causing the leaks. I am cuttingly mashing in my first eBIAB thank you

ImageUploadedByHome Brew1395589954.627013.jpg


Sent from my iPhone using Home Brew
 
How long it take to boil? I'm just now looking into an electric system and this is the first I've heard of 120v elements being used. Would be excellent to be able to plug into existing sockets. I'm beyond interested in hearing about your results.


Sent from my iPhone using Home Brew
 
How long it take to boil? I'm just now looking into an electric system and this is the first I've heard of 120v elements being used. Would be excellent to be able to plug into existing sockets. I'm beyond interested in hearing about your results.

IME 3000 - 4000 watts (2 elements 1500 - 2000w each) works well for up to 10 gallon batches, boil times are reasonable, guessing 20 - 40 minutes depending on wattage and batch size.

2 elements at 2000w each will do a 5 gal batch quickly but will require 2, 20 amp circuits, and will also work for 10 gallons but be on the slower end....like 40 minutes. 2 elements at 1500 each will work for 5 gallon batches, mash to boil in about a half hour.

I have never timed it, just guessing here but the heating times are reasonable IMO.
 
I have two 1500w and it boiled in maybe 40 min. On avg it was going 10deg every 3min 30sec

Sent from my iPhone using Home Brew
 
madcore, good to hear the issue got fixed. Welcome to e-brewing. It sounds like those elements worked out nicely. They're the same ones I'd linked to earlier right? The 1500W LWD ones?
 
madcore, good to hear the issue got fixed. Welcome to e-brewing. It sounds like those elements worked out nicely. They're the same ones I'd linked to earlier right? The 1500W LWD ones?


yup the same ones. The only thing im not fond of is to use the fauls bottom that I am I had the angle the element and the are touching making the ends hard to clean off but this set up make brewing in it so easy Ill take the trade off.. now I need to add a ball valve to drain my pot and get a chiller so i dont have to dump my wort into another pot to cool over night :( but one step at a time.

One thing i found is i left one plugged in once i hit 154 the temp i planned to mash at....my temp prob was in the grains I stirred it and all the sudden ti showed a temp on 164 and stayed there after i unplugged both for my 90min mash....literately dropped maybe one or two degrees in 90mins so this beer might not be the best it could of been but just and excuse to brew again :)

and no Im not using a controller trying to keep it as cheap/easy as possible

More brewing is always a good thing. To avoid that problem, just make sure your giving your strike water a few stirs when your getting closer to your mash temps so everything evens out and it's accurate.
 
More brewing is always a good thing. To avoid that problem, just make sure your giving your strike water a few stirs when your getting closer to your mash temps so everything evens out and it's accurate.
I was but thought If i only had one unplugged the other would hold the temp or it would move slow enough i would see and unplug the other, but the one left pluged in heated really good still. One will hold a slight boil both you get a good boil running. so for now on once i hit my mash temp and grains are in both unplugged for the mash time should solve the only real problem I had with the brew day
 
ImageUploadedByHome Brew1395687604.827832.jpg
That's what it looked like with both elements on


Sent from my iPhone using Home Brew
 
Back
Top