Pretty good prices too. I see by the spec sheet they are rated 20A 240VAC by UL. Good for a 4500W element for sure. Probably close enough for a 5500W too... If I do another element, I will pick some up.
You are using an out of date browser. It may not display this or other websites correctly.
You should upgrade or use an alternative browser.
You should upgrade or use an alternative browser.
Element cord options
- Thread starter Joe_in_GA
- Start date

Help Support Homebrew Talk:
This site may earn a commission from merchant affiliate
links, including eBay, Amazon, and others.
Yea, it'll be ok with 5500W but with a Sanke keg setup 4500W elements are enough. One thing about the connectors. All connections should be soldered i.e. no crimp on lug connections, IMHO.Pretty good prices too. I see by the spec sheet they are rated 20A 240VAC by UL. Good for a 4500W element for sure. Probably close enough for a 5500W too... If I do another element, I will pick some up.
Cpt_Kirks
Well-Known Member
This SOOOO tagged.
I really need to upgrade my "pvc caps crammed full of silicone" setup on my HLT. I mean, it works fine, but it worries me.
Plus, sooner or later I'm going to add elements to my BK, and the heatsticks will just be backups.
:rockin:
I really need to upgrade my "pvc caps crammed full of silicone" setup on my HLT. I mean, it works fine, but it worries me.
Plus, sooner or later I'm going to add elements to my BK, and the heatsticks will just be backups.
:rockin:
How about cover plates for them? Or do you have to cut your own?
Yea, you have to cut your own. There are way too many variables for a vendor to provide it.How about cover plates for them? Or do you have to cut your own?
MoesTavern
Member
I've been mulling this one over and then remembered fabricating parts and designing a system for a friend. With his setup I used a special plug and outlet very similar to the ones used for home computers but with a much higher current rating.
First thing, an element connector nut was soldered in place along with a gem box and ground wire.
P-J
I trust your advice implicitly, but I'm curious about sealing within the box... those handy/gem boxes are not "weather tight"… Were there provisions to seal it off or are we not worried about water at the element contacts? Good enough with a solid ground and GFCI? Just thinking about boilover and other such accidents within the wet zone..
Thanks

$22.00 ($623.23 / Ounce)
AMZLMPKNTW Ball Lock Sample Faucet 30cm Reinforced Silicone Hose Secondary Fermentation Homebrew Kegging joyful
无为中南商贸有限公司

$33.99 ($17.00 / Count)
$41.99 ($21.00 / Count)
2 Pack 1 Gallon Large Fermentation Jars with 3 Airlocks and 2 SCREW Lids(100% Airtight Heavy Duty Lid w Silicone) - Wide Mouth Glass Jars w Scale Mark - Pickle Jars for Sauerkraut, Sourdough Starter
Qianfenie Direct

$53.24
1pc Hose Barb/MFL 1.5" Tri Clamp to Ball Lock Post Liquid Gas Homebrew Kegging Fermentation Parts Brewer Hardware SUS304(Liquid Hose Barb)
Guangshui Weilu You Trading Co., Ltd

$7.79 ($7.79 / Count)
Craft A Brew - LalBrew Voss™ - Kveik Ale Yeast - For Craft Lagers - Ingredients for Home Brewing - Beer Making Supplies - (1 Pack)
Craft a Brew

$58.16
HUIZHUGS Brewing Equipment Keg Ball Lock Faucet 30cm Reinforced Silicone Hose Secondary Fermentation Homebrew Kegging Brewing Equipment
xiangshuizhenzhanglingfengshop

$10.99 ($31.16 / Ounce)
Hornindal Kveik Yeast for Homebrewing - Mead, Cider, Wine, Beer - 10g Packet - Saccharomyces Cerevisiae - Sold by Shadowhive.com
Shadowhive

$49.95 ($0.08 / Fl Oz)
$52.99 ($0.08 / Fl Oz)
Brewer's Best - 1073 - Home Brew Beer Ingredient Kit (5 gallon), (Blueberry Honey Ale) Golden
Amazon.com

$53.24
1pc Hose Barb/MFL 1.5" Tri Clamp to Ball Lock Post Liquid Gas Homebrew Kegging Fermentation Parts Brewer Hardware SUS304(Liquid MFL)
yunchengshiyanhuqucuichendianzishangwuyouxiangongsi

$176.97
1pc Commercial Keg Manifold 2" Tri Clamp,Ball Lock Tapping Head,Pressure Gauge/Adjustable PRV for Kegging,Fermentation Control
hanhanbaihuoxiaoshoudian

$20.94
$29.99
The Brew Your Own Big Book of Clone Recipes: Featuring 300 Homebrew Recipes from Your Favorite Breweries
Amazon.com
I had no concerns with it. I purposely left the bottom seam open enough to provide a drain area "in case". This also eliminated a risk concern I had 'if' the element gasket leaked. Overall, all is A-Ok as the whole thing is GFCI protected.I trust your advice implicitly, but I'm curious about sealing within the box... those handy/gem boxes are not "weather tight" Were there provisions to seal it off or are we not worried about water at the element contacts? Good enough with a solid ground and GFCI? Just thinking about boilover and other such accidents within the wet zone..
Thanks
I had no concerns about boil overs. That is one of the major reasons I choose to use Auber Instruments PIDs. They have a manual mode that allows you to control the percent power delivered during a boil.
I hope this makes sense.
Joe_in_GA
Active Member
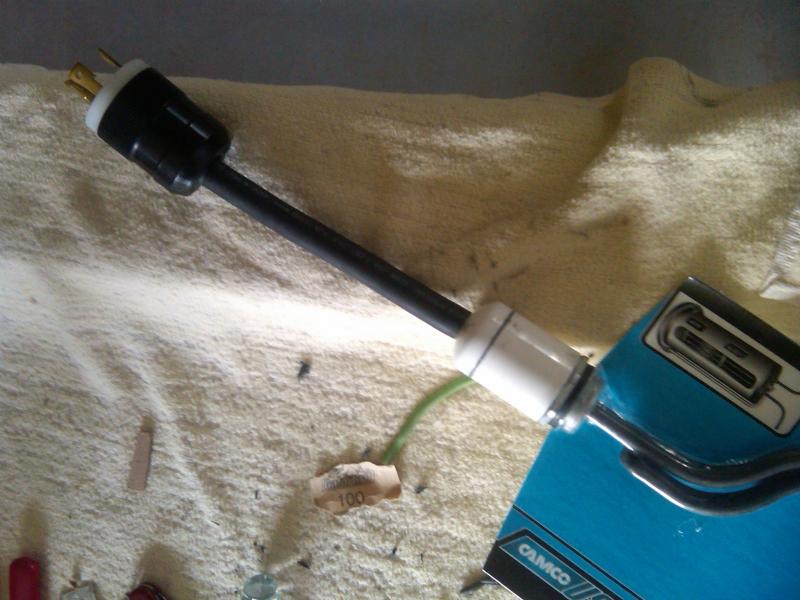
Here is what I ended up with. It's the usual 1" coupling with a cap on the end. I plan on painting it eventually. I still have a long way to go until my system is done, so I'm not in a rush.


Similar threads
- Replies
- 20
- Views
- 1K
- Replies
- 0
- Views
- 370
Latest posts
-
-
-
-
The Dysfunctional-Palooza Obnoxious Masshole BS Thread
- Latest: TheDudeLebowski
-
-
-


![Craft A Brew - Safale S-04 Dry Yeast - Fermentis - English Ale Dry Yeast - For English and American Ales and Hard Apple Ciders - Ingredients for Home Brewing - Beer Making Supplies - [1 Pack]](https://m.media-amazon.com/images/I/41fVGNh6JfL._SL500_.jpg)

