Electrical Panel - Component Mount Details

Homebrew Talk - Beer, Wine, Mead, & Cider Brewing Discussion Forum

Help Support Homebrew Talk - Beer, Wine, Mead, & Cider Brewing Discussion Forum:

This site may earn a commission from merchant affiliate links, including eBay, Amazon, and others.

Brian Parfitt

Active Member
Joined
Apr 17, 2020
Messages
42
Reaction score
3
Hello all,

I'm starting a conversion to electric brewing and am basing my build on craftbeerpi and a diy panel. I'm looking for some 'packaging' or finishing help with the electrical inside the panel. While I have a lot of experience with breadboard prototyping and hobby builds, I'd like this project to have a more 'finished' look to it. i.e. not wire spaghetti.

I plan on using this box to house the electronics:
Bud Industries Enclosure

My plan is to use some DIN mount components (contactors, SSRs, terminal strips) to keep things tidy. Do I just screw the rail into the back of the plastic box, or do people typically use a backing plate?

Would folks be willing to share photos of completed control panel innards utilizing DIN rail mounts along with some details on how things were mounted/organized in the panel?

Again, my goal here is to up my game around how the project looks when it is finished.

Thanks in advance.

Brian
 
The BUD box you linked comes with a plate that mounts to the back of the box on standoffs. You can attach the DIN rail to that plate using short screws or nuts/bolts.

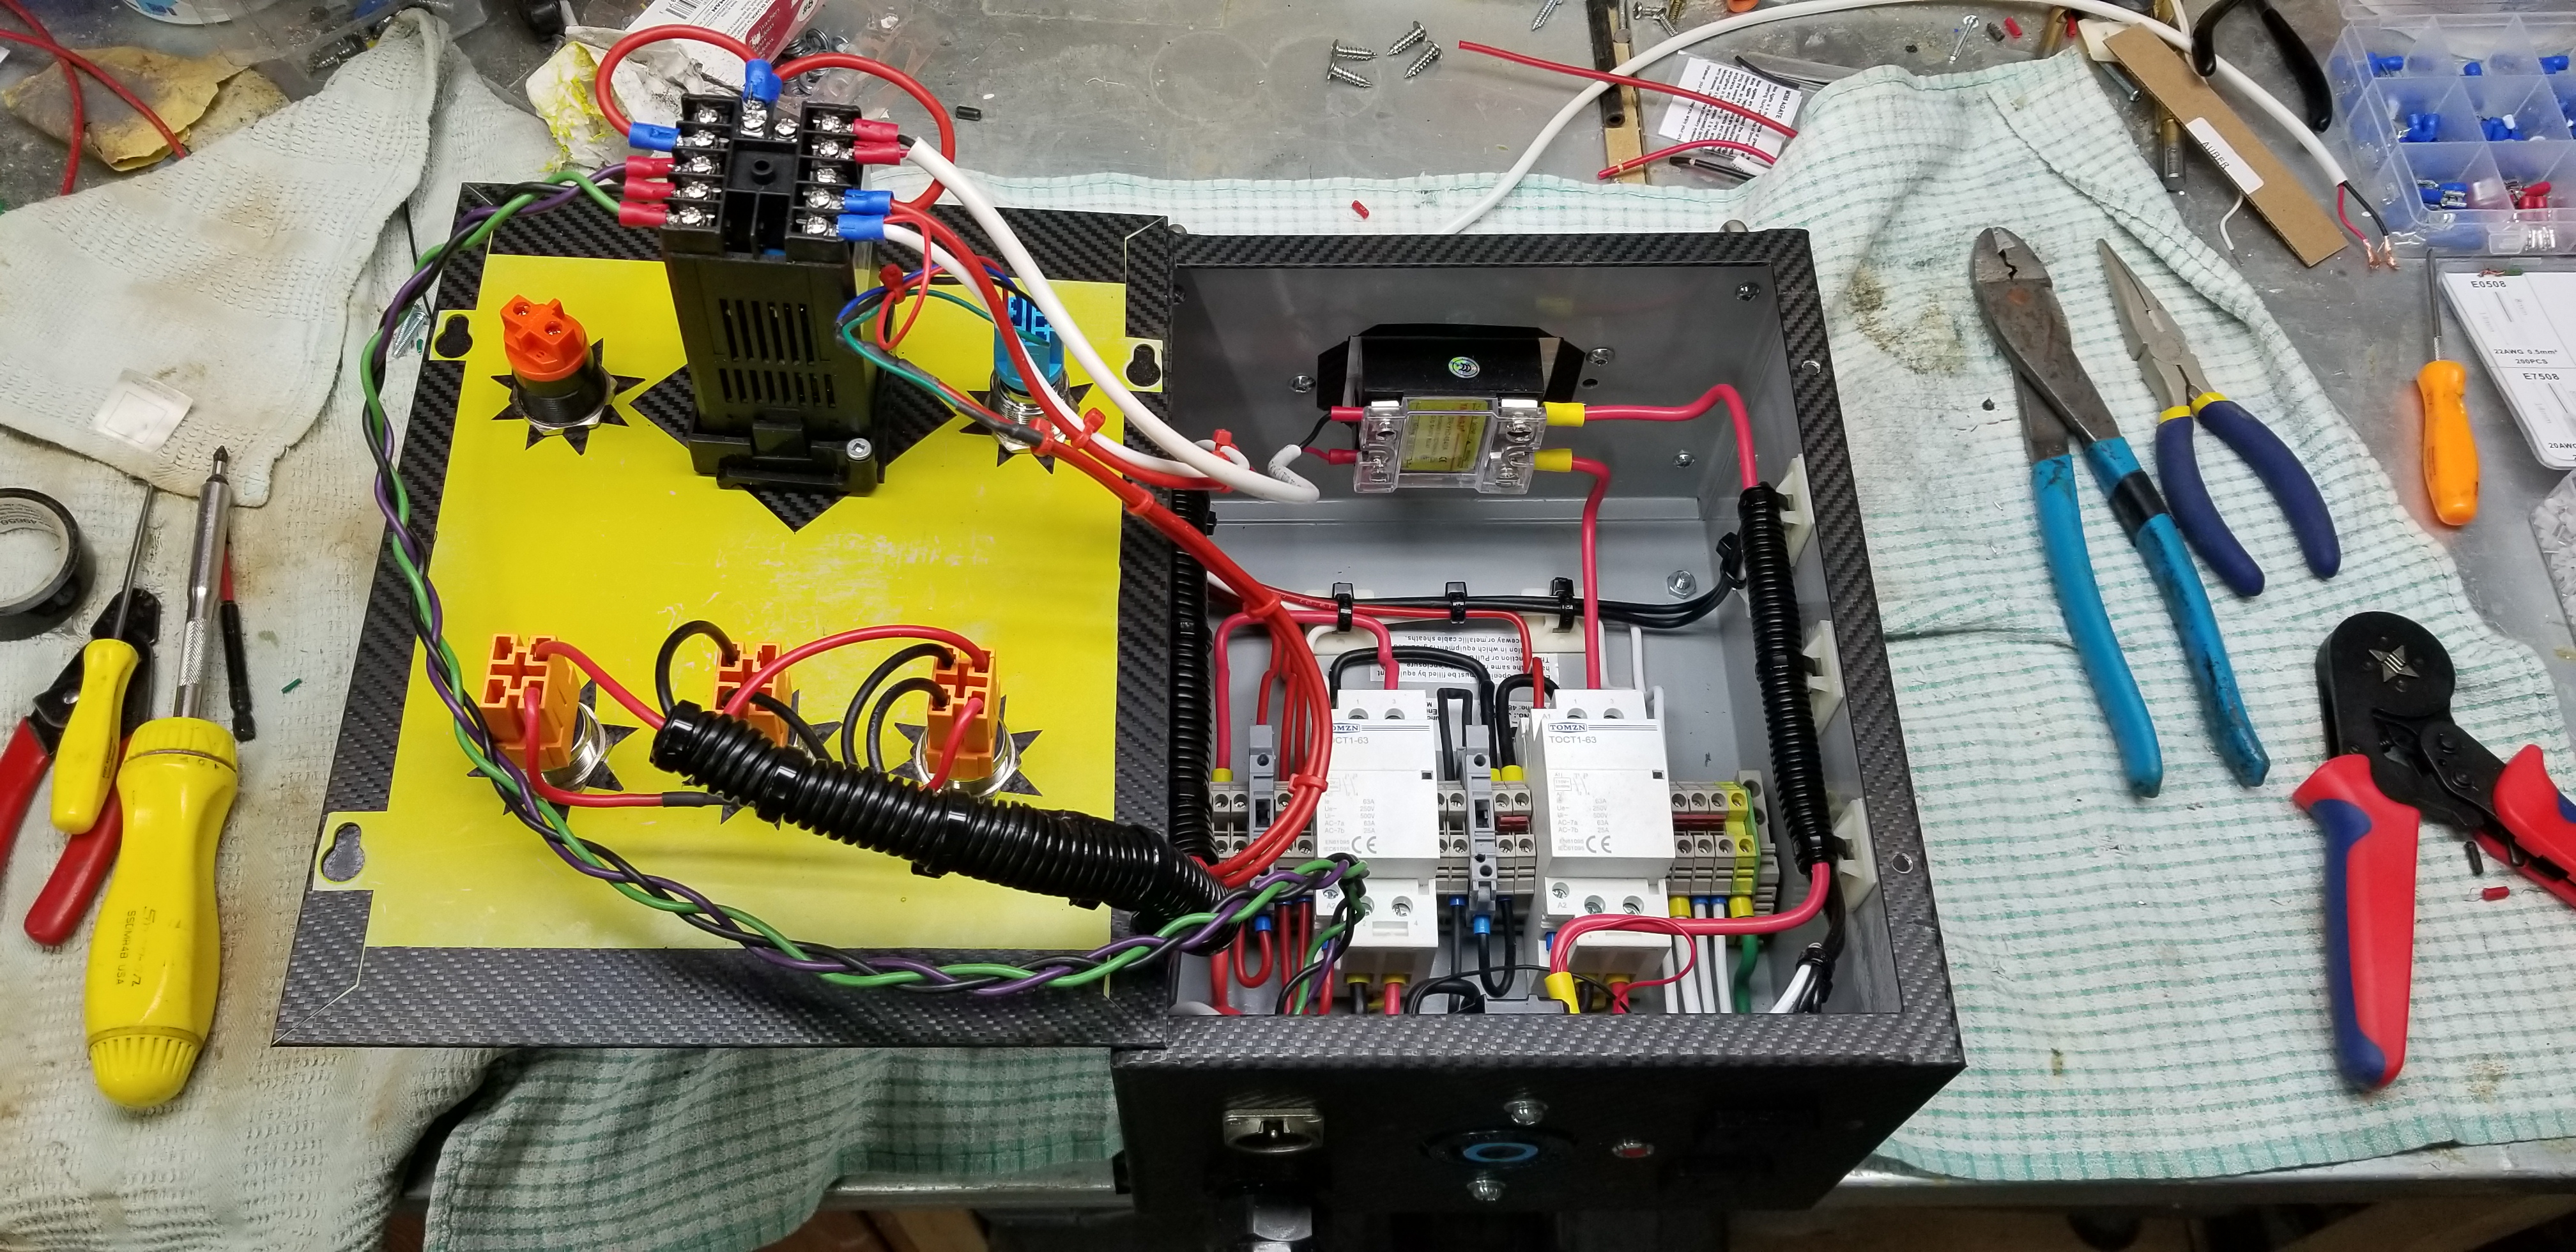
Here's the inside of my panel using DIN contactors and distribution blocks. I didn't use a DIN mount SSR as it's attached to a heatsink. The panel is built in a BUD JB-5939.

20191026_182512.jpg
 
One piece of advise-- when mounting your din rails themselves to the back panel, I find using self-tapping screws the easiest way to go. Lay-out and square the centerpoint of your mounting line, then mount with self-tapping screws.
 
The BUD box you linked comes with a plate that mounts to the back of the box on standoffs. You can attach the DIN rail to that plate using short screws or nuts/bolts.

Here's the inside of my panel using DIN contactors and distribution blocks. I didn't use a DIN mount SSR as it's attached to a heatsink. The panel is built in a BUD JB-5939.

View attachment 681295
That's a very nice looking panel.. I don't think the box I purchased comes with a mounting plate, but I do see it offered as an extra. I'll get one ordered.

Did you do anything for common bus for ground and power distribution? i.e. terminal strip obscured along the bottom edge someplace?

Very nice work!
 
Thanks!

I don't have any bus bars other that what you see. Some of the DIN rail terminals have jumpers across them to distribute the two hots and the neutral. The jumpers are the maroon coloured bars that you can see in the middle of the terminals on either side of the right contactor. The grounds are connected via a stack of ring terminals onto the box's grounding post.

The plate is not a requirement but it's nice to have because then the back side of the fasteners will be in the space between the plate and the bottom of the box. If you don't mind fasteners sticking out of the bottom then you can mount the rail directly to the back. If you go that route then don't use screws as the sharp points will be protruding.
 
The BUD box you linked comes with a plate that mounts to the back of the box on standoffs. You can attach the DIN rail to that plate using short screws or nuts/bolts.

Here's the inside of my panel using DIN contactors and distribution blocks. I didn't use a DIN mount SSR as it's attached to a heatsink. The panel is built in a BUD JB-5939.

View attachment 681295
So, not wiring related, but what did you cover your box with? I like that faux carbon fiber look....
 
Thanks!

I don't have any bus bars other that what you see. Some of the DIN rail terminals have jumpers across them to distribute the two hots and the neutral. The jumpers are the maroon coloured bars that you can see in the middle of the terminals on either side of the right contactor. The grounds are connected via a stack of ring terminals onto the box's grounding post.

The plate is not a requirement but it's nice to have because then the back side of the fasteners will be in the space between the plate and the bottom of the box. If you don't mind fasteners sticking out of the bottom then you can mount the rail directly to the back. If you go that route then don't use screws as the sharp points will be protruding.

Not sure how I missed it at first glance, but +1 for the carbon fiber wrap on that box! Looks great! This will be my first DIN rail panel. It looks like those jumpers can span more than 2 terminals. Is that correct? i.e. I could jump 3-4 terminals if needed?
 
It looks like those jumpers can span more than 2 terminals. Is that correct? i.e. I could jump 3-4 terminals if needed?

Yes, the jumper bars are about 10 slots wide. You can cut them down to size.

So, not wiring related, but what did you cover your box with? I like that faux carbon fiber look....

It's 3M car wrap vinyl. You can buy it a couple of square feet at a time from Amazon. It worked really well. Here's what it looks like on the outside:

20191101_170239.jpg
 
Yes, the jumper bars are about 10 slots wide. You can cut them down to size.


It's 3M car wrap vinyl. You can buy it a couple of square feet at a time from Amazon. It worked really well. Here's what it looks like on the outside:

View attachment 681423

Thanks, I'm going to look at my cube and decide how hard it would be to wrap it. I really like that look, but I won't bother if I have to totally take it apart to get it covered.
 
The BUD box you linked comes with a plate that mounts to the back of the box on standoffs. You can attach the DIN rail to that plate using short screws or nuts/bolts.

Here's the inside of my panel using DIN contactors and distribution blocks. I didn't use a DIN mount SSR as it's attached to a heatsink. The panel is built in a BUD JB-5939.

View attachment 681295
What are the adhesive backed cable guides/holders you are using there? Most of my components have arrived and I am starting to lay things out. Looking forward to getting into this!
 

Latest posts

Back
Top