I would go with the 50'.
You are using an out of date browser. It may not display this or other websites correctly.
You should upgrade or use an alternative browser.
You should upgrade or use an alternative browser.
DIY Interwoven "Rib-Cage" Immersion Chiller
- Thread starter RedIrocZ-28
- Start date

Help Support Homebrew Talk:
This site may earn a commission from merchant affiliate
links, including eBay, Amazon, and others.
cliffhanger1821
Well-Known Member
really interested as to how this design works, chill time/input temp/heighth of top coil. Seems like the exact thing I was thinking of.
First post, been lurking for a while...
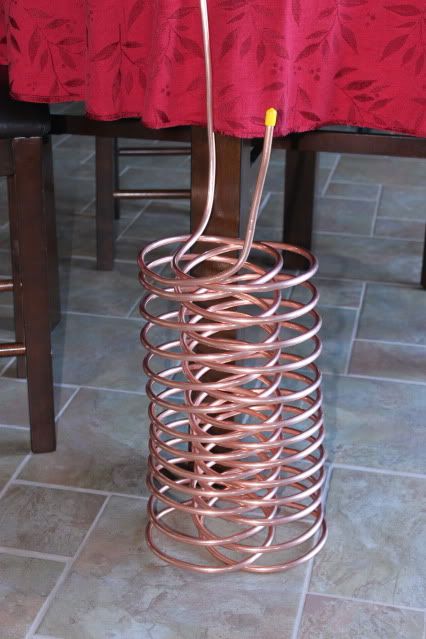
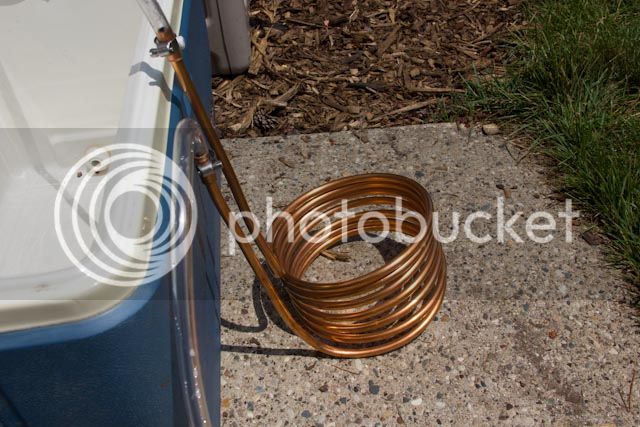
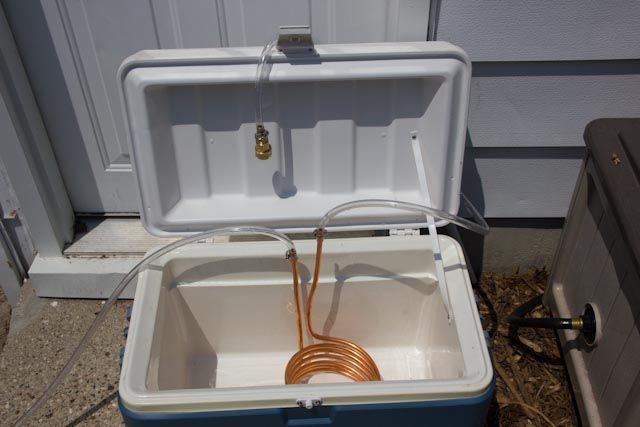
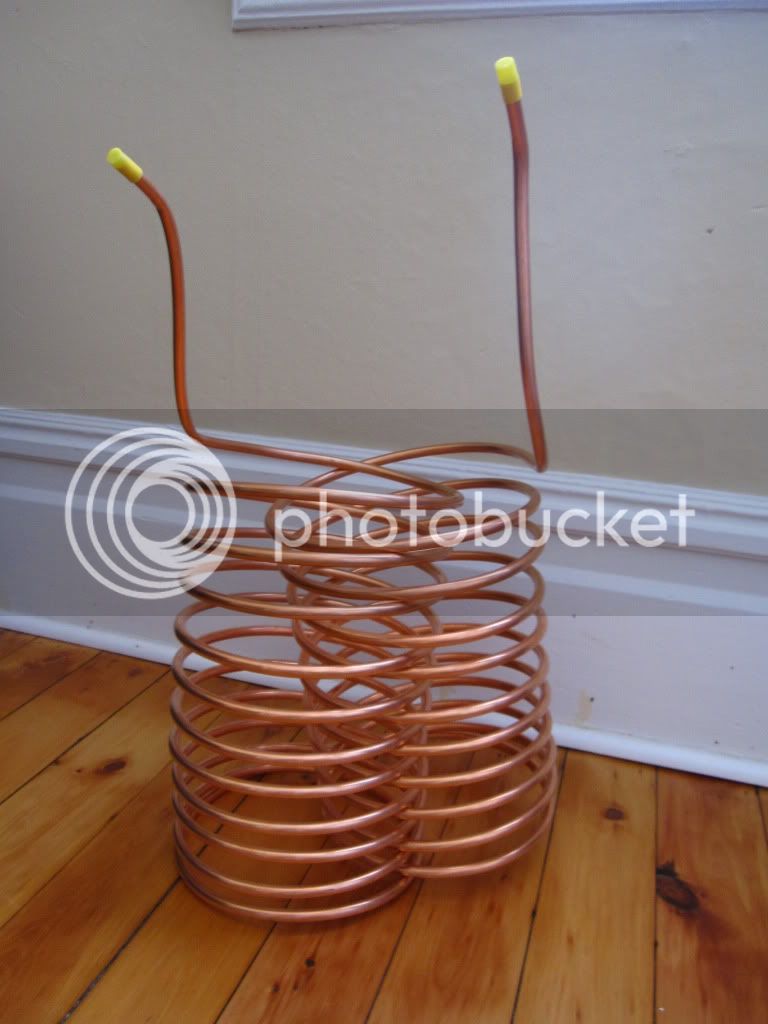
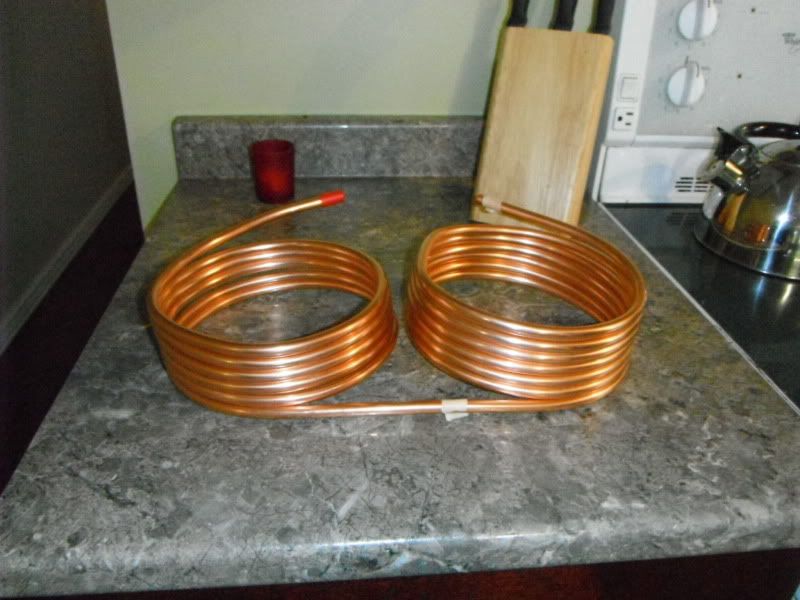
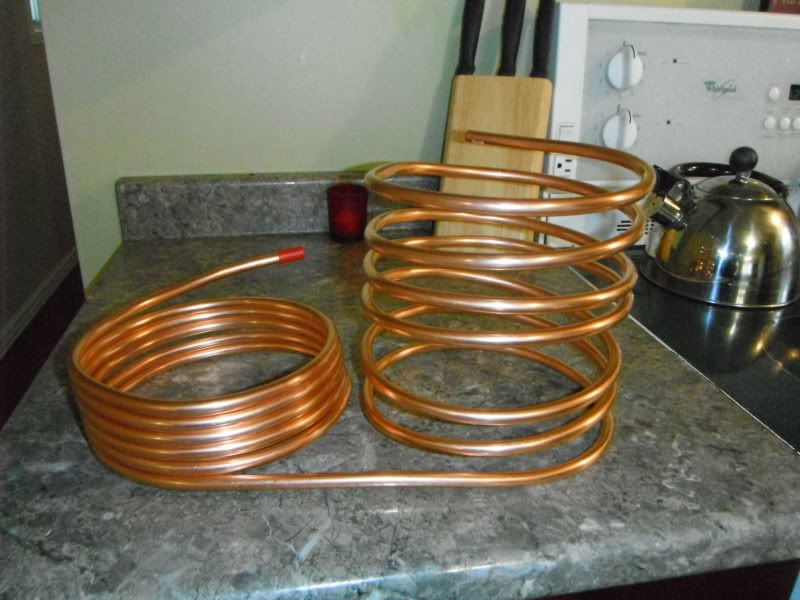
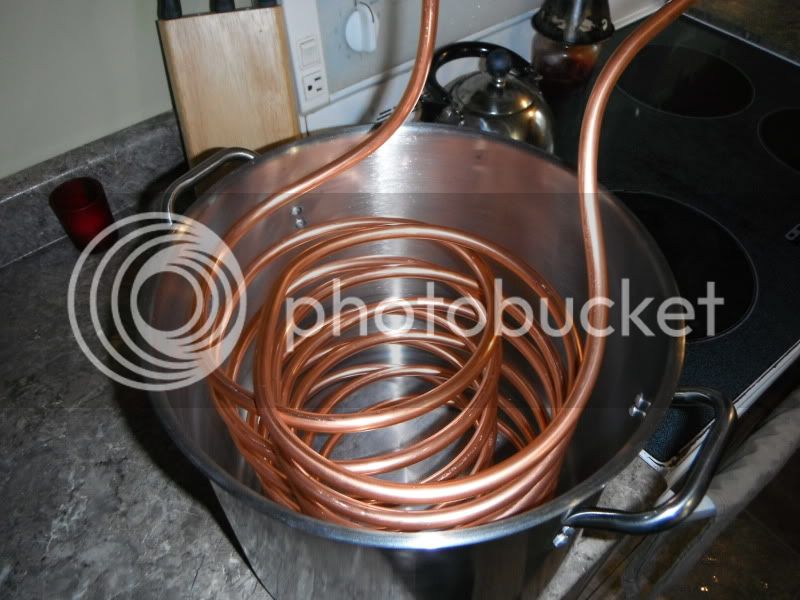
Made mine today and yesterday. Used 50' of 1/2" refrigeration tubing, split into two coils and about 5' of additional 1/2" for the spouts. This thing dwarfs my brew kettle right now, since I'm only doing partial and extracts, but I'm hoping to get into a larger kettle and AG in the near future
Finding the tees and elbows was a bear, I finally found a HVAC wholesaler that would sell me the parts without a contractor's license. Formed everything by hand, which was a bear, and I haven't done any plumbing-type soldering in about 25 years. Water tested it just now, and am going to test with a kettle of boiling water. I also have to figure out some way to keep it standing upright on its own. Any suggestions appreciated.

ACESFULL
Well-Known Member
I would go with the 50'.
Thanks for the reply. Got the 50' going to start the project sometime this week. Will post pics and details as I go. This is so much cheaper than buying IC from the LHBS...
Thanks All!!
ACESFULL
Well-Known Member
Thanks for the reply. Got the 50' going to start the project sometime this week. Will post pics and details as I go. This is so much cheaper than buying IC from the LHBS...
Thanks All!!
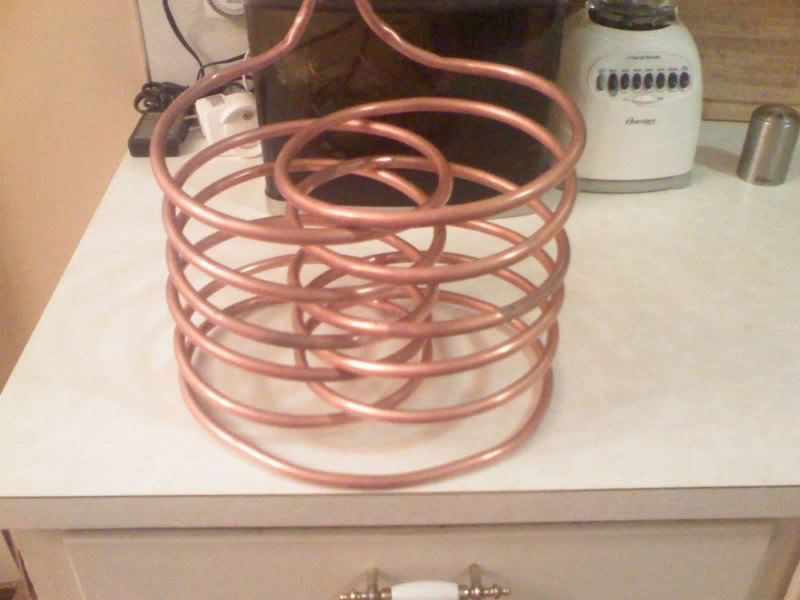
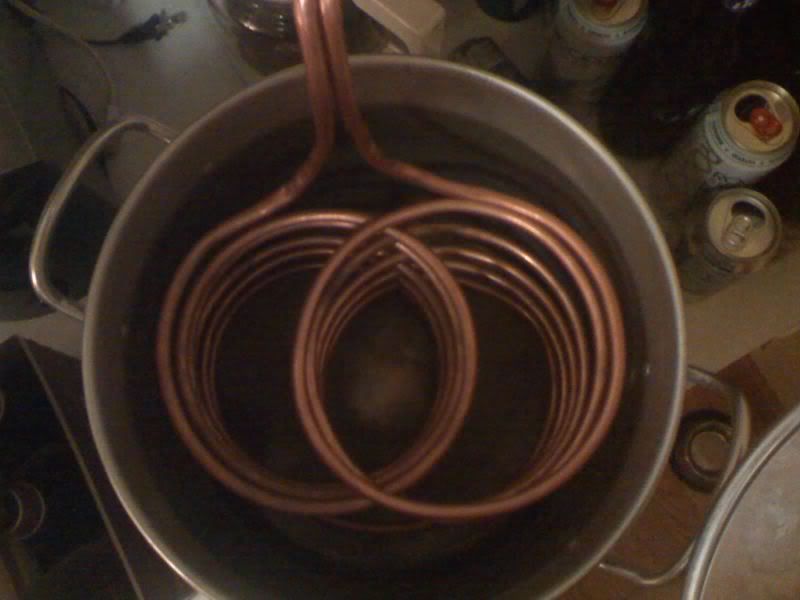
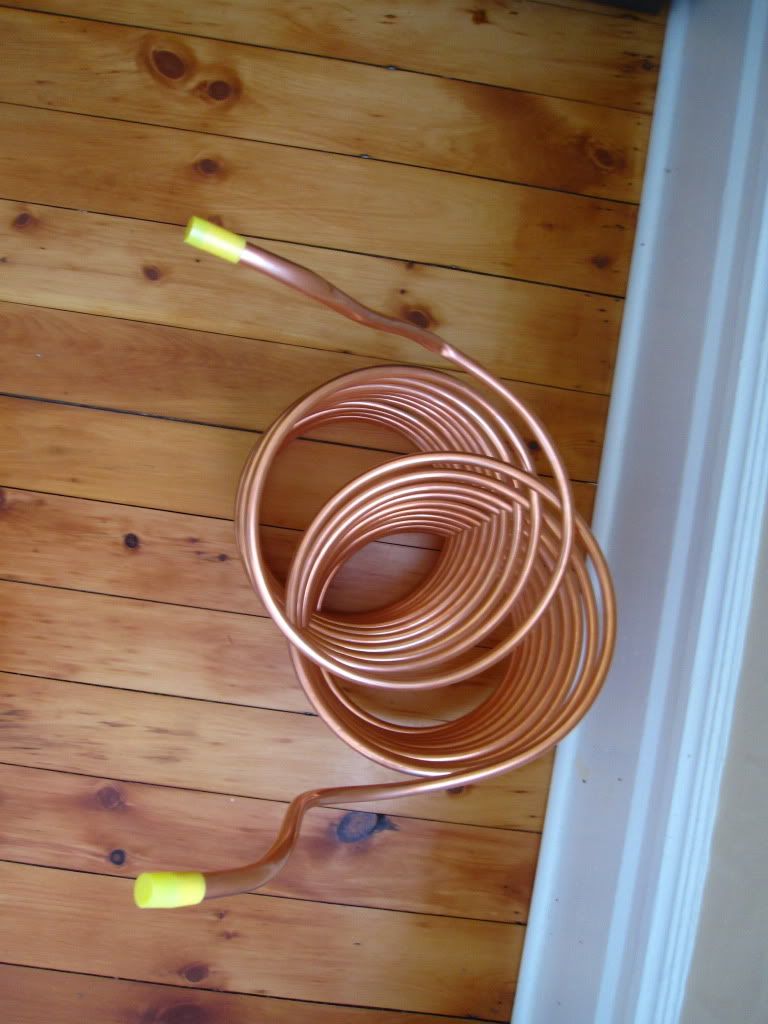
Went with the 50" and this was super simple to do. Thanks to all that posted instructions and or videos to assist us all. Here is the finished product.
really interested as to how this design works, chill time/input temp/heighth of top coil. Seems like the exact thing I was thinking of.
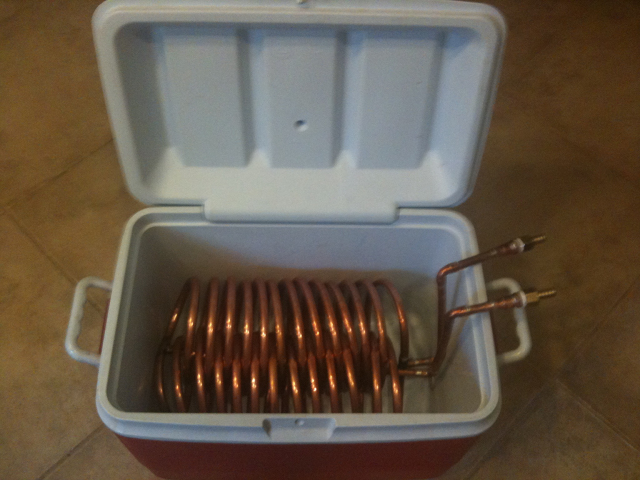
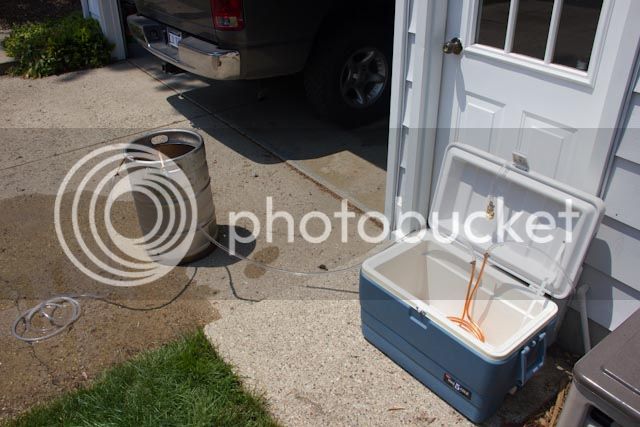
Well, I've used it several times now, and it's MUCH faster than an ice bath. My problem now is that my local cold water temp is starting to approach the low 80s (Las Vegas summers, don't ya know). I'm seriously considering using this as a pre-chiller in a cooler filled with ice water, and making a smaller one for my brew kettle, as this one is a little large for my 32q kettle.
Vance71975
Well-Known Member
Guys, I have gotten some pretty good results with this new chiller design I made last week. I have done 2 brews with it thus far and the results are better than expected.
I used 22' of 3/8" Refrigeration tubing. I don't have pictures to show how I made it, so I will be as descript as possible.
I began by marking the center of the length of tubing. I then wrapped the tubing using a paint can to make the coils. I started at each end of the tubing and wrapped toward the marked center point. When I was done I had 2 opposing coils and 12" of straight tubing at the beginning end of each of the coils. Next I spread the coils apart a little and then meshed them together much in the same way you would do with your fingers like you are taught to pray when you are a little kid. After that I bent the straight ends so they went vertical and then bent the downturns so they would reach up, out of, and over the side of the pot.
Here is the finished product.

This will stand up high enough to reach out of a 7.5gal turkey fryer.
The results are kind of hard to believe but this was done with a timer last night so I have to just accept that I have created a fantastic chiller for next to nothing.
I chilled 5gal of wort from a boil to under 70* (67* to be exact) in just shy of13 minutes. I did immerse the pot in my sink, using the "spent" water to circulate a cold water bath around the pot. I also raised and lowered the cooler in the wort every few minutes to make sure that everything was stirred up nicely.
Patent the design man!


$2.41
$29.95
Mastering Homebrew: The Complete Guide to Brewing Delicious Beer (Beer Brewing Bible, Homebrewing Book)
Clickgoodwill


$58.16
HUIZHUGS Brewing Equipment Keg Ball Lock Faucet 30cm Reinforced Silicone Hose Secondary Fermentation Homebrew Kegging Brewing Equipment
xiangshuizhenzhanglingfengshop


$22.00 ($623.23 / Ounce)
AMZLMPKNTW Ball Lock Sample Faucet 30cm Reinforced Silicone Hose Secondary Fermentation Homebrew Kegging joyful
无为中南商贸有限公司


$53.24
1pc Hose Barb/MFL 1.5" Tri Clamp to Ball Lock Post Liquid Gas Homebrew Kegging Fermentation Parts Brewer Hardware SUS304(Liquid Hose Barb)
yunchengshiyanhuqucuichendianzishangwuyouxiangongsi


![Craft A Brew - Safale S-04 Dry Yeast - Fermentis - English Ale Dry Yeast - For English and American Ales and Hard Apple Ciders - Ingredients for Home Brewing - Beer Making Supplies - [1 Pack]](https://m.media-amazon.com/images/I/41fVGNh6JfL._SL500_.jpg)
$6.95 ($17.38 / Ounce)
$7.47 ($18.68 / Ounce)
Craft A Brew - Safale S-04 Dry Yeast - Fermentis - English Ale Dry Yeast - For English and American Ales and Hard Apple Ciders - Ingredients for Home Brewing - Beer Making Supplies - [1 Pack]
Hobby Homebrew

$7.79 ($7.79 / Count)
Craft A Brew - LalBrew Voss™ - Kveik Ale Yeast - For Craft Lagers - Ingredients for Home Brewing - Beer Making Supplies - (1 Pack)
Craft a Brew


$53.24
1pc Hose Barb/MFL 1.5" Tri Clamp to Ball Lock Post Liquid Gas Homebrew Kegging Fermentation Parts Brewer Hardware SUS304(Gas MFL)
Guangshui Weilu You Trading Co., Ltd


$479.00
$559.00
EdgeStar KC1000SS Craft Brew Kegerator for 1/6 Barrel and Cornelius Kegs
Amazon.com

$176.97
1pc Commercial Keg Manifold 2" Tri Clamp,Ball Lock Tapping Head,Pressure Gauge/Adjustable PRV for Kegging,Fermentation Control
hanhanbaihuoxiaoshoudian


$39.22 ($39.22 / Count)
Brewer's Best Home Brew Beer Ingredient Kit - 5 Gallon (Mexican Cerveza)
Amazon.com


$10.99 ($31.16 / Ounce)
Hornindal Kveik Yeast for Homebrewing - Mead, Cider, Wine, Beer - 10g Packet - Saccharomyces Cerevisiae - Sold by Shadowhive.com
Shadowhive


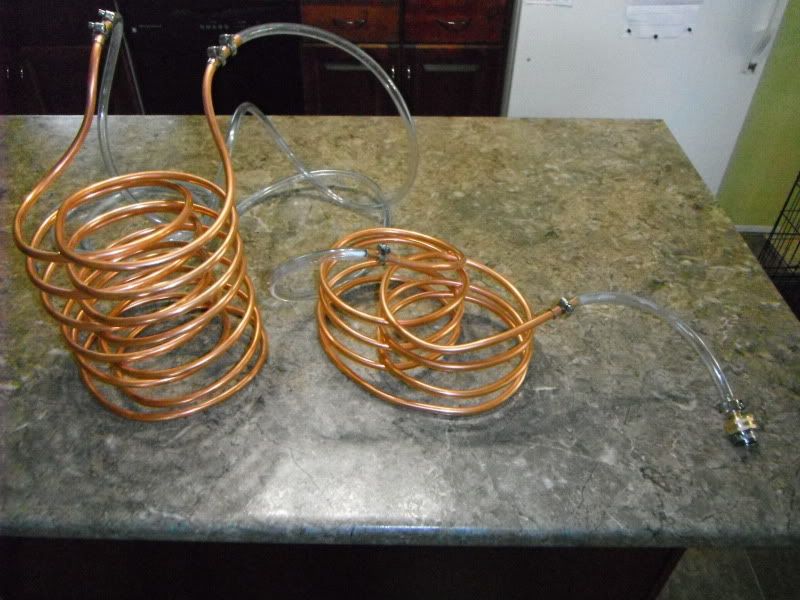
Well, I've used my rib-cage chiller a few times now, and it works fine. My few complaints are that it takes up a lot of space in my kettle, can get in the way of late additions (I was making a chocolate milk stout, and a lot of the cocoa powder ended up on the chiller instead of the wort), and it's very difficult to stir the wort for whirlpooling.
So I went out and got another 50' of 1/2" tubing and built a new chiller that uses the dual spiral, but with a larger center to facilitate additions and stirring/whirlpooling:


I also modified the old rib-cage design, and will now use it as a pre-chiller in a cooler of ice, since Las Vegas summer tap water temperatures average 85 degrees:
I'll let you know how it works.
So I went out and got another 50' of 1/2" tubing and built a new chiller that uses the dual spiral, but with a larger center to facilitate additions and stirring/whirlpooling:
I also modified the old rib-cage design, and will now use it as a pre-chiller in a cooler of ice, since Las Vegas summer tap water temperatures average 85 degrees:
I'll let you know how it works.
I made this from 20' copper coil yesterday...
I have to warn anyone trying this that bending straightened copper tube is difficult to impossible! My hands are a bit raw (yes, gloves would have helped) and I kinked the tube in a few places (caught myself, so water still flows without leaks). I DID use a tube bender... it helped, but not a lot (and it's hard to get it around kinks... luckily I was able to get it off the tube.
Soldering was MUCH easier... I went for added expense with soldered and screwed fittings (there is a 3/8" MIP soldered copper connection that the Watts parts fit on).
The intake has a cheap 6' hose with quick disconnects that I'll leave in place. I'm not sure what to do for the out hose... the cheapo hoses can't take much for heat and I don't want to spend more on this one! I guess I can just line it up to feed onto the pavement.
Next time I would get two 10' (or two 20' for a 40' chiller) and solder a join between them at the bottom. That sounds like a good project for when my wallet feels better and I'm in need of a pre-chiller.
Huge props to this thread. Made my 50' rib cage this afternoon using a couple of paints cans and some patience. Probably took about 30 minutes to do all the bending. Didn't quite hit my midway point perfect, but it is by far close enough. Can't wait to give it a try!
Grubba
Member
- Joined
- Jan 13, 2012
- Messages
- 14
- Reaction score
- 1
I made this from 20' copper coil yesterday...
I have to warn anyone trying this that bending straightened copper tube is difficult to impossible! My hands are a bit raw (yes, gloves would have helped) and I kinked the tube in a few places (caught myself, so water still flows without leaks). I DID use a tube bender... it helped, but not a lot (and it's hard to get it around kinks... luckily I was able to get it off the tube.
Hmmm...are you sure you bought soft copper refrigeration tubing? There are several different types of copper tubing and perhaps you bought the wrong kind? I picked up a 50' coil of 3/8" OD refrigeration tubing (Cambridge-Lee Industries, Inc. brand) from Lowes for $23 and it was very easy to work with and I didn't need a tube bender. I bent it around an empty 1-gallon cider jug and it took me like 15-20 minutes to make the whole interwoven structure. I unwound 25' from the coil and wrapped it around the cider jug by rolling it across the floor. Then I repeated the same process on the remaining 25', wrapping in the opposite direction. Using the clear glass jug made it simple because I could see the tubing as I rolled the jug across the floor, making sure I got the coils tight together.
When the whole thing was completed I noticed that I could compress it down quite a bit so I used some "paddle wire" I had on hand to tie the adjacent coils together. When I was done the whole structure was shorter and much more "solid" (no slinky effect when picking it up). However, when I was cleaning it in a boiling vinegar/water solution I realized that the paddle wire was made of iron and would probably rust/corrode which is obviously not desirable. So I took it all off, and in that short time of soaking in the vinegar solution it had already left dark marks on the copper. D'oh! So now I'm gonna go out and get some copper wire, because it was real nice when all the coils were lashed together.
Update: used the chiller for the first time a couple nights ago. I'm only doing 3.5 gallon boils and topping off to 5 gal in the fermenter, but it cooled that 3.5 gallons down to 70 degrees in about 10 minutes, holy crap! That sure beats waiting an hour and a half for it to cool down in an ice bath in the sink.

lateknightucd
Active Member
Sorry to resurrect this old thread but thanks to everyone for posting these ideas! I'm getting ready to do my first homebrew using some hand-me-down stuff (though including a nice keggle) from my brother in law. There wasn't an IC along with the gear so I started looking around and stumbled on to the photos here. My local hardware store only had 60' of 3/8" OD soft copper coil so I picked that up. We're brewing Sunday and it's been in the high 90's here in Grand Rapids. Since I had extra tubing, I figured I'd make a pre-chiller as well. The prechiller is 15' of tubing coiled around a paint can and will go in a cooler with ice, water and rock salt about 15 minutes before flame out to start getting cold.
The RCIC is the remaining 45' of tubing and fits the keggle nicely.
All in all the build went well. There are a few minor kinks but the system flows nicely and holds pressure. Has anyone used the prechiller with ice, water and salt? Since this will bring the prechiller down below 32 F I don't want to run the risk of the water freezing in there. Thanks!
I'll get times and temperatures on Sunday and will report back.
lateknightucd
Active Member
The RCIC worked great! I had 5 gallons at a rolling boil. After flameout I started the water, tipped the keg up on a bit of the angle and started to swirl the wort. Cooling times were as follows:
3 minutes - 110 F
5 minutes - 82 F
10 minutes - 69 F
Seems like a working design to me! For next time I'm going to replace the outflow hose with a high temp line. I'll also put in some sort of quick connects as the whole device is a bit unwieldy to clean and store and it would be great to be about to break it down a bit. Thanks again to everyone who suggested this design and posted pictures!
kc_blueandwhite
Member
Thanks to the OP, this design is great.
I put mine together this weekend, and I'm happy with how it turned out. I used 50' or 3/8" copper, and kept the connections simple with silicone tubing and hose clamps.
I've never built the traditional style IC so I can't compare the difficulty to this, but this was really not that hard to do. I don't know why anyone wouldn't build their IC using this method.
Again thank you to RedIrocZ-28! Picked up 20' of 3/8" OD copper coil from the Depot. Used my CO2 tank as a coil/guide and it turned out great. I do have to admit that I was pretty nervous at first... Go ahead and give a whirl if you want to change your IC.

BadBeagleBrew
Well-Known Member
Here's my build, I did the 22' 3/8od copper like the op's. I got a bit of a score though, the guy at the hardware store didn't want to measure out the copper so he gave me what he thought was close enough I ended up with an extra 13' of copper and made a pre-chiller with it w00t  .
.
The begining used tape to mark center and end that I cut.
Here is how I rolled it over the paint can.

This is the 2 pieces coiled up pre-interwoven.
Just pull apart and mush together.
Sizing it for my pot.
I got a standard fitting for my faucet that replaces the aerator with a garden hose adapter. Than picked up a female garden hose piece with a barbed end that I had to lube up with soap to get on the 3/8id hose. 6 small ss,and 1 medium clamp later here is the finished product.
I spent about $80 on everything including faucet adapter (go east coast of canada where everything is expensive). A basic 25ft Brewers best IC sells for $89.99 + 15% tax around here. So I saved a little over $20 made a more efficient IC and got a free Pre-Chiller.
Thank you op and everyone else in this thread couldn't have done it without your help, can't wait to give this a go.
Edit: Boiled up a little over 4 gal of water cooled it down to pitching temps in 10 min.
.The begining used tape to mark center and end that I cut.
Here is how I rolled it over the paint can.
This is the 2 pieces coiled up pre-interwoven.
Just pull apart and mush together.
Sizing it for my pot.
I got a standard fitting for my faucet that replaces the aerator with a garden hose adapter. Than picked up a female garden hose piece with a barbed end that I had to lube up with soap to get on the 3/8id hose. 6 small ss,and 1 medium clamp later here is the finished product.
I spent about $80 on everything including faucet adapter (go east coast of canada where everything is expensive). A basic 25ft Brewers best IC sells for $89.99 + 15% tax around here. So I saved a little over $20 made a more efficient IC and got a free Pre-Chiller.
Thank you op and everyone else in this thread couldn't have done it without your help, can't wait to give this a go.
Edit: Boiled up a little over 4 gal of water cooled it down to pitching temps in 10 min.
thisbeluke
Member
Just finished mine, worked brilliantly. I've been playing with the spacing after my first test so that the bottom is quite spaced out and the top coils are closer together.
This seems to give more surface area at the top of the kettle, and when I tested it again (very unscientifically) it reduced chill time by 3-4 minutes. Not bad for 5 mins extra work.
This seems to give more surface area at the top of the kettle, and when I tested it again (very unscientifically) it reduced chill time by 3-4 minutes. Not bad for 5 mins extra work.
I'm done arguing against the "rib cage" designs all that but guys, please stop uncoiling the copper only to recoil it. The uncoiling process starts hardening the copper already and just makes it harder to coil. Drop the larger coil over your mandrel (the round thing you use to form the new coil) and simply tight the coil.
BadBeagleBrew
Well-Known Member
You have to uncoil to take measurements in some cases.
Replying to keep track of so I can build one this winter.
worxman02
Well-Known Member
- Joined
- Jan 13, 2007
- Messages
- 230
- Reaction score
- 19
I'm done arguing against the "rib cage" designs all that but guys, please stop uncoiling the copper only to recoil it. The uncoiling process starts hardening the copper already and just makes it harder to coil. Drop the larger coil over your mandrel (the round thing you use to form the new coil) and simply tight the coil.
Bobby,
Why are you against the ribcage design? I dont want to argue with you about it, I just want to know your reasoning against it. Is it because a Jamil style whirlpool IC is more efficient than the ribcage design? Or are you a counterflow/plate chiller guy? I'm trying to figure out what to do for my new chiller as I need to make a new one since I went from a 3 gallon pot to a 15 gallon pot that is 18" diameter and about 18" tall. I don't have a pump since I do BIAB and I would rather not deal with one. I'm trying to figure out how much tubing I should buy to quickly cool 10 gallons of wort in my pot.
You have to uncoil to take measurements in some cases.
OR, you can take a "length" of rope or speaker wire and wrap it around your mandrel first to determine and mark the start / end points. Then start your copper coil at the upper start point and wrap around down to the half point at the other mark.
danbrewtan
Well-Known Member
- Joined
- Nov 13, 2012
- Messages
- 118
- Reaction score
- 17
Well here's my interwoven wort chiller! As a chemical engineer, I really like this design. You spread out the surface area of the copper while also maintaining the best driving force for heat transfer. I almost got into the thermodynamics of it all but I will refrain. This thread has seen enough!
EDIT: everything cost me about $50 at Lowe's. I got some extra vinyl tubing in case I needed the water to run through an ice bath before it enters the wort. The tap water can be very warm in Texas...

EDIT: everything cost me about $50 at Lowe's. I got some extra vinyl tubing in case I needed the water to run through an ice bath before it enters the wort. The tap water can be very warm in Texas...

danbrewtan
Well-Known Member
- Joined
- Nov 13, 2012
- Messages
- 118
- Reaction score
- 17
Well I was finally able to use my DIY wort chiller (picture in previous post) for my imperial whiskey stout this past weekend. It was WORLDS better than an ice bath, but still took about 30 mins to cool from boiling to 80F. I blame it on the 72F tap water...
Anyway, not as successful as some of you, but still a lot better than the alternatives and worth every penny!
Anyway, not as successful as some of you, but still a lot better than the alternatives and worth every penny!
lorne17
Well-Known Member
- Joined
- Jan 14, 2013
- Messages
- 360
- Reaction score
- 30
Guys, I have gotten some pretty good results with this new chiller design I made last week. I have done 2 brews with it thus far and the results are better than expected.
I used 22' of 3/8" Refrigeration tubing. I don't have pictures to show how I made it, so I will be as descript as possible.
I began by marking the center of the length of tubing. I then wrapped the tubing using a paint can to make the coils. I started at each end of the tubing and wrapped toward the marked center point. When I was done I had 2 opposing coils and 12" of straight tubing at the beginning end of each of the coils. Next I spread the coils apart a little and then meshed them together much in the same way you would do with your fingers like you are taught to pray when you are a little kid. After that I bent the straight ends so they went vertical and then bent the downturns so they would reach up, out of, and over the side of the pot.
Here is the finished product.
This will stand up high enough to reach out of a 7.5gal turkey fryer.
The results are kind of hard to believe but this was done with a timer last night so I have to just accept that I have created a fantastic chiller for next to nothing.
I chilled 5gal of wort from a boil to under 70* (67* to be exact) in just shy of13 minutes. I did immerse the pot in my sink, using the "spent" water to circulate a cold water bath around the pot. I also raised and lowered the cooler in the wort every few minutes to make sure that everything was stirred up nicely.
I just spent my entire lunch break reading 18 pages about a ribcage wort chiller. Nice design! I plan to make mine tonight, I only brew 2.5-5 gallons at a time and don't foresee me going any more than that anytime soon. My coworker found 50' x 1/2" for $39 at Lowes this weekend and I think we're gonna split that and stick with 25' each. Originally we thought, why not use 50', but I think using all 50' for such small batches is a waste. But saving $20 helps me justify using compression fittings and making it a nice design that will last! If I need to add a pre-chiller coil, I can in the future, but for now our water in Colorado is pretty cold in the winter.
I'll post pics when I'm done. I am thinking of splitting it in 2 with a compression T fitting so it splits the cold water evenly among the coils. We'll see how it turns out.
Thanks for the great suggestions,
Lorne
lorne17
Well-Known Member
- Joined
- Jan 14, 2013
- Messages
- 360
- Reaction score
- 30
So, I was too excited to get my RCIC done and made so I finished it tonight! Didn't think it'd be done tonight. However it did take some time to really figure out the amount of pipe I needed to leave straight and coil.
All in all, this is 25' of 1/2" copper tubing. I altered the design a bit and added a compression T fitting to split the incoming water into each coil to even disburse the cold water in the Wort. Then both come up and shoot out.
One issue I had was I didn't anticipate how large the 90 degree turn radiuses would be so my straight lengths ended up being too short. I kinked the first one I tried to bend, so I didn't want to risk breaking the tube by straightening and trying again. So I may just have to add a foot or so of clear tubing with a clamp for the exit tubes. Luckily I left PLENTY of tubing for the inlet to a hose bibb. That also came across the top to act as my handle to carry it. Since that's the inlet the tube won't burn my hand, the other two would.
I haven't tested this with any wort yet. I plan to test it on a water boil tomorrow while I clean it, then this weekend I'll make another batch and test it on the real stuff!
Thanks for an awesome design and great insight guys! Here's some pics of my progress and final product.
Lorne
LowNotes
Well-Known Member
I made a rib-cage wort-chiller about a month ago and have used it 3 times now. I used a 25' length of 3/8" copper, and also made a pre-chiller using another 25" of 3/8" copper. I put the prechiller in a 5-gallon bucket filled with icewater, but when I run this setup it is still taking almost an hour to get down to 60-65* pitching temps?
Obviously my tube would function better if it was bigger/longer (THAT'S WHAT SHE SAID), but I really was expecting the prechiller to make up for it. At this point I am wondering if I would be better off scavenging the pre-chiller and somehow sculpting it to fit in my brew kettle alongside the rib-cage, and just run directly from my sink. My water is usually in the 50-60* range, even in winter...so I wasn't sure if I would still have issues.
I suppose I could also buy a big plastic bucket and put the kettle in an ice bath at the same time I am chilling it with the IC...but I am really trying to avoid buying ice bags for every brew day, and the other alternative is to spend a week making ice in my freezer to stock up...
Also, I don't move the chiller around a lot, and I have read that helps, but would it really have that big an impact if it is taking an hour as-is?
ZackN
Well-Known Member
OR, you can take a "length" of rope or speaker wire and wrap it around your mandrel first to determine and mark the start / end points. Then start your copper coil at the upper start point and wrap around down to the half point at the other mark.
Or measure the circumference of your paint can or mandrel and then calculate how many wraps you need to make around it to get half way.
paul_111
Well-Known Member
Let's bring this back one more time...
I made one today. 50' of 3/8" OD tubing. Based on some of the talk about kinking tubing, refrigeration vs soft tubing, etc, I was hesitant at first. But it was easy!
Go slow and be gentle. I used a piece of string to measure 25' (the center) without unwinding the coil. I then coiled around a paint can once on each side of the center mark.
You will need to carefully manipulate the coils to wrap the tubing tight against the paint can; partial unwinding/increasing the coil diameters will be necessary. By the way, a paint can is 6.5" diameter, in case you're looking for something of similar diameter.
Step on the coil of Cu tubing at the mark, and pull the tube tight to the can. Also push the coils together/down so they are uniform. I thin I made 12 coils on each side of center.
Leave about 2' uncoiled at the ends for the flexible tubing.
When it's time to expand the coils to join them together, I rested them against each other by laying one coil on its side, which puts the other on top of it... and very gently the coils apart one at a time so that I didn't over spread them -- I wanted to keep the "cage" tight. Once the coils are meshed, push the outer edges in to push the coils into a manageable width (measure your kettle before you start).
Here's a picture of the tubing I used from Lowes. It was $47, the vinyl tubing was $7.50, and the adapters to get from faucet to garden hose to tubing barb were ~$9. So I'm in for ~$60, which is much cheaper than a 50' IC from a retail outfit.

I am currently brewing 2 gal batches in a 3 gal pot. The IC is a bit tall (and bulky), but I plan to upgrade to a 10 gal kettle for 5-7 gal batches soon.


I used it for the first batch today; an Imperial IPA. Using fairly cool tap water (this is Illinois), I was able to get from 212F to 135F for my hop stand in 1 minute, 22 sec. I thought that was pretty impressive. I didn't time the 135F to pitch, but it did take much longer. I can only imagine how fast it will be in the winter...
This forum :rockin:
Thanks for all of the great ideas!
Similar threads
- Replies
- 11
- Views
- 2K
- Replies
- 5
- Views
- 2K
- Replies
- 2
- Views
- 838
