• Please visit and share your knowledge at our sister communities:
  • If you have not, please join our official Homebrewing Facebook Group!

    Homebrewing Facebook Group

DIY glycol chilled plastic conical fermenters

Homebrew Talk

Help Support Homebrew Talk:

This site may earn a commission from merchant affiliate links, including eBay, Amazon, and others.
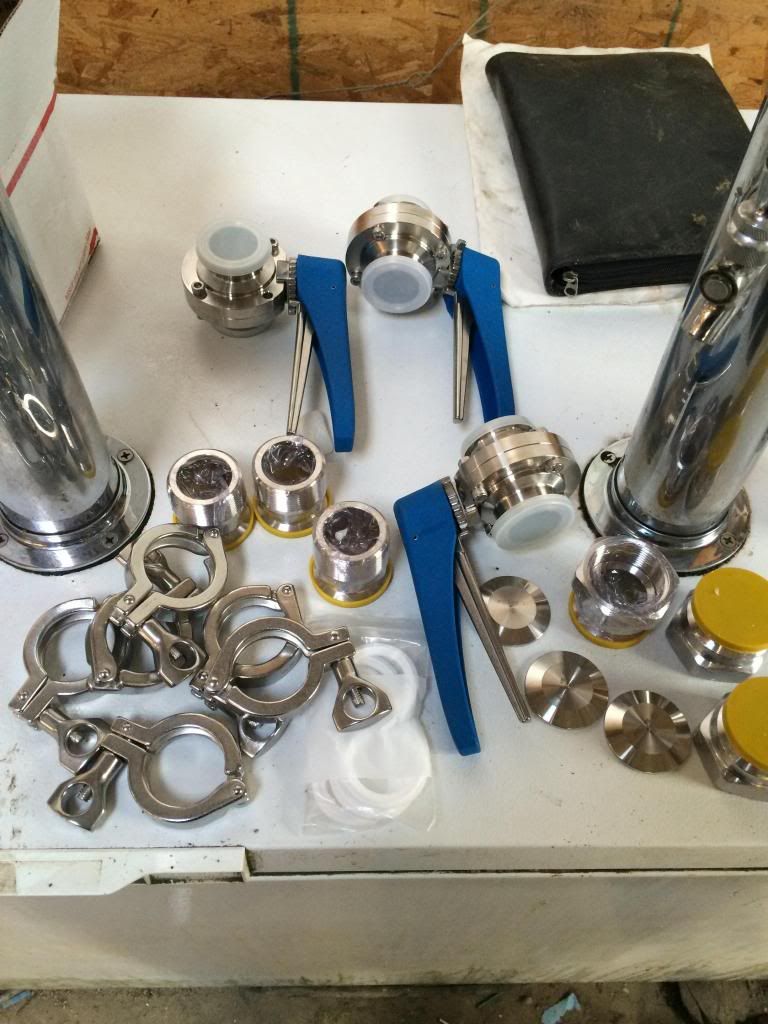
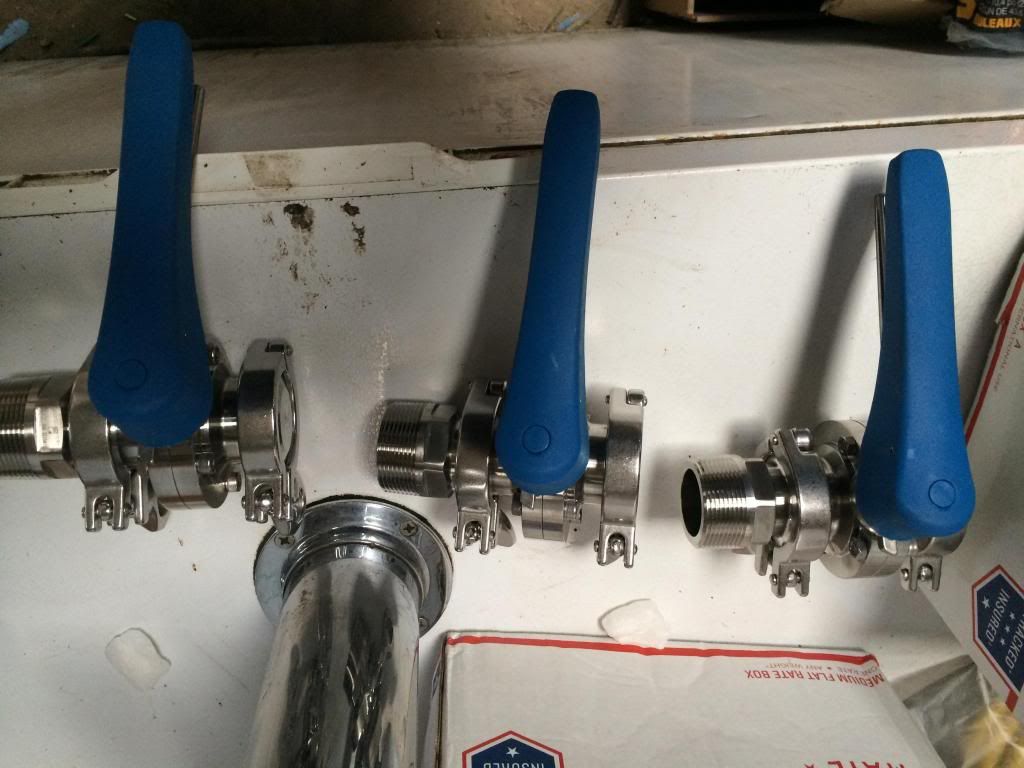
Anybody any closer to building one of these? Closest I am currently is I have my conicals, and I have my valves....but waiting on my cash flow for the rest...

IMG_3614.jpg


IMG_3615.jpg
 
YEP!

I'm right there with you!

I have all parts except the PEX stuff, reservoir & AC unit, neoprene insulation, and the stand, which I am doing in aluminum instead of wood, and will be done by end of this month. Am sort of waiting until then, but I think I will try to get the control box done at some point. Very busy of course, but its on the short list of things to get completed
 
I am building a 2 conical system with a custom Arduino controller. Just about have all of the plumbing done. Tested the conicals yesterday and no leaks! Hope to have beer fermenting by the end of January.
 
I will post some pics soon. I mostly followed packets build plan.

1) Since it is winter and cold in my garage, I will be using the flex watt heater tape and reflectix insulation. I hope to test it this weekend. If you read up on this, it is almost exclusively used for reptiles, so there are a lot of precautions about using a thermostat and dimmer so that the temp can not get above 90F and you don't end up with roasted rattlesnake. I also saw some info that the material itself is only compatible up to 110-120F. I have 11" width that I plan to use on the cone, two pieces oriented like a diamond as suggested earlier in the thread. I will also put a 3" wide strip around conical just above the stand. When I tested this on the counter in my kitchen, the 11" piece never got above 92F and the 3" piece got close to 100F before I shut it off. I plan on using my controller to pulse this every few seconds to control the temp, but I am not sure how well it will work if the 3" and 11" operate at different temps. BTW, this stuff is really easy to work with if you can solder.
2) I did not use quick connects on the connections to the cooler as I don't expect to need to disconnect it too much. This resulted in having to transition from PEX to braided tubing and I used hose clamps on PEX fittings. It does not fit nicely like a hose barb fitting, so I am hoping it will be reliable
3) I looked for quite a while at coming up with a way to move the connection to the coil outside of the lid. I am concerned that if this connection leaks I will not know and I will have undetected PG going into my beer. I know it is non-toxic, but I don't really want to add it to my beer, especially if I don't know it is happening. One idea was to bore out a FIP-compression fitting to pass the tubing through a nipple and still have a way to seal the lid, but this would take 4 more SS compression fittings, 4 nipples SS nuts, and drilling of these fittings. They make bored out fittings for 1/4" tubing, but I could not find any for 1/2" tubing. Anyone else have a solution to this? In the end I plan on sticking with the current design, save the cost and trust the fittings.
 
Cool.

Did you put LED temp readout panels? Looks like it would be a cool addition, am thinking about doing it.
Hopefully I'll get a chance to mark up my enclosure panel this weekend so it can be plasma cut and painted. A good friend owns a body shop and can do this for me easily saving me the effort of cutting and painting.

TD

I need friends like this... lol
 
So before xmas, we brewed a quick batch and got it into one of the three conicals we built. The whole system is brand new including the fermenters and the electric brewery so there was lots of stumbling and mistakes but all good learning. Only ended up with around 4 gallons in the fermenter which barely hit the bottom of the coil. Might end up tossing that batch.

This weekend, we brewed a 12 gallon smash with Mosaic and Rahr 2 row pale and split out 6 gallons to each of the other two fermenters: one with wpl001 and the other with a wpl lager (forgot number). We loosely based the recipe on Kal's "Brew Day" recipe. A lot less stumbling this time probably due to much less 'drinking while brewing'. We ran oxygen into the brew through one of those monster devices from Williams brewing for about 2 minutes on number 4 before pitching. We've got a dissolved 02 meter but realized we hadn't figured out how to use it at pitch time.

Is any one else who built this system finding that as fermentation takes off, there's no action from the end of the blow off tube? I built the center blow off just like Packet did and have hoses going into bucket of sanitizer. I hadn't seen any action since Sunday and thought maybe I needed to re-pitch more yeast. So I took a reading this morning and I'm at 1.012 in the ale and 1.014 in the lager. OG was 1.042. Obviously we've got pretty decent fermentation going on. (side question: I didn't do it, but was tempted to pop the top and look inside. Is that a no-no?)

When we clean the conicals, we use a pretty high pressure sump pump with a big spray ball. When we crank that sucker up, there is some blow out around the area where the lid seals to the conical. I'm guessing that maybe the blow off is going out those cracks?? I find it odd given that the tube would seem to be the point of least resistance. But maybe since the tube is rather large, the bit of head pressure caused by the water at the end of the blow off tube is more than getting out the cracks?

Thoughts?
 
Sounds like you've probably got a leak through the lid seal, of air and water as indicated by the CIP ball blasting through, assuming the lid is screwed in fully while you're doing this. This could also explain the lack of bubbling in the blowoff.

Pictures of your build would be appreciated please!

I would think removing the lid would be risking contamination, but I've done it on other vessels for adding dry hops. Need to get a cannon unit to inject the dry hops from the outlet port like the pros!!

Glad to hear others are building and using this! I can't wait to start on mine. Maybe up and running by end of March if all goes well.

TD
 
@fpweeks, did you get action out of your blow off even though it didn't seal?

@trickydick, I'll get some photos up soon.
 
I never bothered with a blowoff. My batch size was typically 10-12 Gallons which leaves plenty of head space and never had a need for a blow off.

The long and short of my plastic conical story is that i bought 2 brewhemoths on their black friday sale. Just waiting for them to show up!!
 
Yeah I saw that sale.

How are you going to chill them?

I decided to do this because I want to start doing lagers, and currently they plug up the pipeline for doing ales. I don't want to invest in an array of temp controller refrigerators/freezers or a walk in. I had hoped I could use my home AC system, but it's not even good enough for doing ales.

TD
 
I never bothered with a blowoff. My batch size was typically 10-12 Gallons which leaves plenty of head space and never had a need for a blow off.

The long and short of my plastic conical story is that i bought 2 brewhemoths on their black friday sale. Just waiting for them to show up!!


Also, what all did you do in attempt to get the plastic conicals to seal? Seems like this has been problematic, but I understand that once you get to a certain point, that you are ready to move on... to stainless. I recall pricing out all the plastic parts to see what a conical build would cost compared to stainless. It seemed to be close, and those stainless fittings do add up.

I am hoping for a a good outcome on the lid seals. I'm wondering if a large O-ring would be helpful if the included threaded lid and silicone treatment aren't enough.

Have a few more things to order. Just bought some LED displays to read the temps. For a set of three and cables and faceplates, it adds $134 to price plus shipping and the effort to cutout holes. Saving the neoprene until the last, but all the other stuff is sitting in my amazon cart. Almost there....

TD
 
Cool.

Did you put LED temp readout panels? Looks like it would be a cool addition, am thinking about doing it.
Hopefully I'll get a chance to mark up my enclosure panel this weekend so it can be plasma cut and painted. A good friend owns a body shop and can do this for me easily saving me the effort of cutting and painting.

TD

I am building a Arduino based controller that is based on one a made for a chest freezer fermentation chamber. It has some LED indicator lights, a encoder/button (similar to a car radio knob) for changing settings and a 4 line x20 char LCD screen. In normal mode, it will display the temps of the fermenters, glycol and show status of whether it is heating, cooling or off.
 
What is the best practice for getting the lid to seal. I don't see an o-ring on packets BOM and he mentioned earlier that he tried weather stripping with limited success. If anyone has a solution please post with part numbers or sizes of o-rings.
 
I silicon sealed the top ring, and added weather stripping to the lid, which are the items that guys on here have claimed to have sealed them up.....i found that really all the weatherstipping did was make it nearly impossible to get the lid off if i left it on for more than three or four days.

I have just about finished up my homemade glycol chiller build for my brewhemoths. I ordered them with the 3/8 internal chiller.
 
I sealed my conical with a piece of 3/8th hdpe plastic that I got from ebay. I completely removed the black threaded ring from the top and replaced it with a piece of weather stripping from hd. I then used 8 ss 3 inch machine screws nuts between the raised part where the threaded piece was and the edge of the conical. I drilled holes inserted the screws from inside conical with an oring on each screw to seal it, then put a nut on each screw on the outside to lock the screw in. I put the piece of hdpe on top and used ss wing nuts to tighten it down. I will take a pic of it in a little bit but I cant get a pic of it with the top off for a couple weeks. Its fermenting away now.
 
I silicon sealed the top ring, and added weather stripping to the lid, which are the items that guys on here have claimed to have sealed them up.....i found that really all the weatherstipping did was make it nearly impossible to get the lid off if i left it on for more than three or four days.

I have just about finished up my homemade glycol chiller build for my brewhemoths. I ordered them with the 3/8 internal chiller.

have you documented this build anywhere? I am looking at doing the same thing with a brewhemoth and haven't found too much on the chiller side of things. Thanks!
 
I'm looking at ordering some large flange gaskets here: http://www.allstategasket.com/info-flange-gaskets-NSR.asp

They have different materials from red rubber to epdm to bunna, etc and have the necessary sizes at a decent price. I sealed mine the Packet way with silicone removing the lower ring. I'm going to get the gasket and try that under the lid as that seems to be the place where it's losing seal. I have one of those triclamp fittings with the QD fitting for CO2 on it and can pressurize and search for links. I'll continue to update.

@fpweeks, so how does yours vent, just by the lack of a full seal?
 
Yes. I've never used an airlock or blowoff on it. Usually I just covered the camlock (that i use to connect my pump outlet to) with foil.
 
@bemerrit. The glycol chiller builds are found in a few threads. I didn't document mine.....especially since I haven't fully tested it. It was really easy to put together...he says before fully tested.

I ordered the brewhemoths with the internal chiller coil. so there's not much for me to do, expect connect some tubing for chilling and add flex watt and insulation for heating.
 
Here's the pic of how I sealed my lid.

When I transfer the beer out of it I will take a pic with the lid off.
 
I made a new lid out of acrylic to replace the original one. Machined an o-ring groove in the lid for a -456 o-ring to allow it to seal up tight. Threaded the poly for some 1" long 1/4"-20 threaded studs and used wing nuts to clamp down the lid. I used a 1" male & female threaded x tri clamp adapter for the center blow off port and spray ball connection. On the mpt x tc adapter I silver soldered a ss washer to allow me to tighten and seal up the connection through the lid. Also have an oring between the washer and lid to make it air tight. Still need to add the 1/2" swageloc bulkheads for the cooling coil connections.

Not sure if all the poly conicals have it but where the black female threaded lid ring sat in the poly body the poly had a lip that extended towards the bottom of the conical which I routered out. This allowed the top to be flush rather than have a step down around the threaded insert.

 
@bemerrit. The glycol chiller builds are found in a few threads. I didn't document mine.....especially since I haven't fully tested it. It was really easy to put together...he says before fully tested.

I ordered the brewhemoths with the internal chiller coil. so there's not much for me to do, expect connect some tubing for chilling and add flex watt and insulation for heating.

Did you use a window ac unit to do the chilling?
 
@WPStrassburg, oooh, dude, you got me thinking now!

I really like the idea of being able to see into these suckers.
 
@bemerritt

Heres the pics. I have filled it and made sure it makes water colder.....but now its fully assembled, control panel operational, but have yet to actually plug it all in and see how it performs.

Maybe this weekend.

IMG_1387[1].jpg


IMG_1389[1].jpg


IMG_1392[1].jpg
 
Thanks. Any suggestion on type of window ac unit? electronic or mechanical make much of a difference? I might forgo craigslist and go pick up a 5,000 BTU unit from home depot for 119 and call it a day. I figure if i don't mangle it too bad, i can return it if it doesn't work as intended.
 
The wiring is much easier if you find a mechanical one. I was close to buying one, and i just happened to drive by a yard sale in the fall and see this clunker for $15.
 

Latest posts

Back
Top