DIY Counterflow Chiller - Jaded Cyclone Clone

Homebrew Talk - Beer, Wine, Mead, & Cider Brewing Discussion Forum

Help Support Homebrew Talk - Beer, Wine, Mead, & Cider Brewing Discussion Forum:

This site may earn a commission from merchant affiliate links, including eBay, Amazon, and others.

BeardedIdiot

Well-Known Member
Joined
Jun 5, 2012
Messages
520
Reaction score
30
Location
Louisville
Hey everyone,
I thought that since I've had a brew under my belt with this beast, I should probably share it on here. I've only seen one or two of these on HBT so far, and they were smaller versions with only a few runs.

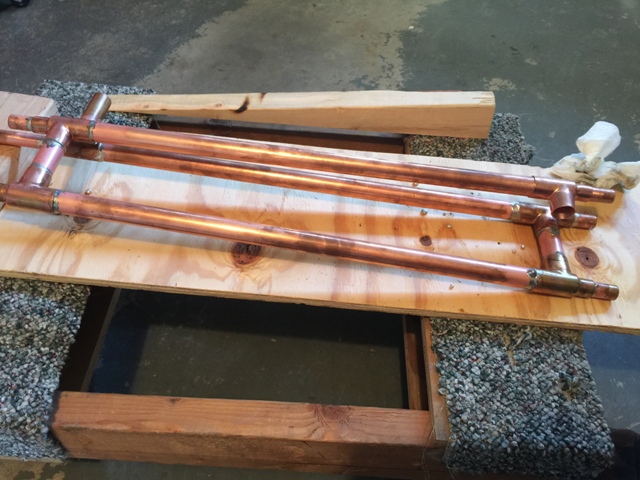
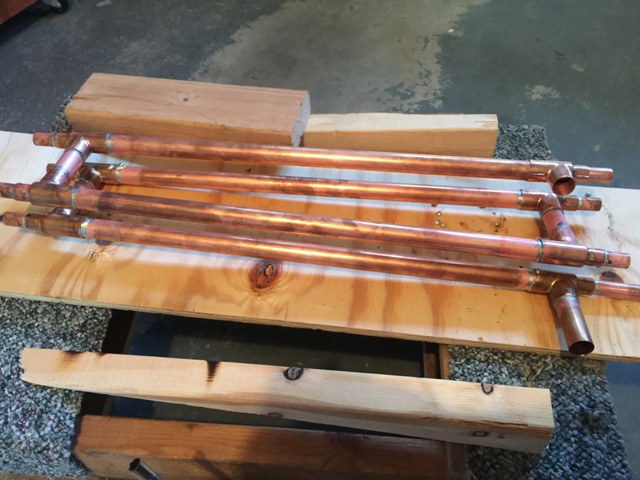
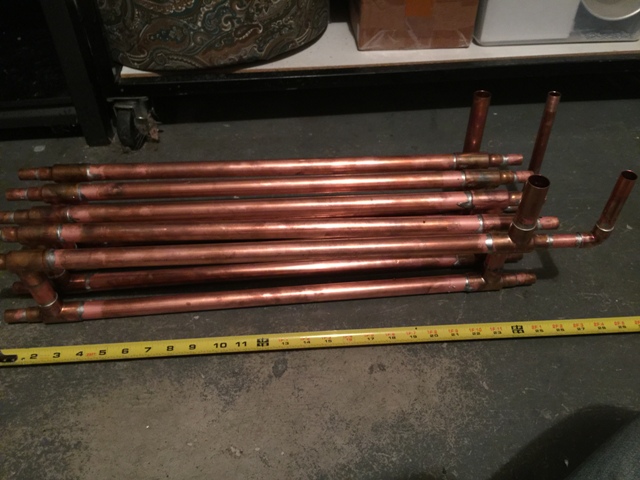
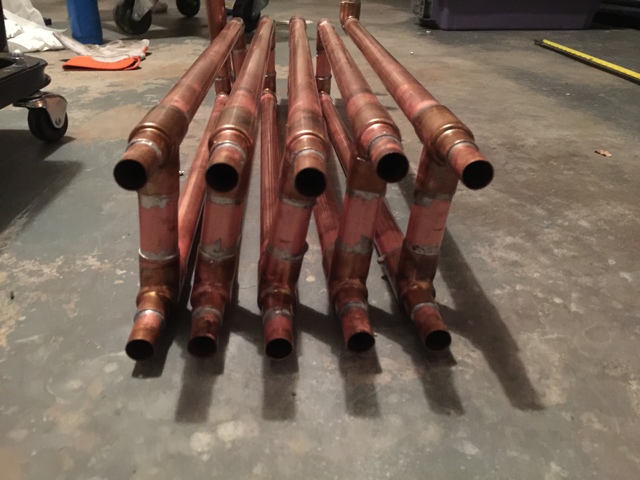
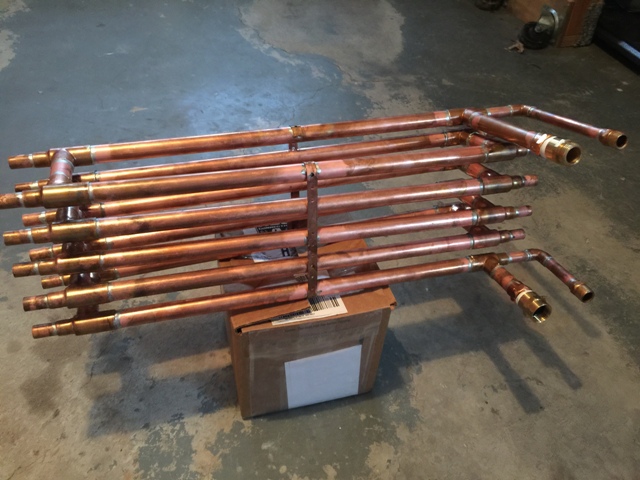
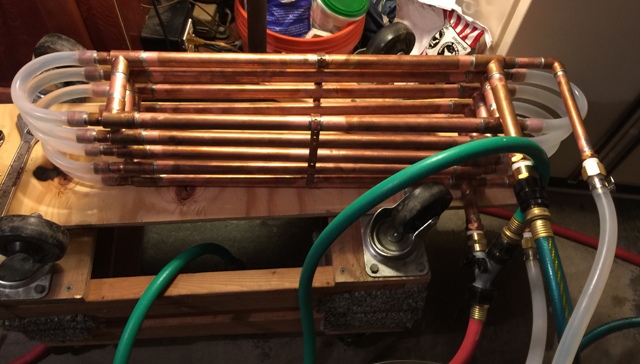
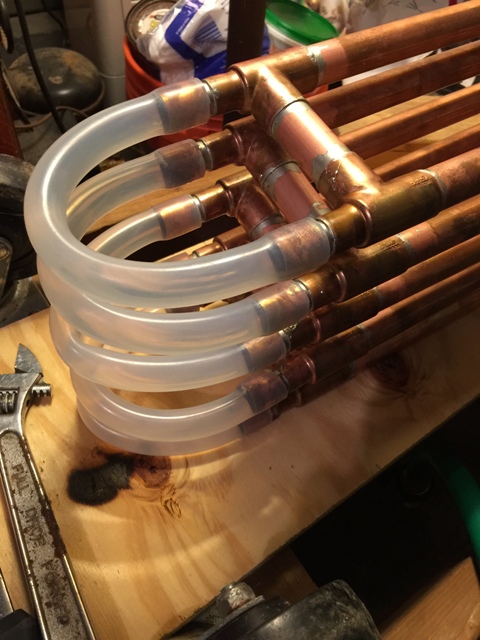
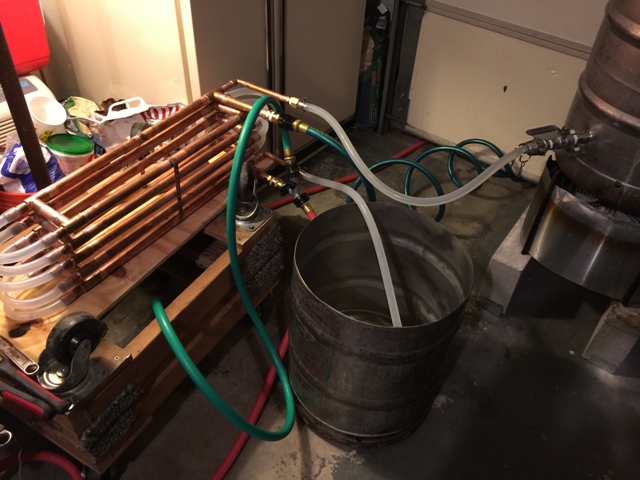
This chiller is about 28" in length not counting the silicone tubing loops on the ends. The external pipe is 3/4" diameter, and the internal pipe is 1/2" diameter. The length of 1/2" pipes enclosed by the 3/4" pipe is 22" per tube. With 10 tubes, that means 220" total, or 18.33 feet of contact for chilling.

This cost me about $130 buying everything new (pipe, fittings, solder, flux, and new propane torch bottle). I found the fittings MUCH cheaper online than at Lowes/Depot.

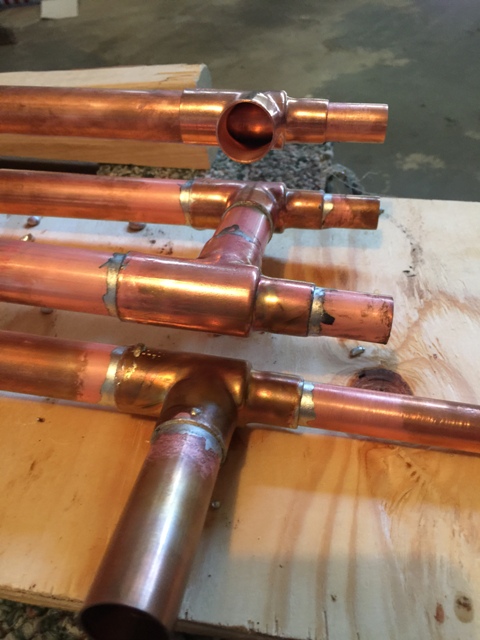
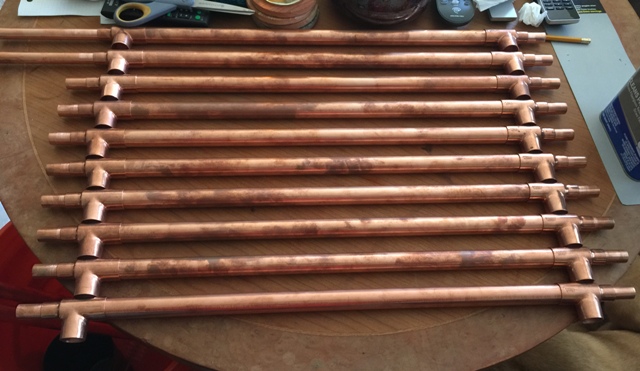
This was definitely a challenge to build. You have to grind the inside of the T-fittings out slightly so that the 1/2" tube will slide through, but not so much that you can't solder it. With as close together as the pipes are, it became more challenging as I progressed. I don't know how many times I burned the heel of my hand trying to swing the torch or solder around to get at all sides of the fittings. With a couple days of prep time cutting pipe and grinding fittings, it took me about 6 straight hours of soldering to get it done.

As far as chilling, I did a test run with boiling Oxyclean solution (needed to clean it anyways). Gravity draining the keggle and with chilling water valve only open about half, I was able to cool about 6 gallons of 212F solution to 75F in just over 8 minutes.

Considering it used to take me 20-25 minutes to chill with my IC, I considered that a huge improvement.

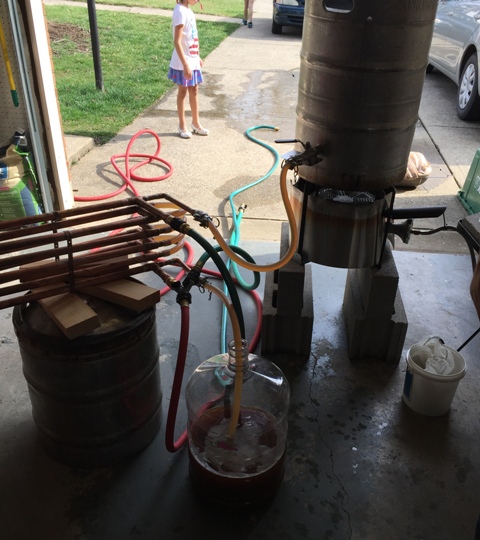
I got to try it out on an actual brew day about a week later. Gravity draining through the chiller directly into the fermentor, I was able to chill 5.5 gallons of wort from boiling to 77F in 6 minutes and 14 seconds. I think I can knock off a little more time fiddling with the chilling water flow.

Pics are worth a thousand words:
IMG_3702-1.JPG


IMG_3704-1.JPG


IMG_3705-1.JPG


IMG_3707-1.JPG


IMG_3709-1.JPG


IMG_3712-1.JPG


IMG_3715-1.JPG


IMG_3718-1.JPG


IMG_3719-1.JPG


IMG_3726-1.JPG
 
Wow! I have a cyclone and thought it looked a bit aggravating to construct. You sir just drove that point home for me. I do however prefer the 90. bend for the inlet and outlets. Kinda wish JaDeD would have done this.
 
Thanks guys. It was a bit of a pain, but once I got the hang of it it wasn't too bad.

I prefer the 90 deg bends because the plan is to mount it underneath the top of a brew cart eventually, and this way the connections are all easily accessible from the front.

I've used this several times now, with a pump, and it has yet to take longer than 6 minutes and 15 seconds to finish chilling. I circulate using the pump for the last 5 minutes of the boil, and then either whirlpool while chilling, or chill directly into the fermenter (either way works fine). I need to add a whirlpool arm so that I get a better trub cone in the center of the pot. I've got the copper cut and dry-fit, I just need to stop being lazy and solder it already.
 
I was about to post my parallel chiller build when I saw yours here..... I could have used a lot let room by doing it the way you did it but oh well... I like mine anyway....was a lot of work but will be interesting to see how well it works.
Will get a picture to post
 
Impressive build, that thing is a beast. I wonder if you reach maximum cooling potential before the wort runs the entire length. Could you get the same cooling with say 6 runs?
 
impressive, I like this style primarily for the large tubing-less likely to clog and the ability to clean. Did you consider using pvc to do the shrouding pipes? a lot less soldering and perhaps less expensive but likely bulkier in that configuration.
 
I thought about using pvc for the shrouding, and even started some drawing, but I with having to solder the copper inside of the pvc as I assembled it was going to be difficult, and I was afraid I would end up with a leaky setup. The copper was more expensive, but it's a smaller profile, sturdier, and I know it's rock-solid sealed at every joint. And it's really simple to clean. I can run a rough bristle brush through it easily, And if I ever need to I can heat clean it as well.
 
Great design.
How much temp drop do you get chilling straight to the carboy?
What is the Hose Y on the cold water input side used for?
 
Great design.
How much temp drop do you get chilling straight to the carboy?
What is the Hose Y on the cold water input side used for?

If I chill straight into the carboy, I belive it ended up around 76-78F. I haven't brewed in a few months, and haven't used it in winter. Water temp with have a big impact.

The Y on the input splits the water between a short hose used to fill the kettle, and the chiller. I also use the short hose for cleaning once done.
 
That is cool, think I'll try my hand at making one. I was thinking of running the coolant water through my immersion chiller that is sitting in an ice bath, then into the Cyclone. During the Summer months in SC, tap water can run a little warm.
 
I'm going to make one of these, but right now, have no other hoses to connect to the chiller.
How do you choose/determine what type of connectors/fittings to use at the inlets and outlets? I suppose choosing the right one from the start is the best option.
I guess the cooling output can be a simple garden hose connection with the hose going to a drain. What about the other 3 connectors?
I've seen a mixture of garden hose type threads - both male and female, quick disconnects of various sorts, etc. Is there a general rule?
 
Thanks for the post and pics. Looks like a fun project for in between brew sessions and I kind of enjoy soldering copper.

I have a question about the design. You appear to have just about doubled the surface area claimed by the Jaded version by adding more runs.

I am guessing this increases water efficiency but possibly at cost of reduced maximum flow rate.

I previously ditched my DIY 3/8" OD copper in a 1/2" ID garden hose CFC due to slow flow rate through the chiller. I brew mostly hoppy beers with big late and whirlpool additions. I want a system that can handle a pound or more of loose hop pellets in 12 gallons of wort and return the wort to the kettle with enough velocity go get a whirlpool going. (pumping through the CFC with a chugger pump)

What do you think? The 3 loops of the cyclone or the 5 loops you designed?

JaDeD makes 2 versions. One has 3 loops, the other has 5.

5 looper: https://jadedbrewing.com/products/the-jaded-cfc

3 looper: https://jadedbrewing.com/products/jaded-counterflow-chiller-cfc
 
That larger model has said "Sold Out" for a long time.

I've had mine for a while now and I absolutely love it. I use a recirc/whirlpool and go from boil to 100 on my 10 gallon rig in minutes, then throttle the water back until I get down to 10 degrees of my incoming water temp or pitch temp, whichever comes first. I save a TON of water this way.

Cleaning is dirt simple, pop the hoses, run the brush through, rinse, go do something else.
 
Planning on making one of these.
How do you choose/determine what type of connectors/fittings to use at the inlets and outlets? I suppose choosing the right one from the start is the best option.
I guess the cooling output can be a simple garden hose connection with the hose going to a drain. What about the other 3 connectors?
I've seen a mixture of garden hose type threads - both male and female, quick disconnects of various sorts, etc.
I have no current hoses, pumps, etc. Just getting this started.
Is there a general rule for connections?
 
Thanks for the post and pics. Looks like a fun project for in between brew sessions and I kind of enjoy soldering copper.

I have a question about the design. You appear to have just about doubled the surface area claimed by the Jaded version by adding more runs.

I am guessing this increases water efficiency but possibly at cost of reduced maximum flow rate.

I previously ditched my DIY 3/8" OD copper in a 1/2" ID garden hose CFC due to slow flow rate through the chiller. I brew mostly hoppy beers with big late and whirlpool additions. I want a system that can handle a pound or more of loose hop pellets in 12 gallons of wort and return the wort to the kettle with enough velocity go get a whirlpool going. (pumping through the CFC with a chugger pump)

What do you think? The 3 loops of the cyclone or the 5 loops you designed?

Sorry for the late response everyone. I started a home remodeling project last summer that took on a life of it's own, and I'm still finishing it up (new flooring turned into complete renovation of the house).

Also, my wife is pregnant and due two weeks from tomorrow. So we've been a bit busy the last year.

Eric, there is more than enough flow through the chiller. I use a Little Giant 2-MD-HC, and I throttle it back. I could run it full bore, but I feel like I get better chilling slowing it down. If you wanted to run a chugger and whirlpool, I don't think you'd have a problem with flow. I went with the bigger diameter copper pipes to make sure that they didn't restrict the flow to much as I like to whirlpool too.

I think the 3 loops would probably work OK, I just wanted to maximize my cooling potential, especially if I ever want to do larger batches.

And while it was a pain in the ass to build, it wasn't too bad. Got it done basically in one day once I had all the parts on hand. You do have to get pretty creative finding ways to keep the loops separated but still angled so that liquid will drain easily.

I built one of this style so that it would mount under my brewing cart easily and be out of the way. If I didn't have a large brewing cart, I probably would have built one of the round chillers from copper tube and a rubber hose to save space. This chiller design isn't the smallest.
 
Planning on making one of these.
How do you choose/determine what type of connectors/fittings to use at the inlets and outlets? I suppose choosing the right one from the start is the best option.
I guess the cooling output can be a simple garden hose connection with the hose going to a drain. What about the other 3 connectors?
I've seen a mixture of garden hose type threads - both male and female, quick disconnects of various sorts, etc.
I have no current hoses, pumps, etc. Just getting this started.
Is there a general rule for connections?

I used garden hose connections for the water in and out connections, and then soldered half-inch NPT fittings on the wort in and out connections. The half-inch fittings give me lots of flexibility for connections. You can use simple barb fittings or camlocks. I prefer camlocks for ease of disconnecting and changing hose destinations. It just depends on how you want to plumb your chiller.
 
I just bought the hydra. I looked at this and said i could probably make it. I personally wouldnt of put the 90 on the end with the wort. I just wouldn't want solder and flux to touch where my beer will touch. I wounder how much cheaper it was to build it than just buy it?
 
I just bought the hydra. I looked at this and said i could probably make it. I personally wouldnt of put the 90 on the end with the wort. I just wouldn't want solder and flux to touch where my beer will touch. I wounder how much cheaper it was to build it than just buy it?


I think not any, if you put a value on your time!
 
I just bought the hydra. I looked at this and said i could probably make it. I personally wouldnt of put the 90 on the end with the wort. I just wouldn't want solder and flux to touch where my beer will touch. I wounder how much cheaper it was to build it than just buy it?

If i remember correctly, I've got about $120-130 in it, but that includes extra copper pipe and fittings I didn't use, new solder and flux, and 25' of silicone hose for connecting the pump, chiller, and kettle. If you use brass barb fittings (or even stainless ones) instead of camlocks, you can cut about $30 off that price.

It took me about 7-8 hours to solder it, I would guess, most of one morning and afternoon. I probably could have done it faster (if messier) or taken longer and kept it a lot cleaner looking.

As far as solder and flux touching the wort, as long as you clean it really well beforehand it won't have any effect. I soldered a 1/2" fitting into my kettle for a drain. Just boil some water and pump it through the chiller. Cleans it, tests it, and you're ready for the first brew with it.
 
My son is an apprentice plumber and gets copper pipe for free that he recycles. I've used some of this (3/4" and 1/2") for the chiller. The only thing I had to buy is the 3/4", 3/4", 1/2" Tees and silicone tubing. So, it is going to be pretty cheap for me.
If you know a plumber, ask for some old pipe and you can make this pretty cheap.
I'm going to solder some copper wire around the 1/2" pipe to get some turbulence in the cooling water flow, hoping that will help. It still fits inside the 3/4" pipe.
 
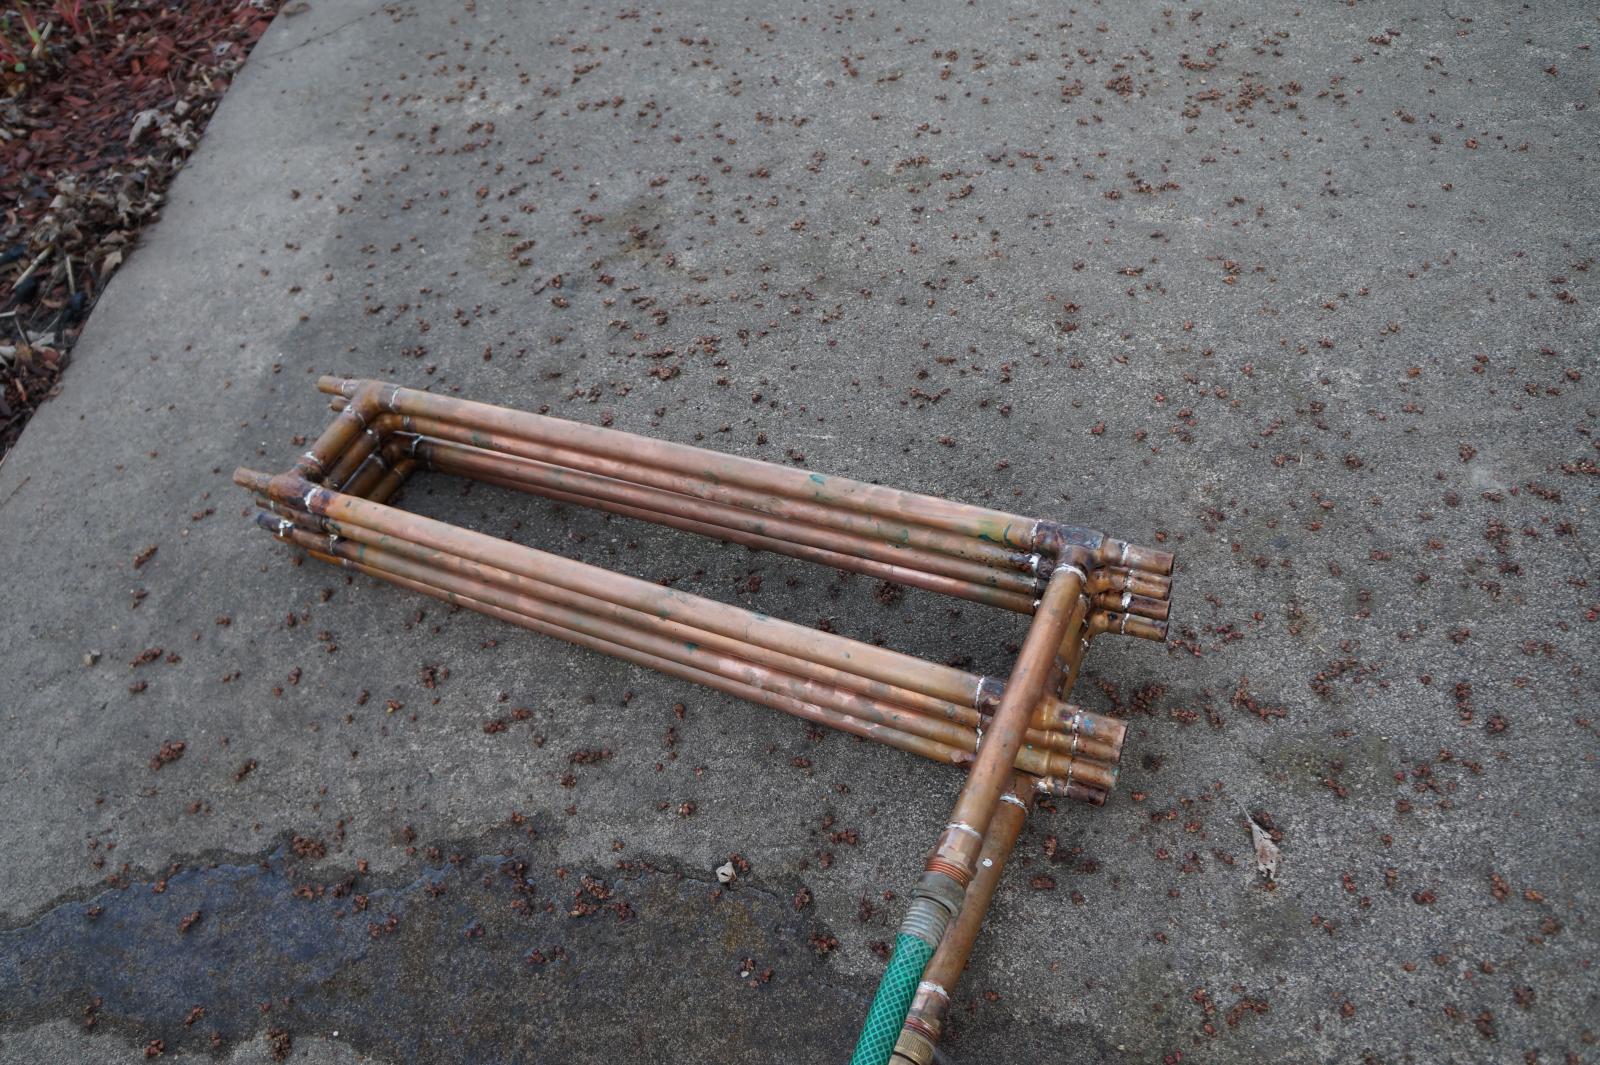
I finished the chiller yesterday and gave it a pressure test with the garden hose outside (I haven't bought the silicone tubing yet). It leaked - I discovered that I forgot to solder one of the joints on 2 reducer Tees. I corrected that and tested it today. It doesn't leak now!!! Nice. (Top picture - note, the water you see on the ground is from the cheap quick-release on the hose, which will be replaced. The chiller is not leaking now.)

I have about $35 into mine so far (I used recycled 1/2" and 3/4" pipe). I still need to buy the silicon hose and whatever fittings I want to use.

Next, I'll clean it up on the inside and outside and add it to the stack of items I'm collecting for my electric HERMS system.

I did solder some 12 gauge electric household wiring around the outside of the 1/2" pipes in a circular pattern, making the cooling water spin in around and create turbulence. I'm hoping this makes for better cooling. (bottom picture)

DSC02234.jpg


IMG_20170414_171822.jpg
 
A little CPR for this thread!
@BeardedIdiot or @rkhanso... How did either of you grind out the reducing tees? Was it just patient sanding or did you use particular bit / mandrill / stone? If so, what type / size? I can imagine some emory paper taped to a dowel and driven by electric drill might work, but how did you guys get it done?
 
Last edited by a moderator:
Just miked a piece of 1/2" ridgid copper pipe. The OD is 0.625" (5/8"). Copper is rather soft, so a 5/8" hand reamer should go through it like butter. They run about $15 US on Ebay for the cheap HSS imports, which should last a lifetime on copper.
 
Thanks guys! If I ultimately decide to give this a go I will probably try the hand reamer, if only because I have been less than impressed with my dremel work in the past.
 
There was mention of using PVC for the shroud, and that was the route I plan to go.

I plan to copy one seen in "Zymurgy" mag, I believe it was, a few years back, but I can't find it now!

To the best of my recollection, it required no soldering anywhere near the PVC, but only for any couplings / fittings you wished to have on the wort inlet and outlets.

It did require: some close tolerance holes for where the copper passes through the PVC shroud elbows, and they were epoxied in place, methinks.

All wort runs , were straight copper runs, ( as above), and easily brushed out after removing the silicone loops.
I believe you are correct. There is one on byo. Here is a similar one from the electric brewery

http://www.theelectricbrewery.com/forum/viewtopic.php?p=296442#296442&sref=tapatalk&subID=tapatalk

I dunno if going pvc is worth it. Maybe. It would be interesting to see similar builds side by side death match style
 
Back
Top