• Please visit and share your knowledge at our sister communities:
  • If you have not, please join our official Homebrewing Facebook Group!

    Homebrewing Facebook Group

DITCHES (Dual Immersion Thermal Coil Heat Exchange System)

Homebrew Talk

Help Support Homebrew Talk:

This site may earn a commission from merchant affiliate links, including eBay, Amazon, and others.

Boerderij_Kabouter

Well-Known Member
Joined
Dec 21, 2007
Messages
7,763
Reaction score
180
Location
Oconomowoc, Wisconsin
[EDIT] This thread used to be titled Brouwerij Boerderij Kabouter and was a build thread for my brewery. I have since sold the test brewery and constructed a small scale electric brewery (see the Simple brewery and 2P-Twent-E). This build is still my dream and I already have my eye on parts collection so I can have a DITCHES of my own in a couple years.

A few DITCHES have shown up and I am currently building a hardplumbed super-bling version now for another HBT member. Below is the full development of the design and several useful thoughts and posts.

Enjoy :mug:

[/EDIT]

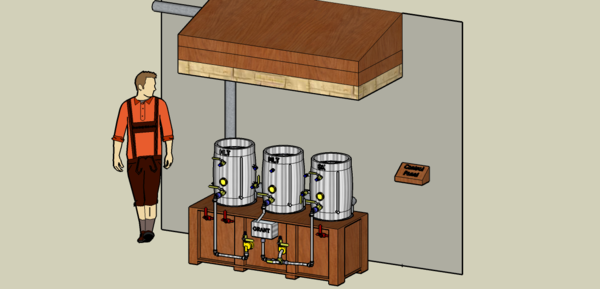
After many months of thinking drawing, rethinking and redrawing, posting, and listening,.... I think I have my "final" design for my brewery down. It is a single tier two pump system with three direct fire tuns, a HERMS, and a new cooling system (yet to be named).

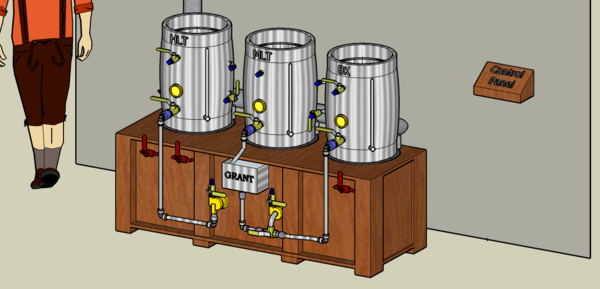
Here is the base layout:

brewery.bmp


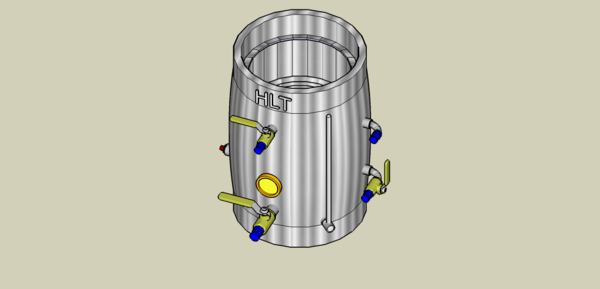
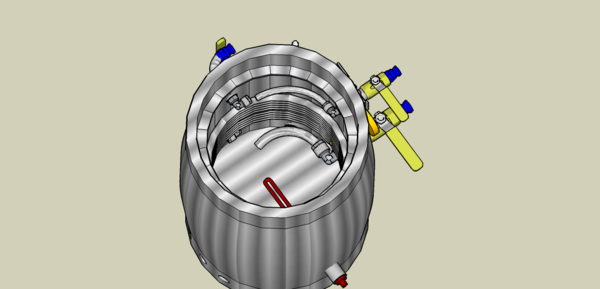
The HLT (left) includes a HERMS coil (stainless) hard mounted into the tun, a copper whirlpool return on the top and a hard mounted outlet at the bottom. The outlet leads to a 809 pump (bronze). I also plan to have an electric heating element with a temperature controller setup for maintaining the temperature within the HLT during the mash. All heating operations will be done with a propane burner.

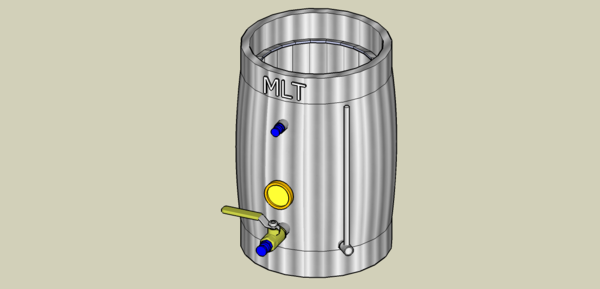
The MLT (middle) includes a stainless false bottom, with stainless pickup, and an adjustable height stainless sparge ring. Steps will be done with a propane burner. The HERMS is only for maintaining temperatures during the mash and clearing the wort.

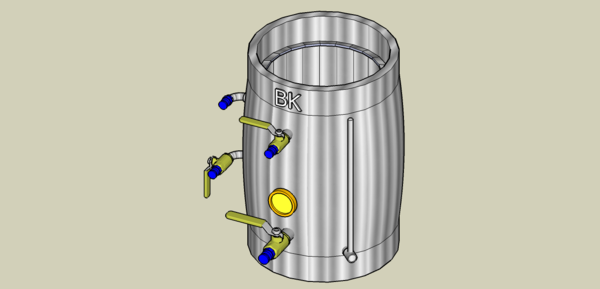
The BK (right) includes a stainless pickup and whirlpool return, and a hard-mounted stainless cooling coil.

The first pump (left) will be used to transfer water only, and the second pump (right) will be used for wort transfer only.

The three lines at the bottom of the drawing are the hoses that will be used to route the system. All connections will have stainless quick disconnects from B3.


Here is the configuration while mashing:
brewery_mash.bmp


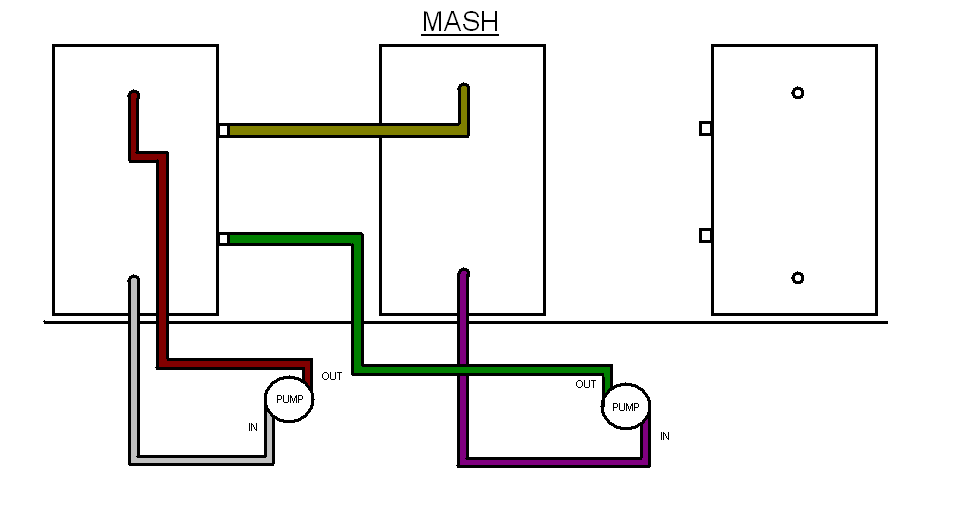
The first pump will recirculate the HLT water around the HERMS to ensure an even heat distrobution within the HLT. During the mash, the electric heater with add heat back in that is removed by the HERMS.

The second pump will recirculate wort through the HERMS. Step mashes will be done by carefully adding heat with the propane burner.

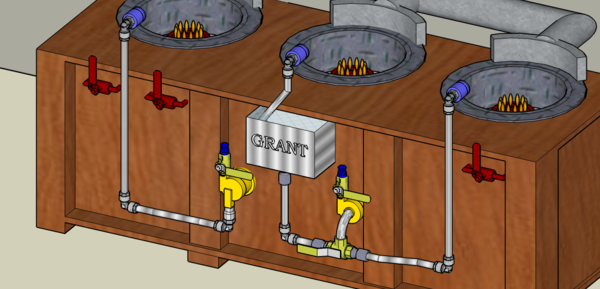
Here is the configuration while sparging:
brewery_sparge.bmp


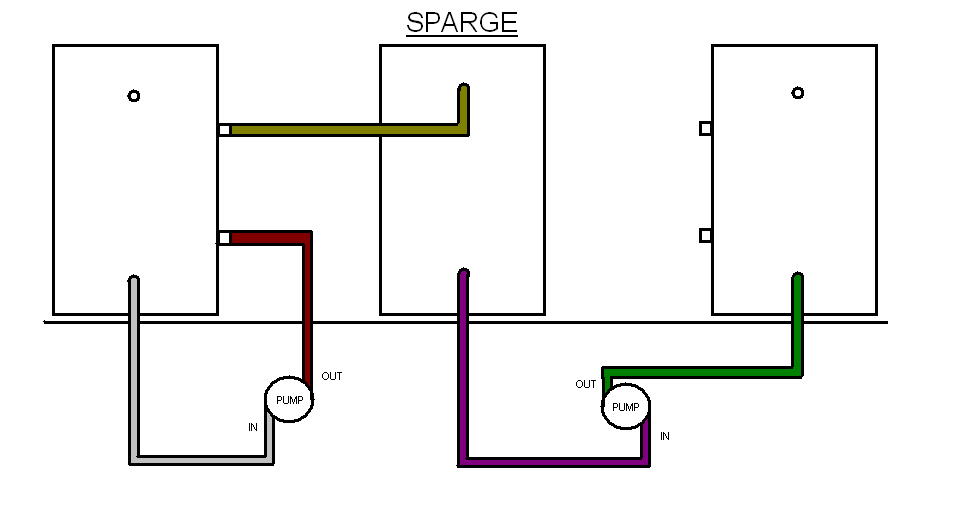
After the mash, the first pump outlet is routed through the HERMS coil and then into the sparge ring. This should push all the sweet wort remaining in the HERMS out, and into the BK. The output of the second pump will be routed to the BK.

The boil will be standard and manually operated.

Here is the configuration while cooling:
brewery_cool.bmp


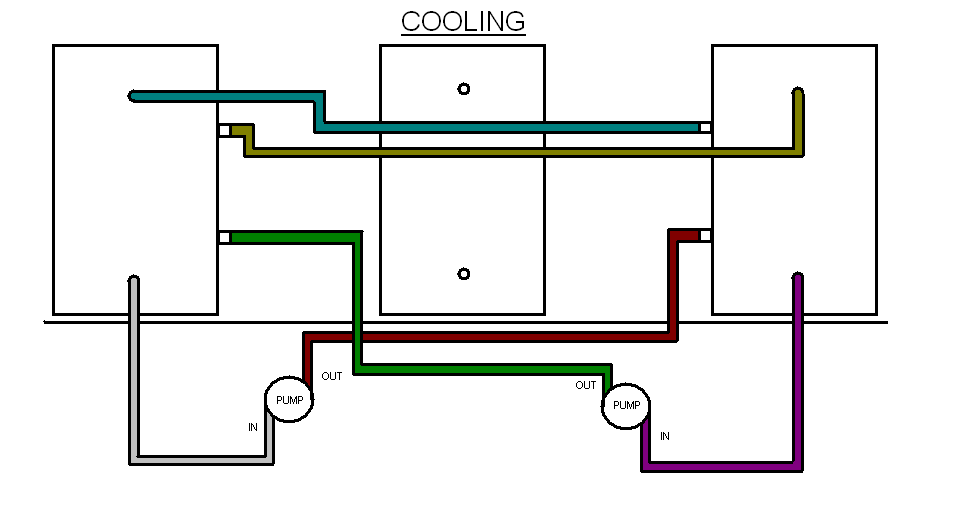
Here is where my new cooling idea comes in.... the HLT will be filled with ice water during cooling, and the first pump will recirculate the ice water through the cooling coil in the BK while the second pump recirculates wort through the HERMS submerged in ice water. Both returns are setup for whirlpools to ensure trub collection and good heat transfer. I hope this system will be able to chill my full wort volume very quickly.

I have priced this beast out, and from where I stand now I need to raise $500 to get it done. As I complete parts of the build I will post my progress here.

Let me know what you think!
 
From my perspective it looks great. I'm not knowlegable on HERMS, so I can't offer much more. Good luck and we look forward to seeing construction pics.
 
I like it but I don't see a need for the dubble cooling thingy. I think a good plate or CFC whirlpooled back in would do it just fine and less to deal with.
 
I think a good plate or CFC whirlpooled back in would do it just fine and less to deal with.

I agree, it is definitely overkill. The reason behind the design was I wanted a HERMS during the mash, so the coil goes in the HLT. I know I could just use a loose coil and move it around, but I really like the hard-mounted idea. Just rinse down after brewing, and then run HOT oxiclean through everything after to clean in place.

If I didn't have the double cooling system, I would still be recirculating the wort (see Mr. Malty for why) because I think it is the best way to cool. The extra hook-up for the double cooling will be really easy with the QD's.

Thanks for the input guys! :mug:
 
I have decided to call my heat exchange system "DRICHES" for Dual Recirculating Immersion Coil Heat Exchange System. This name is still being developed, but thats the best I have so far. If anyone comes up with another good idea, let me know:mug:

Also, I coiled the 50' of 1/2" stainless that I have. NO PROBLEM :ban: :ban: :ban:
The bend went slick using the same method everyone uses for copper. It was harder to bend than copper but did not kink at all and we got a pretty even coil in the end. I coiled it around one of my old brew pots and wound up with about a 14 inch diameter which is what I was shooting for. The coils will be on the very outside of my keggles (25' in the HLT and 25' in the BK) and the recirculation will whirlpool in the center of the coil. Jamil mentioned he thought a larGe coil diameter would be optimal, so I am taking his advise!

PSA - Stainless can be coiled by hand without too much effort! Hurray! I'll get some pics up when I can find my wife's camera.
 
I have made some adjustments to my idea. So here is V1.2:

brewery1.bmp


brewery_mash1.bmp


brewery_sparge1.bmp


brewery_cool1.bmp


I am going to hard-plumb all the outlets from the keggles and add a grant. The outlets leading to the pump inlets will all be 3/4" stainless tube and compression fittings. Keggles will be attached to the hard plumbing with stainless cam-lock disconnects, so to clean up I will just pull the keggles out of the rig. The MLT and BK are connected to the pump with a three-way ball valve.

I think this will be a better setup, but would like to here from some of you with opinions. If you use a hard-plumbed system, do you like it? Would you do it again? Any suggestions welcome.
 
I decided that I like the hard plumbed design and went ahead and designed it out. The following a screen shots from Sketchup 6. If you are interested in designing a stand, or another piece of brewing equipment, I highly suggest this program. I have uploaded all the components I used so you don't have to start from scratch (including fittings valves and everything else).

Without further ado....

Here is a perspective look of the full brewery:
Brouwerij_der_Boerderij_Kabouter_1.png


and here is a front view:
Brouwerij_der_Boerderij_Kabouter_2.png


This brewery will be housed within my "one-day-to-be" bar in my basement so it needs to be well ventilated. Here is a better view of the vent:
Brouwerij_der_Boerderij_Kabouter_7.png


The top vent will pull all the evaporation out of the basement and exhaust outside. The top vent will also catch some combustible fumes and generally keep air moving.

The brewery is a single-tier, two pump design and operates using version 1.2 above. All the lower plumbing is hard lined and connected to the stand. The hard lines are connected to the kettles with cam lock fittings, so to remove the kettles from the stand is easy.
 
Here is a view of the stand with the kettles removed:
Brouwerij_der_Boerderij_Kabouter_5.png


Here you can see the three burners. Each kettle will be direct fired for maximum flexibility in temperatures.

I took Kladue's venting design for the burners. As you can see, each kettle has a vent that draws combustibles out of the brewery. Here you can see I will cut holes in the keg skirts where fumes can escape from under the kegs.
Brouwerij_der_Boerderij_Kabouter_14.png


I think this design is great because it is clean, out of the way, and traps the heat under the kettle.

Here is a closer view of the plumbing:
Brouwerij_der_Boerderij_Kabouter_6.png


The pump on the left is a bronze March 809 and the right pump is a stainless mag drive pump. I intend to replace the March when I find matching SS pump. The SS pump on the right is a 3/4" pump, so all the hard plumbing is 3/4" as well. All the piping will be stainless and connected using swagelok fittings, so once a year I can run a brush through everything for a little spring cleaning.

I also decided I want a grant so there that is.

The red valves control the burners, and the three way ball valve at the bottom changes the supply to the second pump.

Here is a closer view of the assembled brewery, with kettles locked in place:
Brouwerij_der_Boerderij_Kabouter_4.png


The control panel will have on/off switches for the pumps, and a LOVE controller that will be connected to the HLT. Otherwise, this rig is all manual, I think I like it that way (at least for now).
 
The individual kettles are going to be highly modified Keggles. Here is the HLT:

Brouwerij_der_Boerderij_Kabouter_8.png


and the inside:
Brouwerij_der_Boerderij_Kabouter_9.png


The HLT has an electric heating element, a stainless heat exchange coil hard-mounted in, a thermometer, a sight-glass, a 1/2" return, and a 3/4" dip tube. Just now I realized I need to add in a thermowell for the LOVE probe... thats why modeling things is a good idea :drunk:

All connections will male stainless q-d's. The hoses will all have female q-d's.
 
And here is the Boil Kettle:
Brouwerij_der_Boerderij_Kabouter_12.png


and the inside:
Brouwerij_der_Boerderij_Kabouter_13.png


The boil kettle includes a stainless heat exchange coil hard-mounted in, a thermometer, a sight-glass, a 1/2" return, and a 3/4" dip tube. The coil here will be used as an immersion chiller circulating ice water from the HLT during the cooling phase. The return and dip-tube are arranged to create a whirlpool.
 
Please look this over, especially those of you who have experience building rigs. I am really trying to iron out my design before I start building.

I am already starting to collect pieces on Ebay and all over. It will take me a while... if I were to buy most of this stuff retail or from regular suppliers it would be worse for my pocket book than a suppository full of glass.
 
Very nice. I love my HERMS. If you want to take a look at the build of my HERMS feel free to check out my galery. Keep us posted.
 
oooh oooh oooh! I have a name for your system:


Bi-Immersion Thermal Coil Hyper Effective System: *******


course you could go family friendly with Dual Immersion Thermal Coil Hyper Effective System
 
oooh oooh oooh! I have a name for your system:


Bi-Immersion Thermal Coil Hyper Effective System: *******


course you could go family friendly with Dual Immersion Thermal Coil Hyper Effective System

AWESOME!!!!!!!!!

I think we have a winner:tank:


And I give you.... my *******! Now I can pimp my ******* anytime I like. ROTFLMOA:mug:
 
So I really like your ideas, the only thing that I can foresee is when you have to clean up. Wort is a bitch to clean even off the smooth inside surface of a keg. The inside of your BK looks like a sticky nightmare for you to clean. And I don't mean just wash down, there are lots of places for bacteria to hide in all those fittings and coils. I suggest trying to plumb your system so that your 175 deg sparge water follows your wort transfer to the kettle. This will at least get that residual sugar water out of your pump and hard line plumbing. I might be a little off but I hand built my entire rig , which is now a HERMS, and I'm a clean freak from batch to batch. But I think cleanliness in next to godliness and I've never had an infection or brew gone astray. Also, you mentioned that your plumbing is 3/4". I suggest a practice run with a common amount of Mash water you would use. That size line holds quite a bit of water, I wouldn't want you to run your grain bed dry. Overall I think your ready for the dream system build. Good Luck and have fun.
Cheers, Gabe
 
Hi Gabe, thanks for the review! I too am most worried about the cleaning. Here is a view of my sparge setup:
brewery_sparge1.bmp


The hoses will be routed such that the sparge water is pushed through the HLT coil and push all the wort out and simultaneously clean the inside of the coil.

My plan for cleaning is to fill the Mash Tun with oxyclean solution during the boil and heat it to ~180 dF (I've heard that is a good cleaning temp?). I will then run that hot oxy solution through the whole rig to clean everything out. After the oxyclean I think I will have to rinse with water so I don't get a film or something.

Does that sound like a good plan??? I hope that is enough, more than that would be a sizable pain (I think). Maybe I will need to install a high pressure washing station:rolleyes:
 
Well My collection of parts is going blindingly slow.... I keep brewing with my stashed cash :rolleyes:

I was burned at work today, and spend some more planning time. Here is my total parts list and a layout of all the fittings.

Purchase_Order1.bmp


Parts_List1.bmp


EDIT: You will notice a lot of 0's in the Qty. line. I went through many iterations on this list so, my final design includes some parts but not others.
 
Exactly the sort of parts list I wanted to see as I'm going Blichmann as well and have been using your setup as a model to base mine one. I've had problems visualizing what's needed for the "in between parts" and now it's clearer. Thanks!

EDIT: Actually, it's pseudo-clear. Code numbers beside the parts diagram (2nd pick) along would help, but I can figure this out. :)

EDIT2: The only other recommendation I can make is to use silicone tubing (available from B3) instead of the NB thermoplastic stuff.

Kal
 
Wow, that's dedication. I can't wait to see this vision come to fruition! SUBSCRIBED!
 
EDIT: Actually, it's pseudo-clear. Code numbers beside the parts diagram (2nd pick) along would help, but I can figure this out. :)

EDIT2: The only other recommendation I can make is to use silicone tubing (available from B3) instead of the NB thermoplastic stuff.

Kal

I am glad it helped!

1) I will probably add the part numbers today, I'll post back when I do.

2) I have considered that as well. I really like how stiff the NB tubing is and doesn't collapse or kink, but the translucency of the silicon is really nice.

I am excited to see your system. At the rate I am collecting parts, you will likely have yours done before mine! lol :tank:

If you want my excel sheet PM me with your email and I will shoot it over
 
1) I will probably add the part numbers today, I'll post back when I do.
Thanks!

2) I have considered that as well. I really like how stiff the NB tubing is and doesn't collapse or kink, but the translucency of the silicon is really nice.
Yes. Also for any sort of taint or other issues. I want to stay away from rubber and vinyl as much as possible. I actually ended up buying this Silicon tubing off of ebay:

Sani-Tech Tubing STHT-C-500-5F New in Package - eBay (item 120337468973 end time Nov-22-08 17:13:15 PST)

The walls are twice as thick as the stuff that B3 sells and it's 1/2 the price too.

I am excited to see your system. At the rate I am collecting parts, you will likely have yours done before mine! lol :tank:
I highly doubt that. :) I'm extremely slow as well.

If you want my excel sheet PM me with your email and I will shoot it over
PM sent!

Kal
 
Very nice. You just got another subscription to this thread. Now get to work! :D
 
Excel sheets sent and parts list updated above. Thanks guys! It really is a fun project, its just that all that stainless is not cheap! It is much cheaper to design than it is to build.

If any one else wants the excel files posted above, just PM me with your email and I will send them out.

This would be an easy rig to add automation to, and I intend to do so once it is up and running.... so I'll get back to you with those details in 9-10 years :cross:
 
I am in the planning stages for a HERMS setup as well! I really liked you desighn and alot of the features! I will be watching this with much anticipation as I hope to start my build aftewr the new year!

PM Sent by the way
 
Back
Top