flyangler18
Well-Known Member
What is stopping the liquid from going to the right side of the TEE where the relief valve and copper tubing is?
The needle valve. When it's closed, no liquid can make it out the bleeder tube.

What is stopping the liquid from going to the right side of the TEE where the relief valve and copper tubing is?
I was a little more patient last friday, and opened the kettle valve to let the liquid flow via gravity to the pump before turning it on. I had an instant prime...so maybe I was just overreacting in my OP. But to answer your question, the march pump and recirculating whilrpool IC setup was an awesome upgrade. I LOVE my pump (used it three times so far).
Cool. I 'll probably still add one in the future. I would also use it for recirculating through a CFC. But I've also found one pass with gravity chilled my wort down to pitching temps as well. Does the pump just allow you to do it faster?
I have many more things before worrying about a pump. Such as ingredients.Trying to break my Hobby Equipment Whoring this year. Not going to allow myself to by/build anything without at least 10G between each item.
Oh and my dip tubes often seem to have air in them (locked in from when it was empty and I filled from the top) so I'm planning on doing a cheap bottom mount drain, look for a how-to thread soon... if it works.
The needle valve. When it's closed, no liquid can make it out the bleeder tube.


Isn't this only a bleeder valve?
Is there a needle valve in the pump set-up picture that I am not seeing?
That seems like it would be harder to prime than the reverse of that. Bigger lines on the suction side just make it that much harder to prime and any restriction on the pressure side does the same.The PDF instruction sheet on the March web site recommends 3/4 inch input hose and 1/2 inch output hoses. I am thinking you can mimic this by just closing the output valve slightly but I'd like to try a 3/4 in ball valve and hose between the MLT and pump.
That seems like it would be harder to prime than the reverse of that. Bigger lines on the suction side just make it that much harder to prime and any restriction on the pressure side does the same.
If you had to start a siphon which would be easier to start...1/4" tubing or 1" tubing? Same with priming a pump imo.
It said a larger hose in the suction/inlet side. Take an extreme example; what would be easier to prime: a 1/4" ID tube or a 1 mile ID tube? See how hard it would be to get a good prime on that 1 mile ID tube? But just a little suction on the 1/4" tube would prime it easily.That's what it's saying, A larger hose going to make more pressure (weight) to push the air out.
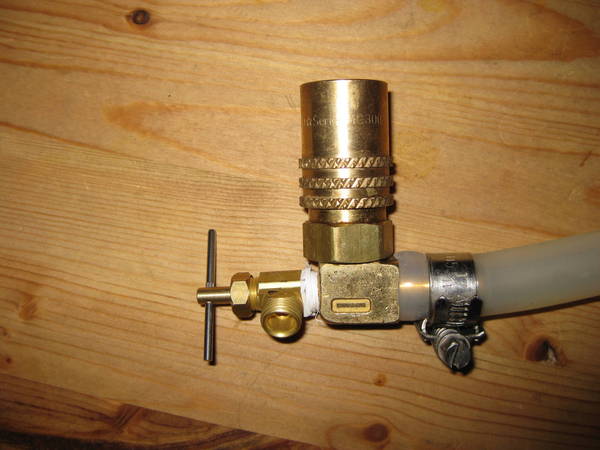
To the point of the siphon tube filling with air/steam and then flushing into the pump's inlet line.... I just ordered a brass schrader valve stem from Mcmaster and I'm going to drill into the elbow of my brass QD and solder that sucker in. A little tap on the valve should let the air escape from the line.
It said a larger hose in the suction/inlet side. Take an extreme example; what would be easier to prime: a 1/4" ID tube or a 1 mile ID tube? See how hard it would be to get a good prime on that 1 mile ID tube? But just a little suction on the 1/4" tube would prime it easily.
IMO, it's not really about getting the air out per se...but more about getting pure liquid to the suction side. Once you get pure liquid at the suction side you're golden...the pump will take care of getting the air out (as long as you give it a path).
Of course it does. There is suction on one side and pressure on the other. Since it's centrifugal it's not a lot (esp when not primed)...but it wouldn't work if it didn't have a differential pressure across the inlet/outlet. How does the liquid 'know' to move? The pressure gradient.The pump doesn't provide suction at all.
I see what you're saying FSR402. But if the kettle is above the pump then the pump should already be primed. Since people were having problems priming I assumed that wasn't the case.
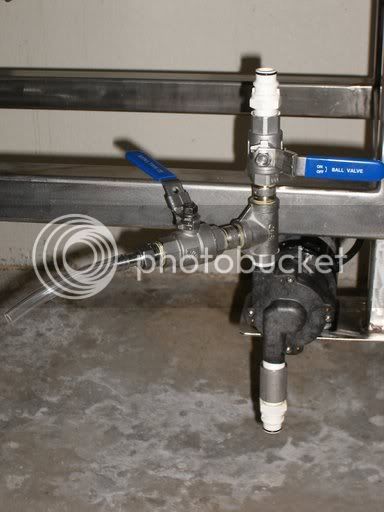
I think everyone has a plan figured out, but just in case someone else is looking for another idea, I recently added this to my pumps. Opening the side valve until liquid flows through then closing it and opening the top valve it gets everything flowing almost every time.
I know...I've been using them at work for years. Often mine won't pump liquid either...but it's not because they aren't primed. 'Not primed' isn't the same thing as 'too much head pressure' or 'impeller cavitating'...both of which will prevent the pump from moving liquid.March pumps aren't self-priming.
why wouldn't opening the the top valve do the same thing?

Here's what I came up with to vent the air bubble out of the inlet tubing. This is the QD that goes on the vessel I'm pumping from.
For now I plan to leave the valve assembly out of the stem and just loosen the cap to vent. I'll write up more after I test it out.
I was replying to FSR402.I know how a schrader valve works. I unscrewed the valve assembly and decided to leave it out for now because that air pocket isn't going to be under much pressure. I'm pretty sure the cap can handle the temps but if not, I have a metal one. During a brew session, I'll go ahead thread in the valve to see if it works but poking something in to push on the pin would get really annoying.
I actually meant to have the tube sticking up but totally beefed it when I drilled the hole. Having the elbow part disassembled from the QD screwed up my perspective and I was in a big rush.


![Craft A Brew - Safale S-04 Dry Yeast - Fermentis - English Ale Dry Yeast - For English and American Ales and Hard Apple Ciders - Ingredients for Home Brewing - Beer Making Supplies - [1 Pack]](https://m.media-amazon.com/images/I/41fVGNh6JfL._SL500_.jpg)


