CSST uses

Homebrew Talk - Beer, Wine, Mead, & Cider Brewing Discussion Forum

Help Support Homebrew Talk - Beer, Wine, Mead, & Cider Brewing Discussion Forum:

This site may earn a commission from merchant affiliate links, including eBay, Amazon, and others.

snowman_fs

Well-Known Member
Joined
May 25, 2010
Messages
80
Reaction score
18
Location
Walpole, NH
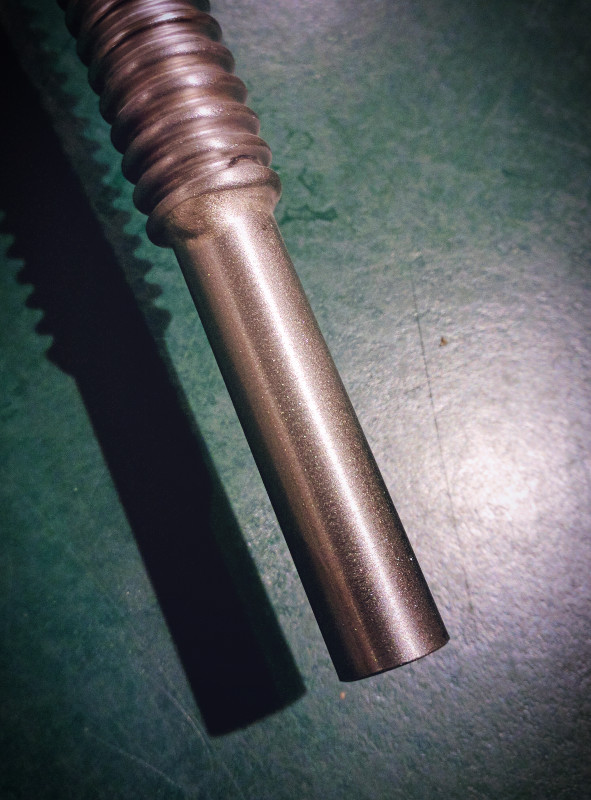
From another hobby I have discovered CSST (corrugated stainless steel tube) where I'm using it as a heat exchanger. It's typically used for gas plumbing and made from 304 SS but also used with domestic water without the PVC overmolding. Since discovering it, I have been thinking about it's applicability to brewing as an immersion element/exchanger; either as a heating coil within the mash or a chiller for wort.

I'm just fishing to see if anyone else has tried it or thought about it. The large surface area and flow turbulence created by the corrugations are benefits to heat exchange.

CSST.png
 
From another hobby I have discovered CSST (corrugated stainless steel tube) where I'm using it as a heat exchanger. It's typically used for gas plumbing and made from 304 SS but also used with domestic water without the PVC overmolding. Since discovering it, I have been thinking about it's applicability to brewing as an immersion element/exchanger; either as a heating coil within the mash or a chiller for wort.

I'm just fishing to see if anyone else has tried it or thought about it. The large surface area and flow turbulence created by the corrugations are benefits to heat exchange.

Interesting idea. Have you found a source to provide uncoated CSST at a reasonable price? I only see the yellow PVC-coated stuff, and it is quite expensive.
 
100m rolls are the only way to drop the price. EBay has 1/2"x330' near $175. Splitting 6 ways means only $30/ea for 55'. I stripped a 25' section of the PVC jacket in 5 minutes, its no different than stripping cable. My 25' with two end fittings cost about $50 at a local trade supply.

Fittings are nice but pricy. I can also hoseclamp a garden hose directly over the 1/2" csst.
 
This sure looks interesting! That material is very easy to shape and coil. Looks like it would make a great chiller, or heat coil in a mash. While the corrugation will aid with heat transfer, might make cleaning a little more difficult....not likely just a thought.
 
Perhaps fittings could easily be silver soldered?

The bulk pricing is really where it's at $0.55 per foot, or 11 bucks for a 20 foot length.

I bet 30 feet would make a helluva chiller, or 50 feet for huge batches!
 
Curious where you found 100 meters for $175. I found this gasflex for $179: http://www.ebay.com/itm/like/301106762977?lpid=82&chn=ps

But that isn't CSST. It is advertised as "flexible as CSST." It is flexible aluminum with PE liner and cover.

Unless you found something else, CSST seems too expensive at more than $1 per foot, even in bulk.
 
Time has proved bountiful. I have a 50' chunk of 1/2" 304 CSST sitting in front of me today. I'm going to strip off the over mould and wrap it around a soda keg to form a new immersion exchanger. I would like to try it both hooked up to my RIMS system as an indirect HERMS and also be able to switch to cold water to use as an immersion chiller. I can see this with BIAB, RIMS tube, and my eBK as my new favorite way to brew.
 
I just found my preferred way to connect CSST. Since I could not confirm the quality/safety of the factory fittings with the CSST for food use, I decided an easy solution was to braze in some stainless tube. Now a compression fitting will make an easy attachment.

I have sectioned off a chunk of CSST to wind into by BK as a permanent heat exchanger.

2016-02-21 20.36.30.jpg
 
I have roughly installed my CSST based heat exchanger within my 50L keggle. Not as easy as one might presume... It's snug to the walls but still has wiggle room to move up and down or even diagonal to get behind a bit. What isn't visible in this pic is my whirlpool fitting that I needed to remove to get this CSST into place or the 1" element fitting and element. The whirlpool comes into the keg at the 6'oclock position just ender the parting line of the keg while the element fitting is down low at the 10'oclock spot.

I converted the old 1/2" keggle drain port to the lower fitting for the CSST; so I installed a new 3/4" drain port directly in the bottom. I dimpled and brazed in a 3/4" union to have access to NPT threads on both the inside and outside of the keg for the drain. My plan is to use a hand tightened stub/stand pipe on the inside to bring the drain up a few inches and out of the trub level. Then when I'm cleaning I can unscrew it and drain everything flush with the bottom.

The flow I have laid out for the CSST puts it after my plate exchanger, with the working fluid side of the plate discharge port going into the top fitting of the coil, where the bottom of the coil goes to drain. On the wort side my pump can either goto the whirlpool return directly, throught the PP heat exchange and back to the whirlpool or out to a fermenter either direct or via the PP exchanger via silicone hose(s).

The neat thing about the heat excahnge loop is that I also have a steam generator ready to go for my next run. I'm going to use the CSST coil (and maybe even the plate excahnger) to run my boil as well as chilling with, (insert mandatory steam warning here). I have plugged the 1" element port in the BK for now and moved the electric element to the steam generator.

Now I even have dreams of using this "pot" as a temperature controlled MT with my false bottom and maybe a BIAB in it. Stepping temps should be no problem with some drill powered agitiation and both a plate and immersion heater powered by 250°F steam.

2016-02-26 07.16.21.jpg
 
Last edited:
I have roughly installed my CSST based heat exchanger within my 50L keggle. Not as easy as one might presume... It's snug to the walls but still has wiggle room to move up and down or even diagonal to get behind a bit. What isn't visible in this pic is my whirlpool fitting that I needed to remove to get this CSST into place or the 1" element fitting and element. The whirlpool comes into the keg at the 6'oclock position just ender the parting line of the keg while the element fitting is down low at the 10'oclock spot.

I converted the old 1/2" keggle drain port to the lower fitting for the CSST; so I installed a new 3/4" drain port directly in the bottom. I dimpled and brazed in a 3/4" union to have access to NPT threads on both the inside and outside of the keg for the drain. My plan is to use a hand tightened stub/stand pipe on the inside to bring the drain up a few inches and out of the trub level. Then when I'm cleaning I can unscrew it and drain everything flush with the bottom.

The flow I have laid out for the CSST puts it after my plate exchanger, with the working fluid side of the plate discharge port going into the top fitting of the coil, where the bottom of the coil goes to drain. On the wort side my pump can either goto the whirlpool return directly, throught the PP heat exchange and back to the whirlpool or out to a fermenter either direct or via the PP exchanger via silicone hose(s).

The neat thing about the heat excahnge loop is that I also have a steam generator ready to go for my next run. I'm going to use the CSST coil (and maybe even the plate excahnger) to run my boil as well as chilling with, (insert mandatory steam warning here). I have plugged the 1" element port in the BK for now and moved the electric element to the steam generator.

Now I even have dreams of using this "pot" as a temperature controlled MT with my false bottom and maybe a BIAB in it. Stepping temps should be no problem with some drill powered agitiation and both a plate and immersion heater powered by 250°F steam.

That looks brilliant - did you ever get around to running a brew day with the plans you mentioned? A makeshift steam jacket / chiller combo would be pretty amazing
 
That looks brilliant - did you ever get around to running a brew day with the plans you mentioned? A makeshift steam jacket / chiller combo would be pretty amazing

Yes, I have brewed with it a number of times now. Awesome is the best description. I'm still ironing out the kinks of steam; the only issue I have left is efficiency. Open loop steam takes more power than I expected and is significantly slower than my immersion element. So I have re-installed my 5500w element with the CSST coil. BIAB is really nice with the CSST around the perimeter. The bag can drain from all around and never seems to restrict my recirculation so I can still ramp temps with a RIMS tube or even the immersion element.

I'm confused - is that a hex in a HLT with wort being run through this tubing?

No wort goes through the tube; only clear water or steam. I use it as both a heating and cooling element within my single vessel HLT/MLT/BK with BIAB. I can also use it as part of a 2 vessel brewery with a 10 Gal cooler but the appeal of that has worn off on me.

I have added my plate exchanger into chilling loop prior to the CSST coil. So the discharge of the plate exchanger travels through the CSST coil as an immersion chiller before it hits my wash bucket. This allows me to chill my full boil volume to pitching temps with only 10-12 Gallons of water at full flow in 3 minutes.
 
I can't believe this stuff hasn't caught on for homebrewing. We use a 3/4'', 25' coil of it for a herms coil in our 1 BBL brewery
(3- 55 gallon stainless drums). We also just bought a 55 gallon plastic conical fermenter and put a 25' length of 1/2"
sst inside of it, and hooked it up to an existing glycol chiller. It works amazing. It's stupid easy to coil, and work with, (I did it)and the heat exchange and coolant flow through 1/2" is great. We just finished our first 40 gallon batch in the fermenter and was easily able to chill it from 68 to 36 degrees for a cold crash.
For the HERMS we used the compression nuts that are designed to be used with the CSST, and it was a PITA. But for the
fermenter we soldered it like snowman fs did. It's way better, solid method.
 
I can't believe this stuff hasn't caught on for homebrewing. We use a 3/4'', 25' coil of it for a herms coil in our 1 BBL brewery

What about cleaning/sanitation? I love the idea of a csst HERMS coil, but I worry about wort getting left in all those convolutions.

I feel like I would have to hook up the hose to it after each brew day and run it for half an hour or so, and then still be worried it wasn't clean.

Now that I think about it, if the inlet and outlet tubes for the coil were above the kettle rim (and not through-kettle like most HERMS coils), then it could do double-duty as an immersion chiller.
 
The ridges are smooth so it's no worse than a regular coil. You can also run your sparge water through it and clean it as your sparging , plus it is in the HLT so if ya think its dirty boil water and recirculate through it. We always run hot water through the whole system before mash in too, to preheat mash tun. We also collect the water from the plate chiller in the HLT and
back flush the whole system at the end. It is also pre boil, so it just has to be clean.
 
Back
Top