• Please visit and share your knowledge at our sister communities:
  • If you have not, please join our official Homebrewing Facebook Group!

    Homebrewing Facebook Group

compact peltier cooled carboy setup

Homebrew Talk

Help Support Homebrew Talk:

This site may earn a commission from merchant affiliate links, including eBay, Amazon, and others.
Some info on power usage:
After the change to three TEC1-12715 running in series on 24V, drawing 8A, the power supply delivers 192W (from current and voltage measurement) and draws 230W (from outlet power meter); that gives a power supply efficiency of 84%. The setup used 1 kWhr in 7 hours, so that should be about 3.5 kW hours or 50 cents per day.
I'm now running a single 5 gallon keg with a set point of 6 deg C and a 2 degree deadband (cooling off at 6 C, on again at 8 C); the temperature readout fluctuations felt a bit too large to run with 1 degree deadband.

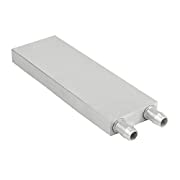
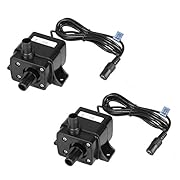
It seemed that the problem of air getting sucked into the cold loop was getting worse with the lower running temperature. The hot side does not have this problem. I assume this has to do with the plastic tubing getting less pliable as it gets colder, and sealing at the connections getting worse. I think I also lose small amounts of coolant and introduce a bit of air every time I reconnect a keg or fermenter with the quick disconnects. Therefore, instead of trying to seal all connections on the suction side of the pump, and still having to vent and refill every few quick disconnect cycles, I added a small closed reservoir inside the peltier enclosure and mounted the cold side pump in it. This vents air bubbles out of the cooling circuit every time the pump starts up (and actually continuously while it is running). It should be a while before I have to add coolant.

Some pics:

cooling enclosure with two 5 gallon kegs and a 7.5 gallon fermenter (partially visible in the front):
IMG_20200807_143242 - Copy.jpg


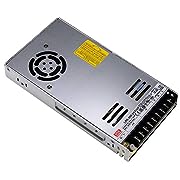
side view of peltier enclosure; 24V power supply on top, cold side coolant reservoir just below, with cold side pump inside:
IMG_20200814_183133 - Copy.jpg


top view; the plumbing inside looks a lot cleaner than before - the outside wiring could still use some cleanup....:
IMG_20200814_183206 - Copy.jpg


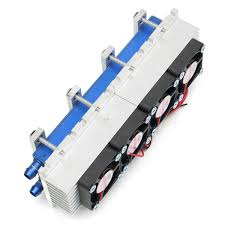
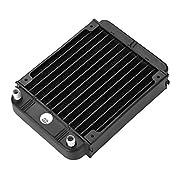
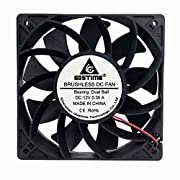
less plumbing, less wiring; the two pumps split 24V in series, and so do the three peltiers (this would not have worked with a 12V power supply); I'm monitoring one of the three 8V peltier voltages. The cold side of the peltiers uses some of the left over keg enclosure insulation (on the right). Cold (left) and hot (right) loop connections at the bottom of the picture.
IMG_20200814_182700 - Copy.jpg


close up of the cold side coolant container; the pump output line is fed through the lid directly, the discharge line into the reservoir plugs into a barbed Y-fitting (because that is what I had left...):
IMG_20200814_182557 - Copy.jpg
 
Last edited:
Just to add how nice it is to see the second 5 gallon keg cooling down from 14C to 6C in just a few hours! I hooked it up to the cooling loop at midnight, expecting to wake up to a slightly warm Weissbier (since the loop will exchange heat between the kegs), instead the cooldown was already done.
This is the keg with more copper cooling tube windings and the better insulation (which shouldn't matter so much in the new enclosure). Also, I did not have to vent the cold loop after putting the second keg inline.

I find that the cheap controllers I'm using for temperature readout have offsets as large as 2.5 C between them. Luckily they seem constant.
 
I should probably update the parts list; the main changes to the original list are the polyisocyanurate enclosure, the switch to the 15A Peltiers that I run at 8V/8A, the Meanwell 24V 350W power supply, and the 120mm by 40mm heat exchangers.

In steady state the system uses about 3.1kWhr per day. Yesterday when it was cooling down the second keg, it used 4.6kWhr.

Updated parts list:

Aideepen 5pcs TEC1-12715 DC12V Heatsink Thermoelectric Cooler Cooling Peltier Plate Module 40x40MM $28.69 (used three of them)


ARCTIC MX-4 (8 Grams) (Current Edition) - Thermal Compound Paste, Carbon Based High Performance, Heatsink Paste, Thermal Compound CPU for All Coolers, Thermal Interface Material $11.76 (used very little of it; I moved away from the thermal silicone adhesive so that the cooling stack would be repairable)


Propylene Glycol Half Gallon (64 oz.) by Pure Organic Ingredients, 100% Pure, Food & Pharmaceutical Grade, Hypoallergenic Moisturizer and Skin Cleanser $10.95 (used about 100 cm^3 of it; this just seemed the best deal)


MEAN WELL LRS-350-24 DC Power Supply, 24V 14.6A 350W for 3D Printer, LED Strip Light, Industrial Control System NES/SE/S $29.95


Quickun 5/16" Hose Barb Fitting Equal Barb Cross 4 Way Splicer Joint Mender Adapter Union Fitting (Pack of 20) $15.99 (used the two-way unions for feedthroughs, and one Y-joint for the cold reservoir return)


2x BXQINLENX Aluminum Water Cooling Block for CPU Graphics Radiator Heatsink 40x 120(White) $12.99x2


25 Feet Vinyl Tubing- Food Grade- 5/16" ID 7/16" OD 10 Ft, 25 Ft, or 50 Ft FDA Approved
Sold by: Nolk Co $13.45


AGPtek® 12 Pipe Aluminum Heat Exchanger Radiator for PC CPU CO2 Laser Water Cool System Computer $17.99


GDSTIME 120mm Case Fan, Increase Air Pressure Fan, 120mm x 25mm 12V Dc Brushless Cooling Fan Dual Ball Bearings $15.99


MOUNTAIN_ARK 2 Pack 63 GPH (240L/H) Submersible Water Pump DC 12V 3.6W 9.8ft Lift for Fish Tank Pumping, Rockery Water, Bonsai Fountain $13.99


HDVD 10 Pack DC Power Male Pigtail Connectors 2.1 x 5.5mm Copper 10 inch Length $6.50 (not all used)


HDVD 10 pack DC Power Female Pigtail Connectors 2.1 x 5.5mm Solid Copper 10 inch length $6.30 (not all used)


R-Tech DC12V 1A UL-Listed Switching Power Supply Adapter for CCTV - 5 Pack - Black $13.99 (only used one of those)


Temperature Controller Module with Case, 2PCS XH W1209 Display Digital Thermostat Module with Waterproof NTC Probe $7.99

total ~$220
I'm not listing the plastic enclosures ($11 for a whole bunch of them), wiring, zip ties, quick disconnects, and probably some other stuff.

and for the keg and fermenter enclosure:
  • 1 sheet 8' by 4' 2" thick polyisocyanurate foam, AP-foil faced on both sides, for ~$30. I used two sheets of 1" thick material because that is what was in stock. It helps to have your cut list in hand, since not all cars will fit a 8'x4' sheet, and Menards has cutting tables available in the building materials area.
  • aluminum tape ~$6
  • construction adhesive ~$10 ; I used three cartridges of Liquid Nails Fuze-It, but using a single 2" sheet one cartridge should be sufficient.
total ~$46
 
Last edited:
I tried removing the hot side radiator fan and just having the A/C blow cold air (17 C) through the radiator, but the temperature started to creep up (cold feed is at 0 degrees C, Pils is at 5 degrees C), so I put the fan back. I moved it to the other side of the radiator so it now blows through the radiator, which makes it a bit quieter. My office A/C is super quiet, so the radiator fan is actually the dominant noise source: 62 dB at 1 foot, 56 dB where I sit; background noise floor is about 50 dB.)

The next things to improve would probably be a larger radiator and a larger and quieter radiator fan; but I think I am at the point of diminishing returns, and I am happy with the setup as it is now.
 
I installed a quieter radiator fan; it's also cheaper. Only downside: the blue light. (Actually, it looks pretty cool straight through the radiator, and is otherwise mostly shielded from view.) Apparently the kids these days demand LEDs in their fans.

Cooler Master SickleFlow 120 V2 Blue Led 120mm Square Frame Fan with Air Balance Curve Blade Design, Sealed Bearing, PWM Control for Computer Case & Liquid Radiator $9.99

It provides a bit less air flow, but the coolant temperature is the same within 1 degree C. I will have to check the power usage to see whether the system runs less efficiently.
The old radiator fan was nominally 92 cfm, but actually only provided 31 cfm. ( 230 W 192W divided by 11 K radiator outlet - inlet temperature difference divided by 1.2J/K/Liter heat capacity of air gives 39 31 cfm.)
The new fan leads to a radiator outlet temperature of 33 C, so 16 K Delta T, so the air flow is 31 * 11/16 = 21 cfm. Nominally this fan is supposed to provide 62 cfm. That is the same derating factor (34%) as for the GDStime fan.

Update: energy usage with the new Coolermaster fan is 20% higher than with the old GDStime fan: 4.4 kWhr per day vs. 3.7 kWhr per day.

Update 2: A website I find useful for Peltier cooling estimates: TEC / Peltier Element Design Guide
In particular this graph tells me that with running 8A through a 12A nominal Peltier I'm not too far from the optimum for a Delta T of about 35 K:
1599085061746.png

So I am probably getting 60-70W cooling power out of my system (Qh/Qc between 2.75 and 3).
 
Last edited:
I've got a "catalyst" fermenter, it's not polycarbonate but similar, and so I can cut holes in it. I use one of these stuck in the side: IceProbe Thermoelectric Aquarium Chiller - Nova Tec The stopper in the top of the fermenter is dual hole with a thermowell, and a temp probe connects to an inkbird to turn this chiller on. Kind of a small version of one of these: BrewJacket Immersion Pro - Fermentation Temperature Control Systems which I discovered afterwards.

I agree sometimes space is important, and I don't have anywhere for a keezer either. I don't brew lagers, just ales, and just need to keep them running 5 - 10F below ambient at times, so this has been good enough for me. It's been through at least a dozen brews and seems to be working well. There's a chance the surface in contact with the beer is changing a little, so hopefully I'm not getting dain bramage from it if it is.

I love what you're doing, just throwing out some ideas in case you feel like experimenting in a different direction.
 
That's a very compact setup, tracer bullet. Sticking the cold side of the peltier directly into the liquid is certainly the most efficient way.

I like that mine is modular; I can cool the fermenter and kegs (and anything I stick into the enclosure, like wine bottles, if necessary). I think for the next brew I will remove the interior cooling loop from the fermenter, and just run it parasitically (no directly attached cooling loop) inside the enclosure that holds the cooled kegs. I keep the kegs at 6-8C, so it might actually be a little bit too cold for my next Weissbier. We'll see.

Update: The sanitizer in the fermenter was at 15 C, which is actually pretty much ideal. I want to ferment the Weissbier at 16-18C, so with a little bit of heat from the fermentation that should just work out. I was able to extract the cooper loop in one piece, and taped it to the outside, in case I need a bit more cooling oompf.
 
Last edited:
Nice!
Confess I dont quite understand if there are more than one similar project here
could you chill a 10L keg running an outside copper around the keg without gaving a cold water bank? I mean, could it be possible to install the peltier on that water block, it will refrigerate the liquid that will run through the coil around the ouside of thekeg and then return to the peltier water block to be colded againa?
 
Christian, I'm not sure I understand 100% what you are saying, but you also need to cool the hot side of the Peltier(s). So just the cold side loop from the Peltier to the keg is only half of the work. Getting rid of the heat from the Peltier is as important as cooling your beer or wort.
(The third half is preventing condensation...)
 
Gruel, yeas I undertanded that you need to cold the hot side of the peltier, but what is the efficiency of the system just with the fan/dissipatort (a expensive good and a cheap bad)?

the dissipator/fan would chill the hot side of the peltier, think about 5L or 10L,
added a child paint image made by myself of how im thinking this system. A 4 peltier with 4 fans and disspipator and a blos of water chamber. And a bar that I think its made with peltier, that you put on the fermenting beer and it will cool
also there are the minibrew system, that cools like the way im saing

sorry for my english, its a little rusted
 

Attachments

  • example.png
    example.png
    19.5 KB
  • peltier cooling.png
    peltier cooling.png
    55.5 KB
  • techspecs_400x.jpg
    techspecs_400x.jpg
    12.9 KB
  • images.png
    images.png
    60.1 KB
Hi Christian, I think calculating the actual efficiency is a bit involved, but the curves from Meerstetter in my post above tell that for example for a 30 degree (Kelvin or Celsius, not Fahrenheit) temperature difference you can get 40% efficiency if you run the Peltiers at half their maximum current. This 30K is the temperature difference between the hot and the cold side of the Peltier, not between your beer and the ambient air. You are heating the ambient air to get rid of the heat from the Peltier, so at best the hot side of your Peltier is just a little bit above the temperature of the hot air coming out of your cooling system. In other words, how much of that 30 K temperature difference is then left for actually cooling your beer depends on the thermal resistance of your hot side cooling system. Directly cooling the hot side of the Peltier with air can be very efficient if you have enough cooling fin area and create enough air flow.
Here is a link on dimensioning heatsinks: https://www.electronics-cooling.com/1995/06/how-to-select-a-heat-sink/ .

The heat capacity of air is only about 1.2 Joule per liter and Kelvin at normal pressure, so you have to heat quite a bit of air to remove a few hundred Watt.

For example, to get 100W cooling power at an assumed Peltier efficiency of 40%, you need to remove 250W.
That means you would need to heat about 20 liter of air per second (or about 40 cfm) by 10 degree (K or C). In that case you would still have 20 degree 'left' to cool your beer below ambient temperature, since you 'spent' 10 degree on the air. (This is neglecting the thermal resistance from the Peltier to the heatsink.) How much air you actually need to flow past your heatsink depends on the efficiency of the heatsink; the link above has some numbers on that.

For my system I'm using an intermediate step transporting the heat through water, because that allows a very compact heat exchanger at the Peltier and a large surface area radiator at the ambient air side. But if you can fit a large enough heat sink directly on the Peltier, then that makes for a very efficient and less complicated system.

TL;DR : use the link above to dimension your heatsink.
 
I moved my hot side radiator outside the window, since A/C is off since a few days. In principle if it's cold enough outside I could just run the pumps and leave the Peltiers off, but that would require quite a bit of rewiring. It would also make the system less flexible to deal with varying outside temperatures.

Best would actually be to bypass both Peltier liquid heat exchangers, and run a liquid loop directly from the kegs to the outside radiator. I'll keep an eye on the electricity use of the system. For the last month the average was 4.4 kWhr/day or about 60 cents per day.
Beer cooler electricity use 2020-10-03 114326.jpg
 
Update: On average the system used about 140 kWhr per month since August, or $20/month at the rate I'm paying. It ran very reliably. I had to top off the hot side once since I redid the tubing connections. I could hear the pump getting a bit noisier with a few air bubbles circulating.

I now turned the system off, since I'm not drinking enough beer for it to be worth running. Maybe I'll start brewing again in the spring or summer.
 
Back
Top