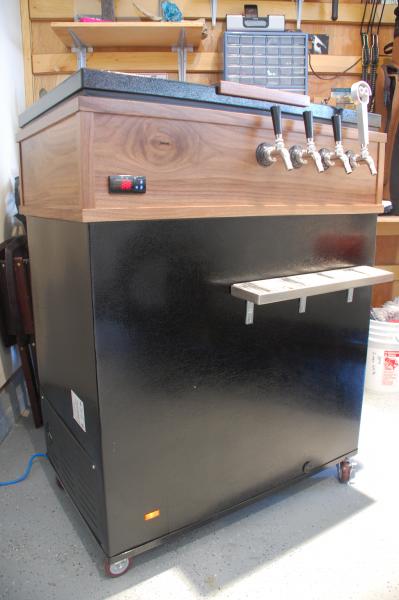
Below you will see my conversion of a chest freezer to a keezer. This project requires some inspired DIY skills that most can handle.
I converted a Frigidaire 7.2 q/ft chest freezer into a keezer. What is a keezer? Kegerater + Freezer = keezer.
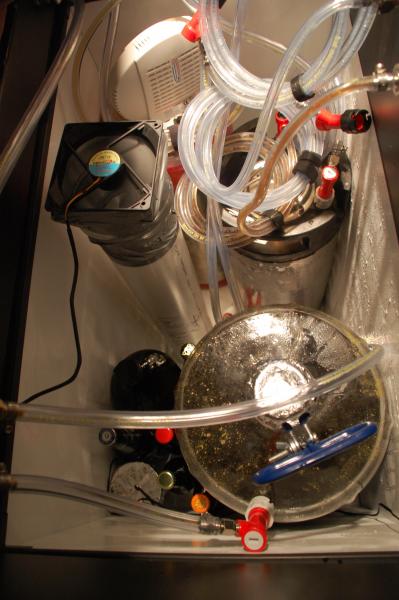
The keezer can hold four corny kegs (pin lock, 5 gallon). I fit three on the floor and one on the hump. It will not fit two on the hump, but with one keg you will have room for other things.
I went to Lowes and special ordered a black Frigidaire 7.2 q/ft chest freezer, picked it up 3 weeks later, and removed the lid. I set the lid aside for later, saving screws. Used chest freezers are an option to save money, you can even paint them black. I wanted a clean, new looking freezer to start.
During that 3-week period I waited for the chest freezer, I researched and purchased 90% of the materials from my LHBS, web, and Home Depot. I included a parts list with price and retailer.
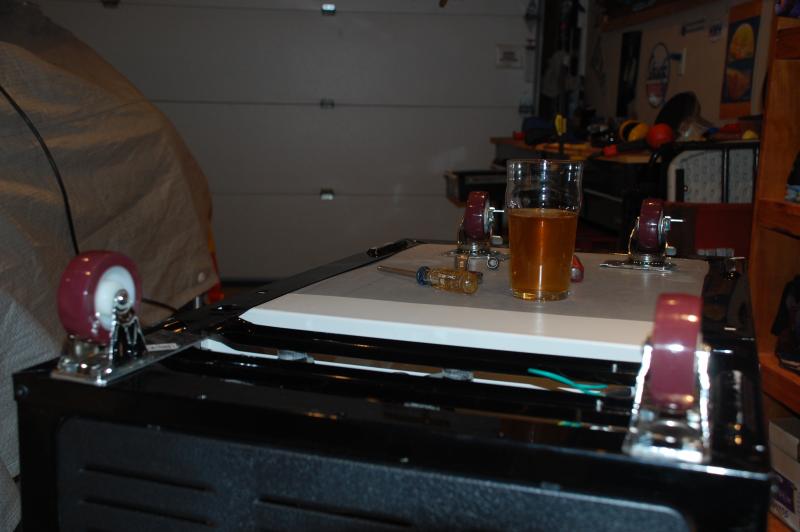
The four casters are 3 inches in size, two have a foot break. I ordered these from HarborFreights.com. To mount the casters firmly to the freezer, I needed more surface area on the bottom of the freezer, so I cut thin stainless steel pieces to place between the casters and the keezer frame. I found these pieces at Home Depot in the lumber section, called strap tight. I bought two 10-inch strips, drilled holes in them, and cut them down to length with a cheep hand grinder. I posted some pics on page 3.
Two casters were mounted with nuts and bolts, the other two were mounted with self drilling screws. The only time you should drill into the wall of the freezer is here, and it's barely drilling into into it. There are no cooling lines running less than an inch around the base of the freezer, so drilling the screws for the casters will work. Anywhere else, and you risk the possibility of rupturing one of the cooling lines. No more drilling.
The wood for the collar is walnut, from a reuse-center in Ann Arbor, Mi. I found two 10 foot pieces of walnut that were close in size. Later on a plainer was used and a sander to create a 1.2 x 8. Hard woods like walnut have killer grove patterns and a natural color worth the extra money. No stain, just three coats of a low gloss satin polyurethane. It was challenging to find other hard woods or even soft woods like Western Hem or Hem Fir at local lumber yards. I almost went with a Hem Fir. I was trying to find 2 x 8’s that I could cut down to size, but could not find the size without going with pine (way to soft). I live in southeast Michigan, and it was February.
The hardness of the walnut allowed me to go less then 1 x 8. Also, the lid of the chest freezer needs an inch to seal, so having a little extra width on the collar is a good idea. I also wanted the collar to be 8 inches high so I would have room for the keg with connections on the hump. Instead of placing the collar on the chest freezer edge, strips of walnut were cut and attached along the bottom edge to form a grove. This allowed the collar to sit on the freezer with no movement. Perfect fit allowed for no glue or nails. The weight of the walnut, and the grove keeps the collar firmly in place. I'm hoping this will not be an issue with condensation, due to warm air entering between collar and chest freezer. Time will tell.
The freezer's lid was then attached to the walnut collar. I marked with a pen in the hinge holes, drilled holes, then attached with screws. The original lid handle was removed and replaced with walnut. To do this required the lid to be taken apart by a few plastic screws which hold down a few layers of insulation. The old factory handle is fine, but I wanted to add my own touch.
Next, 7/8 in. holes were drilled for the beer faucets. A hole for the temperature controller was also made, using drill bits and wood chisels. Go slow here and sip good craft beers too. This will help to keep your mouth moist and mind focused.
The controller slides in the hole perfectly, which comes with two plastic clips to hold the controller into the collar. More about the temperate controller later.
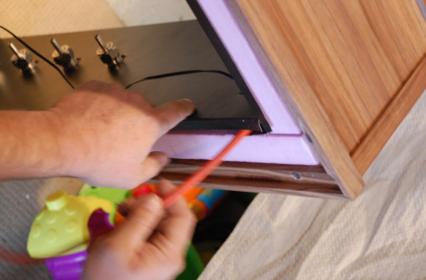
To insulate the collar, I used 1.5 inch thick pink foam board from Home Depot. I cut this down with a sharp blade into four pieces to match the sides of the collar, each nudged lightly into place, no glue needed. Instead of leaving the pink foam exposed on the inside, black aluminum sheeting was used to cover the inside and the top edge.
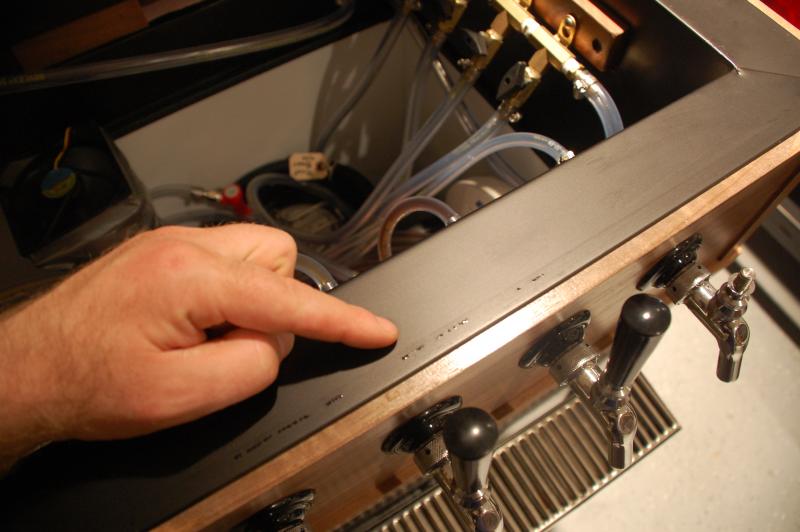
The top edge and inside collar were covered with black aluminum to hide the pink insulation and provide a flat surface for the lid to seal against. I would have used foam glue to glue down the insulation if not for the black aluminum. The aluminum was easy to drill holes in for the faucet shanks.
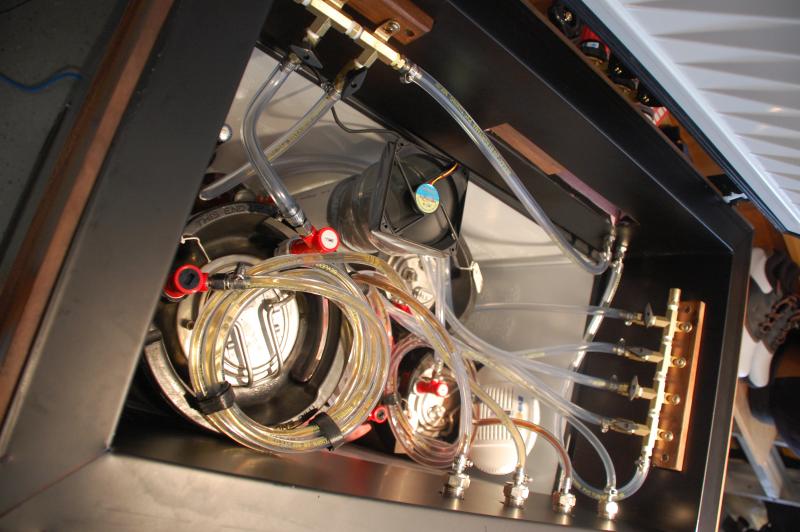
Two manifolds were installed inside the keezer. I’m using two because I like having the options with having two different CO2 pressures, for beer, sodas, or crash carbonating homebrews. I made one gas line longer so I could wheel the keezer up to my workbench and bottle beers.
I next installed the faucets and shanks...quick and easy. The Perlick 525 stainless steel faucets were each purchased as a combo deal: 1 Perlick forward sealing faucets, a 4 inch shank, nipple screw, and beer line connecter. All parts that contact beer are stainless steel. I might have gone with the 3-inch shanks, but could not find them as part of a combo deal.
Next, the temperature controller should be wired up and installed in the collar. The diagram on the controller is not so straightforward for the electrically challenged. In short, the probe goes into port 1 and 2. To get power to the run the controller, I cut up an orange power cord and wired that to the controller. A jumpers used between two ports. Diagrams are aplenty on HomeBrewTalk. Then I slid the controller into collar and secured it with clips.
The probe wire exits the controller and runs down into a glass of water, located on the hump of the keezer . I submerged the probe in water to keep the temp. fluctuations low when I have to open the keezer lid. Check to make sure the probe on your controller is water proof first.
The orange power cord also runs out the back of the controller, then under the collar and out of sight. I lifted the collar up, and pressed the orange cord into the pink foam, hiding it and allowing the collar to sit back down flush with the top of the freezer. A small hole was made at the back wall of the collar to allow the power cord to exit the keezer.
The power cord is then spliced into the freezers power. The idea is to render the freezers temp controller useless, and override it with the Love TSX temp. controller. An electrician is recommended if you don’t feel comfortable with this phase of the project.
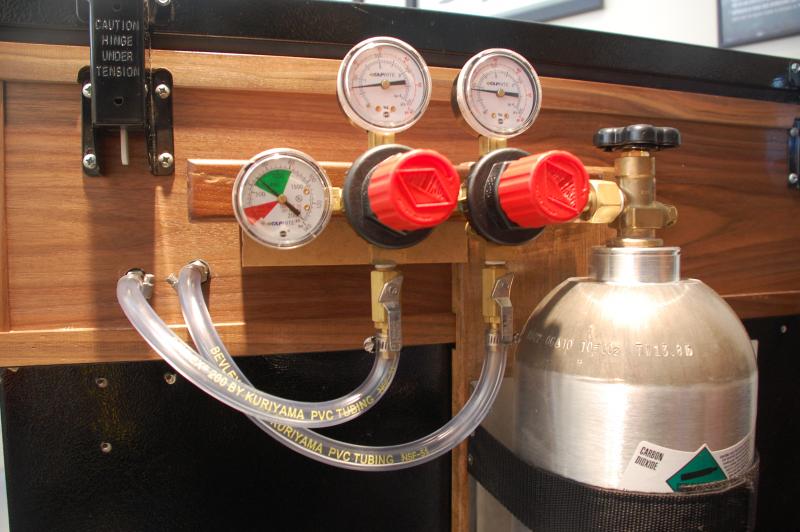
The CO2 system was installed next. I’m using a 20 lb tank, which is resting on a used stainless steel holder I picked up at my LHBS. That holder is attached to a piece of walnut that is attached to the back of the collar. I did not attach that piece of walnut to the pack of the keezer to avoid damage to the keezer’s cooling lines. When connecting your CO2, make sure you use teflon tape on all threaded connections to avoid a gas leak.
The Tap rite regulator is mounted using a piece of walnut and scrap shim. I made extra sure the regulators and tank lined up perfectly before securing them. To get the CO2 into the keezer, two holes were drilled through the walnut collar for the bulkheads. I purchased two bulkheads from my LHBS, complete with gas nipples on both ends. All gas lines are 5/16 in thick tubing I also got from my LHBS. All beverage lines are 3/16 inch.
The fan is key to keeping the keezer dry and temps cool and consistent.
To build it, I purchased a piece of 5 inch PVP tube from Home Depot. I cut it to length, then attached an aluminum piece of duct work which I found at Home Depot. This duct work is 5 inches round on one end and square on the other, which fits perfect for the square fan. I duct taped the fan to this. With the fan at the top, it sucks cool air up the tube, then blows it on the beverage lines and faucets. I cut holes at the bottom of the tube, around it's side to allow air to be drawn up the tube.
I'm running 8 feet of beer lines set at 12 PSI. Beer is cold with a proper head on every pour. Oh so nice.:rockin:
The fan is powered by splicing the fan to a 120V plug. That plug runs out of the back of the keezer down to the keezer power source. A female plug from the other end of the orange power cord is spliced into the keezers’ power, which the fan plug is plugged into. The fan is plugged into that, which runs 24/7 now. If I need to work, clean, or change kegs in the keezer, I just unplug the fans plug from the orange power cord outlet in the keezer.
Next I attached a drip tray, found one for less than 20.00. The tray is attached with tape to 3 inch aluminum shelving brackets from Home Depot. I used 3M heavy duty exterior tape. It claims to hold up to 5 lbs. It can, and it holds great. The drip trays come apart for easy cleaning. I'm working on a walnut trim to go around it, can't throw away walnut.
Best of luck as you embark on your keezer build journey.
Cheers!
I converted a Frigidaire 7.2 q/ft chest freezer into a keezer. What is a keezer? Kegerater + Freezer = keezer.
The keezer can hold four corny kegs (pin lock, 5 gallon). I fit three on the floor and one on the hump. It will not fit two on the hump, but with one keg you will have room for other things.
I went to Lowes and special ordered a black Frigidaire 7.2 q/ft chest freezer, picked it up 3 weeks later, and removed the lid. I set the lid aside for later, saving screws. Used chest freezers are an option to save money, you can even paint them black. I wanted a clean, new looking freezer to start.
During that 3-week period I waited for the chest freezer, I researched and purchased 90% of the materials from my LHBS, web, and Home Depot. I included a parts list with price and retailer.
The four casters are 3 inches in size, two have a foot break. I ordered these from HarborFreights.com. To mount the casters firmly to the freezer, I needed more surface area on the bottom of the freezer, so I cut thin stainless steel pieces to place between the casters and the keezer frame. I found these pieces at Home Depot in the lumber section, called strap tight. I bought two 10-inch strips, drilled holes in them, and cut them down to length with a cheep hand grinder. I posted some pics on page 3.
Two casters were mounted with nuts and bolts, the other two were mounted with self drilling screws. The only time you should drill into the wall of the freezer is here, and it's barely drilling into into it. There are no cooling lines running less than an inch around the base of the freezer, so drilling the screws for the casters will work. Anywhere else, and you risk the possibility of rupturing one of the cooling lines. No more drilling.
The wood for the collar is walnut, from a reuse-center in Ann Arbor, Mi. I found two 10 foot pieces of walnut that were close in size. Later on a plainer was used and a sander to create a 1.2 x 8. Hard woods like walnut have killer grove patterns and a natural color worth the extra money. No stain, just three coats of a low gloss satin polyurethane. It was challenging to find other hard woods or even soft woods like Western Hem or Hem Fir at local lumber yards. I almost went with a Hem Fir. I was trying to find 2 x 8’s that I could cut down to size, but could not find the size without going with pine (way to soft). I live in southeast Michigan, and it was February.
The hardness of the walnut allowed me to go less then 1 x 8. Also, the lid of the chest freezer needs an inch to seal, so having a little extra width on the collar is a good idea. I also wanted the collar to be 8 inches high so I would have room for the keg with connections on the hump. Instead of placing the collar on the chest freezer edge, strips of walnut were cut and attached along the bottom edge to form a grove. This allowed the collar to sit on the freezer with no movement. Perfect fit allowed for no glue or nails. The weight of the walnut, and the grove keeps the collar firmly in place. I'm hoping this will not be an issue with condensation, due to warm air entering between collar and chest freezer. Time will tell.
The freezer's lid was then attached to the walnut collar. I marked with a pen in the hinge holes, drilled holes, then attached with screws. The original lid handle was removed and replaced with walnut. To do this required the lid to be taken apart by a few plastic screws which hold down a few layers of insulation. The old factory handle is fine, but I wanted to add my own touch.
Next, 7/8 in. holes were drilled for the beer faucets. A hole for the temperature controller was also made, using drill bits and wood chisels. Go slow here and sip good craft beers too. This will help to keep your mouth moist and mind focused.

The controller slides in the hole perfectly, which comes with two plastic clips to hold the controller into the collar. More about the temperate controller later.
To insulate the collar, I used 1.5 inch thick pink foam board from Home Depot. I cut this down with a sharp blade into four pieces to match the sides of the collar, each nudged lightly into place, no glue needed. Instead of leaving the pink foam exposed on the inside, black aluminum sheeting was used to cover the inside and the top edge.
The top edge and inside collar were covered with black aluminum to hide the pink insulation and provide a flat surface for the lid to seal against. I would have used foam glue to glue down the insulation if not for the black aluminum. The aluminum was easy to drill holes in for the faucet shanks.
Two manifolds were installed inside the keezer. I’m using two because I like having the options with having two different CO2 pressures, for beer, sodas, or crash carbonating homebrews. I made one gas line longer so I could wheel the keezer up to my workbench and bottle beers.
I next installed the faucets and shanks...quick and easy. The Perlick 525 stainless steel faucets were each purchased as a combo deal: 1 Perlick forward sealing faucets, a 4 inch shank, nipple screw, and beer line connecter. All parts that contact beer are stainless steel. I might have gone with the 3-inch shanks, but could not find them as part of a combo deal.
Next, the temperature controller should be wired up and installed in the collar. The diagram on the controller is not so straightforward for the electrically challenged. In short, the probe goes into port 1 and 2. To get power to the run the controller, I cut up an orange power cord and wired that to the controller. A jumpers used between two ports. Diagrams are aplenty on HomeBrewTalk. Then I slid the controller into collar and secured it with clips.
The probe wire exits the controller and runs down into a glass of water, located on the hump of the keezer . I submerged the probe in water to keep the temp. fluctuations low when I have to open the keezer lid. Check to make sure the probe on your controller is water proof first.
The orange power cord also runs out the back of the controller, then under the collar and out of sight. I lifted the collar up, and pressed the orange cord into the pink foam, hiding it and allowing the collar to sit back down flush with the top of the freezer. A small hole was made at the back wall of the collar to allow the power cord to exit the keezer.
The power cord is then spliced into the freezers power. The idea is to render the freezers temp controller useless, and override it with the Love TSX temp. controller. An electrician is recommended if you don’t feel comfortable with this phase of the project.
The CO2 system was installed next. I’m using a 20 lb tank, which is resting on a used stainless steel holder I picked up at my LHBS. That holder is attached to a piece of walnut that is attached to the back of the collar. I did not attach that piece of walnut to the pack of the keezer to avoid damage to the keezer’s cooling lines. When connecting your CO2, make sure you use teflon tape on all threaded connections to avoid a gas leak.
The Tap rite regulator is mounted using a piece of walnut and scrap shim. I made extra sure the regulators and tank lined up perfectly before securing them. To get the CO2 into the keezer, two holes were drilled through the walnut collar for the bulkheads. I purchased two bulkheads from my LHBS, complete with gas nipples on both ends. All gas lines are 5/16 in thick tubing I also got from my LHBS. All beverage lines are 3/16 inch.
The fan is key to keeping the keezer dry and temps cool and consistent.
To build it, I purchased a piece of 5 inch PVP tube from Home Depot. I cut it to length, then attached an aluminum piece of duct work which I found at Home Depot. This duct work is 5 inches round on one end and square on the other, which fits perfect for the square fan. I duct taped the fan to this. With the fan at the top, it sucks cool air up the tube, then blows it on the beverage lines and faucets. I cut holes at the bottom of the tube, around it's side to allow air to be drawn up the tube.
I'm running 8 feet of beer lines set at 12 PSI. Beer is cold with a proper head on every pour. Oh so nice.:rockin:
The fan is powered by splicing the fan to a 120V plug. That plug runs out of the back of the keezer down to the keezer power source. A female plug from the other end of the orange power cord is spliced into the keezers’ power, which the fan plug is plugged into. The fan is plugged into that, which runs 24/7 now. If I need to work, clean, or change kegs in the keezer, I just unplug the fans plug from the orange power cord outlet in the keezer.
Next I attached a drip tray, found one for less than 20.00. The tray is attached with tape to 3 inch aluminum shelving brackets from Home Depot. I used 3M heavy duty exterior tape. It claims to hold up to 5 lbs. It can, and it holds great. The drip trays come apart for easy cleaning. I'm working on a walnut trim to go around it, can't throw away walnut.
Best of luck as you embark on your keezer build journey.
Cheers!




![Craft A Brew - Safale BE-256 Yeast - Fermentis - Belgian Ale Dry Yeast - For Belgian & Strong Ales - Ingredients for Home Brewing - Beer Making Supplies - [3 Pack]](https://m.media-amazon.com/images/I/51bcKEwQmWL._SL500_.jpg)


