• Please visit and share your knowledge at our sister communities:
  • If you have not, please join our official Homebrewing Facebook Group!

    Homebrewing Facebook Group

Cheap & Easy 10 Gallon Rubbermaid MLT Conversion

Homebrew Talk

Help Support Homebrew Talk:

This site may earn a commission from merchant affiliate links, including eBay, Amazon, and others.
I kept having problems with catching the braid with my mash paddle and tearing it up. i found one of these at the LHBS.
http://ow.ly/gEs0j

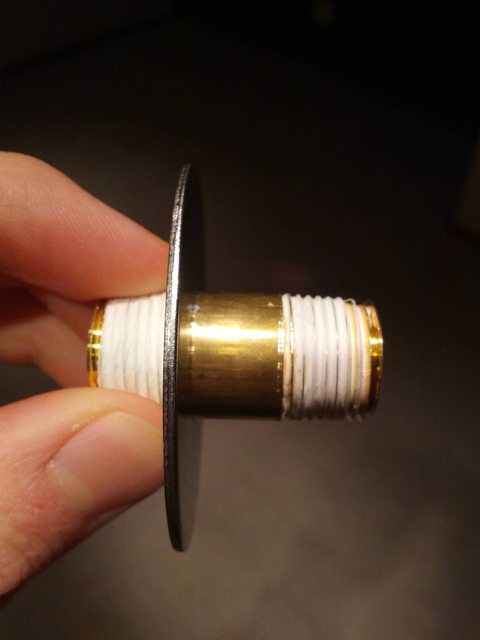
I had to use a different adapter from Watt's that I picked up Lowes to extend the opening because it was too close to screw the screen directly into the valve. It only takes about a half gallon to. Get the grain bed set.
 
I wound up doing this, first to avoid the 'flopping braid' issue, and second because I could angle the street elbows downwards to leave less deadspace. Seems to have worked well on both accounts.

20130108201025.jpg
 
Regarding the play in the valve, I torqued the crap out of the valve and inner nipple to get it to fit, and there was still a little play in it. Fortunately it doesn't leak though. When I examined the inside, I think I found why we're having that problem. The inner stainless steel (SS) washer has a larger diameter than the rubber gasket it goes up against, and as a result the SS washer compresses against the wall of the cooler - much of the torque is against the cooler wall rather than the gasket. If somebody would only make an SS washer with a 1/4" shorter outer-diameter, more of the torque would be against the gasket (and the valve on the other side). That's my theory anyway.

I recall reading a post somewhere that some guy picked up some smaller SS washers, then bored the inside to the right inner-diameter with his press.
Anyone know any stampers?
 
Another solution for those concerned about the ss braid being crushed is to use some copper wire. I took the ground wire out of some standard 14/2 house wire, coiled it up tight around a long pencil, then stretched it out to almost the length of the braid, and slid it inside the braid. Works very well, I've yet to have a stuck sparge.
 
I want to express my thanks to the original post and instructions. I built one on Monday night and just put 3-4 gallons of water in it and no leaks that I can see. So a success for the test run. I'm hoping to give all grain a try in the near future.

I got all of my part from Menards and/or True Value, mostly Menards. And the stainless steel washers I got from Fastenal. I'm in the Green Bay area. Besides the cooler, everything I used totaled just under $30. The 10g cooler came from Home Depot but I got it as a Christmas gift, yay!

But thanks again for the instructions!

What? You can homebrew in Wisconsin? I thought you were all bound by law to drink Miller products ;-) You must be like the black sheep to some, and a trailblazer to others.

(Skoll Vikings!)
 
What? You can homebrew in Wisconsin? I thought you were all bound by law to drink Miller products ;-) You must be like the black sheep to some, and a trailblazer to others.

(Skoll Vikings!)

Ha! I guess Miller lost of its market when SAB bought them, or maybe not, regardless I am a trailblazer in my own mind!

GO PACK!

life_g_gbfan_576.jpg
 
I built this a few months back and I'm now building a stand and integrating pumps. Is there an elegant way to step everything up to 1/2" instead of the 3/8" as far as the valve/barb is concerned?

EDIT: I guess this will work, but it'll cost more to shop than the cost! Will Lowes/HD have anything like this?

http://www.northernbrewer.com/shop/s-s-3-8-mpt-x-1-2-barb.html

Was just at HD today buying the setup for this and I had the same thought, they don't have the 3/8 to 1/2 barb piece, at least at my HD.
 
seedubxj said:
I built this a few months back and I'm now building a stand and integrating pumps. Is there an elegant way to step everything up to 1/2" instead of the 3/8" as far as the valve/barb is concerned?

EDIT: I guess this will work, but it'll cost more to shop than the cost! Will Lowes/HD have anything like this?

http://www.northernbrewer.com/shop/s-s-3-8-mpt-x-1-2-barb.html

Buy fittings from brewhardware.com that's what I did


image-3714996355.jpg


image-690456349.jpg
 
fergyrock said:
Was just at HD today buying the setup for this and I had the same thought, they don't have the 3/8 to 1/2 barb piece, at least at my HD.

See my reply to seedubxj
 
mattyb85 said:
Buy fittings from brewhardware.com that's what I did

That's great if I'm just building it now. But it's done and leak free. No need to start over with a whole new batch of hardware. Maybe I'll bundle it with my next NB order. In gunna check more beer next.
 
seedubxj said:
That's great if I'm just building it now. But it's done and leak free. No need to start over with a whole new batch of hardware. Maybe I'll bundle it with my next NB order. In gunna check more beer next.

Haha missed reading that part. My bad.
 
Thanks for the follow up. I'm about to do the same thing, and got worried when I saw the photo above.
 
I'm having a bit of an issue in that my 5/8" fender washers don't fit over the smooth part of my 3/8" pipe nipple, as you can see in the picture below. This is going to make it difficult to get a good seal. I'm not sure if I need a different pipe nipple (I got the Watts A-786), or different washers (which I got from Fastenal)? Any ideas?

YO1qel.jpg
 
I'm having a bit of an issue in that my 5/8" fender washers don't fit over the smooth part of my 3/8" pipe nipple, as you can see in the picture below. This is going to make it difficult to get a good seal. I'm not sure if I need a different pipe nipple (I got the Watts A-786), or different washers (which I got from Fastenal)? Any ideas?

I used all 1/2" components and my 5/8" washers REALLY didn't fit over the pipe nipple. I used my round file to enlarge the ID of the washers. Took a little bit of patience and elbow grease, but it worked just fine in the end.
 
I'm still working on mine, started the conversion. I went and bought the 3/8" parts, but when got home, realize none of them worked. Had to go back and buy 1/2" parts. I need to find some smaller fender washers too, the outside diameter of the ones I got are a little too big.
 
Did this rusting occur after the first mash? I just finished mine yesterday with the "SS" clamps (maybe mine will be Stainless all of the ay through, fingers crossed) and plan to try my first all grain brew tomorrow.

I think ill go for it and take my chances on the first and monitor the clamps after.

Either way, thank you very much for this thread and all of the useful detailed info!!


cheers!
 
I'm having a bit of an issue in that my 5/8" fender washers don't fit over the smooth part of my 3/8" pipe nipple, as you can see in the picture below. This is going to make it difficult to get a good seal. I'm not sure if I need a different pipe nipple (I got the Watts A-786), or different washers (which I got from Fastenal)? Any ideas?

YO1qel.jpg

I had the same issue. I ran a grinding stone around the inside with my Dremel and after a minute it fit snugly over and I finished mine up yesterday. I filled it with 8 gallons and after 75 minutes it lost 2 degrees and dripped underan ounce so I'm ready to put it to the test tomorrow with an IIPA.
 
Had some random folks stop over while I was mashing out and asked me what the cooler was. As I was showing them the different parts I kept thinking to myself how amazed I was that this thing hadn't broken or started leaking after 40 batches.
 
Prost to the original poster. When I decided to use Christmas money and finally move from BIAB to all grain I debated for a long time on buying a complete tun (from Northern Brewer) or building my own. In the end the desire to squeeze more equipment from my funds won that battle so I made my own using a 10 gallon Igloo.

I ended up having to use two stainless steel fenders (thankfully I have a Fastenal a mile from Lowes!) along with a rubber washer (which I had to drill out to be 5/8") Then on the outside I needed 4 more fenders to get everything secured and tight.

I did a test on Saturday - filled it with 6 gallons of tap water at its hottest (~126) and over 75 minutes it only lost 2 degrees, but it did drip about 1/2 an ounce from around the valve. However, yesterday I used it as a tun for the first time and it didn't lose a drop! I'll have to get better with it though since my efficiency was way off. Question for those who have used these for some time - how much stirring during dough-in do you do? Do you also stir before vorlauf? When you batch sparge? I'd appreciate some tips to help bump my efficiency up (I did condition the cooler with a couple gallons of almost boiling water swished around for several minutes.)

Thanks again OP! :rockin:
 
You can buy Kewler Kit conversions that supply you with a pre-build bulkhead and faucet for converting a 10 gallon Rubbermaid beverage cooler into a mash & lauter tun. But off-the-shelf components from your local hardware store work just as well, and cost far less. I got all my parts at my local Home Depot for a fraction of the cost of a Kewler conversion kit, or other commercial products.

7346-1_All_Parts_r.jpg


Parts List:

7346-2_All_Parts2_r.jpg


Here are the parts you will need for the conversion (see picture, left to right):

- Rubbermaid 10 gallon round beverage cooler
- all stainless steel ¼” hose clamps x 2
- brass square head plug (Watts A-737)
- ½” x 12” (or larger) braided stainless steel supply hose
- 3/8” female barb adapter (Watts A-298)
- 5/8” stainless steel fender washer (sometimes hard to find, but try Fastenal or read this thread if you are stuck)
- 3/8” MIP x 1-1/2” brass nipple (Watts A-786)
- seal from plastic spigot of cooler (shown below)
- Teflon tape (note: everything to the left of the tape in the picture above goes inside the cooler, and everything to the right goes outside)
- 5/8” O-ring (preferably heat resistant, if you can find one)
- 3 x 5/8” fender washers
- 3/8” threaded ball valve
- 3/8” male barb adapter (Watts A-294)

I saw that all of the Watts fittings that you list above are available in lead-free (LF) versions. Do I need to worry about that for this assembly?
 
indybrew79 said:
I saw that all of the Watts fittings that you list above are available in lead-free (LF) versions. Do I need to worry about that for this assembly?

Look up John Palmers "How To Brew" online and read the metallurgy appendix near the end. He really clears things up. Obviously Stainless is best, followed by copper->bronze->lead free brass->normal brass. Even plain brass has a very low lead percentage which can be neutralized on the surface by pickling, a process I am not familiar with. FWIW, my 5 gallon MLT has brass fittings. I'm tossing around the idea of outfitting my 10 gallon with stainless, price and convenience may win out in the favor of whatever type of brass my local store has in stock.
 
Look up John Palmers "How To Brew" online and read the metallurgy appendix near the end. He really clears things up. Obviously Stainless is best, followed by copper->bronze->lead free brass->normal brass. Even plain brass has a very low lead percentage which can be neutralized on the surface by pickling, a process I am not familiar with. FWIW, my 5 gallon MLT has brass fittings. I'm tossing around the idea of outfitting my 10 gallon with stainless, price and convenience may win out in the favor of whatever type of brass my local store has in stock.

This is exactly what I was going to say. I pickle all my brass parts when they're going to touch wort.

Palmer explains this in the section noted above, but I'll put it here, too. To pickle, mix 2 parts white vinegar and 1 part hydrogen peroxide (drug store brand is fine). Make sure the solution has enough volume to submerge your brass part. Place your brass part in the solution for a few minutes, until the surface of your part looks "buttery". If the solution starts to turn a greenish bluish color, you've pickled too long and new surface lead has been uncovered. Dump out the solution and start over.

I hope this is clear enough. If not, you can always just get the LF parts. ;)
 
barrooze said:
This is exactly what I was going to say. I pickle all my brass parts when they're going to touch wort.

Palmer explains this in the section noted above, but I'll put it here, too. Too pickle, mix 2 parts white vinegar and 1 part hydrogen peroxide (drug store brand is fine). Make sure the solution has enough volume to submerge your brass part. Place your brass part in the solution for a few minutes, until the surface of your part looks "buttery". If the solution starts to turn a greenish bluish color, you've pickled too long and new surface lead has been uncovered. Dump out the solution and start over.

I hope this is clear enough. If not, you can always just get the LF parts. ;)

That sounds incredibly familiar now. Almost like I've read it before... I knew it was an acidic solution. Vinegar maxes sense. Completely forgot about H2O2.
 
Has anyone used Pex Tubing when building a mash turn? I would think since it is used for plumbing it would be good but I don't see it mentioned.
 
kepo said:
Has anyone used Pex Tubing when building a mash turn? I would think since it is used for plumbing it would be good but I don't see it mentioned.

What part of the MLT would you be using it for?
 
Has anybody been able to assemble a current online "best prices" parts list?

I've been slowly pricing out a low-end AG setup with coolers, but comparing the price of the 10gl Igloo alone ($72 at Lowes! - which is the only hardware store nearby, or a cheaper Rubbermaid, which I'm not too sure about) vs a pre-built kit from other sites, it seems like the savings isn't really significant anymore... but please correct me if I'm wrong, preferably with links :p
 
Back
Top