okay, i'm already a believer... I happened to be at target with the wife and picked up on for the BK and one for the MLT. I guess I will have to start using whole hops or use a hop bag but this is a great product that will be put to good use. Thanks for the idea.
You are using an out of date browser. It may not display this or other websites correctly.
You should upgrade or use an alternative browser.
You should upgrade or use an alternative browser.
Budget false bottom.
- Thread starter onelegout
- Start date

Help Support Homebrew Talk:
This site may earn a commission from merchant affiliate
links, including eBay, Amazon, and others.
So I was thinking of doing something like this:

However, I don't think I will need the O-rings if I am just getting it to clamp onto the ss mesh.
However, I cannot find those thin locknuts at home depot. I am in the tri valley and all I have is the depot and lowes (trash), OSH (double trash) and ace (expensive but has crazy parts.)
My idea was to have some rigid copper from the keg wall go to a 90* that will extend down and put a bit of pressure on the ss mesh to keep it against the base of the keg. I would just solder the brass to the copper for the connections on the interior.
Anyone know of an easier/cheaper way to accomplish this?
You don't need your dip tube to be liquid-tight fastened to the false bottom.
Just cut a hole large enough for you to slide your dip tube through.
You don't need your dip tube to be liquid-tight fastened to the false bottom.
Just cut a hole large enough for you to slide your dip tube through.
Orly?
I was thinking though that I would need to have a little bit of positive pressure on the mesh so that it stays in place while I be stirring?
Orly?
I was thinking though that I would need to have a little bit of positive pressure on the mesh so that it stays in place while I be stirring?
Well, yeah, you don't want it floating around, but there are ways to do it without attaching the false bottom to the diptube,
What does your diptube look like?
Well, yeah, you don't want it floating around, but there are ways to do it without attaching the false bottom to the diptube,
What does your diptube look like?
Just going to make the diptube out of the rigid copper. Nothing special.
Currently confused on how to get a ball valve attached to the keg side. I can only find tapered threads at the store, and nothing where I can get a tight compression against a keg wall (I would augment with a gasket of course.) How do I get the ball valve connected at the side, without having to buy a kit online?
Just going to make the diptube out of the rigid copper. Nothing special.
Then you can cut a 1/2" hole in the center of the thing. Cut your dip-tube a little short. Solder this onto it.
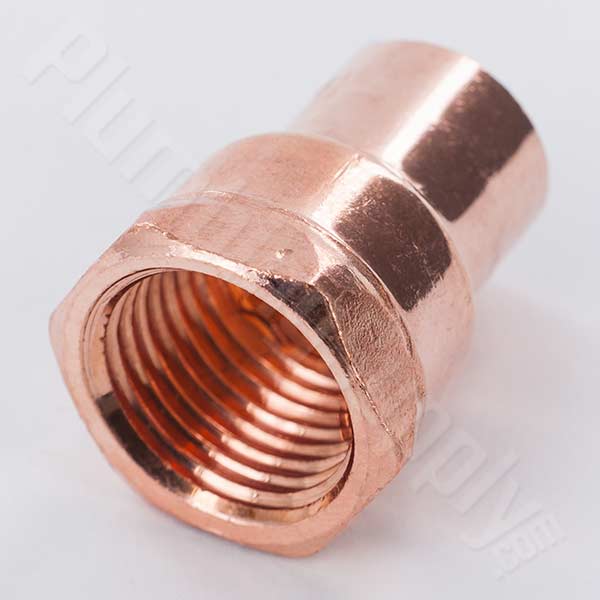
On the under-side of the thing, screw this into it:
It won't screw in far enough to make a tight grip on the false bottom, but if your dip-tube is the proper length, then the female threaded part will be pressing down on the false bottom and the false bottom will be pressing down on the bottom of the keg.
If you need more length under the false bottom, solder a short piece of 1/2" pipe into the male fitting to lengthen the under-side of the dip-tube.
Currently confused on how to get a ball valve attached to the keg side. I can only find tapered threads at the store, and nothing where I can get a tight compression against a keg wall (I would augment with a gasket of course.) How do I get the ball valve connected at the side, without having to buy a kit online?
I've never tried to DIY a bulk-head, so I'm no help there.
edit: it might honestly end up costing you the same as an online kit if you DIY. A stainless bulkhead kit is only like $12. A 1/2" brass coupling at Lowe's is like $5 or $6, so.....


![Craft A Brew - Safale S-04 Dry Yeast - Fermentis - English Ale Dry Yeast - For English and American Ales and Hard Apple Ciders - Ingredients for Home Brewing - Beer Making Supplies - [1 Pack]](https://m.media-amazon.com/images/I/41fVGNh6JfL._SL500_.jpg)


$20.94
$29.99
The Brew Your Own Big Book of Clone Recipes: Featuring 300 Homebrew Recipes from Your Favorite Breweries
Amazon.com

$28.98
Five Star - 6022b_ - Star San - 32 Ounce - High Foaming Sanitizer
Great Fermentations of Indiana

$176.97
1pc Commercial Keg Manifold 2" Tri Clamp,Ball Lock Tapping Head,Pressure Gauge/Adjustable PRV for Kegging,Fermentation Control
hanhanbaihuoxiaoshoudian


$22.00 ($623.23 / Ounce)
AMZLMPKNTW Ball Lock Sample Faucet 30cm Reinforced Silicone Hose Secondary Fermentation Homebrew Kegging joyful
无为中南商贸有限公司


$10.99 ($31.16 / Ounce)
Hornindal Kveik Yeast for Homebrewing - Mead, Cider, Wine, Beer - 10g Packet - Saccharomyces Cerevisiae - Sold by Shadowhive.com
Shadowhive

$7.79 ($7.79 / Count)
Craft A Brew - LalBrew Voss™ - Kveik Ale Yeast - For Craft Lagers - Ingredients for Home Brewing - Beer Making Supplies - (1 Pack)
Craft a Brew


$58.16
HUIZHUGS Brewing Equipment Keg Ball Lock Faucet 30cm Reinforced Silicone Hose Secondary Fermentation Homebrew Kegging Brewing Equipment
xiangshuizhenzhanglingfengshop


$39.22 ($39.22 / Count)
Brewer's Best Home Brew Beer Ingredient Kit - 5 Gallon (Mexican Cerveza)
Amazon.com


$82.50
Wilbur Curtis Brew Cone Assembly with Splash Pocket, High Volume - Commercial-Grade Brew Basket - WC-3422 (Each)
Global Commercial Parts


$53.24
1pc Hose Barb/MFL 1.5" Tri Clamp to Ball Lock Post Liquid Gas Homebrew Kegging Fermentation Parts Brewer Hardware SUS304(Gas Hose Barb)
Guangshui Weilu You Trading Co., Ltd


$53.24
1pc Hose Barb/MFL 1.5" Tri Clamp to Ball Lock Post Liquid Gas Homebrew Kegging Fermentation Parts Brewer Hardware SUS304(Gas MFL)
yunchengshiyanhuqucuichendianzishangwuyouxiangongsi


Hmmmm.... I think BobbyM might have had a thread with a DIY bulkhead made out of copper that was super cheap, now that I think about it.
outstanding pics. i think i'll be modifying my false bottom based on what i see here
... I think BobbyM might have had a thread with a DIY bulkhead made out of copper that was super cheap..
Thanks! Found it! I thought of doing something like this but I thought you could only solder SS to SS. I don't have acid flux and am trying to keep prices low. Would a quick muriatic dip work for the SS? I know it will for copper.
Quoting it across for others who read this:
Ok, a few bucks, YMMV depending on what tools you have already.
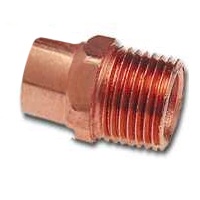
$1 Nibco 604 Copper male adapter 1/2" NPT to 1/2" pipe (5/8" OD actual).
$2.38 for two pack. Hillman 3/4" stainless washers, item 21840 at Lowes
Short piece of 5/8" soft copper tubing but you can do it with a piece of rigid 1/2" pipe with a 90 degree elbow if you have to.
I already had the oring but a #314 is what you'd want to get.
The washer needs to be slightly filed open to get it all the way over the threads. After that, clean up the parts, apply an acid flux and silver solder the washer to the adapter.
The oring then goes on, through the kettle wall, then teflon tape, then the ball valve. If you can't get it tight, add the other washer between the kettle and valve.

I don't have acid flux and am trying to keep prices low. Would a quick muriatic dip work for the SS? I know it will for copper.
If you are asking me: I have no f*cking idea.

If you are asking me: I have no f*cking idea.
Haha, okay.
I was looking around online at what will passivate (get it into your bed and accept your solder) stainless steel.
I found that really lots of acids do the trick. I had heard of lemon juice being used as an emergency flux, and sure enough, it can be. However I would think that rubbing lemons on ss wouldn't work because it is so finicky. Fortunately I have some citric acid hanging around. Ill try cleaning up the SS with the citric acid as its less hazardous than the muriatic acid (being hydrochloric acid.) The muriatic acid also likes to keep eating away at SS so you need to really wash it well after you use it. Most fluxes for SS are phosphoric acid, but the only supply of phosphoric acid I currently have is naval jelly, which is on hand.
I don't want to spend 10 dollars on what will be a single use item, so if I can just get the washers, copper, and ball valve and get that soldered together I will be golden! I will test it out tomorrow and report back with results!
Well, catastrophic failure . I couldn't find our 3/4" drill bit so I had to grind it down by hand and the washer was only 1 inch diameter to begin with. There wasn't much left after getting it to fit the darn copper fitting. Depot didn't have anything else to work with. At this point going out and buying more supplies is pointless, as I could just buy a premade bulkhead as walker said. Ps: Walker, where was that $12 fitting you spoke about? I could only find brass ones at homebrewheaven
Side note, the citric acid really cleaned up the copper, the difference was instantly visible. It went from the standard coppery color that it has, to that pink color of very clean copper nearly instantly.
. I couldn't find our 3/4" drill bit so I had to grind it down by hand and the washer was only 1 inch diameter to begin with. There wasn't much left after getting it to fit the darn copper fitting. Depot didn't have anything else to work with. At this point going out and buying more supplies is pointless, as I could just buy a premade bulkhead as walker said. Ps: Walker, where was that $12 fitting you spoke about? I could only find brass ones at homebrewheavenSide note, the citric acid really cleaned up the copper, the difference was instantly visible. It went from the standard coppery color that it has, to that pink color of very clean copper nearly instantly.
Walker, where was that $12 fitting you spoke about?
Take your pick:
weldless fittings . com
or
bargain fittings . com
$12 at either place and $5 shipping, so if you have other stuff to get, might want to build up more of a shopping cart than just the bulkhead.
Any update on if this works with the correct fittings. I need to convert a keggle to a MT, and looking for a cost effective solution.
It will work. 1/2" npt threads. Unbelievably standard stuff. Just happens to be a non standard part. It will work. I just need to get a bit more moolah before I get going again. Way too many projects at once.
Double-R
Well-Known Member
Bump....Update... Final word... Anyone
Bump....Update... Final word... Anyone
too many projects at once. Its sitting unfinished.
How did this false bottom work out for you?
My DIY aluminum pizza pan with wire mesh took one to many beatings from my mash paddle and is damaged beyond repair. (It did last for many years though). So I bought one of these splatter screens today and plan on adapting it tomorrow.
For anyone that is curiousm it's about 13 3/8" diameter.
My DIY aluminum pizza pan with wire mesh took one to many beatings from my mash paddle and is damaged beyond repair. (It did last for many years though). So I bought one of these splatter screens today and plan on adapting it tomorrow.
For anyone that is curiousm it's about 13 3/8" diameter.
Similar threads
- Replies
- 1
- Views
- 3K
- Replies
- 15
- Views
- 3K
- Replies
- 1
- Views
- 1K
