thats what i figured, there isnt really a photo i can find that shows you a head on view of outlet, but my assumption was exactly that, its a small pipe inside the chiller but it expands out to nearly 1/2" at the end where you put on your connector. seems like a good spot for air to get locked up.The 1/2 inch T is welded onto the outer steel pipe sort of flush so I'd say outer same diameter as the external of a 1/2 inch T.
But I'm about 11700 miles from coolossus to confirm.
You are using an out of date browser. It may not display this or other websites correctly.
You should upgrade or use an alternative browser.
You should upgrade or use an alternative browser.
Brewzilla Gen4 Discussion/Tips Talk
- Thread starter stealthfixr
- Start date

Help Support Homebrew Talk:
This site may earn a commission from merchant affiliate
links, including eBay, Amazon, and others.
Hey rtstrider are you using Grainfather for your recipes? I was using .665 dead space and .3235 for mash thickness. I want to try to dial it in better and I upped both to 0.713265 and 0.375. Is that about what you're using now?Thanks for the heads up! I went ahead and adjusted the recipe to have 2.7 more liters in the mash instead of 2 gallons. Hoping this helps!
rtstrider
Well-Known Member
- Joined
- Dec 12, 2016
- Messages
- 1,310
- Reaction score
- 847
Hey rtstrider are you using Grainfather for your recipes? I was using .665 dead space and .3235 for mash thickness. I want to try to dial it in better and I upped both to 0.713265 and 0.375. Is that about what you're using now?
I'm using brewers friend. Using 1.8 qts per lb for the water. My crush is .035 and it still feels too fine. I was able to get some pre-crushed grain from a local brewery. Their crush looks pretty coarse compared to mine. Either way I'm going to use the bag the next few batches and see if that helps.
agentbud
Well-Known Member
Do you plan to put the bag inside or outside the malt pipe? The one time I used a bag in the Brewzilla, I put the bag outside the malt pipe (ie - put the bag in first, then put the malt pipe inside the bag). Not sure which way would be better. In hindsight, putting the bag inside the malt pipe might be the better way as that would allow everything to be raised up together to drain. The other way, I had to lift the malt pipe high enough to get the bag out from under it. 2nd brew I did not use a bag and had no problems but I had crushed much larger and lost efficiency. I plan to crush about .035 next time and wonder if I might add the bag back just in case. Curious to hear from others that have used a bag...I'm using brewers friend. Using 1.8 qts per lb for the water. My crush is .035 and it still feels too fine. I was able to get some pre-crushed grain from a local brewery. Their crush looks pretty coarse compared to mine. Either way I'm going to use the bag the next few batches and see if that helps.
rtstrider
Well-Known Member
- Joined
- Dec 12, 2016
- Messages
- 1,310
- Reaction score
- 847
The bag is too small to fit outside the malt pipe so going to put it inside and see what happens.Do you plan to put the bag inside or outside the malt pipe? The one time I used a bag in the Brewzilla, I put the bag outside the malt pipe (ie - put the bag in first, then put the malt pipe inside the bag). Not sure which way would be better. In hindsight, putting the bag inside the malt pipe might be the better way as that would allow everything to be raised up together to drain. The other way, I had to lift the malt pipe high enough to get the bag out from under it. 2nd brew I did not use a bag and had no problems but I had crushed much larger and lost efficiency. I plan to crush about .035 next time and wonder if I might add the bag back just in case. Curious to hear from others that have used a bag...
theredviper
Well-Known Member
- Joined
- Jul 1, 2020
- Messages
- 52
- Reaction score
- 23
I also had issues on my first brew but not since. I set my grind to 0.375 and it seems ok for efficiency and the mash itself flowing well.@rtstrider :
I had the same issue as you on my first brew. But on the next brew, I made some changes and it re-circulated with no issues. On that second round, I increased the strike water to about 1.6 qts/lb + enough to cover the deadspace. I set the valve to about 1/2 open and added about 1/2 to 3/4 lb rice hulls. I also increased my grind from .025 to .05 which caused a big loss in efficiency so next time I am going with .038


![Craft A Brew - Safale S-04 Dry Yeast - Fermentis - English Ale Dry Yeast - For English and American Ales and Hard Apple Ciders - Ingredients for Home Brewing - Beer Making Supplies - [1 Pack]](https://m.media-amazon.com/images/I/41fVGNh6JfL._SL500_.jpg)
$6.95 ($17.38 / Ounce)
$7.47 ($18.68 / Ounce)
Craft A Brew - Safale S-04 Dry Yeast - Fermentis - English Ale Dry Yeast - For English and American Ales and Hard Apple Ciders - Ingredients for Home Brewing - Beer Making Supplies - [1 Pack]
Hobby Homebrew


$176.97
1pc Commercial Keg Manifold 2" Tri Clamp,Ball Lock Tapping Head,Pressure Gauge/Adjustable PRV for Kegging,Fermentation Control
hanhanbaihuoxiaoshoudian


$33.99 ($17.00 / Count)
$41.99 ($21.00 / Count)
2 Pack 1 Gallon Large Fermentation Jars with 3 Airlocks and 2 SCREW Lids(100% Airtight Heavy Duty Lid w Silicone) - Wide Mouth Glass Jars w Scale Mark - Pickle Jars for Sauerkraut, Sourdough Starter
Qianfenie Direct


$479.00
$559.00
EdgeStar KC1000SS Craft Brew Kegerator for 1/6 Barrel and Cornelius Kegs
Amazon.com


$49.95 ($0.08 / Fl Oz)
$52.99 ($0.08 / Fl Oz)
Brewer's Best - 1073 - Home Brew Beer Ingredient Kit (5 gallon), (Blueberry Honey Ale) Golden
Amazon.com


$53.24
1pc Hose Barb/MFL 1.5" Tri Clamp to Ball Lock Post Liquid Gas Homebrew Kegging Fermentation Parts Brewer Hardware SUS304(Liquid Hose Barb)
yunchengshiyanhuqucuichendianzishangwuyouxiangongsi


$22.00 ($623.23 / Ounce)
AMZLMPKNTW Ball Lock Sample Faucet 30cm Reinforced Silicone Hose Secondary Fermentation Homebrew Kegging joyful
无为中南商贸有限公司


$44.99
$49.95
Craft A Brew - Mead Making Kit – Reusable Make Your Own Mead Kit – Yields 1 Gallon of Mead
Craft a Brew

$76.92 ($2,179.04 / Ounce)
Brewing accessories 1.5" Tri Clamp to Ball Lock Post Liquid Gas Homebrew Kegging Fermentation Parts Brewer Hardware SUS304 Brewing accessories(Gas Hose Barb)
chuhanhandianzishangwu


$58.16
HUIZHUGS Brewing Equipment Keg Ball Lock Faucet 30cm Reinforced Silicone Hose Secondary Fermentation Homebrew Kegging Brewing Equipment
xiangshuizhenzhanglingfengshop


$7.79 ($7.79 / Count)
Craft A Brew - LalBrew Voss™ - Kveik Ale Yeast - For Craft Lagers - Ingredients for Home Brewing - Beer Making Supplies - (1 Pack)
Craft a Brew

$719.00
$799.00
EdgeStar KC2000TWIN Full Size Dual Tap Kegerator & Draft Beer Dispenser - Black
Amazon.com


$20.94
$29.99
The Brew Your Own Big Book of Clone Recipes: Featuring 300 Homebrew Recipes from Your Favorite Breweries
Amazon.com


$53.24
1pc Hose Barb/MFL 1.5" Tri Clamp to Ball Lock Post Liquid Gas Homebrew Kegging Fermentation Parts Brewer Hardware SUS304(Gas MFL)
Guangshui Weilu You Trading Co., Ltd


I am a long-time BZ 3.1 user that moved to the Gen 4 65L as soon as it was available, and I am four batches in to learning & dialing in the new system. Here is what I have learned to date—please feel free to add to this as other best practices are developed and proved in.
My Gen 4 Tips & Best Practices So Far
My Gen 4 Tips & Best Practices So Far
- PID: use it (have to turn it on in the controller Settings), and use it with the Kegland and/or David Heath recommended settings for your batch size (see their YouTube videos and take screen shots)
- BZ Temp Readings: mine arrived reading 5.7F low vs. actual, which made my first batch in it finish fermentation at way too high of a FG! I got a simple and not expensive reference thermometer, plunked it into the middle of the malt pipe full of water (just above the bottom malt pipe plate) and calibrated it (in the controller) at 150F and 200F. The BZ Gen4 now stays within 0.5F of the reference thermometer, and my FGs are hitting Brewfather predicted values.
- Power: I use 100% power when heating up water and bringing the wort to a boil. When mashing, to include steps, I turn it down to about 40-50% power, which decreases the temp overshoot severity but does not eliminate them. A nice option when boiling is to *not* use 100%, and I find that ~65-70% power (5.5gal batch) results in a nice but not violent boil.
- Mashing Temperature Targets: do not go straight to the temp needed, but ‘walk’ up to it. For example, when mashing out at 168F, I usually put in about 166F and correct it later when close. Otherwise, it may overshoot by 2+ degrees before returning down, sometimes by a lot.
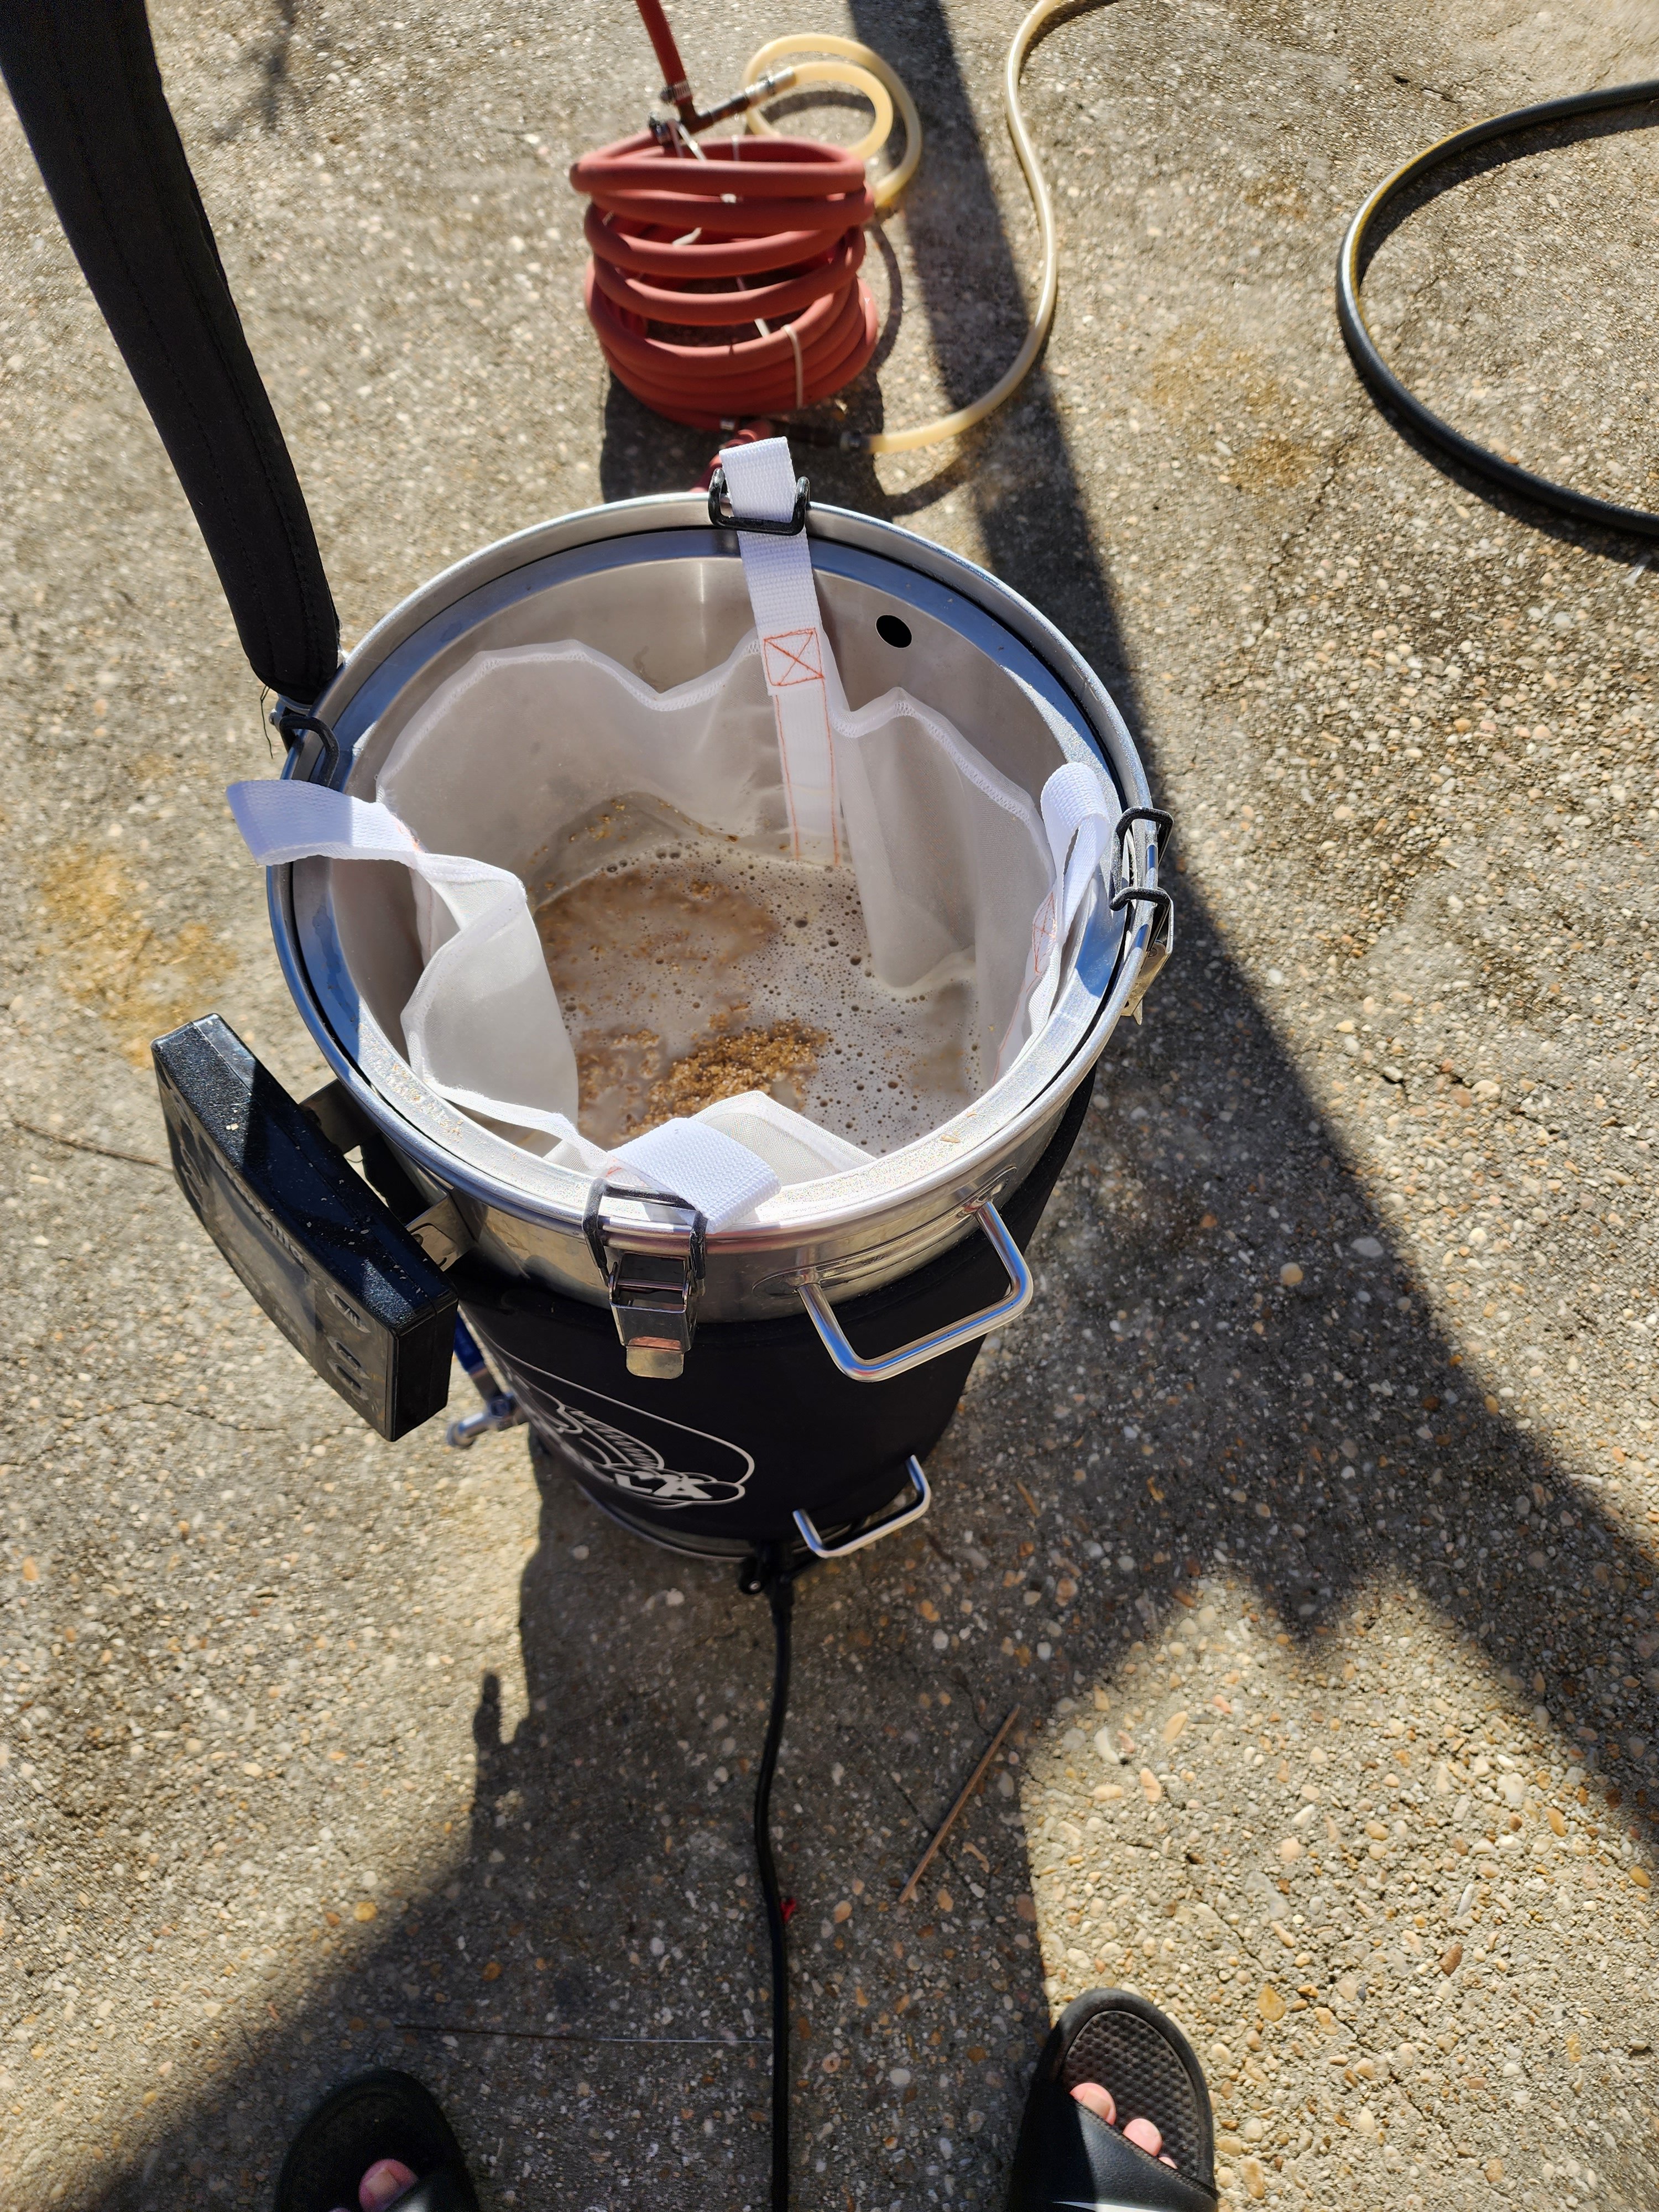
- Pump Clogging: never had a clogged pump in my 3.1 BZ, but clogged multiple times every batch with the Gen 4 UNTIL getting a BIAB bag…The Brew Bag-Designed for Brew In A Bag-This is your LAST brew bag! now has a BZ Gen 4 65L specific version for either the kettle (what I use) or to use within the mash pipe. Using this bag also made the boil and what goes into the fermentor much cleaner than before—highly recommended!
- Recirculation when Mashing: the pump’s power will exceed the strength of your grain bed. Turn up the recirc too high and you can turn your mash into a useless pile of goo…ask me how I know. Start as low as possible and gradually step it up to where you want it. However…(see next recommendation)
- Temperature stability seems highest when there is a low-ish amount of recirc, but worst with high or no recirc. I am sure the Heat Exchanger Dish will help this, but it is not out yet in the US—I am anxiously awaiting it.
- Also, you can change the pump %, but that does not change the strength the pump flows at, but rather the percentage of time it is on/off. Sorta useful, maybe.
- Grain Crush: I am using a three-roller mill (Grain Mill with 11 lb Hopper and 3 Rollers) and crushing the grains twice at the widest setting (0.065?). Any finer of a crush results in a crazy amount of grain escaping both filter plates due to the previously mentioned pump strength.
- Efficiency: in my 3.1 BZ, I usually got about 78%, sometimes higher. My first batch in the Gen 4 was 74%, and I am now hitting 76-77% with repeatability. Glucabuster used very sparingly in the mash seems to enhance efficiency by about 1-3%.
Thanks for your comments. Yes the BZ Gen 4 is a large learning curve for me from a grainfather.I am a long-time BZ 3.1 user that moved to the Gen 4 65L as soon as it was available, and I am four batches in to learning & dialing in the new system. Here is what I have learned to date—please feel free to add to this as other best practices are developed and proved in.
My Gen 4 Tips & Best Practices So Far
Gen4 came with a higher learning curve than Gen3 did, but also offers the greatest flexibility and customization. Using the Brew Bag last batch, and for the first time ever, I was able to clean the Gen4 while it sat on it’s SSBrewtech BrewCube (i.e. didn’t have to move it and no dumping needed), which was a lovely improvement. All in all, it’s a keeper, but I am hoping sharing best practices lowers everyone else’s learning curves. YMMV.
- PID: use it (have to turn it on in the controller Settings), and use it with the Kegland and/or David Heath recommended settings for your batch size (see their YouTube videos and take screen shots)
- BZ Temp Readings: mine arrived reading 5.7F low vs. actual, which made my first batch in it finish fermentation at way too high of a FG! I got a simple and not expensive reference thermometer, plunked it into the middle of the malt pipe full of water (just above the bottom malt pipe plate) and calibrated it (in the controller) at 150F and 200F. The BZ Gen4 now stays within 0.5F of the reference thermometer, and my FGs are hitting Brewfather predicted values.
- Power: I use 100% power when heating up water and bringing the wort to a boil. When mashing, to include steps, I turn it down to about 40-50% power, which decreases the temp overshoot severity but does not eliminate them. A nice option when boiling is to *not* use 100%, and I find that ~65-70% power (5.5gal batch) results in a nice but not violent boil.
- Mashing Temperature Targets: do not go straight to the temp needed, but ‘walk’ up to it. For example, when mashing out at 168F, I usually put in about 166F and correct it later when close. Otherwise, it may overshoot by 2+ degrees before returning down, sometimes by a lot.
- Pump Clogging: never had a clogged pump in my 3.1 BZ, but clogged multiple times every batch with the Gen 4 UNTIL getting a BIAB bag…The Brew Bag-Designed for Brew In A Bag-This is your LAST brew bag! now has a BZ Gen 4 65L specific version for either the kettle (what I use) or to use within the mash pipe. Using this bag also made the boil and what goes into the fermentor much cleaner than before—highly recommended!
- Recirculation when Mashing: the pump’s power will exceed the strength of your grain bed. Turn up the recirc too high and you can turn your mash into a useless pile of goo…ask me how I know. Start as low as possible and gradually step it up to where you want it. However…(see next recommendation)
- Temperature stability seems highest when there is a low-ish amount of recirc, but worst with high or no recirc. I am sure the Heat Exchanger Dish will help this, but it is not out yet in the US—I am anxiously awaiting it.
- Also, you can change the pump %, but that does not change the strength the pump flows at, but rather the percentage of time it is on/off. Sorta useful, maybe.
- Grain Crush: I am using a three-roller mill (Grain Mill with 11 lb Hopper and 3 Rollers) and crushing the grains twice at the widest setting (0.065?). Any finer of a crush results in a crazy amount of grain escaping both filter plates due to the previously mentioned pump strength.
- Efficiency: in my 3.1 BZ, I usually got about 78%, sometimes higher. My first batch in the Gen 4 was 74%, and I am now hitting 76-77% with repeatability. Glucabuster used very sparingly in the mash seems to enhance efficiency by about 1-3%.
Can I add from experience of only my second brew. I've set my grain mill at 1.5mm and only stir top 1/3 when adding my grain. I control the mash circulation flow so that the level is stable. Level not going up or down. Wow, result was a very clean Wort and an original SG of 1.068 using 6 kg of grain. Fermenter volume 22.5 L
Temp measurement and control aside I'm very impressed with my upgrade to the BZ. I have purchased a portable BBQ Temp probe to check the top of the mash Wort and I fiddle the temp control to get my mash temp. With the experience of a few more brews I will sort my own temp control system I think.
theredviper
Well-Known Member
- Joined
- Jul 1, 2020
- Messages
- 52
- Reaction score
- 23
Any recommendations for a thermometer for calibration, and/or future bluetooth use with the Gen4? Is theirs the only one that is supported?
Referring to this: RAPT - Bluetooth Thermometer -20 to 300C - 20cm HTC Probe
Referring to this: RAPT - Bluetooth Thermometer -20 to 300C - 20cm HTC Probe
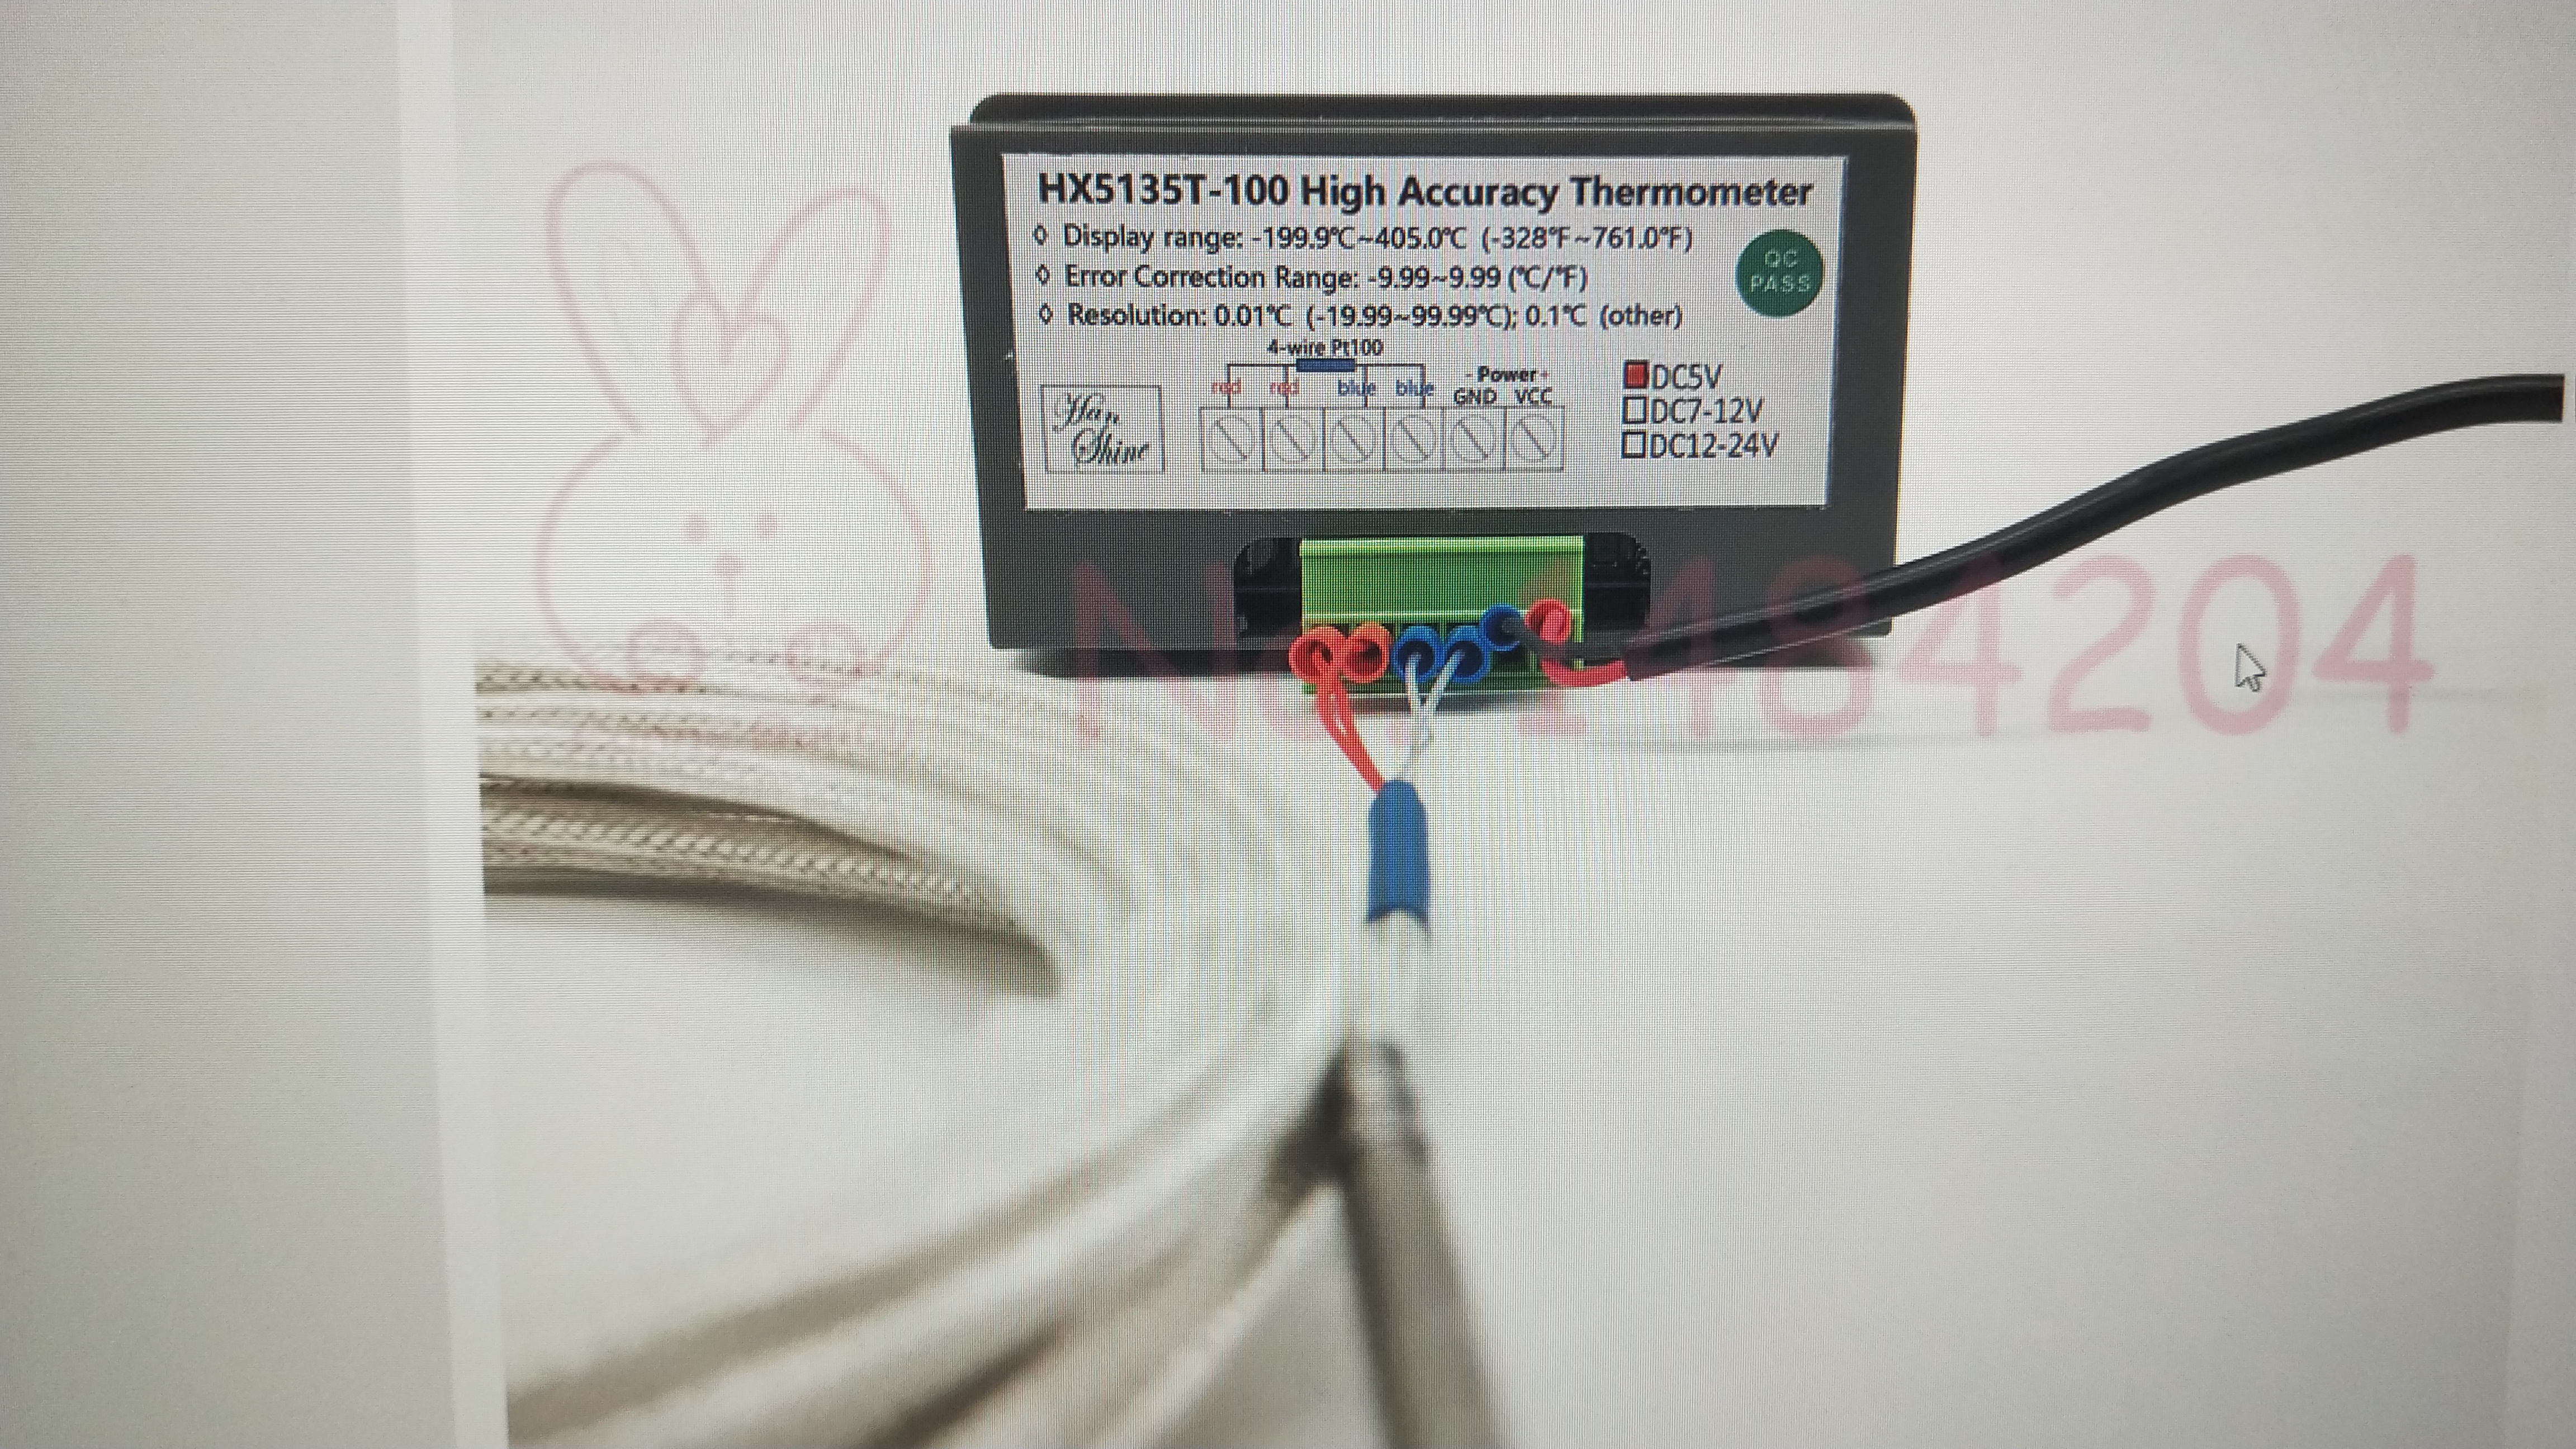
I use a Pt 100 probe connected to a digital display reading to 1/100 of Deg C. It claims to have an accuracy of 0.1 Deg CAny recommendations for a thermometer for calibration, and/or future bluetooth use with the Gen4? Is theirs the only one that is supported?
Referring to this: RAPT - Bluetooth Thermometer -20 to 300C - 20cm HTC Probe
Attachments
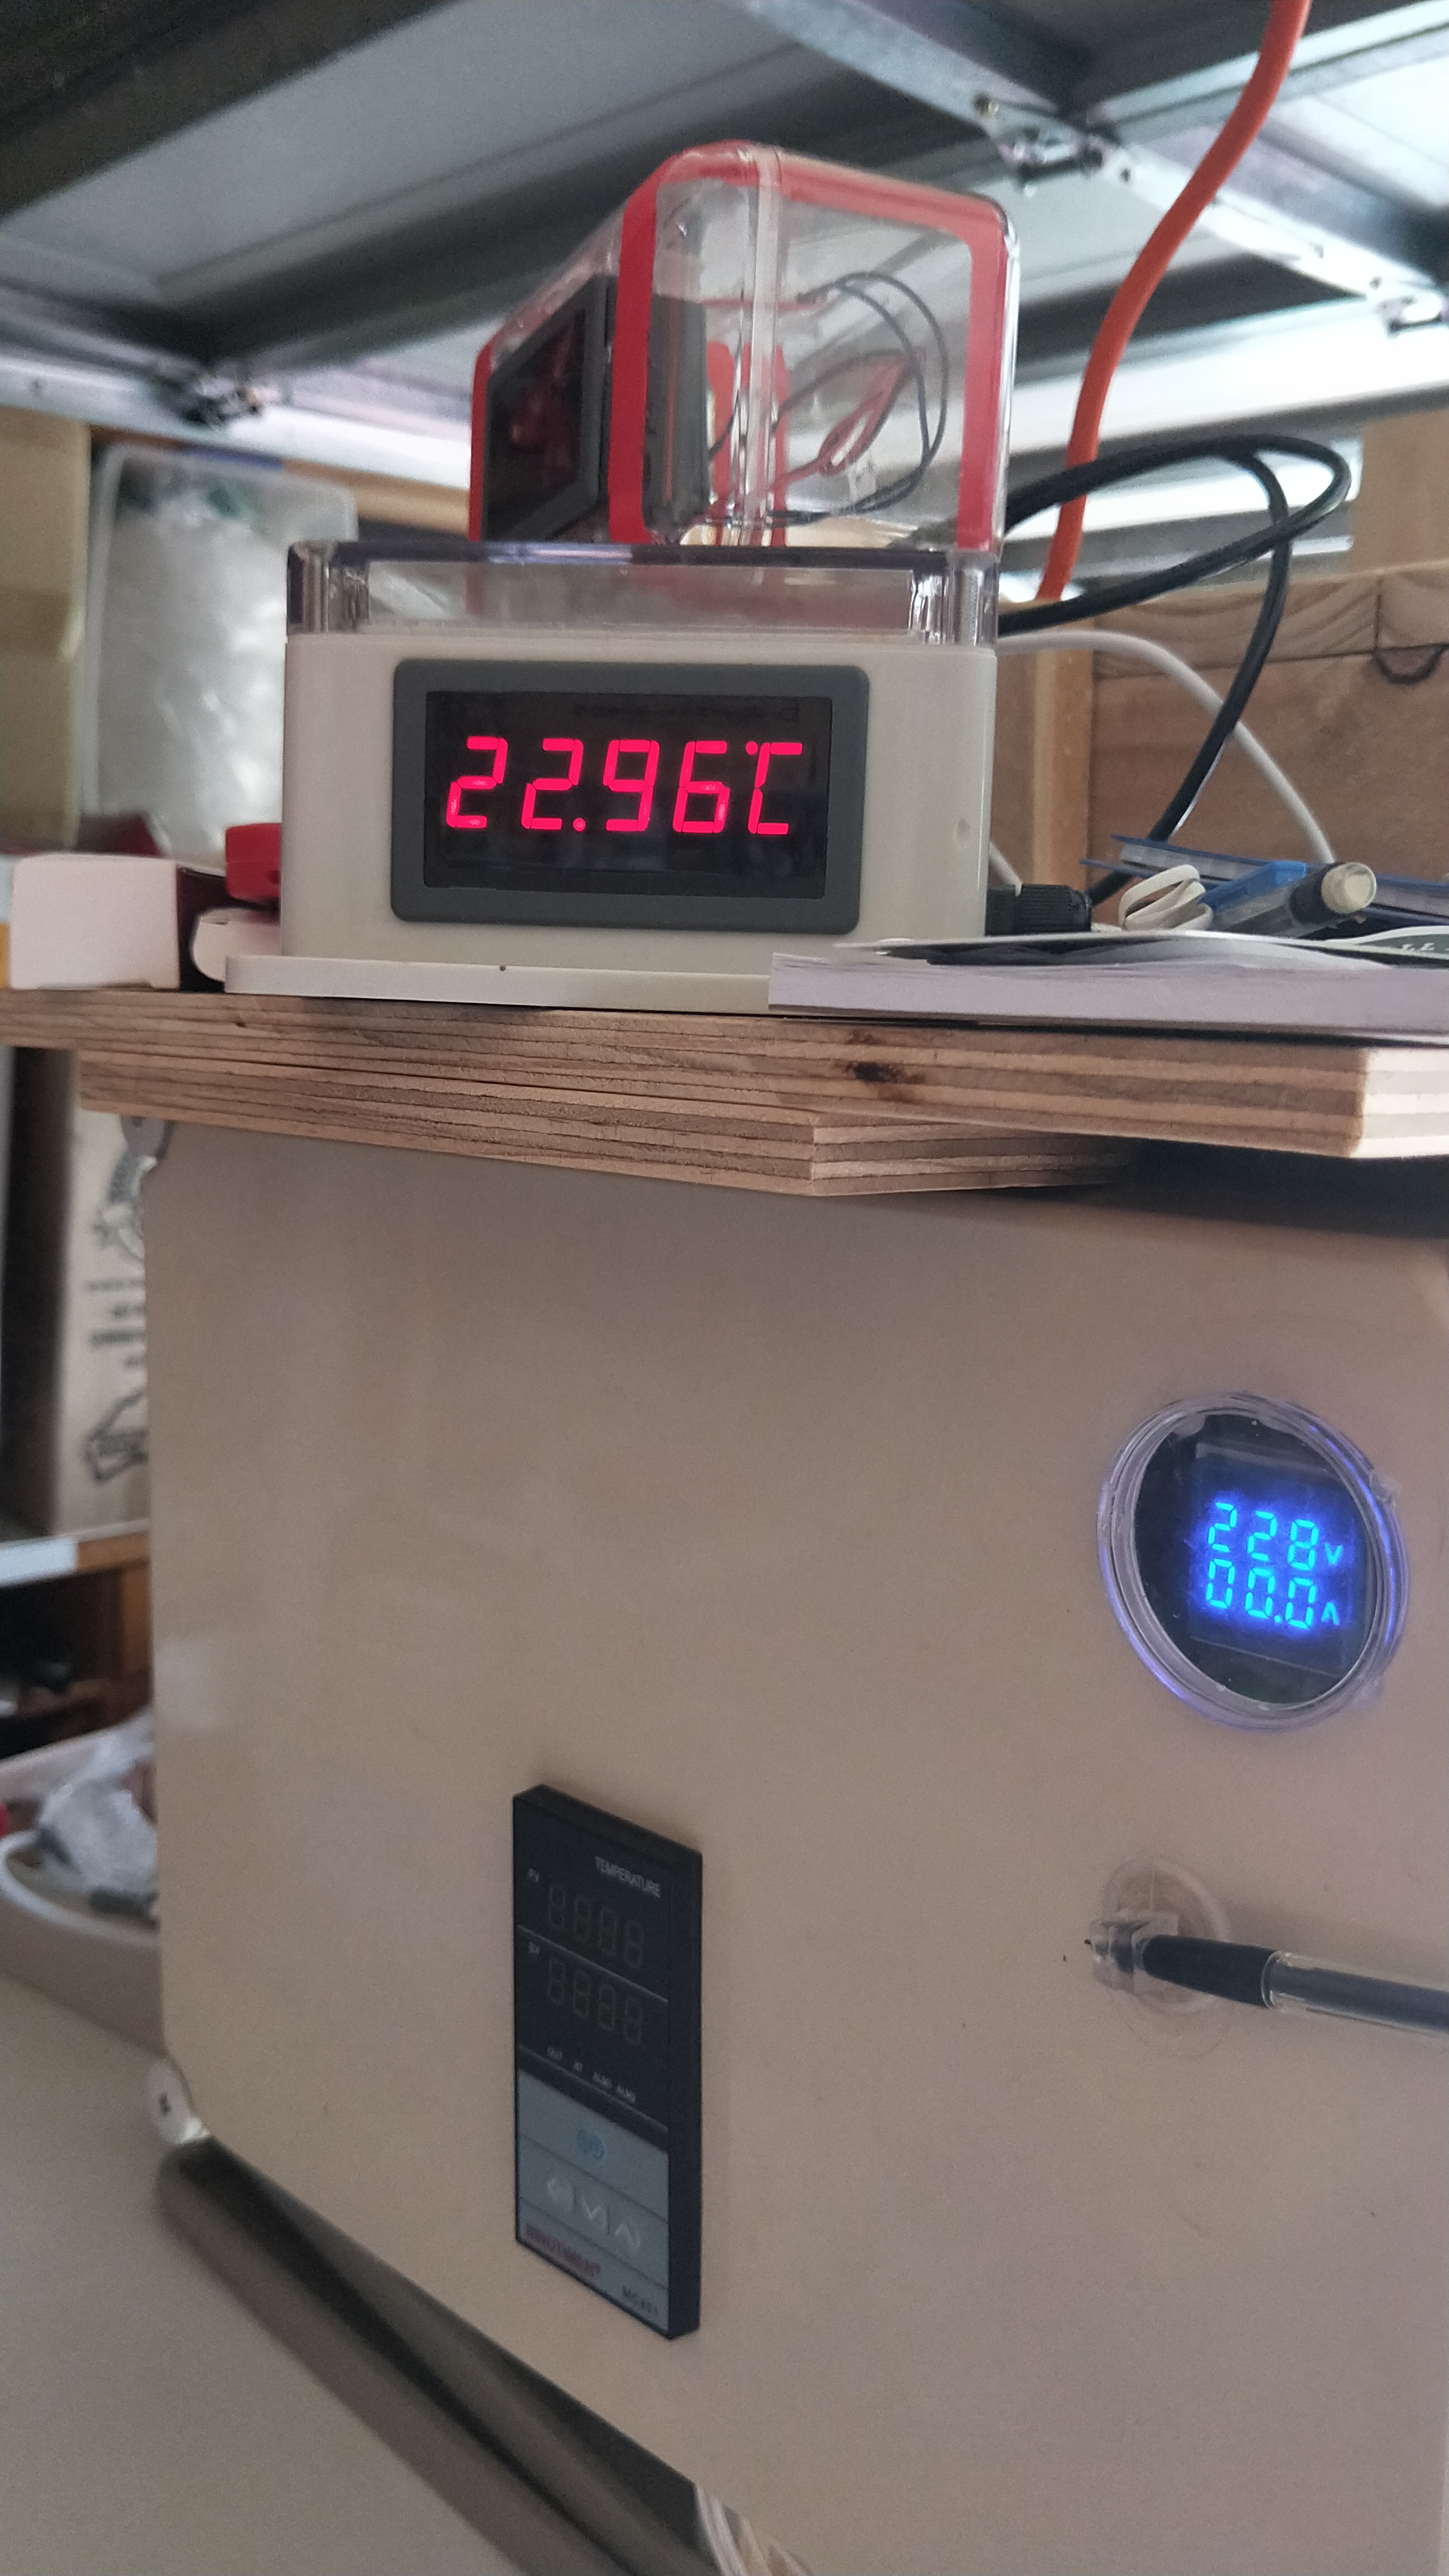
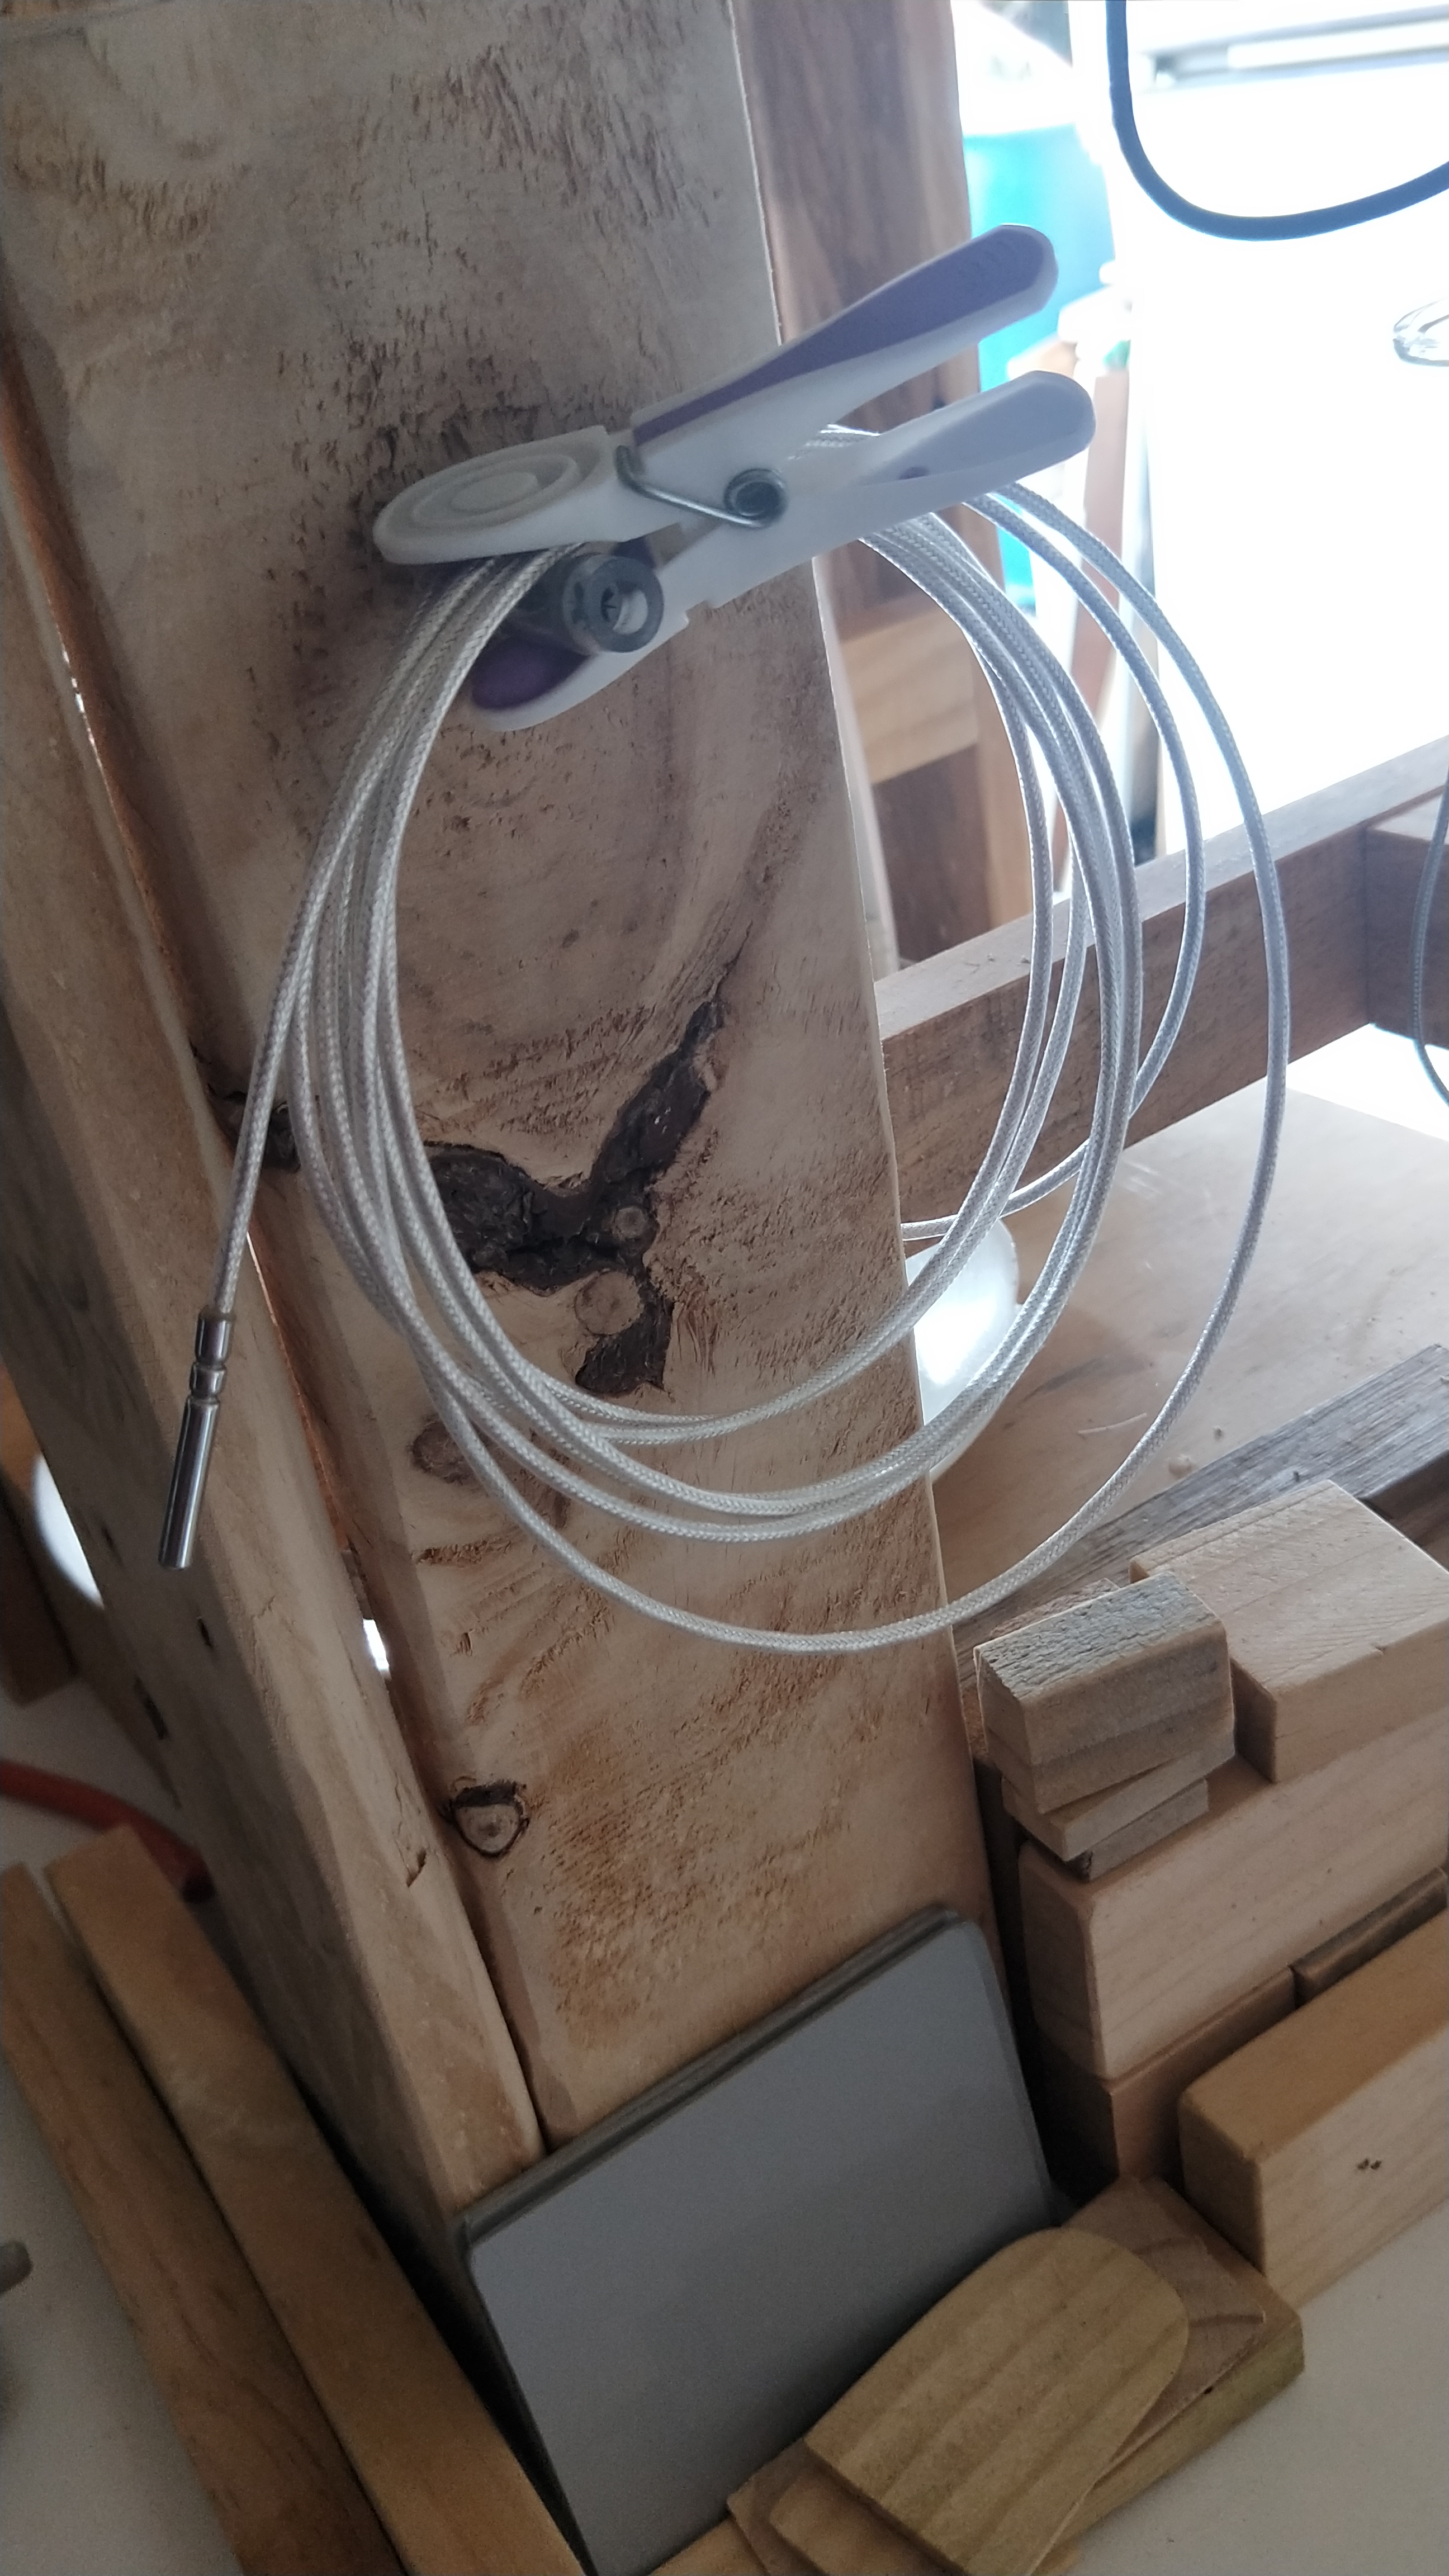
I use a Pt 100 probe connected to a digital display reading to 1/100 of Deg C. It claims to have an accuracy of 0.1 Deg C
Attachments

agentbud
Well-Known Member
per morebeer, the HED was shipping from the manufacturer end of Dec and should be available to buy end of Jan or beginning of Feb. Product code AG545I am sure the Heat Exchanger Dish will help this, but it is not out yet in the US—I am anxiously awaiting it.
agentbud
Well-Known Member
Bag size aside, I watched a couple of videos of Chris and Vito from MoreBeer brewing on the new Brewzilla and in both videos they used a bag and put it on the outside of the maltpipe. I've got a bag that is big enough to do that but I think next brew I still plan to put it inside the maltpipeTried using the brew bag for the first time today and it's not even close in size. Hoping they'll take this and swap it out for something correctly sized.
theredviper
Well-Known Member
- Joined
- Jul 1, 2020
- Messages
- 52
- Reaction score
- 23
One of the reasons I bought the Brewzilla was to get away from BIAB! 
rtstrider
Well-Known Member
- Joined
- Dec 12, 2016
- Messages
- 1,310
- Reaction score
- 847
The bag made a significant difference! If I can get this swapped for the correct sized bag it would be perfect! No stuck mash, nice clean wort, just the easiest brew day I've had with this unitBag size aside, I watched a couple of videos of Chris and Vito from MoreBeer brewing on the new Brewzilla and in both videos they used a bag and put it on the outside of the maltpipe. I've got a bag that is big enough to do that but I think next brew I still plan to put it inside the maltpipe
tgbruiser
Member
I ordered the RoboBrew G4 65L "basket" bag from them and it was even oversized for the kettle, let alone the basket. I had previously purchased one for the Anvil Foundry 10.5 that fit perfectly, so wondering what went wrong here.Tried using the brew bag for the first time today and it's not even close in size. Hoping they'll take this and swap it out for something correctly sized.
Tried using the brew bag for the first time today and it's not even close in size. Hoping they'll take this and swap it out for something correctly sized.
The bag made a significant difference! If I can get this swapped for the correct sized bag it would be perfect! No stuck mash, nice clean wort, just the easiest brew day I've had with this unit
Although I don't use an AIO brew kettle or do BIAB, I have seen a few in use.I ordered the RoboBrew G4 65L "basket" bag from them and it was even oversized for the kettle, let alone the basket. I had previously purchased one for the Anvil Foundry 10.5 that fit perfectly, so wondering what went wrong here.
My impression is the bags you bought are not (custom) made to the correct size, but some generic stock, causing the issues. I'd return them for a full refund for not living up to their promise.
If you want one that is the correct size, contact @wilserbrewer, a member and sponsor here. He makes bags to the right specs, and with glorious reviews.
In that light, any clue on the pore size of the ones you obtained from the manufacturer?
You'll want pores that work best, not too small (tight) and not too large (open).
Bottoms_Up
Well-Known Member
Order "The Brew Bag" from:I ordered the RoboBrew G4 65L "basket" bag from them and it was even oversized for the kettle, let alone the basket. I had previously purchased one for the Anvil Foundry 10.5 that fit perfectly, so wondering what went wrong here.
www.brewinabag.com
They make them to fit the Brew Gen 3 and the Gen 4. My friend recently ordered one and it fits perfectly. I have an older large one from them, which suits me fine. I use the glass lid to hold it in place.
Last edited:
tgbruiser
Member
That's where I ordered from. They have been great working with me over email on the situation. They are working on a smaller one, 18.5 in. high by 13.5 in. diameter, which would just sit in the basket and not wrap over the outside. To get it to wrap over the top of the kettle, it has to be as big as it is.Order "The Brew Bag" from:
www.brewinabag.com
They make them to fit the Brew Gen 3 and the Gen 4. My friend recently ordered one and it fits perfectly. I have an older large one from them, which suits me fine. I use the glass lid to hold it in place.
Bottoms_Up
Well-Known Member
Let me know how that works out. The one my friend got from them fits the basket of the Gen 3 like a glove. Nice and tight so that the edges can wrap over the rim snugly. I thought they had one for the Gen 4 as well, but maybe not. I might purchase one of those if they are available.That's where I ordered from. They have been great working with me over email on the situation. They are working on a smaller one, 18.5 in. high by 13.5 in. diameter, which would just sit in the basket and not wrap over the outside. To get it to wrap over the top of the kettle, it has to be as big as it is.
rtstrider
Well-Known Member
- Joined
- Dec 12, 2016
- Messages
- 1,310
- Reaction score
- 847
After very minor back and forth and some measurements it appears there was an error on their end. They're going to ship another one soon. The site and tag says this is 400 micron. I'm really eager to use the new bag!I ordered the RoboBrew G4 65L "basket" bag from them and it was even oversized for the kettle, let alone the basket. I had previously purchased one for the Anvil Foundry 10.5 that fit perfectly, so wondering what went wrong here.
rtstrider
Well-Known Member
- Joined
- Dec 12, 2016
- Messages
- 1,310
- Reaction score
- 847
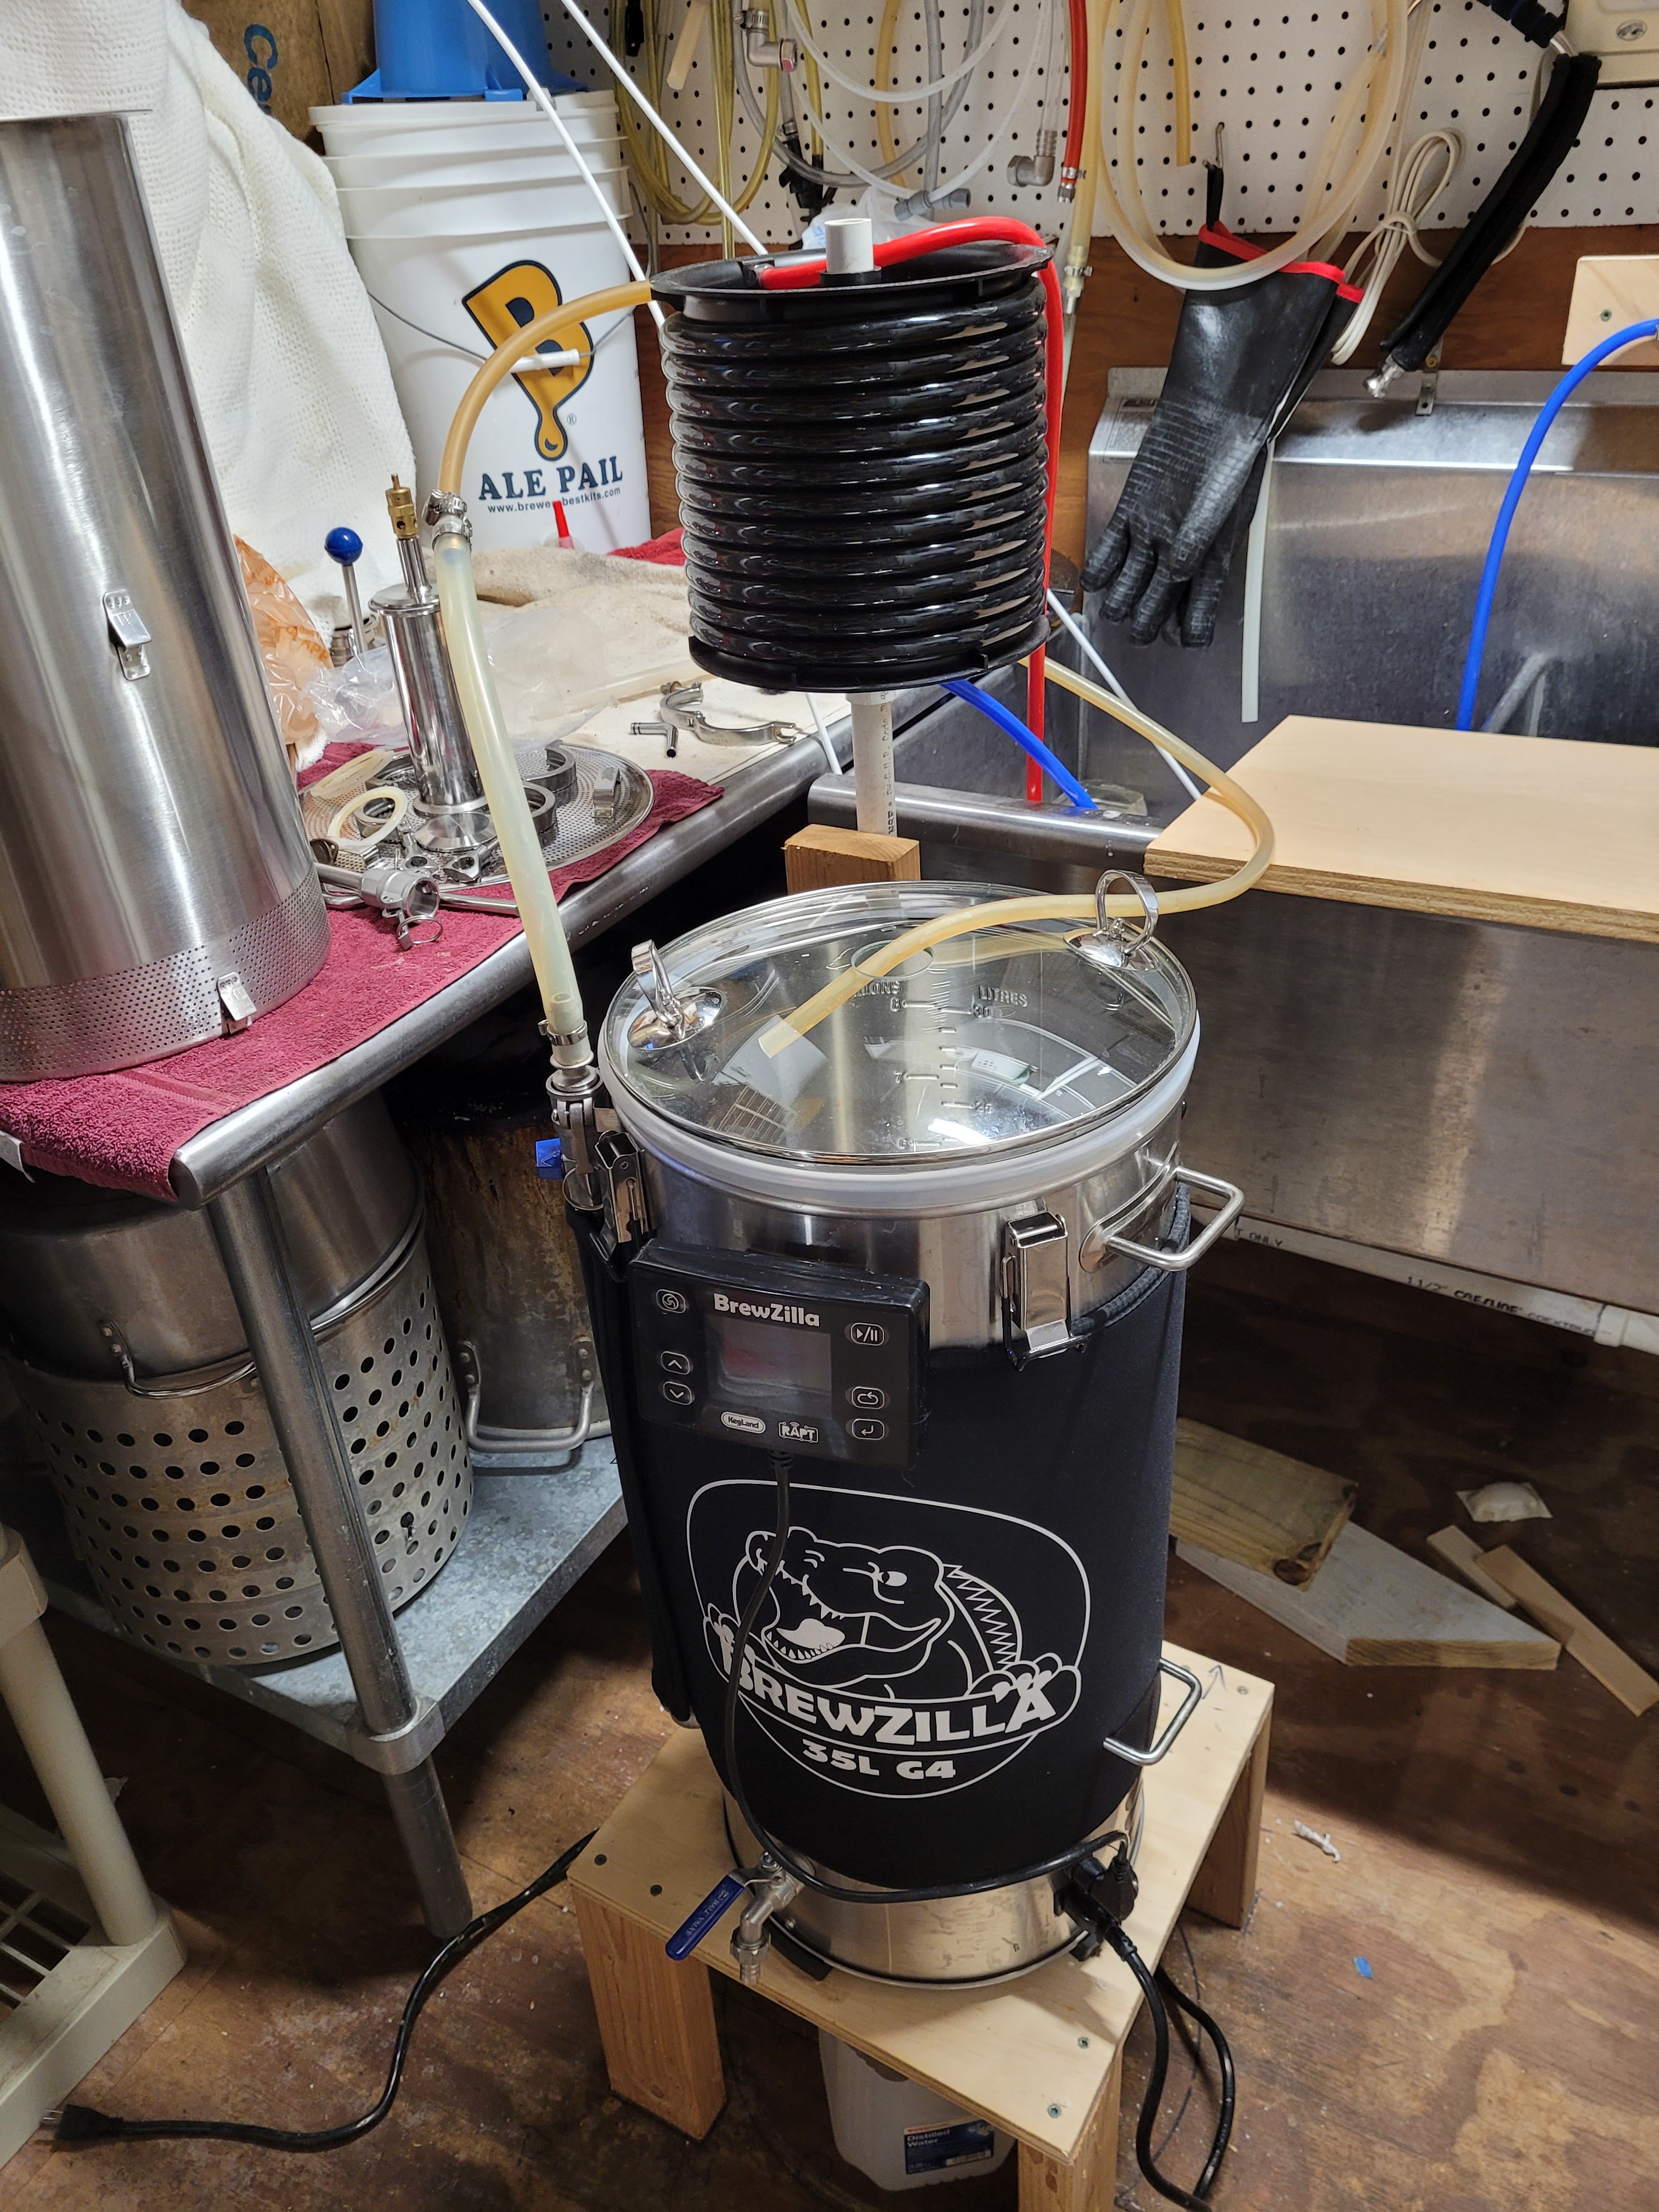
I wanted to report back that I was gifted a new to me counterflow chiller from another homebrewer. I have this connected to the valve on the bottom of the unit and it has significantly reduced chilling times. With the provided wort chiller it was taking 30-40 minutes due to our warm ground water. This gets wort down to ale pitching temps in a single pass. So from cutting the heat to pitching yeast is less than 10 minutes now. I cannot recommend this enough! Now with that said I'll need to invest in some quick disconnect fittings. Another mod I've been eye balling is adding one of these to the sparge arm at the top of the unit during mashing
https://www.amazon.com/Eagle-Brewin...=1674578772&sprefix=sparge+arm,aps,86&sr=8-22
Would that potentially be beneficial? I feel this would help more evenly distribute the mash recirculation with the brew bag than just the single hose. It may not make much of a difference though. Also figured it might help with CIP. Has anyone else tried this "mod"? If so what were your experiences?
theredviper
Well-Known Member
- Joined
- Jul 1, 2020
- Messages
- 52
- Reaction score
- 23
I have started using the top screen on the malt pipe for sparging, I think it distributes the water quite well, and you can give it a "push" at the end to squeeze more through the grain.
Quick disconnect for your water source or something else?
Quick disconnect for your water source or something else?
rtstrider
Well-Known Member
- Joined
- Dec 12, 2016
- Messages
- 1,310
- Reaction score
- 847
Quick disconnect would be for the counterflow chiller connections. I'll be using a brew bag so no need for the top screen. Wouldn't want it to potentially cut the bag.I have started using the top screen on the malt pipe for sparging, I think it distributes the water quite well, and you can give it a "push" at the end to squeeze more through the grain.
Quick disconnect for your water source or something else?
agentbud
Well-Known Member
I did something similar with mine. I picked up a CFC in these forums. I built a platform for the BZ that is just high enough for a 5-gallon pail to sit under the bottom spigot. The platform has a PVC pipe on the back side that the CFC sits on so it is up high. I added a male camlock fitting on the CFC's wort-in line so I can just plug it directly to the pump return pipe and control the flow with the valve. See pics...I wanted to report back that I was gifted a new to me counterflow chiller from another homebrewer. I have this connected to the valve on the bottom of the unit and it has significantly reduced chilling times. With the provided wort chiller it was taking 30-40 minutes due to our warm ground water. This gets wort down to ale pitching temps in a single pass. So from cutting the heat to pitching yeast is less than 10 minutes now. I cannot recommend this enough! Now with that said I'll need to invest in some quick disconnect fittings.
Attachments

agentbud
Well-Known Member
The rep at MoreBeer emailed me to say Kegland did not ship the heat exchanger dishes (HEDs) when originally expected so they no longer have an ETA on when they will be in stock. The wait continues...per morebeer, the HED was shipping from the manufacturer end of Dec and should be available to buy end of Jan or beginning of Feb. Product code AG545
Bottoms_Up
Well-Known Member
One of the most significant design flaws of the Brewzilla is the recirculation process. While mashing, when the pump is on, the wort in the mash is sucked down to the drain which is at the bottom, in the middle. Because the pump is strongly pulling this wort through this drain, most of the wort in the mash is pulled directly into the drain without it having a chance to be heated. Meanwhile, the liquid that stays on the circumference at the bottom, near the heating probe gets heated, and the Brewzilla thinks that the mash temperature has been reached, and turns the heat off. Thus the mash temperature continues to drop and it is most difficult and time-consuming to trick it back up again.
Kegland has come up with a solution to this issue, a circular plate that fits under the bottom screen. The wort coming from the mash is forced to fall off the edge of this plate into the circumference of the bottom, where it then has to travel over the heating elements to pass through the drain.
But in North America (at least in Canada), this plate will not be available until this Fall. I think this plate will greatly help rectify this problem, although I wonder if it only works well when the plate is exactly horizontal (otherwise almost all of the wort will just fall off one edge of the circular flat plate).
In the meantime, a friend and I were trying to think of an interim solution. And then it hit us. If the pump is turned off for a brief time, the wort from the mash will drain straight down, rather than be pulled to the middle (as when the pump is on). It will then fall on the area above the heating elements. It will also remain on the bottom long enough for the heating elements to normalize the temperature of all the wort in the bottom. Once normalized, turning the pump on again will ensure that what gets ciculated back to the mash is heated wort, not wort at more or less the same temperature. This can be intermitently repeated.
Thus, it may work by setting the pump at a low percentage, perhaps 20 or 30%, which can be determined by experiment. This means that the pump will automatically turn on and off repeatedly, allowing heat exchange to occur much more efficiently.
Has anyone already tried this approach?
Last edited:
jtrainer
BeerCzar I am
- Joined
- Sep 28, 2008
- Messages
- 345
- Reaction score
- 36
Why not use the ball valve to regulate the pump speed/flow and regulate it down super slow?One of the most significant design flaws of the Brewzilla is the recirculation process. While mashing, when the pump is on, the wort in the mash is sucked down to the drain which is at the bottom, in the middle. Because the pump is strongly pulling this wort through this drain, most of the wort in the mash is pulled directly into the drain without it having a chance to be heated. Meanwhile, the liquid that stays on the circumference at the bottom, near the heating probe gets heated, and the Brewzilla thinks that the mash temperature has been reached, and turns the heat off. Thus the mash temperature continues to drop and it is most difficult and time-consuming to trick it back up again.
Kegland has come up with a solution to this issue, a cicular plate that fits under the bottom screen. The wort coming from the mash is forced to fall off the edge of this plate into the circumference of the bottom, where it then has to travel over the heating elements to pass through the drain.
But in North America (at least in Canada), this plate will not be available until this Fall. I think this plate will greatly help rectify this problem, although I wonder if it only works well when the plate is exactly horizontal (otherwise almost all of the wort will just fall off one edge of the circular flat plate).
In the meantime, a friend and I were trying to think of an interim solution. And then it hit us. If the pump is turned off for a brief time, the wort from the mash will drain straight down, rather than be pulled to the middle (as when the pump is on). It will then fall on the area above the heating elements. It will also remain on the bottom long enough for the heating elements to normalize the temperature of all the wort in the bottom. Once normalized, turning the pump on again will ensure that what gets ciculated back to the mash is heated wort, not wort at more or less the same temperature. This can be intermitently repeated.
Thus, it may work by setting the pump at a low percentage, perhaps 20 or 30%, which can be determined by experiment. This means that the pump will automatically turn on and off repeatedly, allowing heat exchange to occur much more efficiently.
Has anyone already tried this approach?
Bottoms_Up
Well-Known Member
I tried that, but it didn't work so well, as the small amount being recirculated is barely enough to heat all of the mash. I think it would work more efficiently to heat the wort and then blast it into the mash keeping the valve on full. Maybe a combination of both (with the valve set low not not too low) might also work.Why not use the ball valve to regulate the pump speed/flow and regulate it down super slow?
agentbud
Well-Known Member
Sounds like a good theory to me. I am anxiously waiting on the HED to make it to the USA but in the interim, I may try this method. I have a brew scheduled in about a week.I tried that, but it didn't work so well, as the small amount being recirculated is barely enough to heat all of the mash. I think it would work more efficiently to heat the wort and then blast it into the mash keeping the valve on full. Maybe a combination of both (with the valve set low not not too low) might also work.
that's actually a good way to cause the problem you're talking about. doing a recirc on your mash that is too fast is the same as sparging too fast, you're likely to start getting channeling in the grain bed and resulting bad circulation/temp throughout the bed. a fairly slow rate of recirc doesnt create channels, and it will eventually create that nice 1/2 to 1" layer of wort on top that helps get flow happening throughout the bed as it trickles down all over the place.I tried that, but it didn't work so well, as the small amount being recirculated is barely enough to heat all of the mash. I think it would work more efficiently to heat the wort and then blast it into the mash keeping the valve on full. Maybe a combination of both (with the valve set low not not too low) might also work.
you using the neoprene jacket? or anything to insulate? i have a jacket, and i put my power at 60%, slow the pump down via the valve, and it goes for quite a while without heat cycling on /off. i dont actually get in there and poke around all over the place with a thermometer checking everywhere, but the numbers always seem to be on point. of course i also use a bag, no malt pipe. so i think the bag also does a bit to slow down percolation on its own. but that's another topic.
Bottoms_Up
Well-Known Member
Please let me know whether it works. I just made a brew a few days ago, before we came up with this possible solution. My next brew depends on the weather (I boil outside).Sounds like a good theory to me. I am anxiously waiting on the HED to make it to the USA but in the interim, I may try this method. I have a brew scheduled in about a week.
Bottoms_Up
Well-Known Member
That's why I mentioned the possibility of using both a reduced flow and an intermiitent pump. As mentioned above, using too low a rate of recirculation does not work well for me and does little to help reduce a drop in temperature to the mash.that's actually a good way to cause the problem you're talking about. doing a recirc on your mash that is too fast is the same as sparging too fast, you're likely to start getting channeling in the grain bed and resulting bad circulation/temp throughout the bed. a fairly slow rate of recirc doesnt create channels, and it will eventually create that nice 1/2 to 1" layer of wort on top that helps get flow happening throughout the bed as it trickles down all over the place.
you using the neoprene jacket? or anything to insulate? i have a jacket, and i put my power at 60%, slow the pump down via the valve, and it goes for quite a while without heat cycling on /off. i dont actually get in there and poke around all over the place with a thermometer checking everywhere, but the numbers always seem to be on point. of course i also use a bag, no malt pipe. so i think the bag also does a bit to slow down percolation on its own. but that's another topic.
I do use a neoprene jacket, and I mash indoors (boil outdoors since I don't have a vent). I use an Inkbird thermomenter with a long probe, and leave it in the mash for the entire time, so I can watch the temperature closely. I also use a Brew bag inside the pipe. And I use the top screen, which helps prevent chanelling.
I only use the bag..... Does the top plate allow space for the wort “float“ on top of grain? or just on top of plate? Even the screened plate can allow channeling if it’s already started. but that's probably a low probability unless you dont ever stir or mix at dough-in.That's why I mentioned the possibility of using both a reduced flow and an intermiitent pump. As mentioned above, using too low a rate of recirculation does not work well for me and does little to help reduce a drop in temperature to the mash.
I do use a neoprene jacket, and I mash indoors (boil outdoors since I don't have a vent). I use an Inkbird thermomenter with a long probe, and leave it in the mash for the entire time, so I can watch the temperature closely. I also use a Brew bag inside the pipe. And I use the top screen, which helps prevent chanelling.
seems odd to me that you have that much trouble holding temp even with jacket and being indoors. (I’ll assume you keep the lid on too). but you're in canada, so what the hell do i know.....
is it all your brews? or just big beers with heavy grain bills?
the only other time we’ve seen similar issues was due to too fine crush. We upped it and by getting better flow throughout the bed we had no loss in extraction like you might expect with looser crush. we actually got tiny increase. (temp wasnt an issue as it was a big insulated mash tun)
thats about all i can think of. not helpful, but the few other folks i know with new g4 units dont seem to have any issues with heat retention if using the jacket. maybe its something we're all missing....
agentbud
Well-Known Member
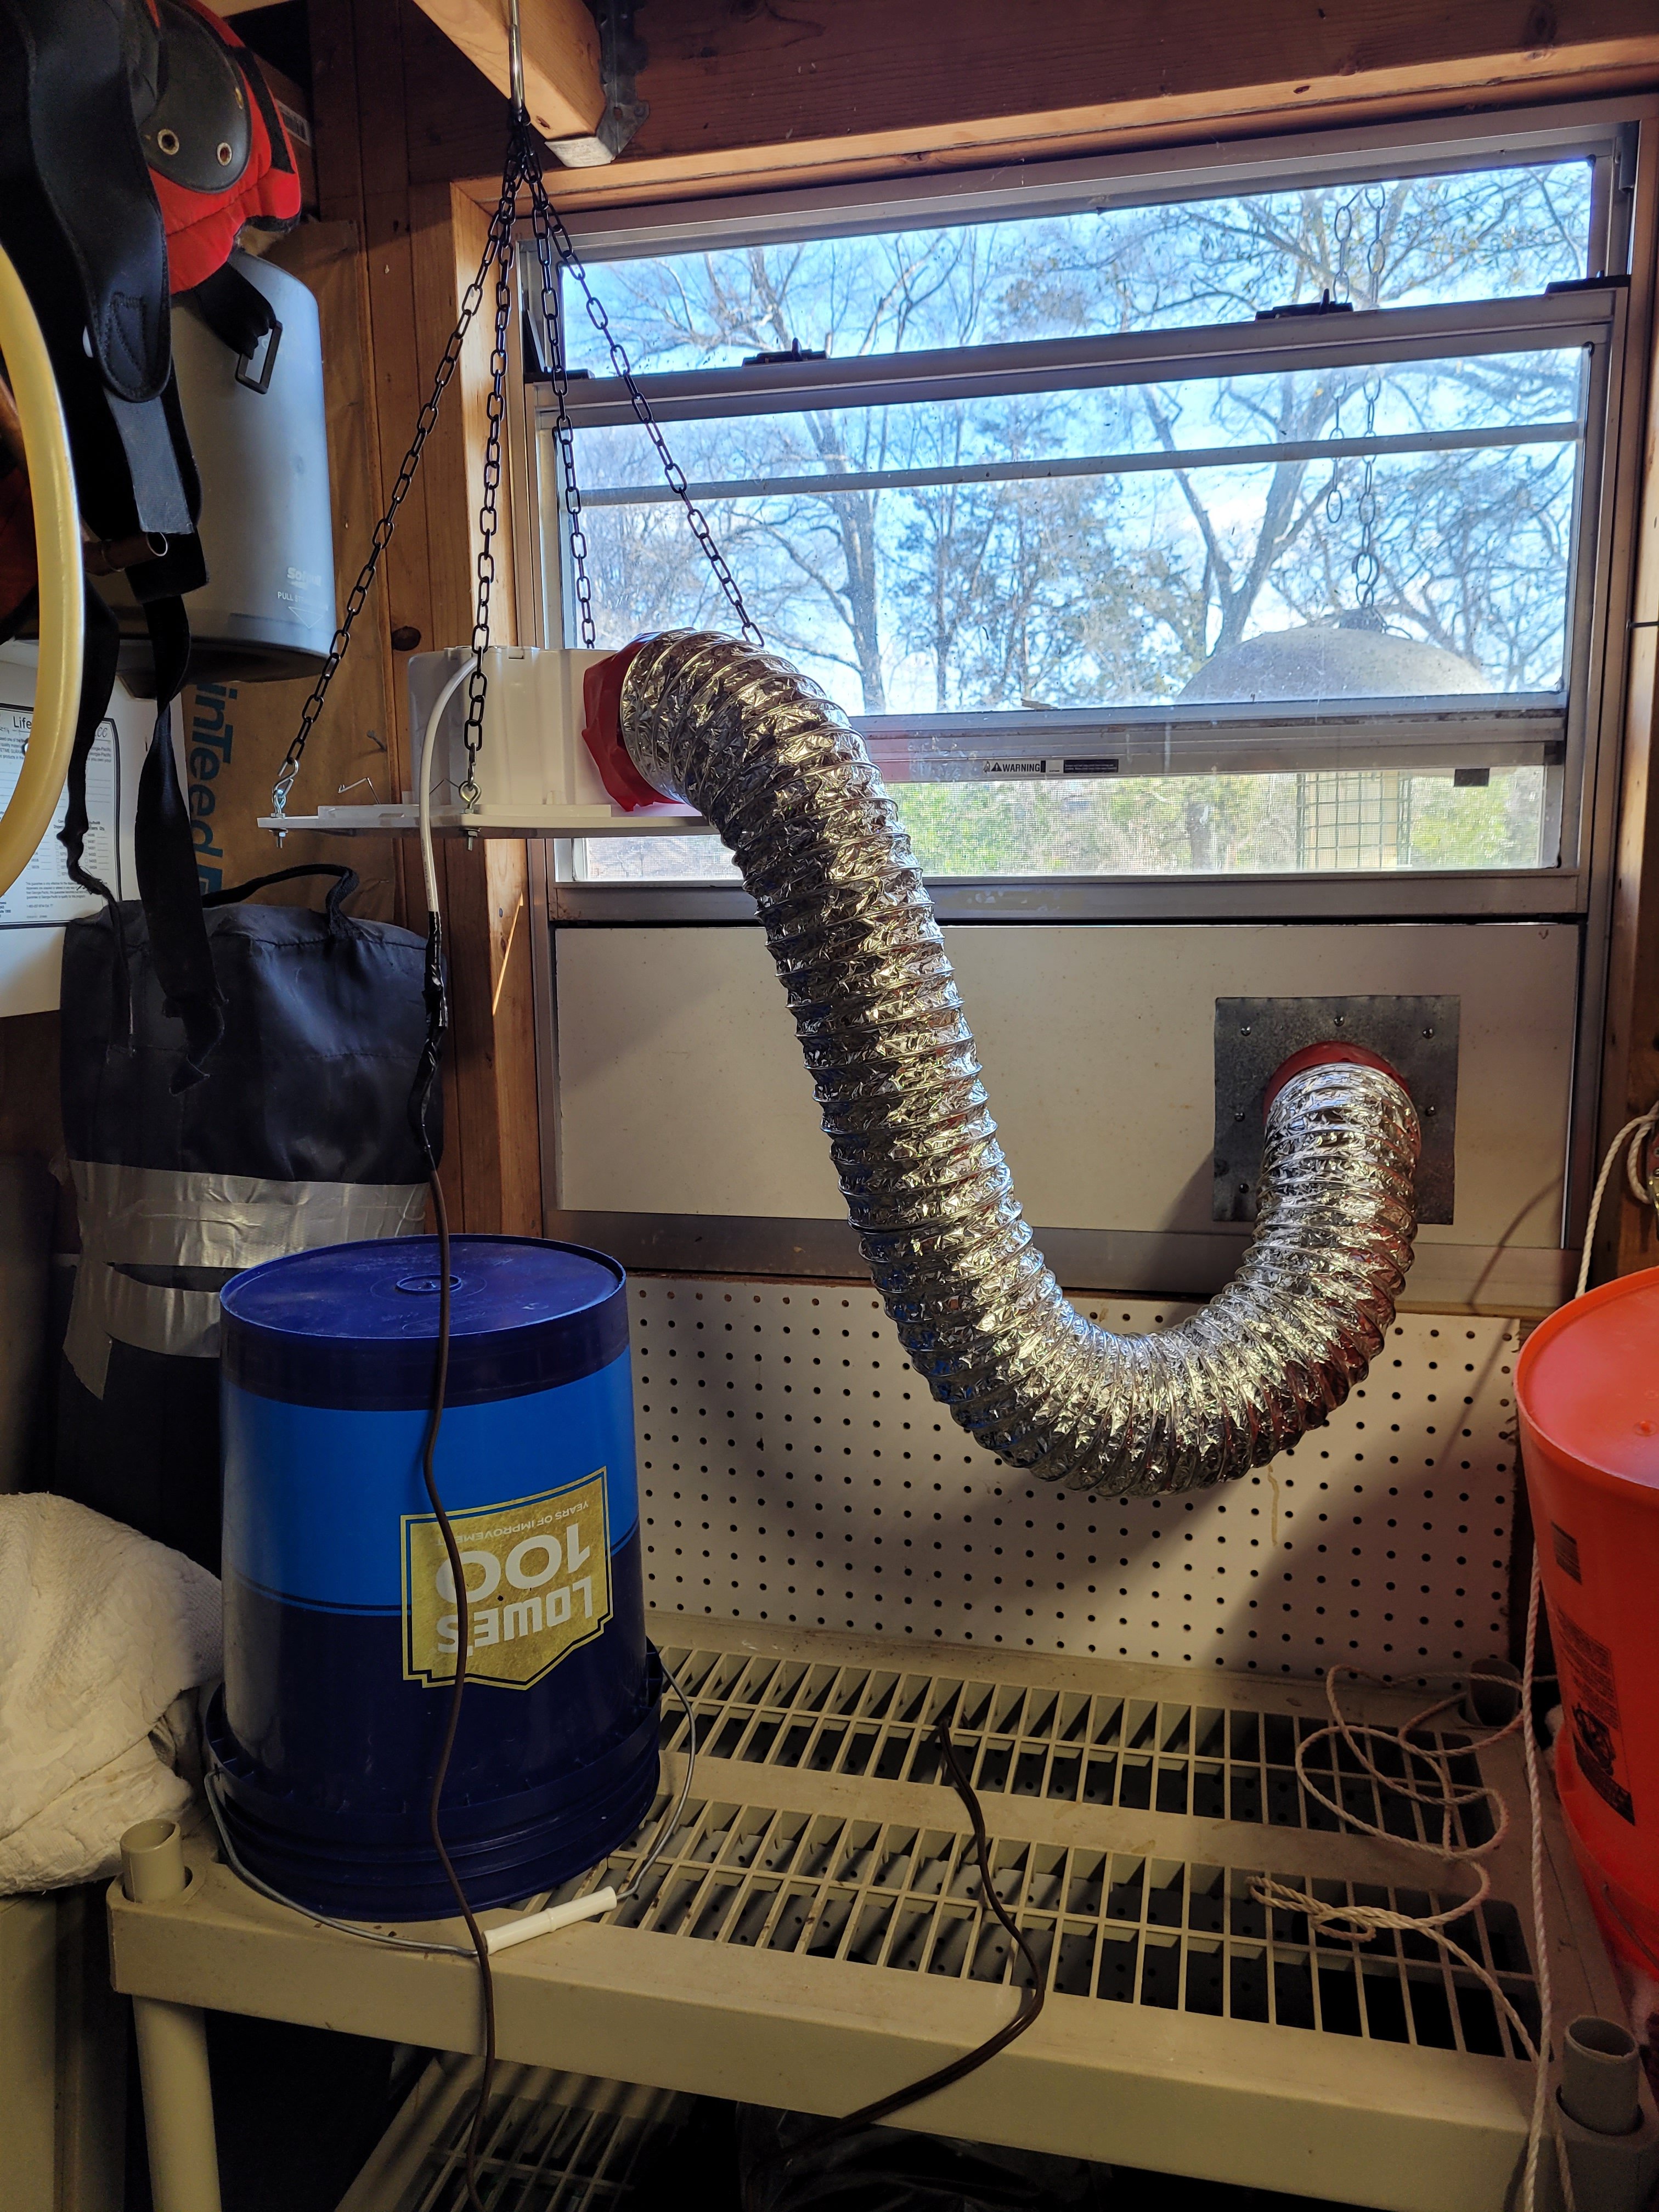
While we do not have the cold temps of Canada, I still prefer to brew indoors (in my shed) as that puts me close to the sink/water. So, I rigged up a cheap bathroom vent fan to a flexible duct that is attached to a board that I can place in a nearby window. Since the board is moveable and the duct is flexible, I can hang it from my BIAB pulley over the boiler when needed, then move it all out of the way when done boiling. Pics attachedI do use a neoprene jacket, and I mash indoors (boil outdoors since I don't have a vent).
Attachments

Bottoms_Up
Well-Known Member
The top plate sits on the grain, with a layer or wort over it, and yes, I do also keep the lid on. I used to do big, double-batch brews, but now stick to five gallon brews at a S.G. of about 1.048. The heat retention issue is almost toally related to the circulation issue. The heat loss is not fast, but perhaps a degree every 15 minutes. With proper circulation, it should remain fairly stable.I only use the bag..... Does the top plate allow space for the wort “float“ on top of grain? or just on top of plate? Even the screened plate can allow channeling if it’s already started. but that's probably a low probability unless you dont ever stir or mix at dough-in.
seems odd to me that you have that much trouble holding temp even with jacket and being indoors. (I’ll assume you keep the lid on too). but you're in canada, so what the hell do i know.....
is it all your brews? or just big beers with heavy grain bills?
the only other time we’ve seen similar issues was due to too fine crush. We upped it and by getting better flow throughout the bed we had no loss in extraction like you might expect with looser crush. we actually got tiny increase. (temp wasnt an issue as it was a big insulated mash tun)
thats about all i can think of. not helpful, but the few other folks i know with new g4 units dont seem to have any issues with heat retention if using the jacket. maybe its something we're all missing....
I don't like how the recirculation tube just flows directly into the mash. I wish there was a system which would spray it evenly over the entire top surface of the grain, like a shower head. Can't use that because the holes are too fine and the tiny grain silt that recirculates would just plug it. I tried something similar and it got stuck quite rapidly.
Bottoms_Up
Well-Known Member
Thanks for this suggestion! Unfortnately, there are no windows in my basement near the sink, the kitchen windows are long and open sideways (rather than up and down), there are no windows in the laundry area, or in the downstairs bathroom, and the only window that slides up and down is the upstairs bathroom, which would mean carrying the wort down the stairs.While we do not have the cold temps of Canada, I still prefer to brew indoors (in my shed) as that puts me close to the sink/water. So, I rigged up a cheap bathroom vent fan to a flexible duct that is attached to a board that I can place in a nearby window. Since the board is moveable and the duct is flexible, I can hang it from my BIAB pulley over the boiler when needed, then move it all out of the way when done boiling. Pics attached
So I mash indoors (in the kitchen), pump the wort into my boiling vessel and boil it in the garage.
I'll give some thought of how I might be able to rig it up in the kitchen although I would not have an easy way of hanging the exhaust vent over the Brewzilla.
kegland has now released a lot more info via 35L BrewZilla Gen 4 - Heat Exchanger Dish (HED)
Check it out.
cheers
Check it out.
cheers
Similar threads
- Replies
- 6
- Views
- 433
- Replies
- 46
- Views
- 13K
- Replies
- 46
- Views
- 16K
