• Please visit and share your knowledge at our sister communities:
  • If you have not, please join our official Homebrewing Facebook Group!

    Homebrewing Facebook Group

Brewstand build finished! 1st brew today

Homebrew Talk

Help Support Homebrew Talk:

This site may earn a commission from merchant affiliate links, including eBay, Amazon, and others.
I just wanted to see exactly how you had the connectors fastened to the panel, and I also wanted to see the exact fitting you used for the disconnects. I like the 90 bend you have right on the disconnect.

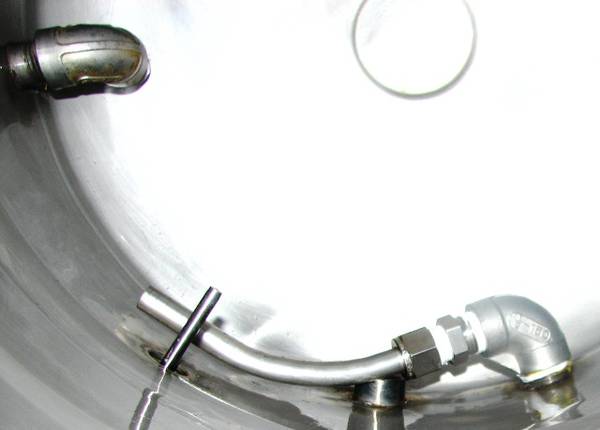
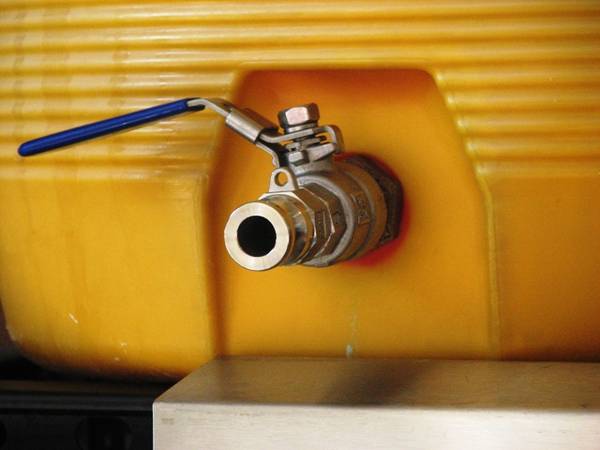
The 90 degree quick disconnects used on the hoses are from McMaster-Carr, part number 6739K68.

item_coolant_6739k92.gif


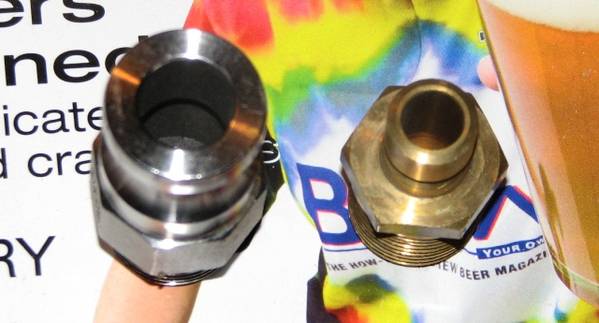
They have a hose barb on one end, so they will fit right into any 1/2" ID hose. I use the high temp silicone hose.

The male QD is part number 6739K59

6739k52_l.gif


The male with the pipe threads is held in place with a 1/2" nut normally used in electrical work from the back of the panel.

brewstand_back2.JPG


From there I use a female threaded coupler into which I screw a male thread to hose barb adapter.

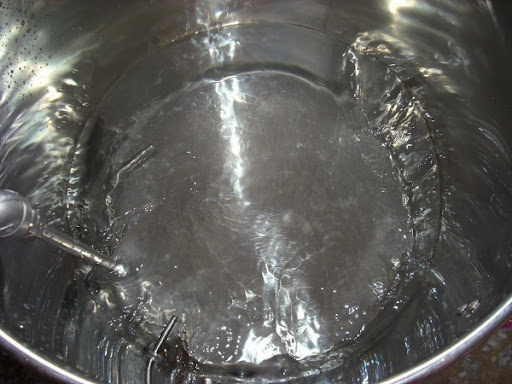
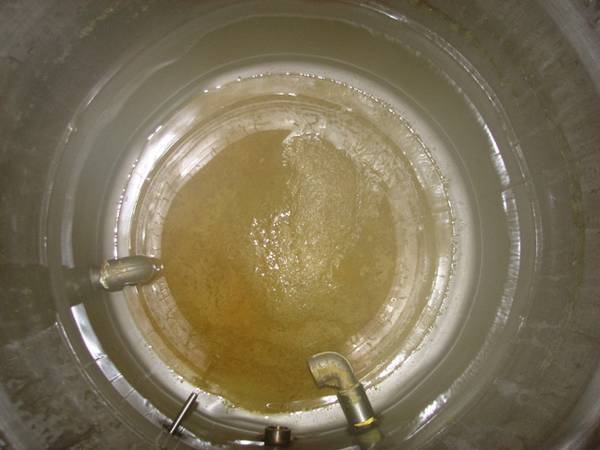
As for the whirlpooling, I guess you lose some wort in the bottom of the kettle since you can't extend you drainage tube right down into the center of the dome? My original plan was to extend the tube to there, use a false bottom to catch the large trub, and then some sort of a large sheet of fine stainless mesh to filter the fine hop particles. But I figured it may clog since I use pellets, and the stainless is expensive. So I guess you just have your tube on the edge?

There will always be losses when you brew. Plan for them. I usually leave 0.625 gallons behind in my kettle. That is including hot break, hops and other trub. No problem. I take all this into account when I do my brewing calculations. Too many people try to squeeze every last ounce of liquid out of the kettle. I plan for 5 gallons into each keg. I back calculate how much I need at each stage to achieve this. I start my boil with 15 gallons in my kettle. After a 90 min. boil, I will end up with 11.5 gallons split between two fermenters, leaving the hops and trub behind.

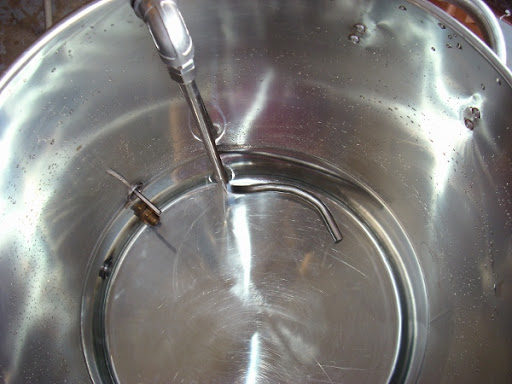
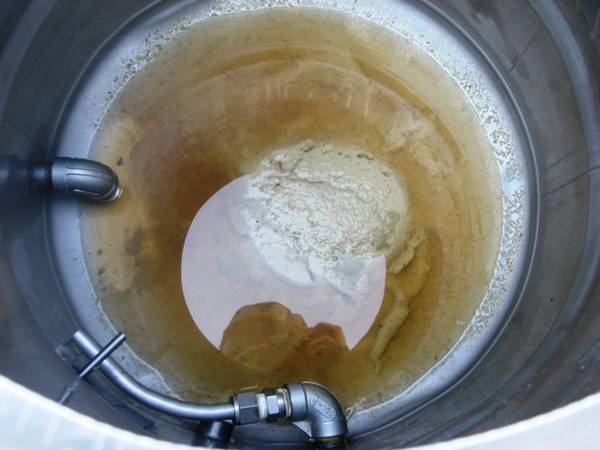
I also know breweries have their tube tangent to the kettle wall. Can you explain the insice of your kettle to me? Looked like you have a large drainage tube on the edge, and then another 90 bend tube that is positioned sideways. That's the interesting part.

I wish I could have tangential ports for my whirlpool. I do not have the skills to build them myself, so a 90 degree fitting was the closest I could come. I do draw off from the side of the kettle. I have an elbow with a close nipple threaded into it so I leave behind most of the trub.

Brewstand_Trubpile.JPG
 
Tangential-Inlet.jpg


A tangential inlet creates less turbulence in the liquid flow.

This illustration is from Stout Tanks http://conical-fermenter.com/products/special-orders/

They offer a custom built brew kettle that has an inverted dome bottom with a tangential inlet. I am currently trying to see if they would be willing to customize one of these for my purposes with a thermowell and a sight glass.

For my uses, I am finding that a 15.5 gallon keg is a bit too small for me to brew a full 10 gallons into my kegs. The 19.8 gallon kettle they offer is very attractive to me.
 
I agree with the keggle size. I was lucky enough to trade some welding for a 25 gallon kettle that is 3/16" stainless. Heavy as heck, but I do 12.5 gallon batches and love the extra space. So I take it less turbulance = less Hot side aeration?
 
I was wondering how you adjust the drainage tube. You have to be able to because of the different amounts of trub you leave behind w/ different styles. What if you brew a huge ipa that uses a lot of hops?
 
The silicone hoses are still under consideration. They are MUCH better then the PVC hoses. They are very flexible and will work with all temps of liquid.

They do balloon out with higher pressure. If I open up my cold water line a bit too much they expand out like a water balloon. That does not happen with the pumps. I may have to install a pressure limiter on the water line.

The March pumps have no trouble pumping from one side of the frame to the other and then up to top of the MLT. I do have to restrict the flow at the MLT.

I've scared the sh&$ out of myself more than once after turning a wrong valve, opening the water-in and blowing up the silicone hose. That loud pop followed by water shooting all over my pumps, control box, etc.... really sux to hear. I've moved to a copper hard line for my water-in to HLT and haven't heard it since:rockin:
 
I was wondering how you adjust the drainage tube. You have to be able to because of the different amounts of trub you leave behind w/ different styles. What if you brew a huge ipa that uses a lot of hops?

The drainage tube is not adjustable. You take into consideration the amount of trub you might get and stop pumping when the trub reaches the outlet. If I use a large quantity of hops, I just increase the recipe by 0.25 to 0.5 gallons so I can still fit 5.25 to 5.5 gallons in the fermenter. The trub will still be left behind in the kettle.

I've scared the sh&$ out of myself more than once after turning a wrong valve, opening the water-in and blowing up the silicone hose. That loud pop followed by water shooting all over my pumps, control box, etc.... really sux to hear. I've moved to a copper hard line for my water-in to HLT and haven't heard it since

I have learned to be very careful with the silicone hoses. I have never popped one. The ability to swap connections about is one of the most important things to me about this brew frame. That will never change.

I have made one small change. I reversed the street elbow on the whirlpool inlet.

Brewstand_Trubpile.JPG


As you can see, before I had a male, close nipple with a female connection going to the street elbow. At the suggestion of Wayne from Bargain Fittings, I removed the double female and turned the street elbow around to thread that directly to the close nipple.

The result was less turbulence and a much tighter trub pile. Wayne is building me a stainless tube with a threaded fitting on it that will bend around the keggle wall to come closer the the ideal of a tangential inlet.

I should have this installed in a couple of weeks. I will start a thread about it and show pictures. The tighter trub pile will also allow me to brew beers with larger amounts of hops without worrying about transferring the trub to the fermenter.

Thanks for all the interest in my rig and all the questions. It makes me very happy to think that maybe someone might use some of what I have made here in their rig.
 
After seeing these pics months ago, I did the same thing. I haven't been as happy with the whirlpool flow as I originally thought. Maybe this new part will help and I can do the same thing...very interested to see how it comes out.

Don't get me wrong, it circulates the wort, but not like my yeast stir plate :)
 
Thanks again for the comments.

I need to add some conditioning vessels to my gear. I currently have 5) 6.5 gallon Mini-Brew conicals and a 6.5 gallon glass carboy. They are all full.

I have a friend who wants me to brew a special beer for the upcoming Frozen Dead Guy Days in Nederland. http://www.nederlandchamber.org/events_fdgd-home.html

He and his neighbors are entering into the coffin race. I NEED to make a brew for this event. I am searching Craigslist to find some conditioning vessels. I think I have at least one found.

Anyway, after I secure the additional tankage to increase production to keep the pipeline filled, I will be changing all the disconnects over to stainless camlocks.

I have also been discussing an oxygenation system with Wayne of Bargain Fittings. Hopefully, all this will come together in the next month.
 
After seeing these pics months ago, I did the same thing. I haven't been as happy with the whirlpool flow as I originally thought. Maybe this new part will help and I can do the same thing...very interested to see how it comes out.

Don't get me wrong, it circulates the wort, but not like my yeast stir plate :)

If you built your inlet like I did with the double female coupler and the street elbow, remove the coupler and turn the street elbow around. You will get a much better whirlpool and tighter trub cone.

Wayne (BargainFittings) has built a similar item for himself. He is piping from the top of his kettle.

upgrade-eb3.jpg


upgrade-eb6.jpg


The item he is making for me will come off a standard elbow and bend around the inside of the keggle.

I will post some pictures of the aftermath of the Frozen Dead Guy Ale, if I can get some fermenters freed up. I am planning about 11 oz of hops in the kettle for 10 gallons. That should create a good sized trub pile.
 
Thanks again for the comments.

I need to add some conditioning vessels to my gear. I currently have 5) 6.5 gallon Mini-Brew conicals and a 6.5 gallon glass carboy. They are all full.

I have a friend who wants me to brew a special beer for the upcoming Frozen Dead Guy Days in Nederland. http://www.nederlandchamber.org/events_fdgd-home.html

He and his neighbors are entering into the coffin race. I NEED to make a brew for this event. I am searching Craigslist to find some conditioning vessels. I think I have at least one found.

Anyway, after I secure the additional tankage to increase production to keep the pipeline filled, I will be changing all the disconnects over to stainless camlocks.

I have also been discussing an oxygenation system with Wayne of Bargain Fittings. Hopefully, all this will come together in the next month.

Wayne:

I have a couple of empty 5 gallon carboys and one 6.5. I could loan one to you for the frozen dead guy ale.
 
Wayne:

I have a couple of empty 5 gallon carboys and one 6.5. I could loan one to you for the frozen dead guy ale.

Thanks Joe,

If the offer on the 6.5 is still good. I would like to take you up on that. I should be picking up a 6 gallon Better Bottle later today. That would let me transfer a batch from the conicals so I could brew this weekend.

Drop me a PM to let me know where we can get together to make the swap.

Thanks again,

Wayne
 
Having to go into a store and actually buy Bud Light is what hurt.

He did request a six of homebrew, whenever it was ready. I do plan on brewing an American Wheat for the BMC types.

It is worth a making a lighter brew now and then to keep anyone who can weld stainless happy.

my fabricator is going to weld up my rig for a case of Centennial Blonde (BierMuncher's recipe). He loves it and I like to keep some around for the BMC crowd.

I'm considering a similar system and was wondering if used a false bottom in the MLT or a Braid. I'd like to use a braid ring in my MLT. It works excellent for my current set-up (all gravity).
 
I use a Phil's Phalse Bottom that I have had for about 20 years.

phalsebottomlarge.jpg


It is 12" in diameter and fits my Gott perfectly. I use a fitting from BargainFittings.com that connects to the out tube on the Phalse Bottom and hold the Phalse Bottom in place.

If I was to do it over, I would use a stainless steel false bottom.

12-stainless-steel-false-bottom.jpg

Midwest seems to have the best price

http://www.midwestsupplies.com/12-stainless-steel-false-bottom.html

I have never used a hose braid for lautering, so I can't really comment on them.

I have placed my order for the stainless camlocks. I do have to say I am impressed with the vendor. I forgot one item. E-mailed them about it. They E-mailed me right back. Added the item and everything was shipped today.

I am sure I will be having too much fun next week, changing out 17 male fittings and building new hoses.
 
brewframe_upgrade.JPG


Here is the latest version of the brewframe.

I changed out all the brass, McMaster-Carr, quick disconnects for stainless steel Cam-locks.

I also spent about $60.00 to get engraved signs made for each of the connections and controls on the brewframe.

I am waiting for a package from BargainFittings which will contain the new whirlpool parts. He is also sending me some more silicone tubing.

One drawback to the cam-locks is they do not have 90 degree female fittings like the brass QDs. I could have spent more money to get all the parts to build up a 90, but it was easier to order more hose.
 
Wayne I realy like your rig. The stainless fittings look great. Name plates are a nice touch. Post a pic of your new whirlpool set-up when you have it finished and let us know how you like it.
 
I did receive the whirlpool fittings.

I put them in the kettle today. I'll try to get some pictures posted in the next day or so. Right now I'm charging up my camera's batteries.
 
Here are a couple of shots of the new fittings to allow me to whirlpool in my kettle.

Whirlpool_fitting.JPG


whirlpool_and_outlet.JPG


The fittings were purchased from BargainFittings.com. I had been using a simple street elbow with a coupler before.

Brewstand_Trubpile.JPG


A couple of weeks ago, I removed the coupler and turned the street elbow around. This improved the centripetal force and gave me greater velocity and a tighter trub pile.

The new fittings will more closely simulate a true tangential inlet.

The second picture shows the wort outlet that draws from the side of the kettle. It is an elbow with a close nipple threaded into it. I leave behind 0.625 gallons of wort and trub when I run into my fermenter, as shown in the third picture.

I hope to be able to brew this weekend to give the new fittings a test. If I remember to take pictures, I'll post them here.
 
Wayne,
I'm considering moving away from my hardline approach (see the website in my signature). Can you give some details on the new SS camlocks you installed? I've never seen anything like that.

Thanks!
 
Wayne,
I'm considering moving away from my hardline approach (see the website in my signature). Can you give some details on the new SS camlocks you installed? I've never seen anything like that.

Thanks!

Camlocks, or cam and groove fittings, are very commonly used for industrial fluid movement. They are also used for some solids movement. When we received grain in our silo, back in the brewpub days, the fittings were all camlock.

They are not quite a pure sanitary fitting, but are closer than the brass quick disconnects I was using. I would prefer to use a bevel seat fitting, but those are not made to fit 1/2" hose.

I purchased the camlocks from Pro Flow Dynamics. here

They were great to deal with. I wanted to change the order slightly after I placed it. They graciously accommodated my request and still shipped it the same day I placed it.

The female fittings with the hose barb do take some getting used to. You have to move both wings at the same time. After a few uses they do loosen up a bit.

I have now brewed twice with them and I am never going back. With the brass fittings I did need to wear a glove to release the hose on the kettle. With the loops on the wings, heat from the fittings never travels out that far. They are easier to release and to attach. There are sometimes during a brew day that I just need to have fluid flow for a short period. I can do so with the camlocks without going through the whole connection process.

Lots of benefits and a cheaper price. They are a win/win for me.

Here are a couple of other shots of the male fittings on my vessels.

mlt_camlock.JPG


kettle_camlock.JPG


Here is a comparison shot between the old male disconnect and the new camlock.


disconnects.JPG


I have brewed on a couple of all hardpiped systems. I, personally, did not care for them. I like the versatility and ease of cleaning using a diverter panel, disconnects and hoses.
 
Wayne,
Thanks for sharing all the information on your set up. I'm trying to understand these items so as to utilize others experience before making my own. I was just wondering about a couple of things.

Does the relative depth of the tangent inlet relative to the outlet play a role. I would think if they are at the same depth, the tangent inlet would impinge its flow on the outlet connectors.

The second thing is, if you did it over again, would moving the tangent inlet's current position (A), clockwise to a position (B) be more helpful ? Or in your case, lengthen the stainless tube to run around so that its exit is just beyond the outlet connector.


Regards,
BB
 
In most of the systems that I have used, the inlet port is on the side and as low on the kettle as it can go. In my system, for various ergonomic issues, I had to place the inlet and outlet at 90 degrees from each other.

There is no reason I can't have the inlet on the right side of the kettle and outlet on the left. In fact I will do that for my next brew to see what happens. If anything it will keep the flow away from the thermo probe in the middle of the kettle.

For an electric kettle I think you would want the inlet high and outlet low to ease stratification.
 
Yambor, this is the one you want, it's the type F. The female one is correct for your hoses:

732_xlg.jpg
 

Latest posts

Back
Top