Brewie

Homebrew Talk - Beer, Wine, Mead, & Cider Brewing Discussion Forum

Help Support Homebrew Talk - Beer, Wine, Mead, & Cider Brewing Discussion Forum:

This site may earn a commission from merchant affiliate links, including eBay, Amazon, and others.
Yes. It is quite thick and you need a good drill bit. There is a ventilation opening where it is designed to line up with the wires of the heater. I drilled mine into that spot like Ironcyberia did.

Also need some small gauge wire to extend the fan wires to the power supply because the lead that comes off the fan isn’t long enough. Cut off the small plug that comes with the fan and splice together. Another Home Depot item.
 
Last edited:
Thanks to @Nate R for sharing what he's working through and to @HarkinBanks, @Hamboner, and @sniperd for sharing their expertise and experience now and throughout the thread. I'm also planning to swap out the wiring and connections as a preventative measure on my original B20 machine and my ebay unit. Plus I'm having some issues getting to a strong boil on my original unit, even in developer mode.

Question - do you all think the muffin fan is hack useful/necessary for the B20 machine? I'm pretty sure that's what Nate is using, but I believe that hack was introduced for the B20+.

Also, while I'm asking questions - about how much wire per machine would be necessary to buy?

Thanks so much in advance. Really appreciate all the information.

Well... for the amount of time, effort, etc. That i have spent just to get to the boil tank, i am going to do it all at once and be done with it!!
Also, in my last few batches i also did not get to a full boil as well... probably a good bet it is the wires degrading.

As far as wire length, i just ordered the 10' length from ebay (from the reccomended link on the forum) for $16. I think that will be plenty. I could not find the wire at home depot.
 
You should be able to check for continuity with a multi-meter. If the thermostat failed open you would get no continuity. Check all the wires and the thermostat. My wires were already in pieces when I opened it up.

Not a thermostat..... it is a thermal cut off switch set to a specific temperature.

I recommend installing new wiring and the auxiliary fans on both sides. I replaced the existing fans and added 2 new fans. I would do this Especially if you use a step mash in your brews. The more you have to heat with the mash side the more likely you will have the same problem on the mash tun some time down the road. Be sure your fans add up to but not over the same amperage used by the originally installed fans if you are going to splice them into the existing wiring. You will also want to make sure that they move close to the same CFM (cubic feet per minute). You can find my mod thanks to harken and iron that started their mods before I dared open mine. here. https://www.homebrewtalk.com/forum/threads/brewie.506703/page-37#post-8506655
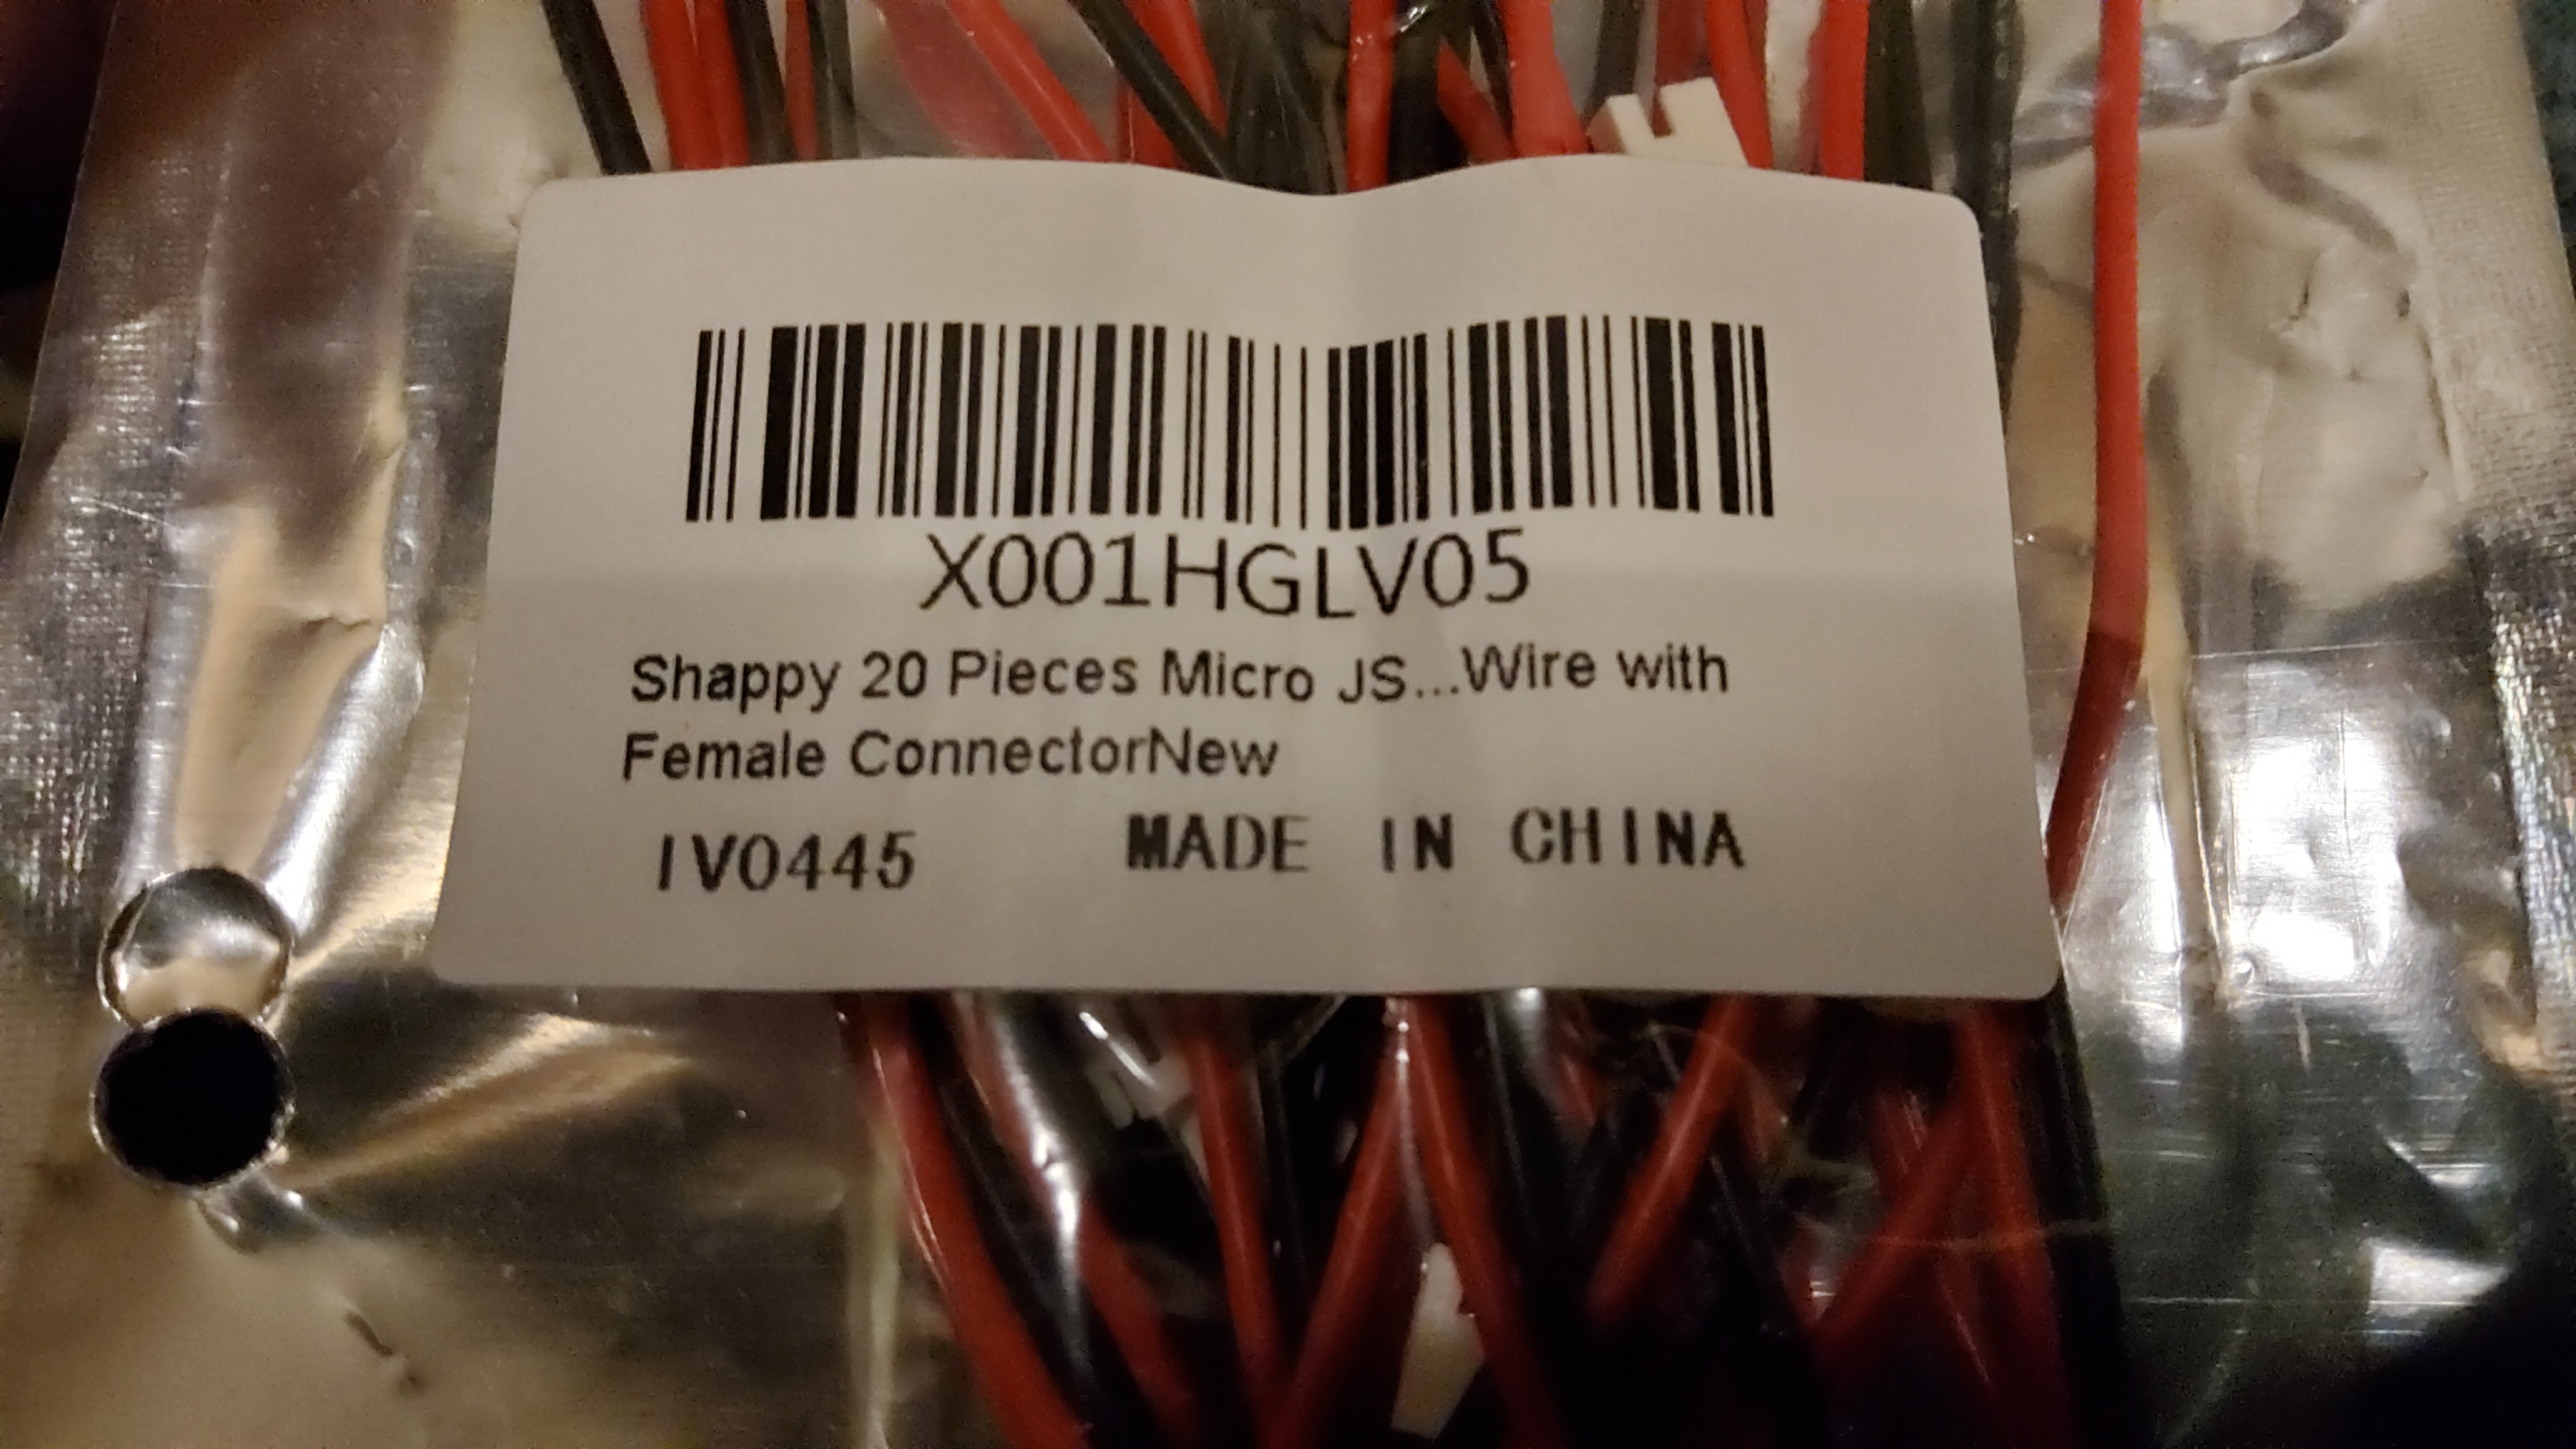
The connectors used for the fans are Micro JST on the B+ I ordered the wrong ones the first time and it is listed wrong in those posts. You can see a couple of additional pictures here.
https://www.homebrewtalk.com/forum/threads/brewie.506703/page-40#post-8540416

On the B+ locktight was used on the bolts holding the fans to the base. I had several of them break while removing. My replacement fans came with new bolts so not a big deal. If your fans do not come with new be sure to have some on hand to speed thing up and not have to make a store run in the middle of you repair.
 
Last edited:
If anyone needs the Micro jst plugs I have a number of sets left just send me a SASE and a buck per 2 pair and I will drop them in the mail. It was so much cheaper buying them in a pack of 20 than just buying one set. PM me for info. I have about 15 left. Or you can order this...
15726066298178801523063856060928.jpg

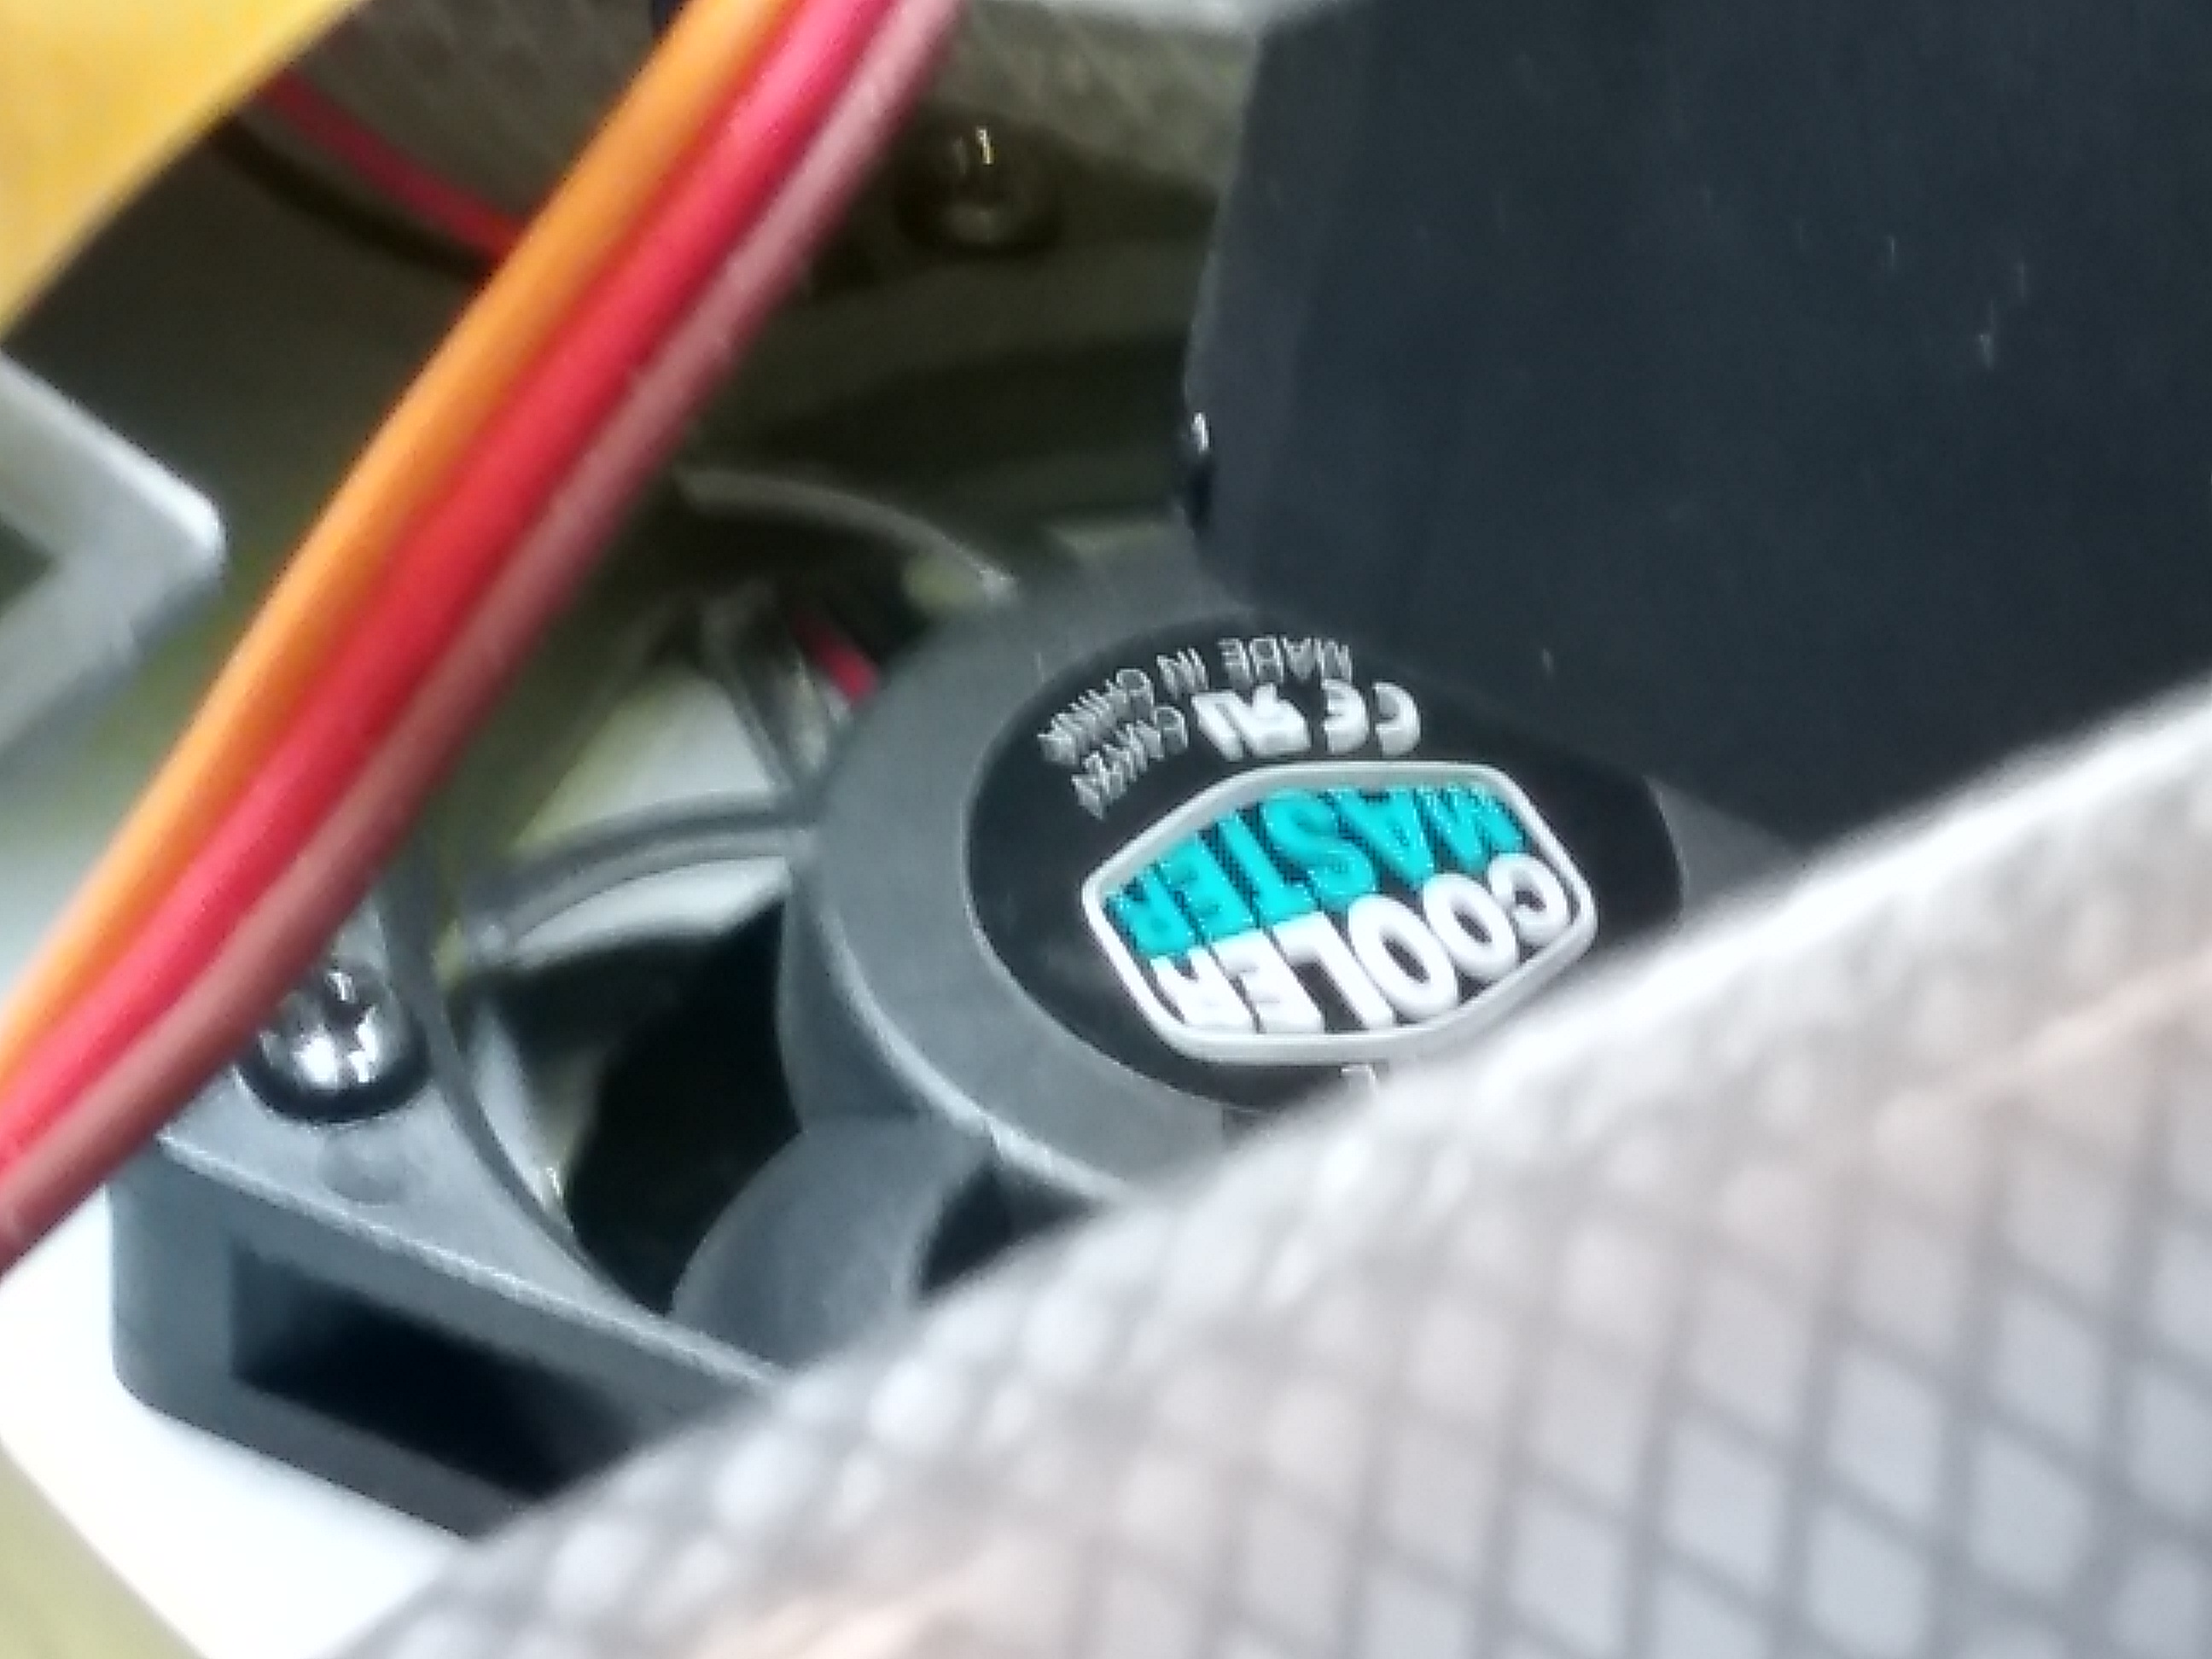
And the fans I replaced the existing fans with are

15726067499353991967344162991550.jpg

Those fans came with the wrong plugs but I bought enough that it didn't matter to me. They also came with grills and bolts. Used less power and move really close the the same amount of air. The other 2 fans I installed were from scrap computers..... smaller and originally used to cool CPU's. If I remember correctly.
 
Last edited:
Good morning all!
I wanted to again thank you all for the help, advice, and posts to links that I could (should?) have found on my own with a little bit of work.
I decided to create a spend tracker for my records, but figured it might help others to have a list of what is needed.
Some of these items you may not need, or already have, etc.
Also, I may have ordered too many crimp ends- but since I am doing the mash side as well, I wanted to make sure I have plenty of parts.
 

Attachments

  • BrewieB20RepairCost_PDF__.pdf
    419.8 KB · Views: 55
Hey guys - I have a couple of questions.
I've brewed a couple of times now on my brewie, and I think I might need some advice on how to get a better effeciency.
(yesterday I brewed the jingle ale - beersmith calculated an effeciency of 67%, but the real numbers turned up an effeciency of 61%).

I've looked over the brewie video giving hints on better effeciency:
1) My water is quite hard and mineral rich, so I don't add any salts, but do add some 80% lactic acid, using the brunwater excel file for calculations.
2) I'm looking to buy a mattmill, but am a bit in doubt about which model to buy. There seems to be one aimed at circulation systems like braumeister etc (mattmill brewmaster), but if I read the specs right, that one doesn't go down below 1mm...?
Anyone here have recommendations? Also, what mill gap do you guys use? I believe someone mentioned 1mm, although the video suggests 0,7-0,8mm.
3) I do add quite a bit of rice hulls.
4) I stir periodically. I bought the basket from arborfab, and this is the first brew I used it for.
5) The video seems to suggest a ph of 6,4 for the sparging water - this seems higher than what I typically see as the recommendation..??
6) I just generally drain everything into my fermenter. Any reason not to?
 
6) I just generally drain everything into my fermenter. Any reason not to?

No reason not to, I do every time and it has not hurt my beer at all.
A couple of hints though.... 1. Be sure not to stir your grain bed during the last 5 minutes or so of your sparge it is acting like a filter and does a very good job at getting the loose particles out of your wort.
2. When you are draining into your fermenter run the wort coming out of the hose through a sanitized, fine mesh colander to get any stray hop particles. Doing this also helps aerate you finished wort. If you are using a fermenter with a small opening you will be unable to do the second step. I posted pictures of the colander my wife got me from Bed Bath and Beyond a while back on this thread, but picture is not on my tablet anymore.
 
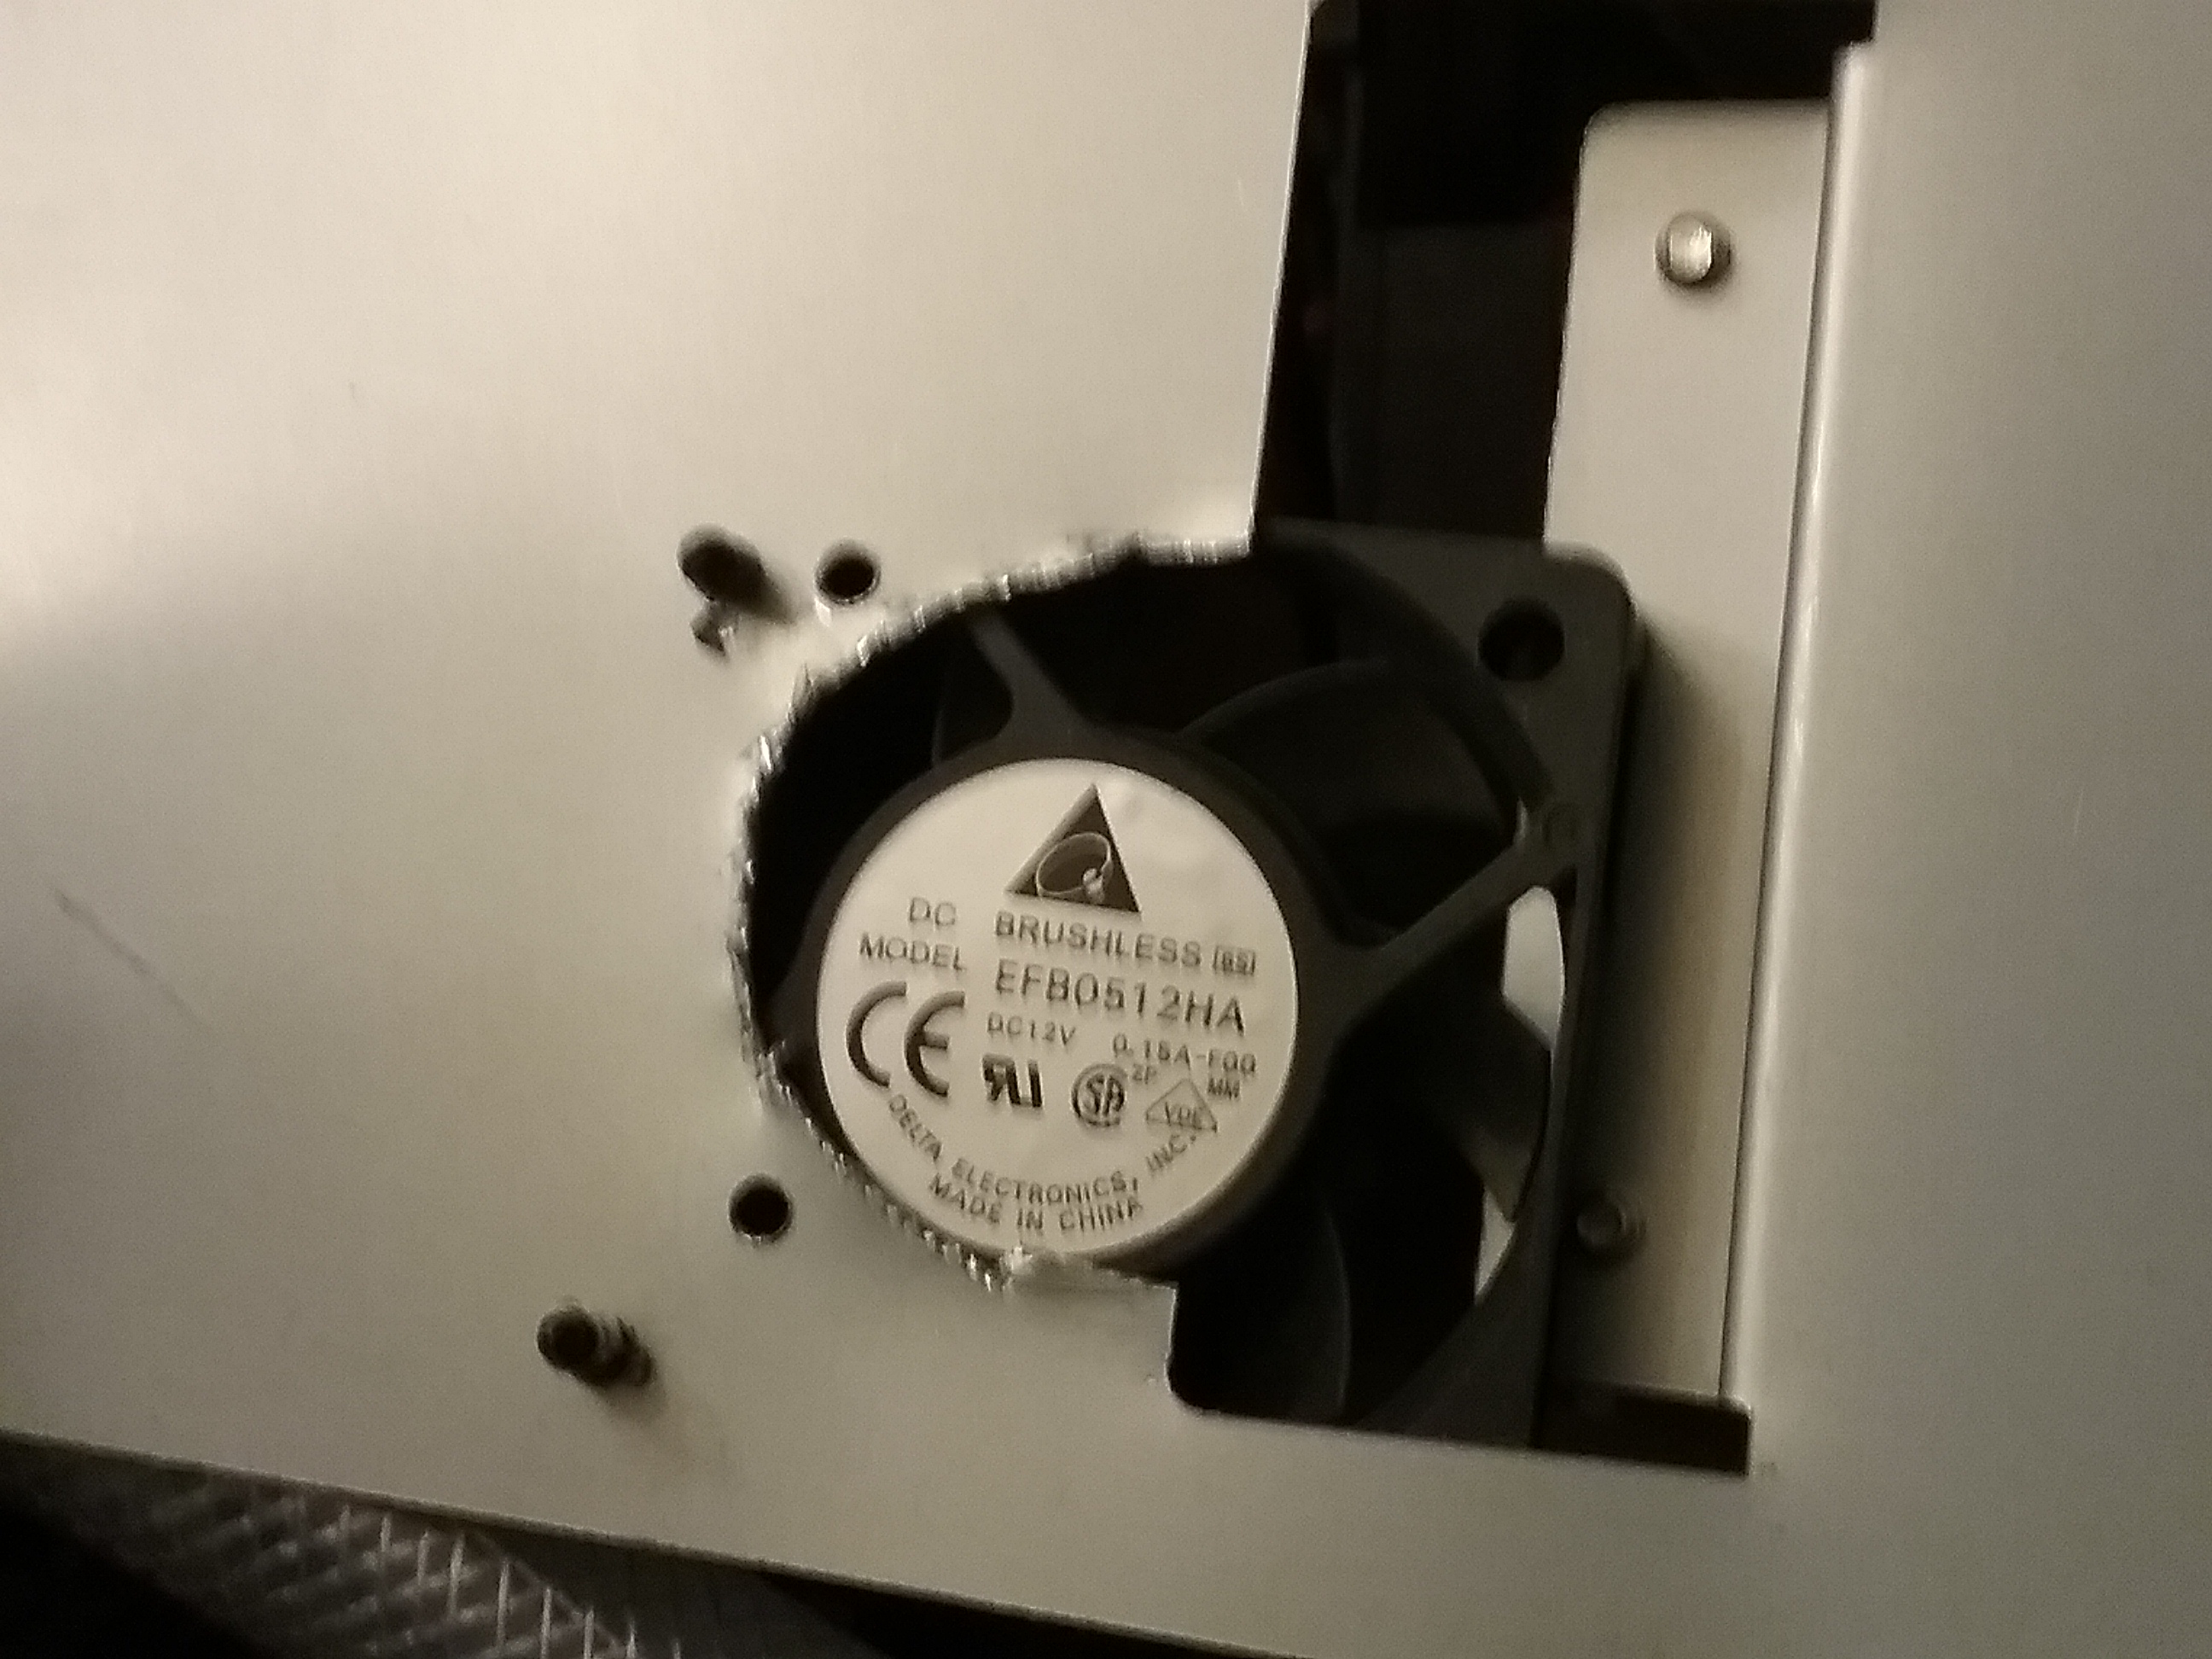
The second fan has part of the plate it is mounted to cut away so it does not block the flow of air as much
20190128_180414.jpg


After I took that picture I cut a little more away but forgot to take a picture
 
@Still Brewn these are great, thanks!!

Just so i understand, with the original fans- is the airflow IN to guts of the Brewie or AWAY from the guts? I never checked before and now my machine is taken apart.

I want to make sure my fans all blow the same way!
 
No reason not to, I do every time and it has not hurt my beer at all.
A couple of hints though.... 1. Be sure not to stir your grain bed during the last 5 minutes or so of your sparge it is acting like a filter and does a very good job at getting the loose particles out of your wort.
2. When you are draining into your fermenter run the wort coming out of the hose through a sanitized, fine mesh colander to get any stray hop particles. Doing this also helps aerate you finished wort. If you are using a fermenter with a small opening you will be unable to do the second step. I posted pictures of the colander my wife got me from Bed Bath and Beyond a while back on this thread, but picture is not on my tablet anymore.

Thanks.
Any comment on mills and milling gap size?
 
Thanks.
Any comment on mills and milling gap size?
Here is my $0.03 worth:
Since brewie is a biab, and since you have the arborfan baslet, smaller the better for the gap. I just recently posted in the all grain brewing section abiut this with pics from my mill.
Here are some tips:
- you can condition your grains by misting with water. I did this on my last batch but my brewie died before the batch! D'oh!!

Here is my best advice- before you buy a mill, decide HOW you will.power it.
-A hand crank sucks. Period.
-A drill is better- but then how will you mount it? Will you get a good 180.rpm?
- the best way is to get a direct motor with either pulleys or a gear coupler. If you are handy you can make.
- i would strongly advise you buy the kit togethet from like more beer or williams. Plan on $400. You can go cheaper but you get what you pay for.
I wish i would have saved and done what i just suggested.
 
Thanks for your tips. I live in EU, so I have to look at what's available here. Seems like the mattmill is nicely germanly over-engineered, which is why I'm aiming at that - but they have different products, so I'm trying to figure out which is best.
You say smaller is better - but isn't there problems with too much flour? Since there's a lot of tubing around inside the Brewie, I'm worried about things getting clocked up in there - but I'm a bit of a beginner in this area.
Conditioning the grain - I'm not sure I understand - can you elaborate?
 
Here is my $0.03 worth:
Since brewie is a biab, and since you have the arborfan baslet, smaller the better for the gap. I just recently posted in the all grain brewing section abiut this with pics from my mill.
Here are some tips:
- you can condition your grains by misting with water. I did this on my last batch but my brewie died before the batch! D'oh!!

Here is my best advice- before you buy a mill, decide HOW you will.power it.
-A hand crank sucks. Period.
-A drill is better- but then how will you mount it? Will you get a good 180.rpm?
- the best way is to get a direct motor with either pulleys or a gear coupler. If you are handy you can make.
- i would strongly advise you buy the kit togethet from like more beer or williams. Plan on $400. You can go cheaper but you get what you pay for.
I wish i would have saved and done what i just suggested.

Keep in mind while the brewie is a biab type setup it's also a recirculating mash as far as I'm aware and milling tight generally doesn't work well on recirculating systems. Cheers
 
Thanks for your tips. I live in EU, so I have to look at what's available here. Seems like the mattmill is nicely germanly over-engineered, which is why I'm aiming at that - but they have different products, so I'm trying to figure out which is best.
You say smaller is better - but isn't there problems with too much flour? Since there's a lot of tubing around inside the Brewie, I'm worried about things getting clocked up in there - but I'm a bit of a beginner in this area.
Conditioning the grain - I'm not sure I understand - can you elaborate?

Read this thread.

https://www.homebrewtalk.com/forum/threads/any-opinions-on-the-looks-of-the-grain-crush.671037/
 
Keep in mind while the brewie is a biab type setup it's also a recirculating mash as far as I'm aware and milling tight generally doesn't work well on recirculating systems. Cheers
Yeah.. for sure. Dont want just flour, but it seems to me i just cannot get a small enough crush. Every time i adjust i still get too rough. With the 600 micron mesh arborfab basket tho... allows for some pretty fine crush. A must to have at least 4-6 ounces rice hulls... for my wheat beers i do about 0.5 pounds.
 
Yeah.. for sure. Dont want just flour, but it seems to me i just cannot get a small enough crush. Every time i adjust i still get too rough. With the 600 micron mesh arborfab basket tho... allows for some pretty fine crush. A must to have at least 4-6 ounces rice hulls... for my wheat beers i do about 0.5 pounds.
It's not the bag/basket that's the issue. It's when the grist can't flow well enough to keep up with the pumps flow rate that you have issues. Channeling or compacting the grain bed occurs. It can even crush the falsebotton or scorch the bottom of your mash tun in extreme cases. Cheers
 
20190128_190453.jpg
Screenshot_20191104-072219_Samsung Internet.jpg
@Still Brewn these are great, thanks!!

Just so i understand, with the original fans- is the airflow IN to guts of the Brewie or AWAY from the guts? I never checked before and now my machine is taken apart.

I want to make sure my fans all blow the same way!

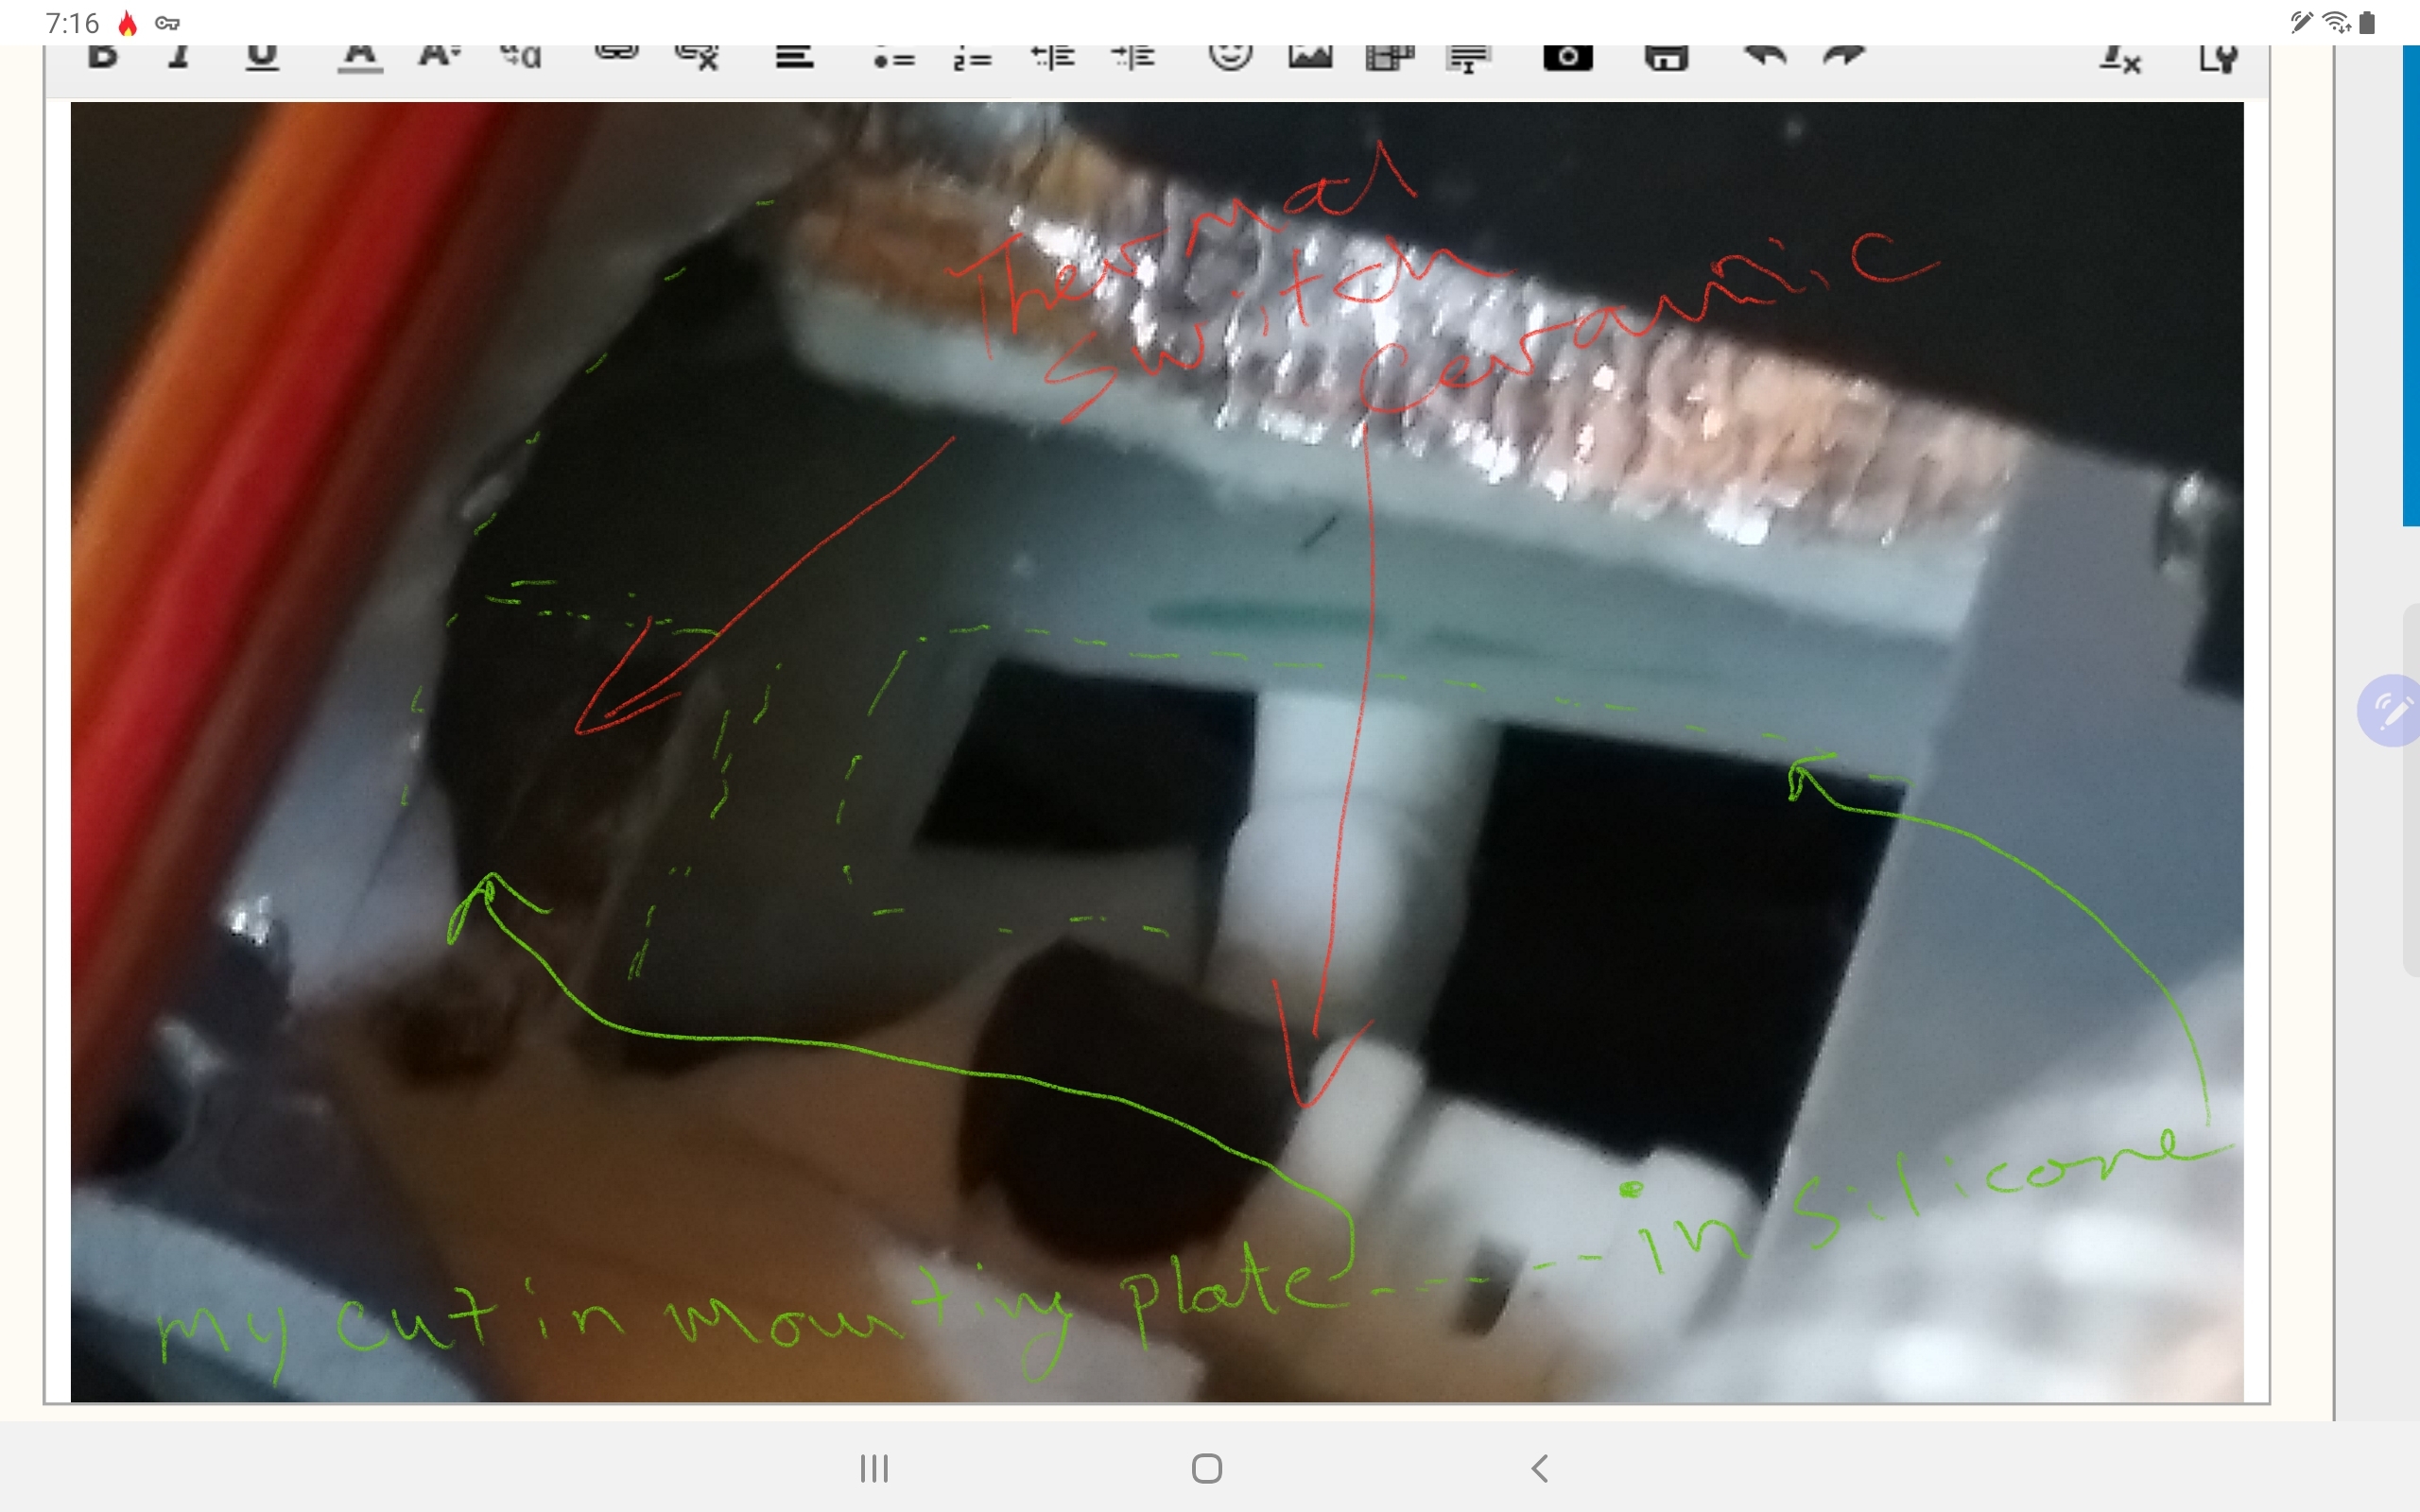
I does not matter what the others are doing. You want the cool air blowing directly onto the ceramic and connection points of the heaters with air spilling off onto the temperature switch connections. You will then make sure the heated air can escape the area by making sure there is an escape route for it under the hop cage area where all the tubes are located

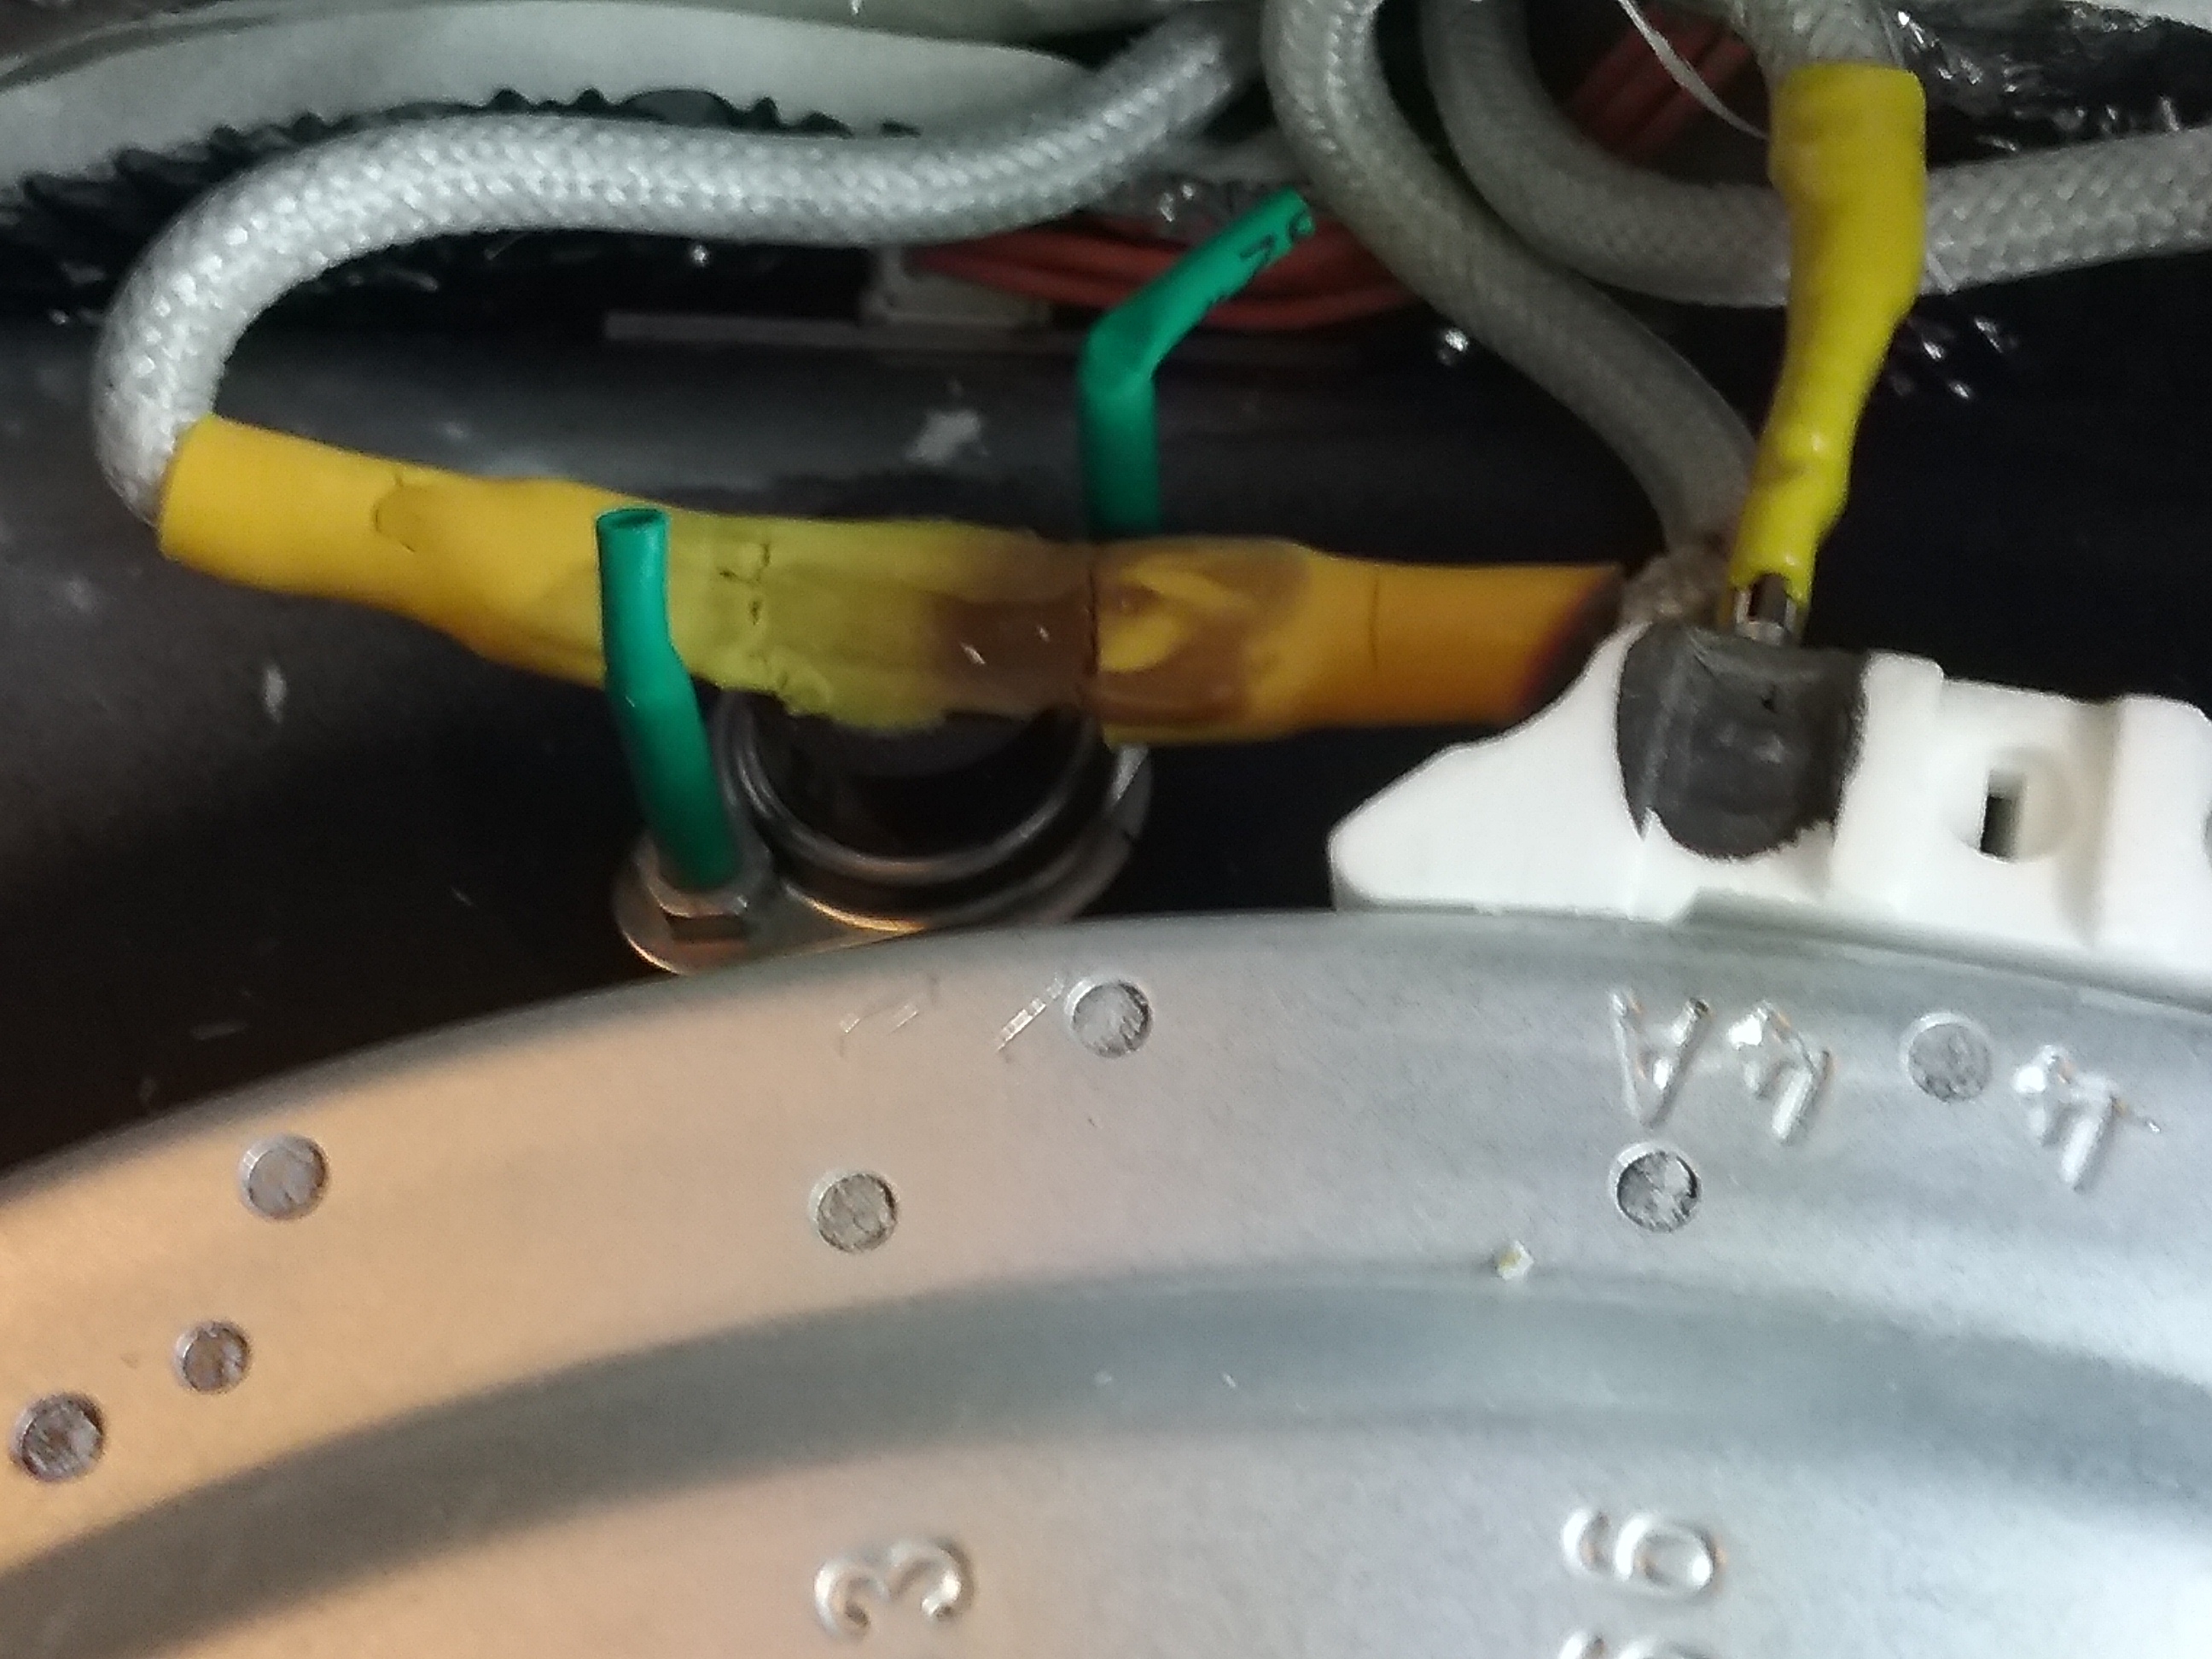
As you can see you will also have to cut the heat blanket and if your machine did not come with covers on the thermal switch studs I would place heat shrink on them.

20190128_180251.jpg

Like this. Some of the thermal switches could rotate in the housing and end up having the electrical connections making contact with the mounting studs shorting the system. You end up with melted studs/blown fuses/blown relays.
When you cut the heat blanket make sure that you cut it away far enough that there is no chance of the foil face making contact with any of the electrical connections.

As you can see in the last picture there is still significant heat generated through conduction (you can see this because the plastic cover on the connector at the ceramic has been replaced from the original and subsequently melted) this picture was taken after I made the repair and added the fan on the boil kettle but before I received replacement wires with the silicone insulators you see in the picture above it. When I got the wires I put a slightly more powerful fan on the boil side and added the fan to the mash tun. (that is why you see an extra set of holes in my picture in my previous post any why it looks like the fan blades are blocked I have since cut away a little more metal) I then, some time later, took it apart again and added connections to the the factory fan controller and replaced the factory fans with more efficient ones (to reduce power consumption on the 12 volt system) that way all 4 fans can be controlled by the machine and the ones I installed are not running any time the machine is plugged in.
 
Last edited:
Anyone have any leads on where I can buy an additional grain bag for the mash? I would like to have a second to split grains with high gravity brews to increase efficiency or to have a second bag for doing a gose etc

When I search google, I seem to just find ghost listings or discontinued pages.

Is there an alternative that will work well?
 
If you are in the EU you can order them from Brewie if you are in the US you may be out of luck for now....

Or you can try this from more beer https://www.morebeer.com/products/drawstring-mesh-bag-18-20.html

Since it is a drawstring instead of a zipper I suggest going bigger than the original 17"×17" Brewie bag. Let us know if it works because there are a number of us that still use the bags. More beer has nothing listed for the Brewie anymore by the way.....
 
I tried something like this to get better efficiency and try and get the step mash temps to hit more accurately.

upload_2019-11-6_16-24-7.png


It was a first test run that didn't go perfectly. I 3d printed an elbow to fit into the mash inlet port and ran the hose up over the top. I used PETG which is generally regarded as food safe (think plastic water bottles) and prints at a higher temp than PLA or ABS. I thought it would hold up to the heat but it warped a bit and by the end it had cocked about 45* in the port and the flow to the top was significantly reduced. I think the next iteration may involve using some smaller tubing that will fit snugly into the port, cut at a 45* angle to allow the mash water flow (comes from the bottom in the brewie) and 3d print a 'sleeve' for it that will allow it to make the 90* vertical bend without kinking the hose closed.

I have just been doing single infusion mashes for the past few batches to ensure i hit conversion temps (mash in 8-10F higher than desired mash temp). I found that when doing step mashes, the mash water temp (measured by brewie) is not the same as the grain bed by a good margin. I would do 30-40 minutes steps and it would heat and progress through the steps allegedly, but the actual grain temps were always way way low. I think the mash inlet was bypassing a lot of the grain bed. By putting the liquid up top, its forced to go through the whole grain bed and heat the whole mash instead of just the water and malt at the bottom/sides.

I'd also like to get a fly sparge arm or sorts up there instead of the passive spreader, should improve the spray pattern and the vertical clearance issues (clearly couldn't shut the mash lid all the way with this).

I'll post again once i get the next iteration up and running.
 

Attachments

  • upload_2019-11-6_16-21-32.png
    upload_2019-11-6_16-21-32.png
    372.4 KB · Views: 44
Interesting idea!
I still keep wondering whether it would be beneficial to block the sides of the cage, to force the wort to circulate down through the bottom like a regular maltpipe in a grainfather. It would likely be necessary to reduce the flow for this though, to avoid having too little liquid on the heater.
 
I tried something like this to get better efficiency and try and get the step mash temps to hit more accurately.

Nice! I have been thinking in those terms to, but haven't done anything yet. But I was more into a SS plug (into the hole), weld a pipe etc.
Please share a Close up pic on the plastic where you plug it into Brewie.

BTW: www.brewie.org is up right now.
 
Hey guys - I have a question about the recipe collection from Brewie.
The Irish red ale lists "Caramell" as one of the ingredients - and I'm uncertain about whether this is a malt type, or a sugar addition... ?
Anyone know?
 
and another question: I found two beersmith profiles for the brewie, but I the numbers dont seem to add up to reality for me... have anyone messed with that?
 

I looked just before posting the comment and tried to see if I could order bags. The website says they don't ship to my country (US). So while not a definitive answer as to whether or not they are still alive or not, it didn't say they couldn't ship anywhere (as in sorry we are not shipping right now). Sorry I couldn't be more help. Maybe someone from the EU could chime in here with a test order....
 
I tried something like this to get better efficiency and try and get the step mash temps to hit more accurately.

View attachment 651473

It was a first test run that didn't go perfectly. I 3d printed an elbow to fit into the mash inlet port and ran the hose up over the top. I used PETG which is generally regarded as food safe (think plastic water bottles) and prints at a higher temp than PLA or ABS. I thought it would hold up to the heat but it warped a bit and by the end it had cocked about 45* in the port and the flow to the top was significantly reduced. I think the next iteration may involve using some smaller tubing that will fit snugly into the port, cut at a 45* angle to allow the mash water flow (comes from the bottom in the brewie) and 3d print a 'sleeve' for it that will allow it to make the 90* vertical bend without kinking the hose closed.

I have just been doing single infusion mashes for the past few batches to ensure i hit conversion temps (mash in 8-10F higher than desired mash temp). I found that when doing step mashes, the mash water temp (measured by brewie) is not the same as the grain bed by a good margin. I would do 30-40 minutes steps and it would heat and progress through the steps allegedly, but the actual grain temps were always way way low. I think the mash inlet was bypassing a lot of the grain bed. By putting the liquid up top, its forced to go through the whole grain bed and heat the whole mash instead of just the water and malt at the bottom/sides.

I'd also like to get a fly sparge arm or sorts up there instead of the passive spreader, should improve the spray pattern and the vertical clearance issues (clearly couldn't shut the mash lid all the way with this).

I'll post again once i get the next iteration up and running.

Hate to burst a bubble here ..... drinking bottles are made from pet, they are formed in a blow mold using hot air, there are 2 types one has a transition phase of 67° and the other 81° (152° and 177°) well below the boiling point of water so you will have a tough time being able the get one made of pet to stay stable. Additionally at around 200 pet starts to release other things into your water if I remember correctly, not sure what, how much etc but it would be good to look. Might be antimony.....
 
Hey all.
So (very very) slowly making it through the repairs to my old school Brewie.
Cleaned up the boil side, installed new thermo-shutoff thingy.
Checked on the mash tun side- no signs that i could see. (Pics below).

Had a heck of time getting the two extra muffin fans in. So...
Had an idea- since the two fans already installed in the Brewie blow air down towards the bottom (if the machine is sitting upright) this means the "screens" on the side (with the "B" on them- near the power switch and pause drain switch) are where air gets sucked in.
Can't i just put a high cfm fan into this screen on the boil side? It won't look as sexy but it would sure be easy. Heck, i could even mount it somehow.

Has thia been discussed here? I do not recall reading about it here.

Thanks all!!

20191107_163643.jpg
 
Yes those are air intake holes. I assume the black fabric acts as a dust filter. I did think about putting fans there to increase airflow, but this would alikely mean more dust buildup on those filters, which might end up being so full of dust that airflow actually gets restricted. This is typically seen on computers.....
I think using the smaller fans inside will give less dust, and more cooling where it is needed.
 
Hey guys - I have a question about the recipe collection from Brewie.
The Irish red ale lists "Caramell" as one of the ingredients - and I'm uncertain about whether this is a malt type, or a sugar addition... ?
Anyone know?

My guess is a caramel malt, but with a higher Lovibond than 20L. Like this:

"120° L Briess Malting - Briess Caramel, or Crystal, 120L is used in Red Ales and in beers where you want a heavy caramel flavor contribution. Will contribute deep red hues to the color of your beer. We usually put 1/4 to 1/2 pound per five gallons in Bock beers." (Pulled from Morebeer.com )

I would guess this based on the description from Brewie:
"An easily drinkable beer with hints of caramel and toffee like flavors and a beautiful reddish-copper color thanks to the added roasted barley, which lends a dry finish to this style which can be fermented with ale and lager yeast as well."

I am not familiar with this high of a Lovibond or this beer style, so you may want to experiment with the amoount or stray over to the ingredients threads and get an opinion there.
 
and another question: I found two beersmith profiles for the brewie, but I the numbers dont seem to add up to reality for me... have anyone messed with that?

I have tried but no luck. I have seen a few of these floating around, but have had no real luck with it.
If you can locate a firm profile, please share with us all!
 
Yes those are air intake holes. I assume the black fabric acts as a dust filter. I did think about putting fans there to increase airflow, but this would alikely mean more dust buildup on those filters, which might end up being so full of dust that airflow actually gets restricted. This is typically seen on computers.....
I think using the smaller fans inside will give less dust, and more cooling where it is needed.
Good point on the dust.
I can easily remove the bottom cover and clean the screens from time to time.
I think having a higher CFM blown in may help with the high temp issue from before...
I might just try this and report back.

Thanks!
 
I have tried but no luck. I have seen a few of these floating around, but have had no real luck with it.
If you can locate a firm profile, please share with us all!

Unfotunately, I've found no other profile.
However, I would like to suggest that people could start writing down the numbers and info from their brewings with their Brewie (plus noting whether it's B20 or B+). If we get enough data, I imagine it might be easier to adjust the profile to fit on a general level. There's a nice (empty) recipe thread on brewieforum.net for this :)
 
Has anyone thought about using Brewie as a skeleton, swapping out proprietary parts with more commonly available pieces, and running their own BrewControl/other automation system??

I’m thinking about buying a 3 vessel system and automating it to do what Brewie currently does...... just don’t know if I could save myself some trouble (and cost) by keeping what I have.
 
I have thought about that!
I've been using esp-boards to control my fridges for fermentation, using "brewpiless" software.
It's very nice because it's so small, has wifi, and provides a web interface for all the controls.
The guy that coded this also made a version for the brewing/mashing.
It's nowhere near as nice and complete as the brewie software, but it works.
I'm trying to learn c++ programming to mess with these programs, 'cause I would like to try to make an alternative for the Brewie.
For now, another option could be to use the brewpi/brewblox controller. It's possible to make diy version of that controller. With "brewblox" you have the option of putting together your system on a kind of graphical interface, so the software to do the controls are actually there (and it's open source).
For now though, my Brewie has worked pretty flawlessly, so I haven't been in a rush with this project.
But since there's a lot of room for improvements on the Brewie software, I do wish to work on improving it.

Anyways, you could try to compare the cost - with the Brewie you get two kettles with heating elements, two pump and about 10 valves - all put together in a nice tight package. It has it's flaws alright, but if you're looking at it as a platform for messing around with the controllers - I think it could be hard to match.
 
All, many thanks to all of you!
My 'O.G.' original Brewie B20 is up and running!
Completed a test brew tonight and hit a full 212 boil! (Granted it was 3 gallons but still!!)
Can't express enough how great this community has been!!
Also, to anyone worried about this repair... you can do it! Just read the directions a few times, go slow and take your time!!

Also, a few thoughts on the B20:
-mash side was fine- like no issues (pics above in a post from me).
-the "jumper wire" from the thermo switch to the boil heater needed replacing. The other wires were fine- just needee new ends. I wrapped those ends in the tape that was reccomended above.
-i kept the same 2 fans in the Brewie. I will add an external fan to blow "into" the grate under the boil side (by the drain pause button).

If i was to order these parts again, i could probably spend about $30 or less total for my B20 fix. (Crimpers, 4 ends, 8" wire).

Again, thanks all for the help & support!!
Tomorrow is family day.
Sunday is brew day & football day! Hefe otw!! (Gotta love the step mash!!)
Monday thanks to all the Veterans!!
 
Back
Top