• Please visit and share your knowledge at our sister communities:
  • If you have not, please join our official Homebrewing Facebook Group!

    Homebrewing Facebook Group

Brew stand... giving it a go!

Homebrew Talk

Help Support Homebrew Talk:

This site may earn a commission from merchant affiliate links, including eBay, Amazon, and others.
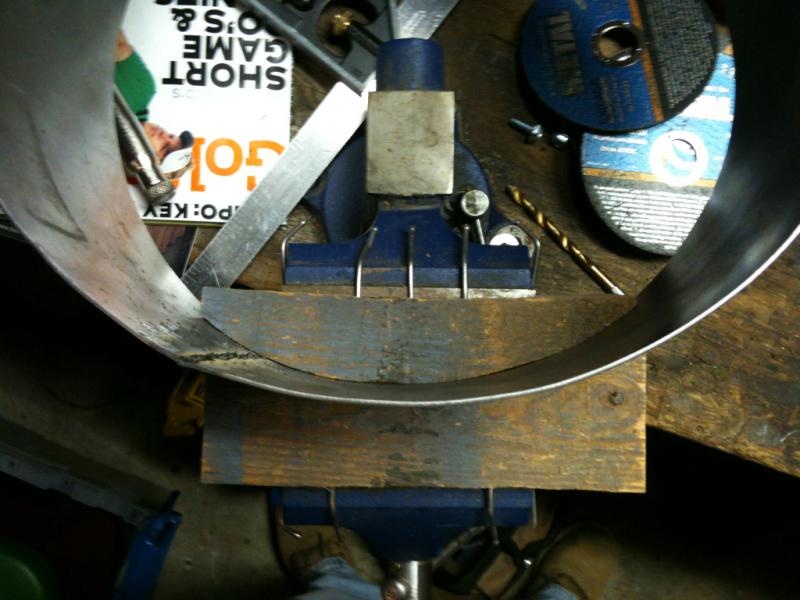
Ok, gave it another night of work. Going to take a break and brew some this weekend. Unless I feel like sweating like crazy, my next update won't be until sometime next week/weekend. As for tonight added the spacers to get me to 11" along with a heat shield. Only have one heat shield and will have to do over as the gauge I had is too flimsy. Will drill and tap so I can mount the shield with some screws. I didn't want to make it permanent in case it needs to adjusted for max burner efficiency. Always open for suggestions and critics. Thanks!

your stand is looking awesome.
something to consider, after I fired mine up with the kegs sitting in place the burner didn't seem to want to burn right even if I adjusted the burner lower. It turned out that the exhaust gasses couldn't vent (or thats what I'm thinking) and the burner wasn't getting enough air to properly burn. I ended up lifting my kegs up a few inches to allow the gasses to vent.
may not be a problem with your stand, but might be, doesn't look like much area to vent gasses with your keg in place.
I'm interested in how it fires up and burns, keep us posted.
 
@ rekoob

Funny you say that, after holding the burner in place I was thinking the same thing. I basically removed all possibility of gasses escaping in the northern direction. would hate to have the keg any higher for stability reasons. How do you accomplish this with yours, you have a pic? Also, wondering if I created a few more "vents" in the bottom of the keg or widened the ones that are already there. Once would also assume we would need to build some heat shields to protect sight glasses and valve ports if the keg was lifted. That is why I was suggesting bigger strategic vents on the bottom of the kegs.

Thoughts?
 
I did a similar thing and had no room for exhaust gas to go... I thought about cutting hole in the apron and read on here that some had bad experiences with that, so finally looking for a cheap quick way to fix my issue so I could finally brew on a system I have been building for a few months I gave this a try and it worked great! Did Pilot brew last Wednesday and it was awesome! The other plus side on this is the keg only rides on the edges of the flat bar, so the face of the top of the stand doesn't get all scratched up now. I had already repainted the top a few times after test fitting the kegs scratched the top. I also had no problems with the flames burning the paint off etc... The work could have been better, but a midnight finish before pilot brew day... I just went tack crazy and called it a day!

3f8cb6ae.jpg


Oh! you can also see I added some flat bar across the front... this was only to block the exhaust from coming out the front where my valves and QD's are. There was a noticable difference in temps from the front and sides! I was glad I did that!
 
@ rekoob

Funny you say that, after holding the burner in place I was thinking the same thing. I basically removed all possibility of gasses escaping in the northern direction. would hate to have the keg any higher for stability reasons. How do you accomplish this with yours, you have a pic? Also, wondering if I created a few more "vents" in the bottom of the keg or widened the ones that are already there. Once would also assume we would need to build some heat shields to protect sight glasses and valve ports if the keg was lifted. That is why I was suggesting bigger strategic vents on the bottom of the kegs.

Thoughts?

I don't have any pics with me right now, well, maybe, I will see if I can find some. there are some pics in my gallery but I don't think any of them show the heatshield up close.
I made heat shields to keep heat off the stand, there is a 1.5 inch gap around the heat shield and the stand. on the top of the heat shield I welded some "V" shaped angle (was scrap from the heat shield angle) on each side. also helps direct heat away from my valve and sight glass.
I have heard good and bad about cutting vents in the keg, not sure I would go that direction but it's an option to consider.
 
I did a similar thing and had no room for exhaust gas to go...

Nice job, I can see myself using a variation of something like that! Thanks to both of you guys letting us know about the gas escape issue. mmurray, what gauge steel did you use for the rings, looks like 18 or 20? I tried already but only had 26 gauge which was great for fitting, but not strong enough to hold burners
 
mmurray: genius idea adding the flat bar to the front. I was planning on doing similar spacers on my (in-planning) build, but that's a great addition.
 
Nice job, I can see myself using a variation of something like that! Thanks to both of you guys letting us know about the gas escape issue. mmurray, what gauge steel did you use for the rings, looks like 18 or 20? I tried already but only had 26 gauge which was great for fitting, but not strong enough to hold burners

I bought the shields from Brewers Hardware. If I had to guess I'd say 18g and they are Stainless. So being directly affected by the flames of the burners I didn't want to have to worry about paint etc...

Thanks for the compliments... I was originally thinking 1/2 round bar, but while at lowes it just didn't seem like it would be high enough and they didn't have any round bar larger. I looked at the flat stock and figured, worse case it wouldn't work, but to me the $18 investment was worth it to try!
 
I bought the shie.....

I noticed in your pic the shut off/adjust valve. One of the guys helping on the build just purchased a 0-30 PSI Regulator, well actually 2, once for each burner. If we do a black pipe set up to feed both burners would we just hook the reg directly to the pipe via adapter or do we only need one directly to the tank and then to the black pipe. Thanks for the help.
 
I noticed in your pic the shut off/adjust valve.

That is just 1 of the valves... I did a panel mount on the front for the ability to control the boil kettle burner easily. I can turn it up and get to a boil quickly, then dial it back to maintain a boil without boil overs or scorching the wort. On my pilot batch I had 7 gallons into the BK at Mash temps 158F and was boiling in less than 5 minutes.


One of the guys helping on the build just purchased a 0-30 PSI Regulator, well actually 2, once for each burner. If we do a black pipe set up to feed both burners would we just hook the reg directly to the pipe via adapter or do we only need one directly to the tank and then to the black pipe. Thanks for the help.
I currently have 1 preset 30psi regulator feeding into a manifold that feeds all 3 burners and 2 pilot lights. See the picture below and I'll tell you what didn't work.
7442b4a5.jpg


First, you see the 0-60psi regulator, the regulator was never the problem. the green ACME fitting has a flow regulator that continually shut the fuel off every time I tried to have more than 1 burner going. Once I figured out that was the problem, I used an old internal POL fitting with no flow control and the preset 30psi reg works fine.

Second, you see on the left I have a double 90 sending the black pipe all the way to the other end that the panel mount needle valve connects to that is then run to the BK burner. The rest of the manifold is a different theory/layout but principally is the same as all the other brutus clones.

Once I had the fuel coming out of the manifold I used the 1/4" needle valves on the HLT/MLT/pilot lights to adjust the flow. The theory there is that once those are set I should not need to adjust them again.
0864ede8.jpg

Hope this helps.
 
@mmurray

Thanks so much for the pics and the explanations! We will definitely use this input when designing the propane set up.
 
I haven't seen an update in a while. It seemed like you were making some really good progress. Hope everything is ok. Looking forward to seeing the finished project!
 
All is ok. Don't you hate when life gets in the way! :(
That being said, I should be back at it later this week and one day over the weekend. Thanks for keeping me on point!
 
Ok so I got a few hours to get back to the stand build. Real slow moving, need to find 28 or 29 hours in a day. 24 just ain't cutting it.

So I was able to build a new ring out of 2 pieces of 6" 16ga sheet metal Welded together I got at HD as a test. Had some trouble bending so I took some hard wood and rigged up a pathetic but effective press. Temp attached to my small vice and 'pressed' away. Actually turned out real well for not having a metal roller.

Also was able to use the actual burner to confirm fit. Thanks to mfiure coming through on delivery a few weeks back

I was also able to tap an install one of the 2 SS dip tubes loh777 supplied to one of the converted kegs.

Again, slow moving but at least moving.

image-3940801624.jpg

Confirmed fit of burner

image-2323577897.jpg

Make shift press to form circle of sheet metal
 

Attachments

  • image-1948288765.jpg
    image-1948288765.jpg
    60.1 KB
  • image-793845084.jpg
    image-793845084.jpg
    32.8 KB

Latest posts

Back
Top