Brew Bucket by SS Brewing Technologies

Homebrew Talk - Beer, Wine, Mead, & Cider Brewing Discussion Forum

Help Support Homebrew Talk - Beer, Wine, Mead, & Cider Brewing Discussion Forum:

This site may earn a commission from merchant affiliate links, including eBay, Amazon, and others.
"Cool factor" aside, are these really worth $225 over a bucket with a spigot?

That's a "Is a Ferrari worth $200k to do 65 MPH on the highway" kind of question. If you have to ask, it's probably not for you. Once you understand/appreciate the finer details, if it's something you want, you will just buy it. Assume that statement applies to all homebrewing hardware.

If something is truly a pile of suck, you can be sure there will be near unanimous agreement on it. Otherwise, it could be good or bad depending on what you were looking for and what your personal value system is like.
 
The only thing that I still worry about with the SS bucket is the ball lock spigot..... I am really paranoid about cleaning it. PBW soak after every batch, starsan soak after and before every batch. Boil it every 3 batches or so...... I don't like things I cannot see inside of when it comes to cleaning/sanitizing.

I take mine apart after each batch to clean. You can see inside of it.
 
"Cool factor" aside... is homebrew worth the time/effort?


Maybe I'm reading more into it than I should, but your comment seems a bit condescending. I hope that wasn't intended. I only asked a question about whether I should invest in one of these. I wanted honest opinions on whether these really made a difference for the price you pay for them.
 
I wanted honest opinions on whether these really made a difference for the price you pay for them.

I think you are good where you are at now (from your brief description earlier.) A new SS bucket does not make better beer than a new plastic bottling bucket...... but.... over time - yeah, I think it would matter. And, like I said earlier, if you can "part with" the .5 gallons or so that is in the cone at the bottom - I do like that it seems to drop everything out pretty nicely. They are not a necessity by any means....... but, they are a real nice, moderate level, luxury. Often in brewing, the "luxury" items are just off the charts expensive. I think this is a case where it is clearly a luxury item..... but within reach of many homebrewers. Take care of the key "process" items first - then come back and buy one of these babies when you have the more important things. I think most people are happy with theirs - but they won't make good beer all by themselves.
 
I think you are good where you are at now (from your brief description earlier.) A new SS bucket does not make better beer than a new plastic bottling bucket...... but.... over time - yeah, I think it would matter. And, like I said earlier, if you can "part with" the .5 gallons or so that is in the cone at the bottom - I do like that it seems to drop everything out pretty nicely. They are not a necessity by any means....... but, they are a real nice, moderate level, luxury. Often in brewing, the "luxury" items are just off the charts expensive. I think this is a case where it is clearly a luxury item..... but within reach of many homebrewers. Take care of the key "process" items first - then come back and buy one of these babies when you have the more important things. I think most people are happy with theirs - but they won't make good beer all by themselves.

Thanks. Money is not the issue. I mean, I can't go out and buy ALL the equipment I need all at once. Well...I could, but I'd have one very pissed off wife! I just wondered if the Brew Bucket was more hype than a valued benefit. I get what you're saying about it being a luxury item.

I do have a lot of equipment to buy to get going with all-grain and you have informed me on the bigger importance of a temperature controlled environment for fermenting, whether that's in a bucket, carboy and Brew Bucket. I'll be hitting my local craigslist for a fridge. I already have a Raspberry Pi and an Arduino I can allocate to the temperature control, so that's a plus. :D
 
You take the spigot itself apart? How? Thanks!!

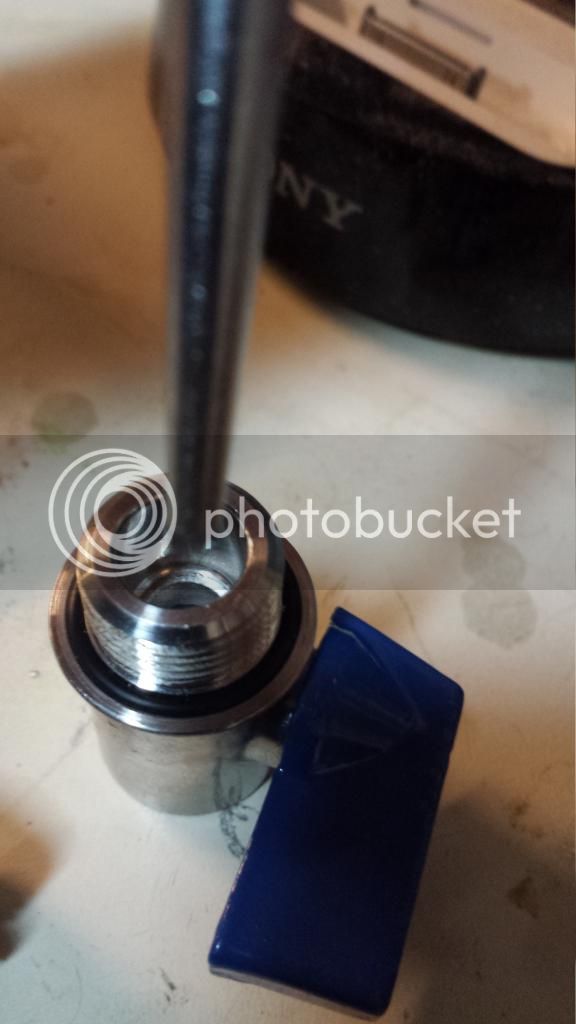
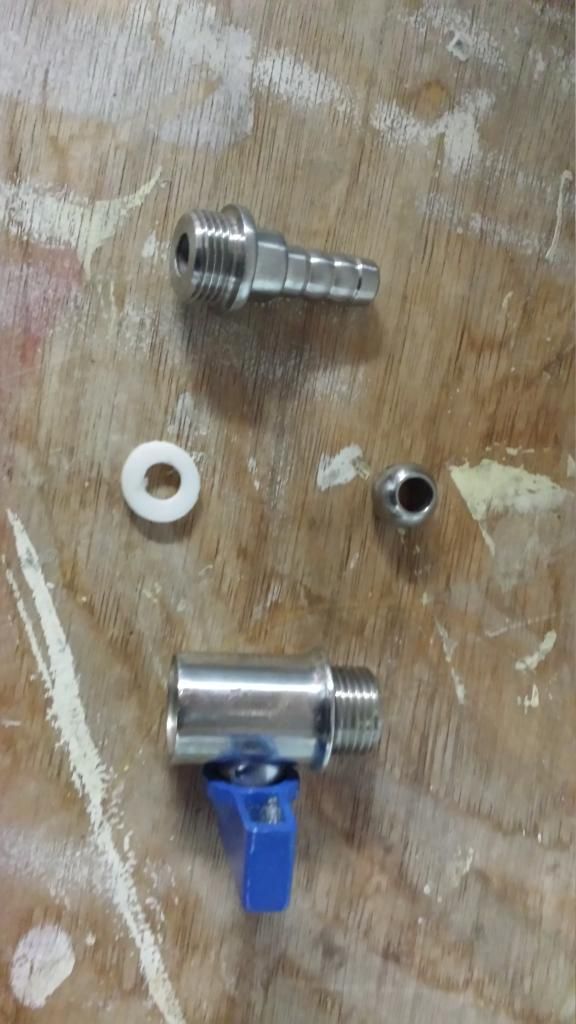
The barb unscrews from the body and bottom of the barb takes a wrench. It was hard to loosen the first time. I loosely put the body in a vise and then removed. Then you remove the seal. Originally I pried it out, but now I push it out from the other side using the ball (in a closed position). I haven't taken the other seal out, but I don't see any real reason to.
 
The barb unscrews from the body and bottom of the barb takes a wrench. It was hard to loosen the first time. I loosely put the body in a vise and then removed. Then you remove the seal. Originally I pried it out, but now I push it out from the other side using the ball (in a closed position). I haven't taken the other seal out, but I don't see any real reason to.

Cool.... who knew:) My one spigot came apart very easily with a wrench right in my hand. The other one seems like it is going to be quite stubborn. I will have to put it in the vice. Thanks for the tip.
 
Can somebody explain how to get the internal gasket(s) out of the spigot? I found that the barb-side unscrewed fairly easily, but I wasn't able to disassemble any further. I just couldn't figure out how to get that gasket out without damaging it, which would be bad.

And after removing that internal gasket, is there any additional disassembly possible?

These spigots DEFINITELY need to be cleaned regularly. Mine had a definite "old beer" smell, which is frightening since this contacts the wort.

I pried mine out the first time. The gasket on the input side is more critical than the one on the outflow side. Now I force it out by putting a punch on the ball (in a closed position) and forcing it out with a hammer. Once the gasket is out you can remove the ball. I wouldn't try to remove the gasket on the input side.

20140807_183358_zpslu25tske.jpg
20140807_183543_zpsyxmz7n50.jpg
 
Just received an email from these folks. Looks like they are now selling the buckets with a thermo-well

"You spoke and we listened. Many of you were wanting to have a built-in thermowell on the Brew Bucket.

$255 price includes 304Ss weldless thermowell and LCD thermometer and FREE SHIPPING!!! Please go to our site for more"

ImageUploadedByHome Brew1407463821.756854.jpg
 
Thanks Spartan for the disassembly details. I tried pushing out the ball, but it's TIGHT! I just can't make myself take a hammer to it, so for now the internal gaskets will be staying in place.

As a minimum everybody should be removing the valve from the bucket with EVERY use, and unscrewing the two parts to clean it out. I immediately found that the stock (white) silicone gaskets that seal the valve to the bucket were getting cut up by the sharp edges of the hole. So having spares would be wise, and www.mcmaster has lots of options. Stock gasket is 5/8" ID x 1/16" thickness (I.e. 3/4" OD). I chose foodsafe EPDM, which apparently has better resistance to strong acids (like Starsan), and thicker (3/32") so they wont get so cut up. About $6 + $6 shipping for 25:
http://www.mcmaster.com/#9561k28/=tflv5y
 
I don't know why people keep posting McMaster links. They are so expensive.

EPDM O-Rings on Amazon.com http://www.amazon.com/dp/B001D8A47C

$10 for 100. Free 2 Day shipping if you are a Prime member. Free ground shipping otherwise if you are spending $35 or more. I buy tons of brew stuff on Amazon, so a Prime membership made sense for me. All kinds of SS fittings, gaskets, lubes, cooking supplies, etc. The only thing brewing related I don't get from there is grain (someone want to step up and do that already?! ;) ).
 
Last edited by a moderator:
Agreed -- McMaster should be a last resort, unless you are a local and can pick up.

Their shipping rates are absolutely outrageous. Yes they have everything you could possibly need, but you pay out the ass.
 
That Amazon link is for a different size o-ring than the McMaster part number rah was previously posted.

Which is right?
 
Agreed -- McMaster should be a last resort, unless you are a local and can pick up.

Their shipping rates are absolutely outrageous. Yes they have everything you could possibly need, but you pay out the ass.

I've always found McMaster-Carr's shipping rates to be very reasonable. Their service is always very good, too.
 
That Amazon link is for a different size o-ring than the McMaster part number rah was previously posted.

Which is right?

[Edit] Sorry, he put the wrong numbers in his post. It's not 3/4" O.D. For 5/8" I.D. (13/16" O.D.) at 3/32" thickness, use this Amazon link http://www.amazon.com/dp/B001D8A4A4

Even cheaper at $5 for 100.

I would have someone verify that o-ring size though and then obviously purchase the correct one. You can click the more sizes link to get a selector that let's you pick from a whole lot of I.D./O.D. and thickness.
 
Last edited by a moderator:
[Edit] Sorry, he put the wrong numbers in his post. It's not 3/4" O.D. For 5/8" I.D. (13/16" O.D.) at 3/32" thickness, use this Amazon link http://www.amazon.com/dp/B001D8A4A4/?tag=skimlinks_replacement-20

Even cheaper at $5 for 100.

I would have someone verify that o-ring size though and then obviously purchase the correct one. You can click the more sizes link to get a selector that let's you pick from a whole lot of I.D./O.D. and thickness.

No, I didn't put the wrong numbers in my post -- 3/4" OD is the stock o-ring, which IMHO is too small. The #114 is the thicker version that I've switched to. I can confirm the #114 does fit, although I haven't leak-tested it yet. Good find on the Amazon link. Gotta remember to check there first. Grrr.
 
Last edited by a moderator:
I've always found McMaster-Carr's shipping rates to be very reasonable. Their service is always very good, too.

Last time I looked at ordering from them (for a hop taco setup), they wanted, for less than 1lb of materials, $25 for shipping to TN.

If that ain't outrageous and just plain old fraud/greed, I don't know what is.
 
Last time I looked at ordering from them (for a hop taco setup), they wanted, for less than 1lb of materials, $25 for shipping to TN.

If that ain't outrageous and just plain old fraud/greed, I don't know what is.

The last time I ordered from them, I bought a thermometer and the shipping was $4.83.

Shipping isn't always based on weight.
 
But I'm still on the fence if I can bring myself to pay $210 for one of these. Please convince me to take the plunge...
I'm a "gear minimalist" but after a few batches with it, I can't imagine NOT owning the brew bucket. You don't have to worry about it breaking and injuring you, plus it has a spigot, easy to clean, can easily add a thermowell, easy-off lid, conducts heat well, etc. This is a no-brainer.

And did I mention that you'll never have to rack beer again? That makes me happy.
 
How does the thermowell work on this. Can I stick the probe from my johnson controls unit in there to turn the refrigerator off when it reaches the correct temp. or is it just to stick their digital thermometer in it?
 
What method are people using to cut the hole for thermowells? Step drill? Punch?

I used a step drill bit, pretty cheap at Harbor Freight. A few pages back I also listed a silicone grommet you can use to fit around the thermowell. Mine has been airtight.
 
Yesterday I went to keg my beer and when I removed the lid of the bucket, the ring had a lot of what looked like black mold on the ring (should have taken a pic). I did a 24 hour PBW soak and with a scouring sponge got all but the tiniest bits off. But, it had me concerned.
I did have this in my new ferm chamber and I did have the temps in the mid 60's until cold crash so there was lots of condensation on the outside of the bucket but I've never seen this before.
The tiny specs that I can't remove almost look like they are in the ring themselves and not on the outside. I'm thinking about doing another concentrated PBW soak but will long soaks in PBW degrade this (silcone???) ring?
 
I've soaked mine for a slightly extended time in PBW without issue. I had one on my last batches that had a very high and vigorous ferment causing kinda the same thing. Cleaned right up with a good soak. Did you do the PBW as per directions?
 
Take a look at my post in this thread #269. I think I had the same issue at first. I think you just need to clean harder than you think.
 
I'll give it a better soaking in PBW overnight just to be sure. I do have an extra one I'll use but I'm thinking another good soaking plus making sure it's 'starsan'd' is all I need.
Thanks guys!
 
Yesterday I went to keg my beer and when I removed the lid of the bucket, the ring had a lot of what looked like black mold on the ring (should have taken a pic). I did a 24 hour PBW soak and with a scouring sponge got all but the tiniest bits off. But, it had me concerned.
I did have this in my new ferm chamber and I did have the temps in the mid 60's until cold crash so there was lots of condensation on the outside of the bucket but I've never seen this before.
The tiny specs that I can't remove almost look like they are in the ring themselves and not on the outside. I'm thinking about doing another concentrated PBW soak but will long soaks in PBW degrade this (silcone???) ring?

You might try putting one of these in your fermentation chamber http://www.amazon.com/dp/B000H0XFD2/?tag=skimlinks_replacement-20.

I had some issues with what I guess was black mold forming on some areas of my Better Bottle. After putting that dehumidifier in my fermentation chamber I no longer see any condensation and no more mold. I'm not sure if it will work as well for you since the black spots are inside of the Brew Bucket but it couldn't hurt.
 
Last edited by a moderator:
You might try putting one of these in your fermentation chamber http://www.amazon.com/dp/B000H0XFD2/?tag=skimlinks_replacement-20.


I had some issues with what I guess was black mold forming on some areas of my Better Bottle. After putting that dehumidifier in my fermentation chamber I no longer see any condensation and no more mold. I'm not sure if it will work as well for you since the black spots are inside of the Brew Bucket but it couldn't hurt.


I have the 1100 in my kegerator and have to empty it at least once a week, sometimes more. They work really well. I may get another one.


Sent from my iPhone using Home Brew
 
Last edited by a moderator:
You might try putting one of these in your fermentation chamber http://www.amazon.com/dp/B000H0XFD2/?tag=skimlinks_replacement-20.

I had some issues with what I guess was black mold forming on some areas of my Better Bottle. After putting that dehumidifier in my fermentation chamber I no longer see any condensation and no more mold. I'm not sure if it will work as well for you since the black spots are inside of the Brew Bucket but it couldn't hurt.
Actually, I have 2 of them in there now with a computer fan blowing as well. Didn't seem to make any difference.
 
Last edited by a moderator:
I had a weird black yeast ring in my Brew Bucket the first use as well. Hasn't happened since, which makes me think the SS just wasn't sufficiently passivated,even thought used BKF and StarSan. Didn't hurt the beer though.

And the EvaDry is a waste of money -- does nothing in my keezer. Spend $10 on some silica gel kitty litter (same stuff) at Petsmart/ Petco, toss it into an old tube sock, and you've got 10x the dehumidifying power. Works great.
 

Latest posts

Back
Top