• Please visit and share your knowledge at our sister communities:
  • If you have not, please join our official Homebrewing Facebook Group!

    Homebrewing Facebook Group

Bottling Tips for the Homebrewer

Homebrew Talk

Help Support Homebrew Talk:

This site may earn a commission from merchant affiliate links, including eBay, Amazon, and others.
Well I used a lighter and smoothed out the bottom of the piece. Some sections got a little black. I was able to rub off some of the darkness but other parts still look pretty charred. I soaked it in oxy overnight - hopefully that'll help clean it up more.

Well the Oxy didn't do much. The bottom still looks pretty charred and sooty. I'm not really keen on using the dirty thing to bottle so I picked up another one to try again (they're cheap enough.) I'm gonna practice on the piece that was cut off first to see if I can smooth it out without scorching the thing.
 
Well the Oxy didn't do much. The bottom still looks pretty charred and sooty. I'm not really keen on using the dirty thing to bottle so I picked up another one to try again (they're cheap enough.) I'm gonna practice on the piece that was cut off first to see if I can smooth it out without scorching the thing.

Go over the edges very quickly with the lighter--don't let the flame linger. All you want to do is round over the burrs, not melt the ends. Butane lighters give off some soot. If you have access to a propane torch, use that at the lowest flame you can set it at, as that will give you less soot.
 
Also, for those who find this thread as they are saying... "I am bottling NOW and need to make a dip tube!"

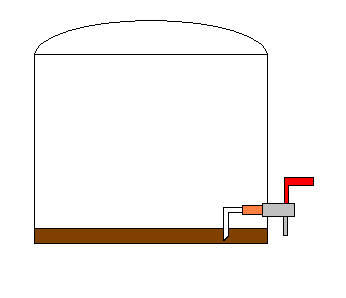
A standard wine cork will fit perfectly into the spigot on the inside of the bucket.

bottling_bucket.bmp


I took a wine cork and drilled a 3/8 hole through the longitudinal center. Then I took an old racking cane and cut the curved portion off. I filed a slight angle in one end of the racking can to a length that would reach the very bottom of my bottling bucket from the center of the spigot hole. Then I jammed the cane into the cork and the cork into the spigot bulkhead. Viola! A free dip tube, NO MORE TIPPING!!!

I'm always looking for better ways to bottle. The dip tube is an excellent idea.... Something that I will definately implement. Thanks for the idea.

One thing that I've done to my bottling bucket that has really sped things up for me is that I've drilled another hole in the bucket and have added a 2nd spiggot. To the two spiggots, added tubing and bottling canes. When I bottle, I bottle 2 at a time instead of just one. Twice as fast.

Now... If I'd only been born with 4 arms and hands... That would really speed things up.
 
To speed things up I upgraded to the 1/2" diameter bottling filler (available at many online sellers).
I do mostly 22 oz or 750 ml bottles (the sparkling cider bottles are great...like Martinelli's) and both really fill a lot more quickly this way. You do end up with a little more air in the neck of the bottle (especially 12 oz bottles)...but I haven't noticed any issues from that. To "adapt" the standard spigot to this filler I cut about a 2" piece of 3/8" (thin wall) silicon tubing...it's a very tight fit on the filler and I slide it all the way up on the spigot. Be sure not to leave much tubing between the 2 pieces of hard plastic because if you do the filler tube swings around a little wildly and splashes beer...plus you end up "chasing" it around with the bottle. Put the silicon tube on the filler first about 1/2" maybe 3/4" but no more (after an hour or 2 of bottling it's really firmly stuck on the filler tube, I even ripped it once trying to just yank it off), then hold it up to the spigot and cut to length plus about 1/8-1/4". Perfect. smccarter....if you had 2 of these you'd be a real fillin' machine!!!
 
Go over the edges very quickly with the lighter--don't let the flame linger. All you want to do is round over the burrs, not melt the ends. Butane lighters give off some soot. If you have access to a propane torch, use that at the lowest flame you can set it at, as that will give you less soot.

I haven't done this yet 'cause I was paranoid about screwing it up again. I used it to bottle on Friday night and it worked like a charm. Barely any beer left in the bucket. So simple and so great.

I've got a month before I'll need to bottle again so I'll try to smooth out the edges before then.
 
Great writeup Revvy, but it is missing one thing. Since you didn't mention it in the original post I'll just throw this out there.

Make sure the spigot on the bottling bucket is closed before racking into it.... I seem to forget this about 1 out of every 3 bottling days. :(

Ha, I just bottled for the first time yesterday and have about 3 cups of beer on my floor because of this.... But it turned out so clear and pretty, if I may say so myself :):mug::ban:
 
I need to get a video or at least some pictures together. I bought a bottling bucket with spiggot. Bought a second spiggot and drilled a 2nd hole in the bottling bucket so that I have 2 spiggots. I come out of the spiggots with two tubes and two bottling canes. I bottle 2 at a time. Works very well.... I bottled 168 beers last night in about 3 hours... including boiling the priming liquid, racking, cleaning, capping, etc....

I totally stole the dip tube idea. I bought 2 rubber bungs that fit into the inner part of the spiggot. I bought vinyl tubing that comes out of the bung. Cut a V in the tubing and the arc of the tubing lays pretty well flat on the bottom of the bucket. What a great idea. I'm left with a thimble full of beer at the end of bottling... sometimes it pays to read these messages.

I hate bottling... but this method makes it much easier to get motivated to do. Just wish I had 4 arms and hands so I could cut the time in half again.
 
Just finished reading the entire thread over the past week (76 pages as of today). I'm studying up for my first brew, and now feel like the world's foremost expert on bottling. Knock on wood. In an effort to try and give back a little, I'll paste in the notes I took while reading the thread in order to provide a cliff's notes version. Thanks again!

Bottling Bucket Mods
• Attach wand directly to spigot with 1-2" of tubing
• Purchase 3/4" 90 degree elbow from Lowe's/HD, threaded on one end and smooth on the other, to attach to spigot and use as dip tube (see thread for multiple graphic images)

Prior to Bottling Day
• Soak bottles in Oxyclean to remove labels
• Brush quickly to remove any sediment
• Rinse in clean bucket

Night Before Bottling Day
• Set fermenter on counter above dishwasher to let settle
• Put clean bottles in dishwasher and run with no soap

Bottling Day
• Sanitize bottling bucket, auto siphon, bottling wand, piece of hose, bottle caps
• Make sure spigot on bottling bucket is closed
• Boil priming sugar (let cool before adding)
• Add to bottling bucket
• Rack beer to bottling bucket
• Stir extremely gently to mix priming sugar without aerating

Next 4 steps to be done in batches
• Sanitize bottles in clean bucket, set back in dishwasher rack (don't let dry before filling)
• Fill bottle - try and only partially open valve at first when bucket is full to avoid aerating beer when pouring
• Set bottle cap on top for 5-10 minutes
• Cap

• Store at 70 degrees for minimum 21 days (can taste periodically thru the process to learn how the conditioning process affects beer)


Note: the one recurring tip I have not included is use of vinator. I'm sure I'll end up with one at some point.

And one last question of my own: are swing top bottles just as effective as capped crowns? (assuming gasket is in excellent condition)
 
You don't need to stir. The racking will mix the sugar in with the beer. I haven't seen anyone that has had an issue from this.

I actually have had problems with getting an even mix from the racking alone. Regardless, I changed my bottling routine to include a verrrry gentle stir at 1/3 full, 2/3 full, and when finished. This did improve the consistency of my carbonation without any side effects. Just be sure to maintain good sanitization processes and do not get too aggressive with the stirring.
 
borden said:
I actually have had problems with getting an even mix from the racking alone. Regardless, I changed my bottling routine to include a verrrry gentle stir at 1/3 full, 2/3 full, and when finished. This did improve the consistency of my carbonation without any side effects. Just be sure to maintain good sanitization processes and do not get too aggressive with the stirring.
Previously I was gently stirring because I too suspect there's problems with the level of inconsistency in distribution with racking alone. This time, using recommendation from this thread, no stir but instead put 1/2 of the priming mix at bottom then 1/2 about 50% done with racking. I sampled a bottle from the tail end of the bottling process (I label a few caps so I can track) at two weeks conditioning and there was very little carbonation (used 5 oz corn sugar for 5 gals). I'll check another in about a week from early and late in bottling process to see if there's difference.
 
Previously I was gently stirring because I too suspect there's problems with the level of inconsistency in distribution with racking alone. This time, using recommendation from this thread, no stir but instead put 1/2 of the priming mix at bottom then 1/2 about 50% done with racking. I sampled a bottle from the tail end of the bottling process (I label a few caps so I can track) at two weeks conditioning and there was very little carbonation (used 5 oz corn sugar for 5 gals). I'll check another in about a week from early and late in bottling process to see if there's difference.

The solution should mix pretty homogeneously with just the agitation from racking. Stirring isn't providing any different type of mixing that already isn't going on. Maybe there is a small whirlpool pocket but it's hard to believe the density of the sugar is higher in certain places. Maybe the issue resides in the amount of yeast in each bottle but I can't really see a side by side experiment yielding different results as the result of a gentle stir.

But anyways, just do what works for you. I personally just try to remove as much contact with oxygen that I can.

See my post above.

I've tried the approach of adding some sugar solution at the beginning and some at the middle of the racking process, but still have had issues with consistency. Not sure what causes it, but I found a solution through gentle stirring. This is based on a lot of experimentation (i.e., enough batches to see the difference).

And yes, as always, YMMV. Experiment and find what works for you, dear reader.


You cannot narrow the inconsistencies down to stirring and not stirring unless you split a batch and priming solution. The inconsistencies could be from the particular batches you're comparing, or one of many other factors such as temperature and time or different yeast strains. I'm not disagreeing with you that it helps or not but you cannot assume the causation is one particular thing, even if it makes the most sense. I would be interested in someone splitting the process to make it an experiment and not inferring anything. Of course this is hard to do on the homebrew level, racking the bottom of the carboy could put more yeast in one and not the other. My guess is there wouldn't be a huge difference between the two processes.
 
You cannot narrow the inconsistencies down to stirring and not stirring unless you split a batch and priming solution. The inconsistencies could be from the particular batches you're comparing, or one of many other factors such as temperature and time or different yeast strains. I'm not disagreeing with you that it helps or not but you cannot assume the causation is one particular thing, even if it makes the most sense. I would be interested in someone splitting the process to make it an experiment and not inferring anything. Of course this is hard to do on the homebrew level, racking the bottom of the carboy could put more yeast in one and not the other. My guess is there wouldn't be a huge difference between the two processes.

Maybe it's the yeast. Sugar should be fairly consistent, as it is highly soluble in water. But yeast cells are in suspension and maybe--with certain strains--some of them floc out during their time in the bottling bucket, or at least there is a gradient of yeast concentration between the top of it and the bottom.
 
Maybe it's the yeast. Sugar should be fairly consistent, as it is highly soluble in water. But yeast cells are in suspension and maybe--with certain strains--some of them floc out during their time in the bottling bucket, or at least there is a gradient of yeast concentration between the top of it and the bottom.

If that is the case, stirring would help. But you cannot discount other possible causes like say, using a different amount of priming sugar between batches (or type of sugar, but that is easy to control).
 
If that is the case, stirring would help. But you cannot discount other possible causes like say, using a different amount of priming sugar between batches (or type of sugar, but that is easy to control).

And for that reason I stir. And I give it another gentle stir right before I start filling bottles.
 
Thanks for all of the info...a great all around help for a newbie! You state that you put the bottles in a warm closet for three weeks. Here's my question...how warm is too warm? , because I have a heating duct running through the closet. All of my beers have been fine until now, but I started in March, and this is the first real heat my bottles will run into...
 
Thanks for all of the info...a great all around help for a newbie! You state that you put the bottles in a warm closet for three weeks. Here's my question...how warm is too warm? , because I have a heating duct running through the closet. All of my beers have been fine until now, but I started in March, and this is the first real heat my bottles will run into...

I asked a similar question when I started brewing and Revvy said not to worry about going too warm for those first few weeks. It's somewhere way back in this thread I believe. I suppose there is an upper limit but you're not likely to hit it.
 
I asked a similar question when I started brewing and Revvy said not to worry about going too warm for those first few weeks. It's somewhere way back in this thread I believe. I suppose there is an upper limit but you're not likely to hit it.

It isn't about an upper limit or lower limit. There is no defined temperature that makes it "good" or "bad" aging, it is just a chemical process. CO2 production and absorption are both a process of temperature and time so you're just adjusting one of those variables. The yeast would benefit from a similar temperature of fermentation but there is such little activity by the yeast you won't notice much. If you made it warmer the yeast would work faster, but less CO2 would get absorbed. This is when you would put it it in the fridge once the CO2 production is complete. There is more to aging than just CO2 absorption so you can't really replace time, but the temperature is just a variable in a process.

Though theoretically you wouldn't want it to reach pasteurize temperatures because it would kill the yeast.
 
Great thread, thanks for all the tips Revvy and others, especially the PVC elbow dip tube. Forgive me if it's been mentioned before, but one thing that slows me down when capping with a wing capper is the fear that a bottle will slip out from under the capper as I push down on it. I've wanted to try a bench capper due to this issue but have kept in mind what Revvy said that it's faster to bring the capper to the bottle than vice versa. So I built a very simple bottle holder that allows me to cap 6 bottles with the wing capper very quickly with no fear that they'll tip over (see pic). My original design was to drill large holes in plywood or thin boards and glue 2 or 3 together with spacers in between, but didn't have the right tools for the task. So this is heavier and not as elegant but works well. I considered a wooden six pack holder (because that would have other uses) but the bottles would get in the way of each other when capping, hence the linear design.

Bottling stand.jpg
 
Sorry for the mispost. Nice tips all! Bottling is a labor of love. Yes it can be time consuming, but worth it.
 
I just tried the PVC elbow dip tube. 3/4 female. Problem is that it gets to a certain point of tightening (not tight enuf to get a good seal) and then it slips off the threads just enuf that if beer had been in there, it would be gushing out around the spigot. I got it to work once but it was very tenuous and I was on pins and needles the whole bottling session. Anyone else run into this?

Regular white spigot and red spigot. Tried both.
 
I toyed around with a PVC elbow, but never got it to work. I also couldn't find a handy source for the elbows that did not sell them with a sticker directly applied, using some god awful glue that I could not remove without Goo-Gone. (And I'm not a fan of cleaning food preparation equipment with petroleum distillates...) I don't think I'd be able to sanitize it.

So I just go with tipping the bucket, it's such an easy thing to do I haven't bothered making any further effort to build a dip tube. I do happen to have some rubber stoppers now, so maybe I'll try with that some time.
 
Just wanted to say thanks for all the good info in this thread. I've only made probably a dozen or so batches because bottle turned into a nightmare for me. I would have one to many beers before starting and would end up hooking several bottles with the 3 ft of tubing I was using. Which resulted in many "man down" situations and a pissed off fiancé. I have been on the fence about upgrading to kegs or building a recurculating ebiab set up as my next upgrade. After getting some useful information from this tread I am pretty sure I'll go ahead and upgrade my brewery and stick to bottles for a little while longer. Thanks again! Love this hobby and this forum.
 
If you have a couple sets of Fast Racks and trays, you can use them to hold your sanitized bottles. Drown the bottles or use a vinator to wet the inside of the cleaned bottles with sanitizer, and then set them in the rack. Put about an inch of sanitizer in the trays such that the lips of the bottles are submerged. The inside of the bottles stay sanitized and are closed to contamination until you pull them out to fill them. It also allows the majority of the sanitizer to drain out.

Fast Rack.jpg
 
Thanks! The elbow is so long that I can't even turn it past probably 60°. It's a Tru Brew 5 gal bottling bucket and the spigot hole center is (just guessing here) ~2" above the bottom.

Remember to hold the elbow in the bucket in the right orientation, and then screw the spigot into the elbow, and not to twist the elbow onto the spigot that is already in place.
 

Latest posts

Back
Top