• Please visit and share your knowledge at our sister communities:
  • If you have not, please join our official Homebrewing Facebook Group!

    Homebrewing Facebook Group

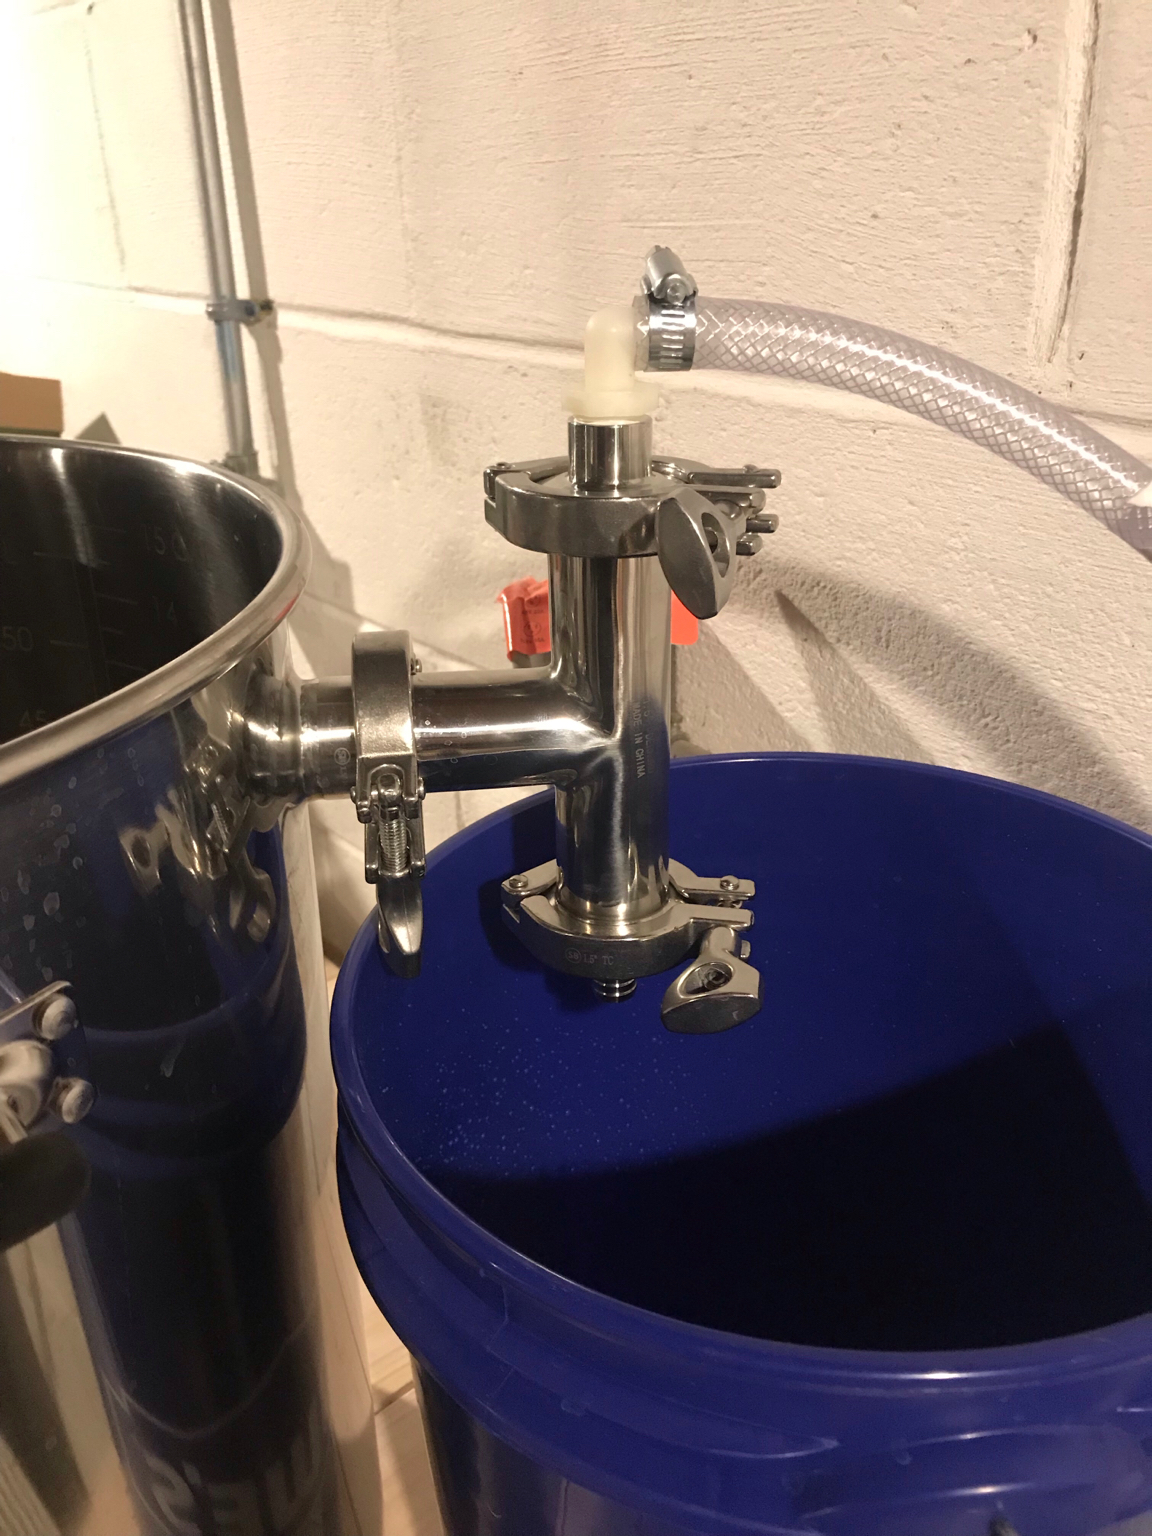
Boil kettle condenser - no overhead ventilation needed

Homebrew Talk

Help Support Homebrew Talk:

This site may earn a commission from merchant affiliate links, including eBay, Amazon, and others.
Any chance that will also include a 2" Weldless T.C.? I really want one for my element install!

A 2" WL TC is in the works but it's going to be a bitch to install given the hole size required. I also have a pull through tool coming soon that will allow install of standard 2" TC ferrules. In any case, elements install through 1.5 TC well enough that I don't understand the desire for 2"
 
I’m brewing today and have ran a pvc drain ran to my sump pit and placed a flexible mesh carbon filter over the opening. I tested on a water boil last night and everything worked. I’m going to try this and if I do have much smell coming off my sump is right under a window so I rigged my old hood fan and some flexible hose to be able to exhaust anything coming from the sump pit. I’m hoping this solves the odor problem. I’ll report back.
 
Got my condenser installed today excited to give it a try. Right now I'm draining to a bucket with a hole in the lid, it's a snug fit so I'm hoping the smell won't be too bad.
 
A 2" WL TC is in the works but it's going to be a bitch to install given the hole size required. I also have a pull through tool coming soon that will allow install of standard 2" TC ferrules. In any case, elements install through 1.5 TC well enough that I don't understand the desire for 2"

Well, I've already purchased a 1 7/8" knockout punch to install the Still Dragon 2" WL TC, but would rather purchase one from you so I'm hoping its the same hole size. As to the why, I have future plans for another vessel that has a welded 2" TC that I would like to share the same element with.

A pull through soldered TC would work as well, I suppose.
 
Brew went well. Smell was much much better with it drained to my sump. I did run an exhaust fan with the flexible ductwork positioned next to the sump so I’m sure that helped. I’m just glad I have a hoodless low odor solution.
this made me laugh a lil.
you ran a fan with duct work...... to avoid a fan with duct work!
ok, carry on guys, I keep coming back to see the final solution here.
 
this made me laugh a lil.
you ran a fan with duct work...... to avoid a fan with duct work!
ok, carry on guys, I keep coming back to see the final solution here.

I have a window in the back of my basement that that is the same size as the window my hood was hooked up to above my kettle so I was able to remove the hood place the fan on the floor slide open the window and place my dryer vent totally out of site of my brewing area. So this solution works for me because I had the fan. I now don’t have a big crappy hood and duct work hanging over my brewery now which was why I added the condenser. With the fan, I can barely smell anything upstairs. Without the fan, and running the condensate to a drain 20’ away alone smelled like a normal brew day with my zymatic upstairs.
 
I have a window in the back of my basement that that is the same size as the window my hood was hooked up to above my kettle so I was able to remove the hood place the fan on the floor slide open the window and place my dryer vent totally out of site of my brewing area. So this solution works for me because I had the fan. I now don’t have a big crappy hood and duct work hanging over my brewery now which was why I added the condenser. With the fan, I can barely smell anything upstairs. Without the fan, and running the condensate to a drain 20’ away alone smelled like a normal brew day with my zymatic upstairs.
oh yeah, i get it man. just kinda funny that you're still employing a fan with ductwork which the slayer was supposed to eliminate altogether. I do understand what's goin on and I assume a solution is coming anyways.
 
No, after I read it back it I can see your point. Lol. I was first thinking of not adding the fan as a variable to see what a full brew day would be like minus the fan but ending up saying screw it, I have it and it’s out of my way and easy.
 
I want to thank BrunDog for his steam condenser design. I don't have the luxury of a dry basement nor any place in my house where I could put a proper hood. I had considered using some kind of window insert but this looks like a much better solution. I'm looking forward to giving it a try if I ever get my panel done.

SteamCondenser1.jpg
 
I'm looking forward to giving the SteamSlayer a trial run this weekend. I've had my kettles for a few years and they all have 1 1/2" TC ports at the top side of the kettle. With some spare TC parts I am hoping the following works. Would love to try it now, but it's 18 degrees in the garage and 4 degrees outside w/o windchill. Wish I would have found this thread earlier, because two weeks ago I brewed a triple batch of G. Strong's Irish Stout in the garage, and the garage looked like Dr.Zhivago's ice palace when we were done.
 

Attachments

  • SteamSlayer_wparts.jpg
    SteamSlayer_wparts.jpg
    577.9 KB
Last edited:
I like the way you have your nozzle set up. I wish I'd seen that 1/8 to 1/2 npt fitting from McMaster when I was trying to piece my nozzle together. It would have saved me a lot of chasing parts down that didn't end up working and in the end having to drill out a fitting to clear the filter on the nozzle I used.
 
I like the way you have your nozzle set up. I wish I'd seen that 1/8 to 1/2 npt fitting from McMaster when I was trying to piece my nozzle together. It would have saved me a lot of chasing parts down that didn't end up working and in the end having to drill out a fitting to clear the filter on the nozzle I used.

Thanks, it took some time to find, but I think Brundog or another poster had it in one of their photo’s.
 
I'm looking forward to giving the SteamSlayer a trial run this weekend. I've had my kettles for a few years and they all have 1 1/2" TC ports at the top side of the kettle. With some spare TC parts I am hoping the following works. Would love to try it now, but it's 18 degrees in the garage and 4 degrees outside w/o windchill. Wish I would have found this thread earlier, because two weeks ago I brewed a triple batch of G. Strong's Irish Stout in the garage, and the garage looked like Dr.Zhivago's ice palace when we were done.

Two concerns with the tube feeding the sprayer: 1. The sprayer may not be centered in the tee, allowing some of the spray to hit the inner wall. This will render that spray water ineffective. 2. If that hose is silicone, the water pressure will probably cause it to burst or at least swell. Make sure the tube you use can handle the incoming water pressure.
 
Two concerns with the tube feeding the sprayer: 1. The sprayer may not be centered in the tee, allowing some of the spray to hit the inner wall. This will render that spray water ineffective. 2. If that hose is silicone, the water pressure will probably cause it to burst or at least swell. Make sure the tube you use can handle the incoming water pressure.

Thanks for your feedback. I’ll give it a try and see if it works, and modify if I can find something else.
 
If you can find a 2” TC cap with 1/2” NPT females on both sides, you can mount the sprayer directly.

BobbyM has those in stock now...https://www.brewhardware.com/category_s/1841.htm?searching=Y&sort=5&cat=1841&show=40&page=2

I wasn't able to find a 2" cap like that when I was piecing my nozzle together so I just drilled out a 2" blank TC cap and silver soldered a 1/4" npt female to male elbow on to it. Then I was able to thread a 1/4" compression fitting on to the elbow from other side along with a short piece of 1/4" stainless tubing and another compression fitting (which I had to drill out on the thread side to clear the nozzle filter) to eventually get to the nozzle. Not the most elegant or simple solution but I'm getting a good spray pattern out of it so it doesn't seem to be too restrictive.
CondenserNozzle1.jpg CondenserNozzle2.jpg
 
BobbyM has those in stock now...https://www.brewhardware.com/category_s/1841.htm?searching=Y&sort=5&cat=1841&show=40&page=2

I wasn't able to find a 2" cap like that when I was piecing my nozzle together so I just drilled out a 2" blank TC cap and silver soldered a 1/4" npt female to male elbow on to it. Then I was able to thread a 1/4" compression fitting on to the elbow from other side along with a short piece of 1/4" stainless tubing and another compression fitting (which I had to drill out on the thread side to clear the nozzle filter) to eventually get to the nozzle. Not the most elegant or simple solution but I'm getting a good spray pattern out of it so it doesn't seem to be too restrictive.
View attachment 609818 View attachment 609819
If that's a lid added to your lid that I'm seeing I like it. Good idea
 
If that's a lid added to your lid that I'm seeing I like it. Good idea

It's an old 1qt saucepan lid I added to make hop additions a bit easier but I can't take credit for the idea. That goes to Brewbuzzard. I noticed he had one in a picture he posted a couple of pages back and I thought it was brilliant.
 
I did a test last weekend, but found that I need another piece. This morning after extended research found a piece from NorCal that will work perfectly with my 2" TC tee and misting nozzle.
 

Attachments

  • 2763-Tri-Clover-2-Inch-x-4-Inch-Nipple-Connect2.jpg
    2763-Tri-Clover-2-Inch-x-4-Inch-Nipple-Connect2.jpg
    21.9 KB
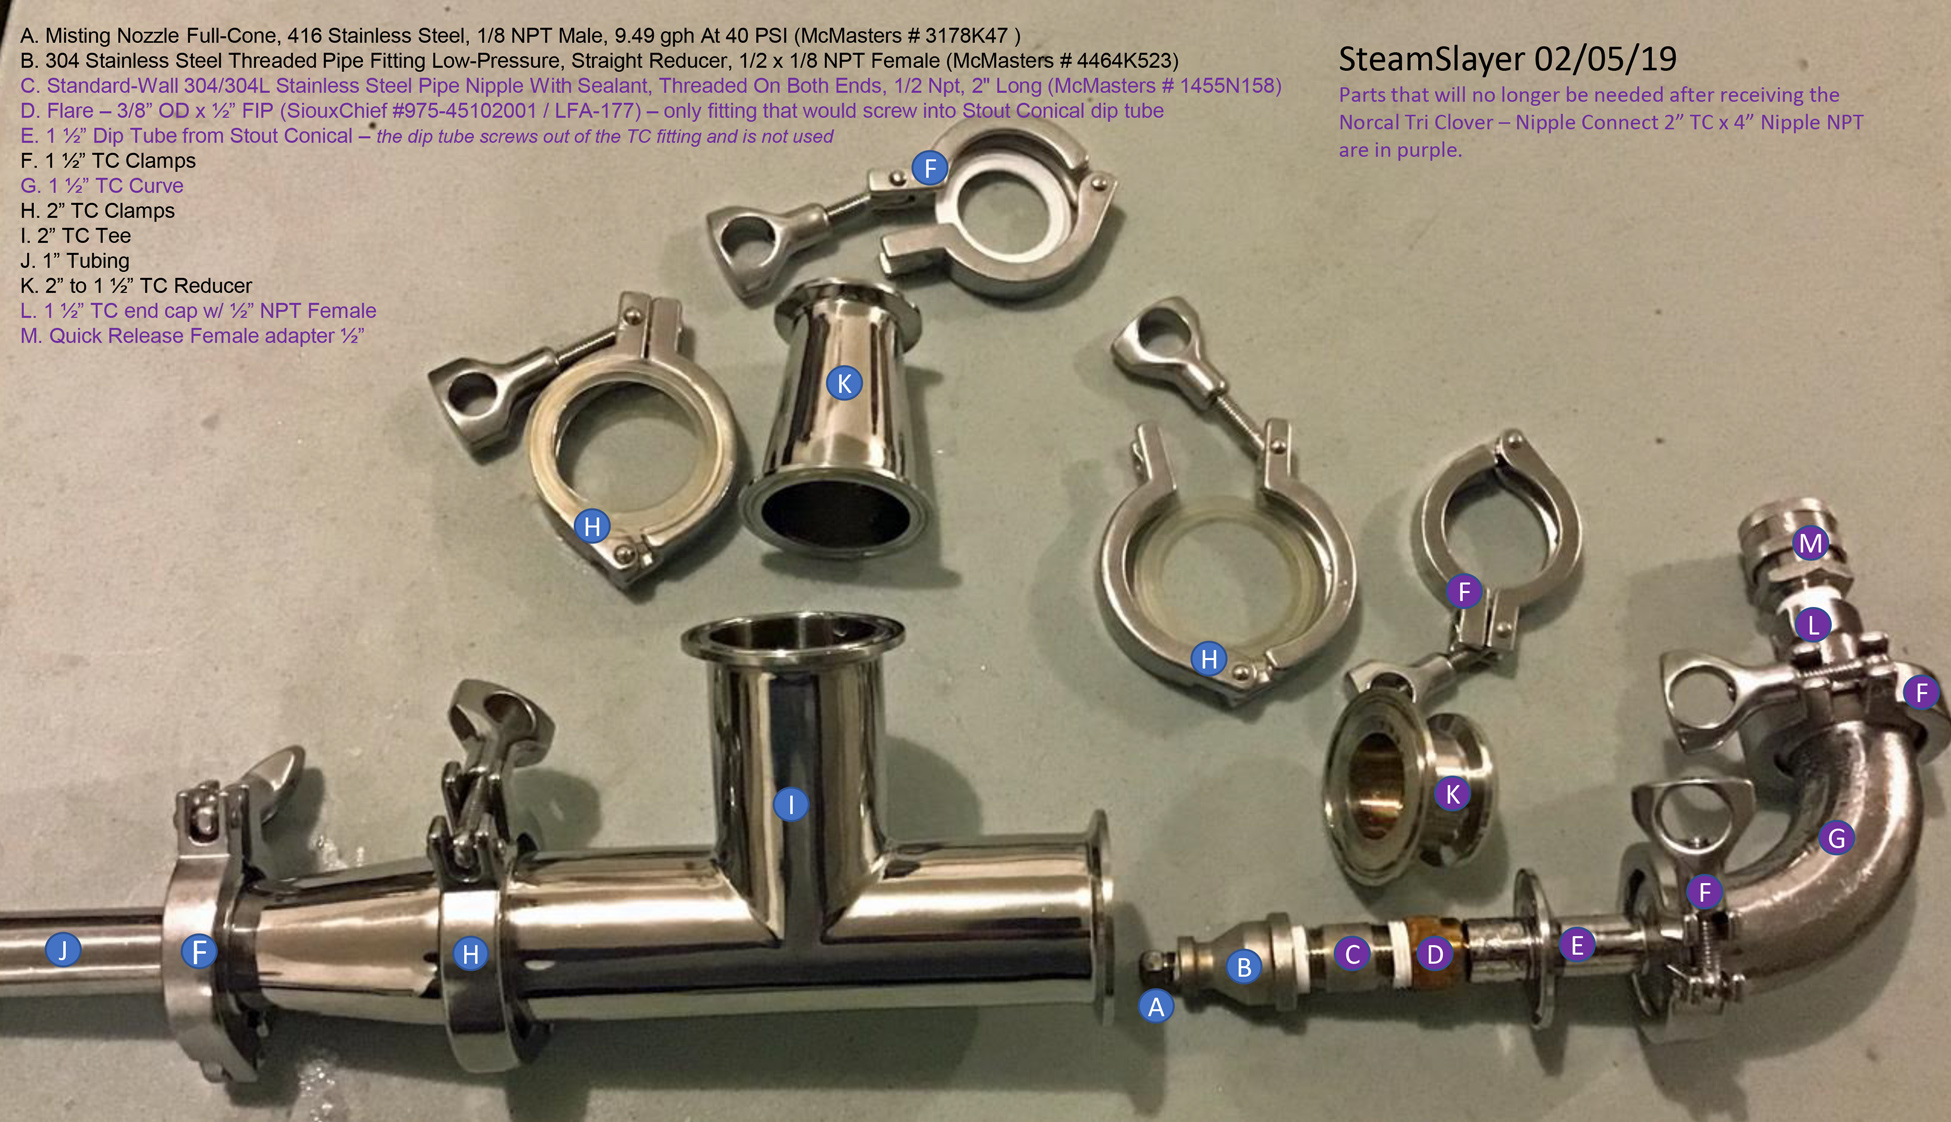
SteamSlayer_bkdwn.jpg
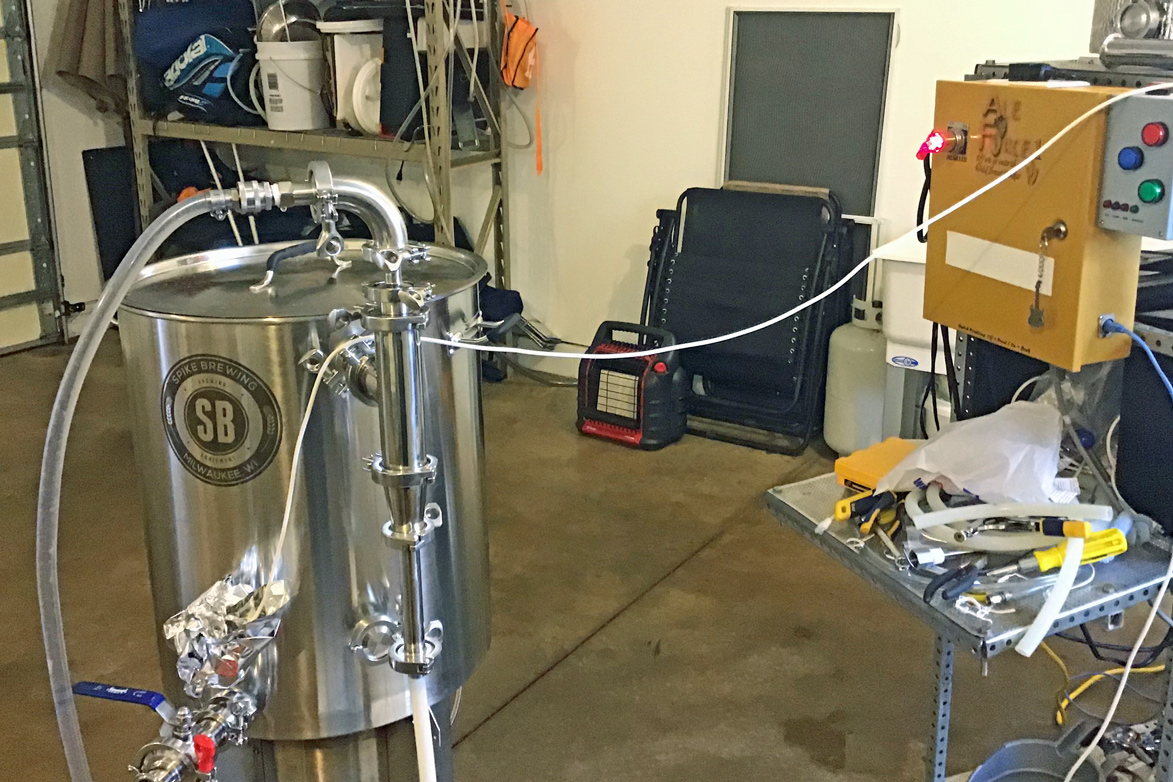
Was able to successfully try out my 30G Spike kettle with the SteamSlayer, using some spare parts I had lying around. After boiling water for an hour to see the rate and effectiveness, I decided to try with some wort. I had bought a More Beer Blonde Ale extract kit for a test. While I have a drain in my garage, I was glad to dump that smelly water outside. The garage stayed dry!

IMG_0120sm.jpg


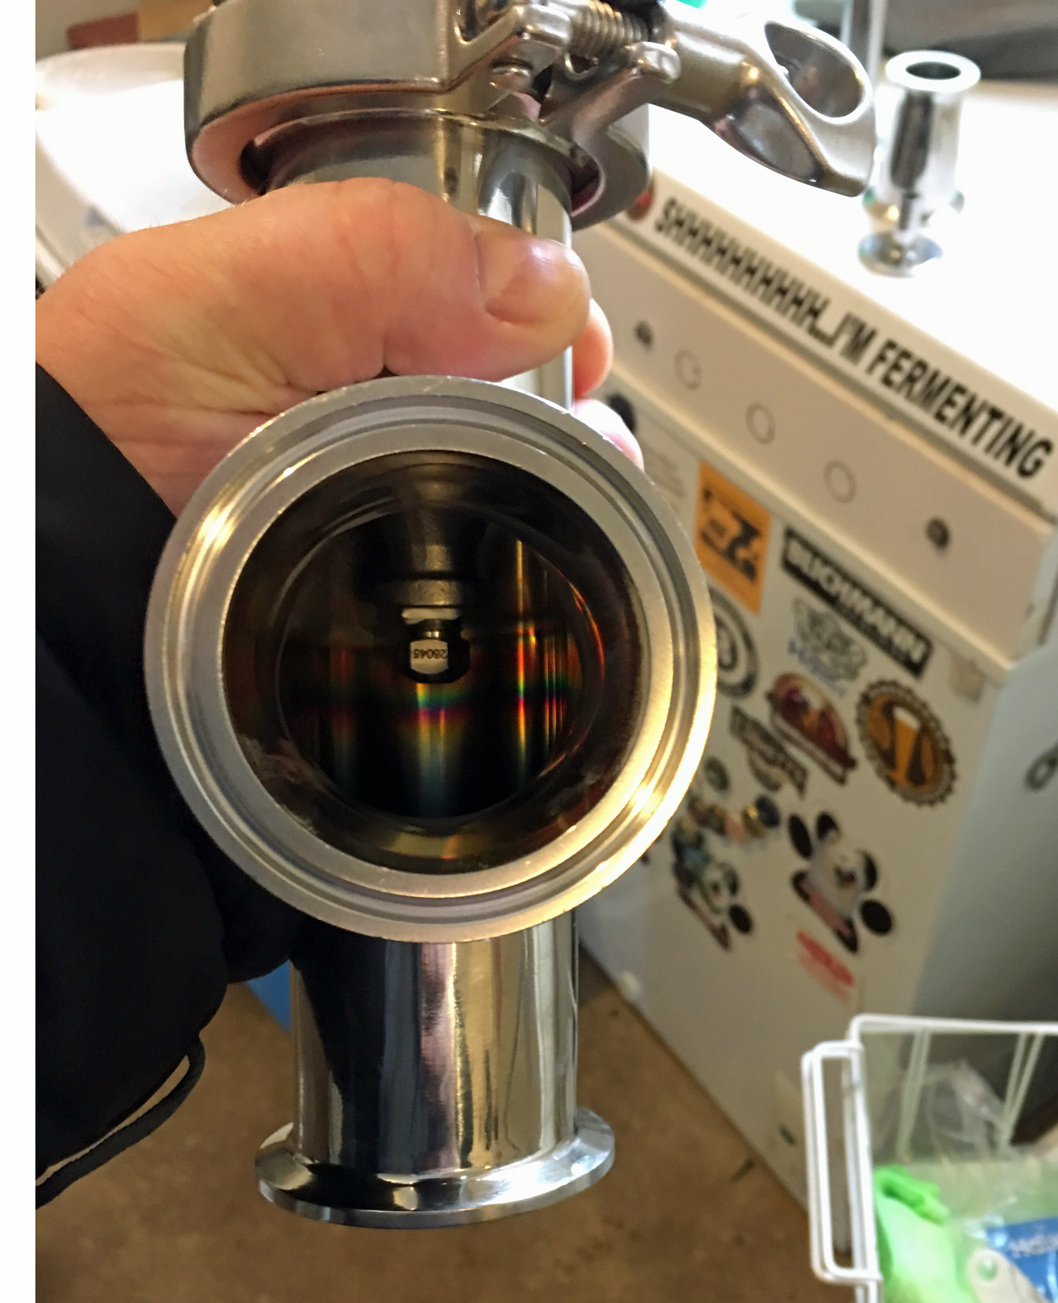
View of the 2" TC Tee piece with the misting nozzle:

IMG_8039sm.jpg


Tear down. With the Norcal piece that I ordered this morning, I will be able to reduce several of the pieces when it comes on Friday.

View attachment 610987

Edit:
When the Norcal part arrives the items in purple will no longer be needed.
 
Last edited:
Two concerns with the tube feeding the sprayer: 1. The sprayer may not be centered in the tee, allowing some of the spray to hit the inner wall. This will render that spray water ineffective. 2. If that hose is silicone, the water pressure will probably cause it to burst or at least swell. Make sure the tube you use can handle the incoming water pressure.

As predicted the Silicon tubing quickly was taken off the part list on Sunday afternoon. I was hoping to use it to confirm the length needed within the Tee.

Almost made it as an entry into the Most embarrassing homebrewing mistakes
thread

SS_SiliconTubing.jpg
 
I was just a wondering if there is an update to the availability for the steam slayer from Bobby? I just got in my new boil kettle this week and would like to get it or parts on order. Mostly curious if it's in days/ weeks/ months timeframe.
 
Nice! One comment for people hooking up water initially... If its easier, you can use a very small tube, like 1/8" or 1/4" polyethylene and push-in fittings. There is such a small amount of flow, a tiny tube will supply enough and makes it easier to handle the pressure.
 

Latest posts

Back
Top