• Please visit and share your knowledge at our sister communities:
  • If you have not, please join our official Homebrewing Facebook Group!

    Homebrewing Facebook Group

Blue Crab Brewing Co. Brew Porn

Homebrew Talk

Help Support Homebrew Talk:

This site may earn a commission from merchant affiliate links, including eBay, Amazon, and others.
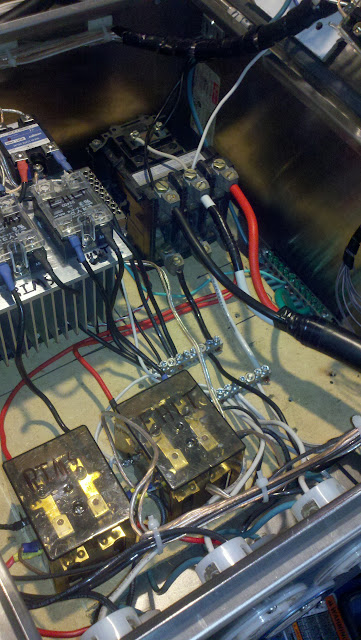
I know what they are, that's why I answered the question "what the hell are those?". Just helping him find what he's looking for. I was actually going to suggest the insulated strips, but he wasn't asking for those. I've done a lot of service work in the last 5 years, and I like to keep things as insulated as possible. The ground bars aren't really good to use for a power strip, because they're all metal, and unless you're fastening them to a nonconductive surface, they're useless. The op looks to have some kind of isolating barrier between the guts and those bars. I don't see any screws holding them in place, so they seem to be isolated from the metal box. Personally, when it comes to electricity, I wouldn't trust anything that isn't screwed or bolted in place.

True, the terminal blocks look nice, and are neat, but I"d rather splice everything together. If you know how to splice (seems simple, but I've seen some really bad splices over the years) then that splice will never come apart. A terminal block, in my mind at least, has multiple points of failure. Say you forget to really tighten down your hot wire screw, and over the years it loosens up and comes free. With a box that's jam packed, there's so much stuff that wire could come in contact with, cause an arc and set the whole thing on fire. Sure, it's probably far fetched, but electricity can kill you, quick. There's a lot of things that could go wrong. But like everything, we each have our own way of doing things, and mine is no more right than some others. If you put it together safely, then it should be fine.

Sorry, didn't mean that to sound like you didn't know what the grounding bar is. I intended it more as "that's x, I need y, would you know where to find that or what it is called?"

It also sounds like you think it would be better to solder it all together than use a terminal block type thing. Say I have 3 wires that all need to connected to the incoming hot line. Should I solder the three together onto a single line and then solder that line to the incoming hot line? The hot line coming into the box is a 6 or 8 gauge line (I don't recall, it's whatever is rated for 50amps). The wiring I'm using in the box for everything except the elements is 14 gauge.

Sorry to thread jack.

edit: great avatar BTW
:off: Same boat for me.

10 awg coming in, splitting off to some 10 awg and some 14 awg. What's best and cheapest? I loved the ground bus bar, and figured I could use it since I was planning on making a wooden Control Panel, (I know, shuddup!), but then realized that with hot screwed into wood, and ground somewhere else on the wood, I COULD get a bit of leakage current and trip my GFCI.

So, I'm with him, if no ground bus bar, what's best? (best = cheapest, but still safe and neat).
 
It also sounds like you think it would be better to solder it all together than use a terminal block type thing. Say I have 3 wires that all need to connected to the incoming hot line. Should I solder the three together onto a single line and then solder that line to the incoming hot line? The hot line coming into the box is a 6 or 8 gauge line (I don't recall, it's whatever is rated for 50amps). The wiring I'm using in the box for everything except the elements is 14 gauge.

I would prefer to just splice them together and stick a wire nut on there. For people that aren't used to splicing, I'd say get one of those insulated terminal blocks. Just be sure to tighten everything sufficiently.

:off: Same boat for me.

10 awg coming in, splitting off to some 10 awg and some 14 awg. What's best and cheapest? I loved the ground bus bar, and figured I could use it since I was planning on making a wooden Control Panel, (I know, shuddup!), but then realized that with hot screwed into wood, and ground somewhere else on the wood, I COULD get a bit of leakage current and trip my GFCI.

So, I'm with him, if no ground bus bar, what's best? (best = cheapest, but still safe and neat).

I"d splice everything and put a wire nut on it. Just be sure that you make a decent splice. The instructions on wire nuts tell you to just put everything together and twist the wire nut on. That's not a proper splice. A proper splice is when you twist the wires together so they're interlocked. That'll never come apart after you cap it with a wire nut.

GFCI's could be sensitive when it comes to liquid. Sometimes it just takes a bit of moisture to trip a GFI. Normally wood wouldn't be a good conductor of electricity, but if you get it wet, and the wood gets saturated, it could be enough to trip a GFI. Then again, tripping the GFI would probably be the least of your problems at that point. But, we're talking about working around liquids, so tripping a GFI is always a possibility if we're not careful.
 
You think I can use stripboard/veroboard for 110VAC if I lay down some thick solder for the connections?
 
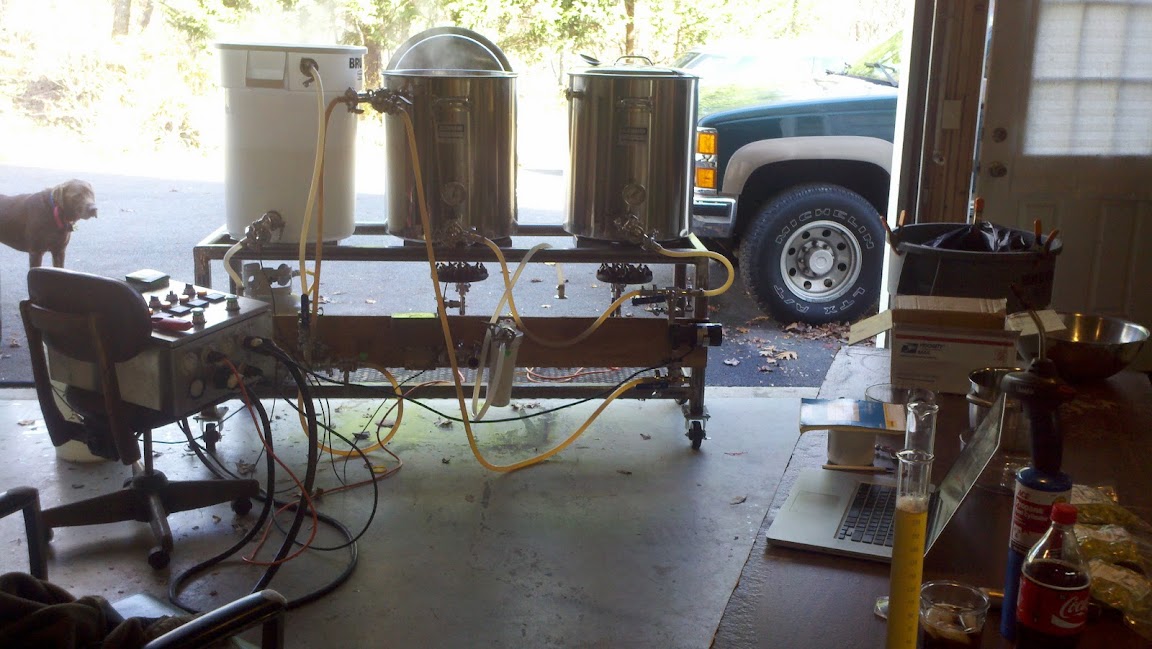
Seeing as how this was my first brew using electric or tri-clover fittings. I thought everything went pretty smoothly, with a few lessons learned...

1) You can never have enough tri-clover clamps, gaskets or hose barbs.

2) Making sure the element couldn't fire unless the pump feeding it is on is probably the best decision I made when wiring my control panel.

3) Do not try and go above 200F with the RIMS tube. Nothing good can happen.

4) Derrins 3-way valves ROCK!!

5) Putting these mesh gasket all over may seem like a good idea... it isn't, only use them where required, aka right before the chiller.

2011-11-11_17-14-59_218.jpg


6) 1/2" kettle returns no longer cut it. I'm gonna have to TIG in some ferrules & pray that i don't **** up my kettles.

6) Fill your HLT with the hot water coming out of the chiller and use it to clean up.

7) If you put silicone tubing between your water input & a ball valve, then close said ball valve the tubing will blow up like a balloon. Same thing with compressed air.

8) Inline aeration is great

2011-11-11_15-07-08_345.jpg


9) I should really build a mount for my control panel.


Big Bob you're setup is very inspirational and you live right down the street. As soon as my kids are old enough to not want me around, we have to talk.
 
The op looks to have some kind of isolating barrier between the guts and those bars.

Correct, the bus bars are bolted to the wooden backing panel. I ground down the bolts & then covered them with epoxy & then duct tape just to be safe.

A terminal block, in my mind at least, has multiple points of failure. Say you forget to really tighten down your hot wire screw, and over the years it loosens up and comes free.

Trust me, those wires aren't going anywhere. I wouldn't be comfortable spicing multiple #6 wires together with a wire nut, but like you said to each his own.

2011-11-16_00-16-20_522.jpg
 
Big Bob you're setup is very inspirational and you live right down the street. As soon as my kids are old enough to not want me around, we have to talk.


Thanks for the praise, but I'm going to be moving out to Indianapolis after new years. If you wanted to come over for a brewday sometime before then I'm sure we could figure something out.
 
I spent the last 2 evenings rewiring my control panel for 50 Amp service. I plan to replace my 5500W with 2x 4500W elements that I can fire simultaneously.

I added a new 60 Amp allen bradley contactor for the power input & am using the old 30 Amp contactor to control one of the elements. I also finished the wiring for the PID overrides. All that's left to do is install the new 25 ft 6/4 power cable & order new elements.

Base plate with new 60 Amp contactor installed:

2011-11-16_00-19-03_616.jpg


Everything installed & wired up in the enclosure:

2011-11-17_23-49-22_204.jpg


I removed the timer I had in there previously (I always used the alarm on my phone anyways) & then installed a 4th PID in its place (2 propane burners, 2 electric elements).

2011-11-17_23-48-50_637.jpg
 
I just found out about Kal's design recently and bought his book... been reading it whenever I can get some free time from my Chief-of-Staff (wife).

Basically, I plan on doing this gradually, over the next few years. I'd love to go out and just buy everything on their shopping list, but that would cost at least 3K... Instead, I'm going to have to piece it together bit-by-bit. I do love the bucket for an HLT, though--about $500 less than a 3rd blichman kettle.

From what I can tell, those hole-cutters they reference are also crazy-expensive. Is that something that an automotive/electric shop would have and I can just ask nicely to use them for a day?

Thanks for the thoughtful feedback from your first brew. I don't understand all of it yet but appreciate the "learn from my mistakes if you try to do this at home" effort.

Great build and a BEAUTIFUL rack (except the wood--but I'm sure you have a plan for that--nicer wood...eventually mounting everything on the rolling platform...etc)
 
I do love the bucket for an HLT, though--about $500 less than a 3rd blichman kettle.

As far as I can tell you could sub a Rubbermaid Brute for the Mash Tun as well if you could come up with a false bottom. I think someone here might actually custom make them (Jaybird??). Not yet sure about their long term durability but they would get you brewing.


From what I can tell, those hole-cutters they reference are also crazy-expensive. Is that something that an automotive/electric shop would have and I can just ask nicely to use them for a day?

I don't know, but its worth a shot.


Great build and a BEAUTIFUL rack (except the wood--but I'm sure you have a plan for that--nicer wood...eventually mounting everything on the rolling platform...etc)

Thanks. Still working on optimizing the layout, plumbing, ect... Once I have everything just the way I want it ill work on making her a bit prettier.
 
Brewed a belgium ale on Friday; everything went great with one exception. I found a bunch of mold growing in the tubing for the in-line aeration stone. Took it all apart, cleaned it & soaked it in star san solution for 2 hours. Going to have to add a check valve to the air line to prevent this from happening again.

2011-11-19_13-11-41_924.jpg
 
Are those returns installed into the lids? I had lid returns and ended up uninstalling them because of the constraints they involved, so I suggest not using lid returns.

I decided you were right on this one. They work fine with metal lids, but with the plastic getting hot & a large moment applied, they warped pretty badly. I moved the inputs to the kettle wall & its working much nicer.
 
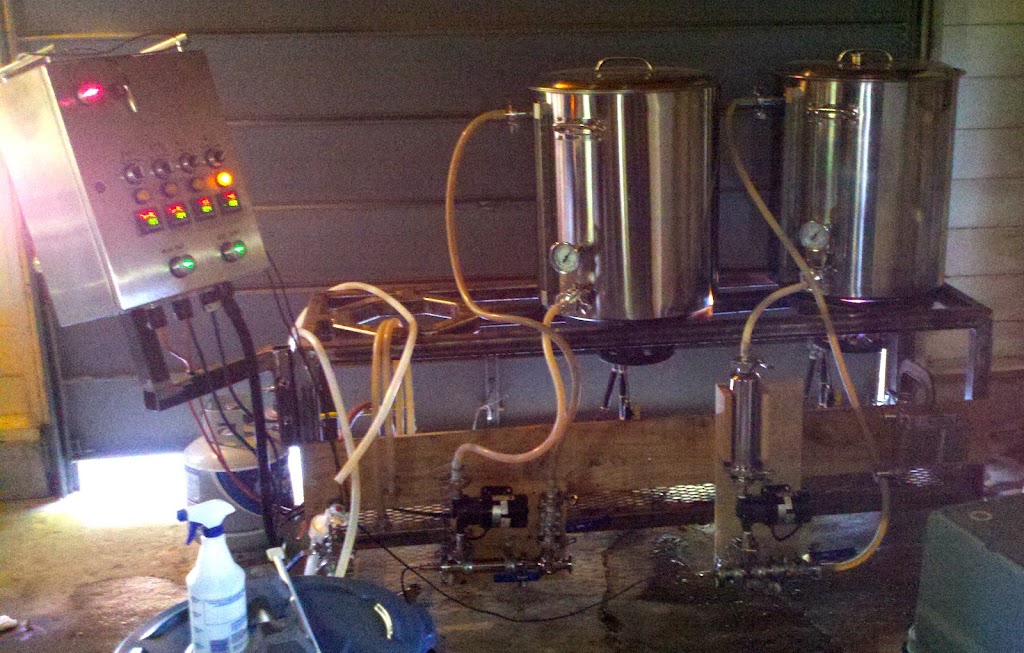
Spent some time re-working the plumbing on the stand. I'm trying to minimize the number of threaded fittings, clamps, barbs, and silicone hose required.

I also added a second rims tub by splitting the first one in half, & adding a triclamp tee to each half.

These improvements should also mean less hoses to move on brew day!

2011-11-20_21-09-46_173.jpg


2011-11-22_00-22-07_944.jpg
 
From what I can tell, those hole-cutters they reference are also crazy-expensive. Is that something that an automotive/electric shop would have and I can just ask nicely to use them for a day?

I went cheap for this. I bought a 3/4" bimetal hole saw from Lowes for like $9. (I see they now have a 7/8" one...wish I'd seen that 2 years ago!). I punch out a 3/4" hole with the saw, then use my dremel to finish it off. For 7/8" holes, (1/2" fittings, 22mm switches/indicators), I usually just use a grinder bit. If I'm lazy, and/or if making bigger holes, (like the 1.2" hole for my BK element), I found that this drywall cutting bit can actually chew through stainless REALLY fast, so I rough it out with the drywall bit, then finish with a grinder bit so it's smooth.

The hole saw has cut 7 holes in keggles, 2 more holes in my stainless 5 gal pot, 3 holes in my aluminum 7.5 gal pot, and about 9 holes so far in my steel control panel, (which is, I think, 12 or 16 ga steel). It's showed no sign of dulling, and I treat it mean. No oil, no lubrication, and full speed on my drill. It punches through a keggle in about 5 seconds flat at full speed, (heats the steel red hot in the process!).
 
I decided you were right on this one. They work fine with metal lids, but with the plastic getting hot & a large moment applied, they warped pretty badly. I moved the inputs to the kettle wall & its working much nicer.

Sweet!

I love hybrid rigs. Mine's almost done - all I gotta do is install the elements!

Is that a HH140 I see? I love my HH140. It's what I used to build my rig.

I'm a little confused. How are you going to do the EHLT and the ERIMS?

:mug:
 
All set for a double brew day tomorrow. Making my red ale & a stout that I'm working on. Got a big yeast starter going now,

2011-11-20_21-09-46_173.jpg

Is that a 1 barrel brewery? How does that brute hold mash temps with the rims tube? I'm thinking of doing a similar set up to start my nanobrewery.
 
Is that a 1 barrel brewery? How does that brute hold mash temps with the rims tube? I'm thinking of doing a similar set up to start my nanobrewery.

Shes on her way to 1BBL, but not there quite yet. The kettles are 30 gal right now, but I'm hoping to upgrade to full 55 gal kettles soon.

I'm actually using the Brute as an EHLT with the rims tube, but in any case it does a surprisingly good job of holding temps.
 
Well, it's been awhile, but I'm finally back in action after moving to Indianapolis! The only drawback is that the detached garage where I'm brewing has some very old, very feeble looking wiring. I don't dare try and run a heatstick off of it. It could be a little while until I am able to upgrade the service to the garage, so it's a good thing this rig has a propane fallback option!
 
I've also reworked the plumbing hardware. I lowered the pumps for easier priming and added a Trub Filter to the mix, to prevent clogged pumps & protect my plate chiller.

Copper%2520IPA.jpg


Trub%2520Filter.jpg
 

Latest posts

Back
Top