• Please visit and share your knowledge at our sister communities:
  • If you have not, please join our official Homebrewing Facebook Group!

    Homebrewing Facebook Group

Blichmann BrewEasy

Homebrew Talk

Help Support Homebrew Talk:

This site may earn a commission from merchant affiliate links, including eBay, Amazon, and others.
This was a step mash with a protein rest... It had oatmeal in the grain bill.

I doughed in at 128 according to an oatmeal stout recipe, and then ramped up to mash temp.

Look guys,

The protein rest I used for this brew was an optional step, not required for 90% of the batches you'll make.... Only required when using unmodified malts.. But I'm not gonna spend time on what you already know. Maybe people read that, got confused, and stopped reading. A step mash is always more cumbersome, regardless of the system... But I probably should've omitted it to alleviate confusion. Could I have achieved the same results by removing that step and mashing in a few degrees higher than desired mash temp (as you would with any other system)? Yes ofcourse.

The point of my long write up was this: check your ph, and don't trust the digital controller completely as gospel.

Is this system as easy to use as Blichmann advertises? Yes absolutely,
If you're happy to boost your grain bill and accept efficiency in the mid 60's.

Is it capable of much more? Yup. Which is what I wanted to prove. It's much more of a pain to get there, and I may not go this far every time, but it's possible.

At the end of the day it's still much easier to use and clean than my previous 3-tier Gravity, cooler, and propane rig.


10 gallon Breweasy, 240v electric. System and kart purchased at great fermentations
 
Yea I still can't figure out why the guy in the one post is mashing in @ 130. I read through the guide for the system and it says to heat your strike water to the calculated temp then mash in. It looks like a easy system to use but you still need to have some knowledge of all grain brewing.

Surely in your vast body of knowledge of all grain brewing, you've heard of a protein rest.

Take the time to write a thorough review and someone insults your knowledge and intelligence. This is why I never post here... I just figured I'd try and help those who are on the fence about this system, being that I was one of the first to buy one.

I've been brewing for 7 years, and my "knowledge of all grain brewing" netted me 80% efficiency on a system that is only advertised to achieve 70% under optimal conditions. Can you attain 60-70% in a simpler manner? Sure. That's been well documented. I brewed a smaller test batch taking extra measures to see exactly how much efficiency I could squeeze out of the system. What I did was successful, and I decided to take the time share it, apparently so people like you could skim it then pick it apart. But I'm glad you read the manual online, you've truly added to the discussion. Anyone who spends or is considering spending $3k on this system has probably brewed all grain before, and has probably read the 12 page manual that comes with it, and is familiar with the contents. If doing what was written in the manual easily hit the 70-80% efficiency most of us are used to, we probably wouldn't be having this discussion would we? Is there any other knowledge you'd like to bless me and other lesser Brewers with? Maybe you've read more things in instruction manuals of products you've never used? You should take your knowledge to another thread, "guy".
 
@danam404

Your review made my day and I was excited to read your process and experiment.

I plan on continuing to document my progress with the system and I think it's a new experiment that is worth sharing the knowledge from.


---


Primary:


Secondary:


Kegged: north of the border Vienna lager, Janets brown sister ale


RIP: Kern River Citra DIPA


On Deck: Stouts
 
I
Take the time to write a thorough review and someone insults your knowledge and intelligence. This is why I never post here... I just figured I'd try and help those who are on the fence about this system, being that I was one of the first to buy one.

I've been brewing for 7 years, and my "knowledge of all grain brewing" netted me 80% efficiency on a system that is only advertised to achieve 70% under optimal conditions. Can you attain 60-70% in a simpler manner? Sure. That's been well documented. I brewed a smaller test batch taking extra measures to see exactly how much efficiency I could squeeze out of the system. What I did was successful, and I decided to take the time share it, apparently so people like you could skim it then pick it apart. But I'm glad you read the manual online, you've truly added to the discussion. Anyone who spends or is considering spending $3k on this system has probably brewed all grain before, and has probably read the 12 page manual that comes with it, and is familiar with the contents. If doing what was written in the manual easily hit the 70-80% efficiency most of us are used to, we probably wouldn't be having this discussion would we? Is there any other knowledge you'd like to bless me and other lesser Brewers with? Maybe you've read more things in instruction manuals of products you've never used? You should take your knowledge to another thread, "guy".

In your original post you stated that you mashed in @130 and then tried to ramp it up to 156. I just couldn't figure out why you were doing that, maybe if you had stated you were step mashing it would of made sense. In normal use of the system you the thermometer on the pot and the controller should match if the strike water is calculated correctly. So the only reason you would need to switch the orifice is if you want to ramp the mash up during step mashing. Also chill out.
 
I

In your original post you stated that you mashed in @130 and then tried to ramp it up to 156. I just couldn't figure out why you were doing that, maybe if you had stated you were step mashing it would of made sense. In normal use of the system you the thermometer on the pot and the controller should match if the strike water is calculated correctly. So the only reason you would need to switch the orifice is if you want to ramp the mash up during step mashing. Also chill out.

If you had actually used the system in real life, you'd know that this is incorrect. Which was the exact point of my post. But you haven't. By all means though, teach me more.
 
How is this different then mashing in a cooler? If I use beersmith to calculate what temp I need to mash in at and mash it at the temp the mash temp will settle at my desired temp. So if I set the controller to 154, calculate what the strike water needs to be to hit that then the mash will settle at 154 to. Why would the controller and thermometer be different?
 
How is this different then mashing in a cooler? If I use beersmith to calculate what temp I need to mash in at and mash it at the temp the mash temp will settle at my desired temp. So if I set the controller to 154, calculate what the strike water needs to be to hit that then the mash will settle at 154 to. Why would the controller and thermometer be different?


Because a cooler is insulated. The mash tun in this system is a stainless kettle, which dissapates heat very rapidly. Your temperatures will match briefly, but almost immediately the tun begins to shed heat and the massive heating element in the bottom kettle begins to fire to compensate.

You can see how you'd develop a temperature gradient in a hurry.

The problem, as best as I can wrap my head around it, is that it takes much less energy to bring the liquid in the bottom kettle to mash temps, than to bring several pounds of grain in the top kettle up to temp. So the controller heats the Liquid in the bottom vessel to 152 or whatever you have set, senses that temp at the pump outlet, and says ok that's good. Even though it's not enough to keep the top kettle at the correct temp.

OK got it now, so the system isn't very good at maintaining mash temperature. That's kind of disappointing. What you said is probably right, it's able to heat the liquid in the bottom much quicker and then since the sensor is at the pumps outlet it's turning off the heating source. Would setting the controller a few degrees above the desired mash temp work?
 
OK got it now, so the system isn't very good at maintaining mash temperature. That's kind of disappointing. What you said is probably right, it's able to heat the liquid in the bottom much quicker and then since the sensor is at the pumps outlet it's turning off the heating source. Would setting the controller a few degrees above the desired mash temp work?

Yes.
 
OK got it now, so the system isn't very good at maintaining mash temperature. That's kind of disappointing. What you said is probably right, it's able to heat the liquid in the bottom much quicker and then since the sensor is at the pumps outlet it's turning off the heating source. Would setting the controller a few degrees above the desired mash temp work?

Yeah that's basically what I was getting in my original post but with a lot more words. HOWEVER. This only seems to be necessary at the beginning of the mash. Once everything gets stabilized for a Few minutes, the controller does fine.

Like I said, the Breweasy works as advertised and will get reasonably acceptable efficiency by following the manual... But if you want to take the extra time and effort it can do much more. Same as everything else, the more you put in, the more you get out.
 
Pulled the trigger on the 10 gallon one except I am going to use an ebrewsupply.com controller and Camco element instead of the Boilcoil and Tower of power/control module.
 
At first I thought this thread was quickly turning into an uninformative Sh*t Show :smack: but you guys turned it around quite nicely. The minor temp adjustment makes sense to me now. Thanks for the feedback guys. :rockin:
 
Since this thread seems to be all things BrewEasy, I will add some information.

I ordered the 10G electric BrewEasy on November 7th. I still have not received the product and there is no sign of it showing up anytime soon. Customer service from Great Fermentations has been great and they indicate that Blichmann may be having some issues with manufacturing of the 20G BK.

I'm not complaining, I understand managing second and third tier suppliers can be challenging especially if you work with low-cost-county. Just a word of caution; if you order, plan to wait.
 
Anyone know if is possible to use a 10 gal BM on top instead of the 7.5 (for 5 gall batch size). I am thinking a lot about acquiring this system to go all electric. I already have a 10 gal G1 pot, so I was thinking I could get another 10 gal G2 elec kettle, get a false bottom for my 10 gal G1 pot, and build my own controller. Using a 10 gal instead of 7.5 would give me more mash tun capacity (for bigger beers), and of course use equipment that I already have.
 
@zentropy the ring that allows the 7.5gal to sit on top of the 10 gal kettle "safely" is not designed this way. The other obstacle is the drain tube. Is is bent in such a way that putting it on a 10 gallon pot will not allow it to fit correctly through the ring.
 
Does anyone have the full Tower stand? (with the flow meter and sample port)
Hows the accuracy? Seems to be 50% useful and 50% cosmetically cool.
 
I have the full tower of power with flow meter. It was challenging to attach my thermonater wort chiller on the tower. Not sure if there is an optional bracket or not. I love that I don't have to bend over the shorter option. It does take up a lot of vertical space if that is a deal breaker for you.
 
Since this thread seems to be all things BrewEasy, I will add some information.

I ordered the 10G electric BrewEasy on November 7th. I still have not received the product and there is no sign of it showing up anytime soon. Customer service from Great Fermentations has been great and they indicate that Blichmann may be having some issues with manufacturing of the 20G BK.

I'm not complaining, I understand managing second and third tier suppliers can be challenging especially if you work with low-cost-county. Just a word of caution; if you order, plan to wait.

Oh man, that sucks. I ordered the 10 gal on the 22nd. I was hoping to be brewing on it by the end of December. Fingers crossed...
 
I have the full tower of power with flow meter. It was challenging to attach my thermonater wort chiller on the tower. Not sure if there is an optional bracket or not. I love that I don't have to bend over the shorter option. It does take up a lot of vertical space if that is a deal breaker for you.

I also have the full tower. I am curious how you mounted the Therminator? Could you post a pic? I tried U bolts and finally gave up. I could not get them the correct size to mount it how I wanted. Also it would have made removing it to dry a huge PITA. I ended up buying a $12 step stool from Home Depot and just mounting it to that. I used stainless wingnuts to mount it to the bracket that it came with. I run PBW then Starsan through it with a pump. After I just take it off the stool and put the holes side down to drain as per the manual.

With the actual use of the tower, I just have one brew on it. It worked great. The sample port was used for my refractometer samples. The two way valve is amazing for going from re circulation to plate chiller to fermenter. I did not use the flow alarm as the BrewEasy does the flow speed for me, I just left the tower valve full open.

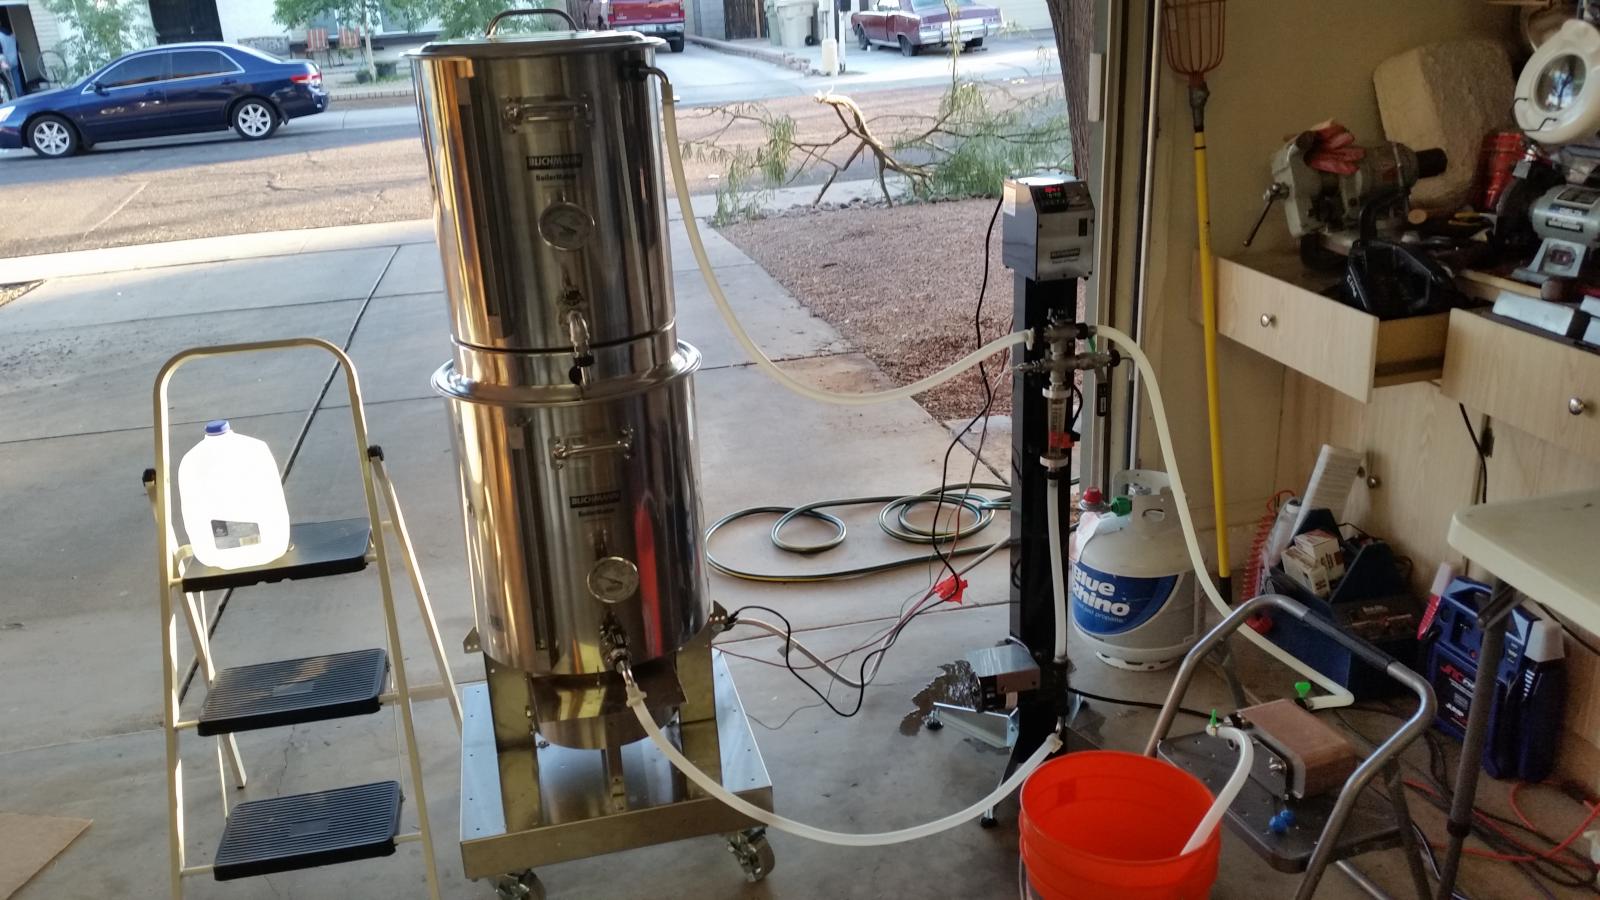
Here is my set up from Brew Day a week ago.

Here is the link to my review of the system as well.
https://www.homebrewtalk.com/f11/blichmann-10-gallon-breweasy-questions-505547/

2014-11-25 16.46.33.jpg
 
Yeah, I was concerned also about having the therminator above the electrical cord on the bottom of the tower. Not sure if that is water proof or not. In the end I decided that I did not want to find out! Stool works great for me and keeps the possibility of leaking hoses away from the expensive electronic stuff.
 
Thank you MC! I'll do that when I get home tonight. I never even paid attention to the add-ons tab/link before....obviously.
 
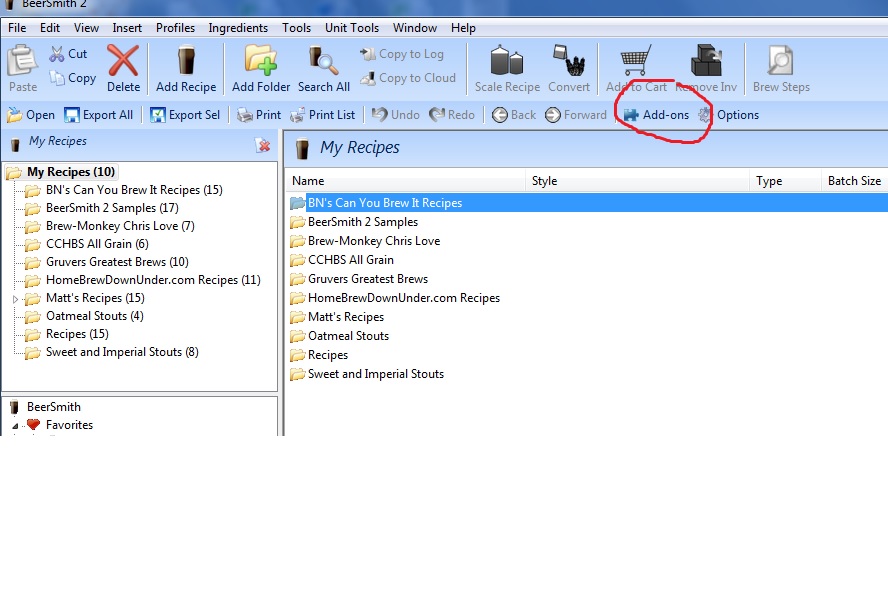
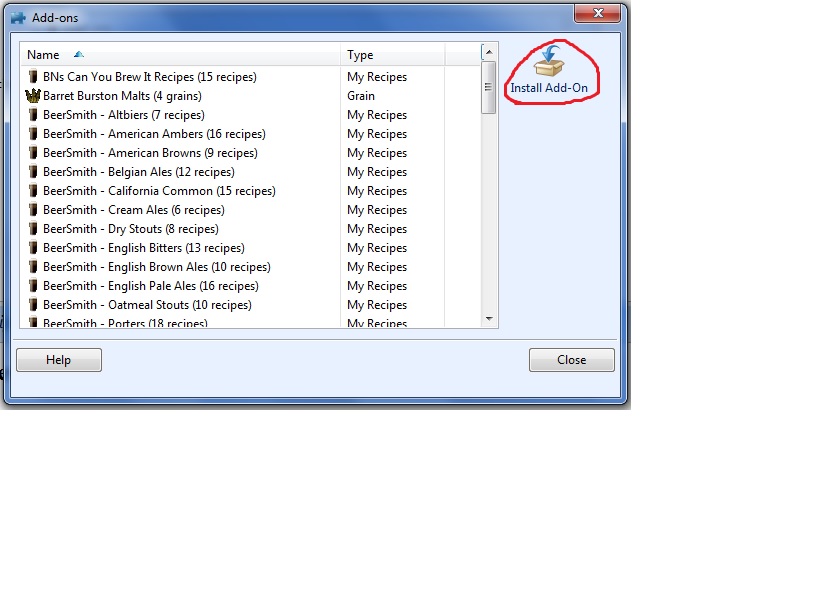
In BeerSmith click add-ons:

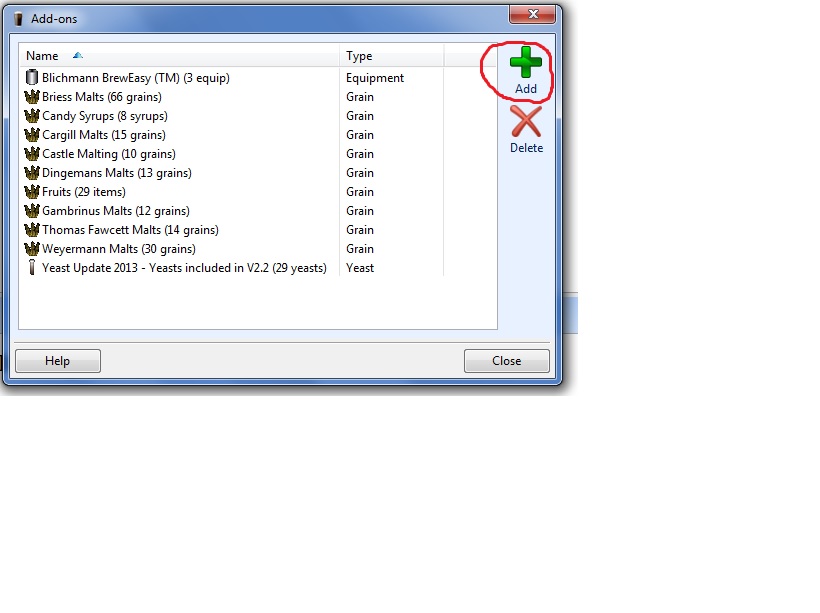
Then Click Add

Then scroll to find BrewEasy and click Install Add-ons

Excellent tip, thanks. I'm putting together sort of a DIY Breweasy and I'd like to see how some of my recipes translate.
 
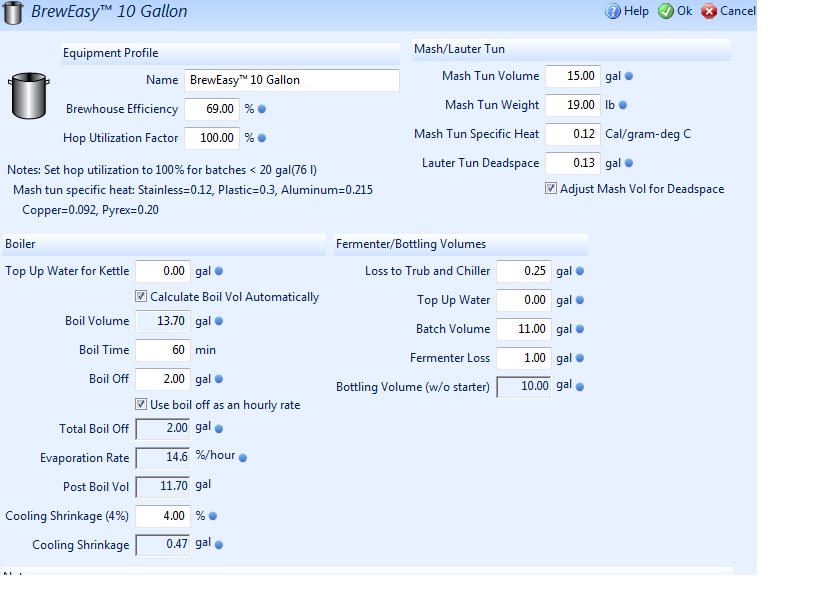
Just and FYI that Beersmith now has the BrewEasy 5,10,20 Gallon equipment profiles. You can get it through the Add-Ons

What mash profile would you use? BIAB? Single/Double Infusion? Temperature?
Or can we expect Beer Smith to come out with Specialized mash profiles for the Brew easy. Or does it even matter?
 
What mash profile would you use? BIAB? Single/Double Infusion? Temperature?
Or can we expect Beer Smith to come out with Specialized mash profiles for the Brew easy. Or does it even matter?

Hopefully one of the other BrewEasy pros will chime in since mine is only on order :ban: but before I did 3 vessel brewing, I was a BIAB'er. The BIAB mash profile makes the most sense to me since you are using a full volume of water.
 
Hopefully one of the other BrewEasy pros will chime in since mine is only on order :ban: but before I did 3 vessel brewing, I was a BIAB'er. The BIAB mash profile makes the most sense to me since you are using a full volume of water.

You would think BIAB profile would be the one, but i've ran into a problem with it. I've been messing around with a sample recipe using the five gallon brew easy profile on beer smith. The recipe calls for 16 pounds of grain. The 5 gallon set up has a 7.5 gallon mash tun, using the BIAB mash profile, beer smith says i need a mash tun volume of 9.5 gallons.
The guys at Great Fermentations told me the 7.5 gallon mash tun will fit around 17 pounds of grain max.
Take it for what its worth. i'm by no means a seasoned brewer. But it's something i just noticed.
 
Back
Top