Beastly's Keezer build

Homebrew Talk - Beer, Wine, Mead, & Cider Brewing Discussion Forum

Help Support Homebrew Talk - Beer, Wine, Mead, & Cider Brewing Discussion Forum:

This site may earn a commission from merchant affiliate links, including eBay, Amazon, and others.

BeastlyBrew

Well-Known Member
Joined
Nov 2, 2013
Messages
58
Reaction score
9
Location
Redding
Hey guys Im new to hbt and figured id break the ice by showing you guys what im building. If i have this in the wrong forum i apologize.
I want to state that I have no woodworking background besides woodshop in highschool so dont rip into me too hard. I got a freezer that "didnt" work for free and it turns out that there was a break in the power cord so just to try i twisted the wires together and plugged it in, alas it got 0 degrees! So i went to home depot and bought a new cord for it and installed it so now i have a working freezer that i got for free. The down side to this free freezer is the fact that it is pretty old and it had quite a bit of rust. so my first step was sanding it and treating the rust problem
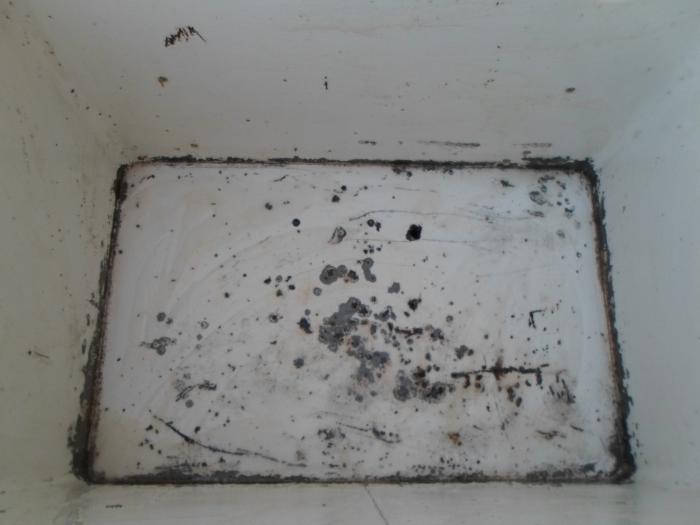
SAM_0179.jpg
 
i got to sanding and i bought a rust remover and went to town. after a few hours it was much better and i threw on some primer and paint. It might not be pretty but i dont have to worry about the rust anymore. SAM_0180.jpg

SAM_0182.jpg

SAM_0183.jpg
 
This freezer seems to be set up differently than others i have seen, most have a hump in it for the compressor, mine is completely flat on the inside and it seems to draw air in from underneath and behind the unit so i decided that if im going to encase this in wood i better at least have it off the ground so heat isnt an issue. I started building a platform for it. I also decided that i will make a platform for the C02 to go on and keep it out of sight. This keezer is big i have it next to a fridge i use to have in my kitchen. (sorry for the messy garage)SAM_0177.jpg

SAM_0178.jpg

SAM_0184.jpg
 
This freezer can hold six corny kegs but it wasnt tall enough so i had to scrap the lid and put on a collar. luckily i only needed to use 2x4's. the collar looks a bit barbaric but it is going to be hidden. SAM_0185.jpg
 
So since i made up a collar i decided that the next step is to build framework around it, keep in mind we had no idea what we were doing. we figured that the lid of the keezer would overlap or hang over the edge of the freezer we built the framework a little lower than the collar. SAM_0186.jpg

SAM_0187.jpg
 
so with all the framework and the collar being done i decided that the next step is building the countertop. I did this by using 1x6's, and a piece of plywood with a vapor barrier on it. The only tools needed on this part was a chop saw, a skill saw and a drill. That and of course glue and screws. SAM_0188.jpg

SAM_0189.jpg

SAM_0190.jpg
 
After letting that set for a day or so i decided to attach a piece that would hang down over the edge and start on the paneling for the cabinet and coffin, im sorry but i didnt get very many pictures of this step i got caught up in the work and missed the opportunity to take as many pictures as i wanted to. I just wanted to point out that i bought a pocket hole jig and it saved me a ton of time, i would recommend getting one. SAM_0195.jpg

SAM_0196.jpg

SAM_0199.jpg

SAM_0200.jpg
 
Now i have the countertop done and the cab around the freezer, i starting building the coffin for on top. At first i made it with wood paneling all around it and i didnt care for it, that will be the first pic. Then i got rid of the front panel of the coffin and replaced it with one that has hardy backer on it so i can lay tile on it. i like that idea better, i wish i thought it out before hand but i was doing this on a whim with no experience. SAM_0202.jpg

SAM_0203.jpg

SAM_0206.jpg

SAM_0212.jpg
 
now that i have all the woodwork done i wanted to stain it. i got the sample cards from minwax, i chose 3 colors i liked and i asked a few people what one they thought would look the best, they all chose red oak. So red oak it was, i decided to do 2 coats, the first one wasnt dark enough for me. Since this was pine, i was advised to use a prestain because i was told pine is too light or soft to absorb stain very well. so the pictures goes as followed: 1- Minwax Pre-Stain, 2- 1 coat of minwax Red Oak 3- second coat of Minwax Red oak SAM_0213.jpg

SAM_0214.jpg

SAM_0215.jpg
 
As of right now thats right where im at, i only get sundays off of work so i dont get very much free time to work on this so i will be updating this every sunday night until i am finished. Sorry if im picture heavy but i figure the pictures can tell the story better than my words can. Good night and i am excited to be a part of HBT. here is the mastermind behind all this. Hope you all enjoyed this post. i will see you guys here next sunday. SAM_0120.jpg
 
No such thing as picture heavy, we love photos.

Solid build, can't wait to see it done.

Cheers.
 
Welcome to HBT. The keezer is coming along very nice and again no such thing as picture heavy.
 
So last night i had plans to install a fan for the coffin and put the finish coat of polyurethane but i got distracted once i took off the panel of the compressor and saw how poor the wires were. So i rewired it and installed a fan, the fan is for 120v but it is extremely fast and moves alot of air, i felt this was a little overkill so i went back to home depot and i bought a dimmer switch for a light bulb and i wired that into the fan and it works like a charm. SAM_0222.jpg

SAM_0223.jpg

SAM_0226.jpg

SAM_0227.jpg

SAM_0228.jpg
 
Wow, that is really great work. It was very smart to put this on a raised base to allow airflow. I love the vintage look but obviously you covered it all so that was that. One thing I wonder is if the freezer dies, will you be able to slide it out and slide a new one in? My hope, when I do anything like this, is that I can fairly easily replace the freezer unit if it were to die without losing my shell.

And welcome to HBT!

Yes Since this freezer is pretty old and im not sure how long it would last so i made it so all i have to do is take off the hinges and take off a single 2x4 on the back then the whole freezer can slide out. here is a pic SAM_0229.jpg
 
This doesnt look like a man with little to no wood working skills! keep us updated this thing is awesome.
 
Just wanted to say sorry, because i said that i would update this on Sundays but i have pleurisy and the flu it took all i had to bottle and brew today with the help of my dad. I hope im 100% next sunday and get some progress done!
 
Hey guys i felt better this Sunday. I went to the doctor on Tuesday turned out i had pneumonia and pleurisy. I did quite a bit on the keezer. First off i decided to add a power outlet so i can run some lights for some background. I also added my johnson temp controll. The LED lights i installed had adhesive backing to stick them on but it was pretty weak and kept falling off so i ended up stapling them on with a staple gun. I made sure and took my time so i would not pierce the led strip with a staple. SAM_0244.jpg

SAM_0245.jpg

SAM_0246.jpg

SAM_0248.jpg

SAM_0249.jpg
 
I also decided to put on the perlick faucets i bought. the one in the middle looks the same but it is a perlick 575ss which is the Creamer version. I insulated the coffin with Styrofoam and foil tape. This is about all i got done this weekend. I hope to update next sunday CHEERS :mug: SAM_0252.jpg

SAM_0253.jpg

SAM_0255.jpg

SAM_0258.jpg

SAM_0259.jpg
 
Sorry for such a long gap since the last post, Im proud to say and excited to say that my keezer is done! if you have any questions feel free to ask. SAM_0267.jpg

SAM_0268.jpg

SAM_0270.jpg

SAM_0313.jpg

SAM_0311.jpg
 
Back
Top