• Please visit and share your knowledge at our sister communities:
  • If you have not, please join our official Homebrewing Facebook Group!

    Homebrewing Facebook Group

Bar Top Keezer Build

Homebrew Talk

Help Support Homebrew Talk:

This site may earn a commission from merchant affiliate links, including eBay, Amazon, and others.
Gorgeous, and impressive flat/glossy mirror finish on top! Can't quite tell, but hopefully top sits on the cross pieces, and they aren't screwed in (opposite grain directions, like a fastened batten) as that would restrict expansion and contraction and could cause warping. Are you happy w/ your hardware (faucet, drip tray, regulator, etc.) choices? I'm hoping to build something simpler soon, but maybe I'll make a nice wooden top for it.
Fine work!
 
I would have gone with a piano hinge.

Great work. It is beautiful. Wish I had your skills.
 
Great, great job, absolutely stunning! Just to let you know, if I decide to upgrade my current keexer build, I might be stealing some of your ideas! Again, great job!
 
My wife wants me to convert our shed into a bar (twist my arm) and I stumbled upon your setups. She loves it which means that I have a green light for this thing.

Few questions:
How long did this build take?
How wide is the 2x6 frame support?
If you could go back and do something differently, would you change anything? If so, what?
What made you choose the table top dimensions of 45x66?

Thanks. I am looking forward to getting this started.

This probably took me 4 or 5 solid weekends to build: 1 weekend to cut, sand and assemble the collar, with the following week to stain and poly. Then I had to wait for the slabs to be delivered. Once they were in hand, I had a weekend to glue, clamp and sand, followed by another week to put on several coats of danish oil and poly the underside. I let it sit for a week to make sure everything cured, then it was a full weekend for the resin pour.

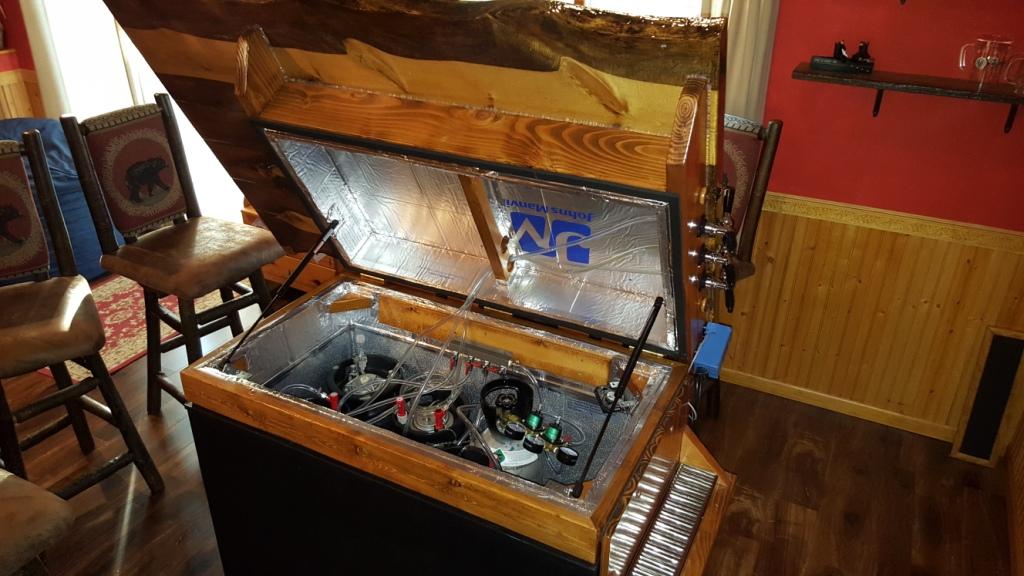
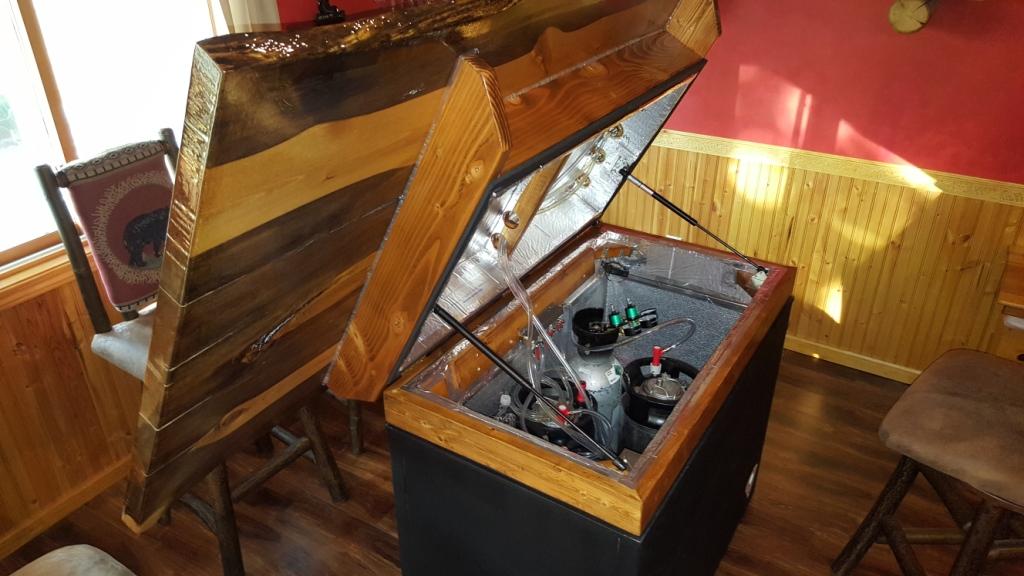
The dimensions of the freezer itself is about 24" x 44", so that's the basic dimensions of the collar. I cut the end 2x6's to about 36" to help support the slabs a bit (was worried the glued outer two slabs wouldn't have enough support; in hindsight probably wasn't needed).

A couple things I would have done different. First, gone with longer shanks: I used 3 1/8" shanks, which would be fine with just the 2x6; but with the insulation it's a bit tricky getting a wrench on the nuts. Second, I would have routed my access hole for the thermostat probe and fan power cord differently: I drilled the access hole and assembled everything before I realized where I was mounting my drip try shelf; made it very tricky snaking the wires through. Also, the fan has been a disappointment; it was something I had salvaged from an old PC. I've had others work just fine, but I think this one had a bad bearing or something; it makes a lot of noise. So I pretty much leave it disconnected; I've got another I'll swap in at some point. Last thing I would have done different would have been to make friends with someone with actual wood shop tools (and skills); an actual clamp setup would have worked much better than the ratchet straps I used to glue together the slabs.

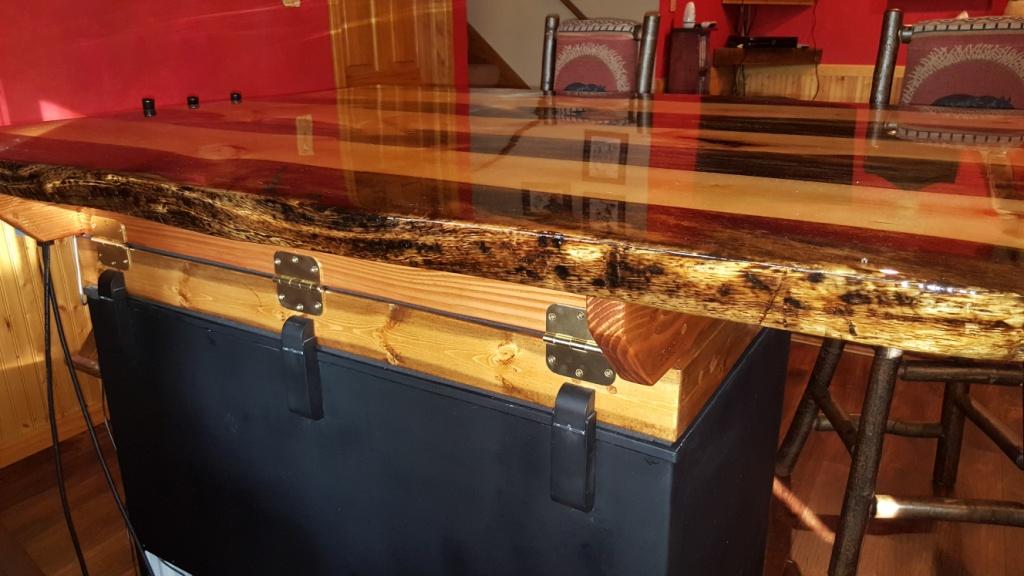
For the bar top dimensions, I wanted a 10" - 12" overhang on three sides, so originally I was looking for something about 48" x 56". The widest the slab provider could get me for 3 slabs ran between 44 and 46 with the live edge. He ended up cutting them long because of some great knots in the wood that he didn't want to cut, and when I got them I also didn't want to cut them. So I kept it long. I was worried that it was cantilevered too much, but it worked out great, and looks great.

So far, it's been working out great. I added a soda line (from a 2.5 gal keg on the hump) and am experimenting with root beer (a bit more of an adventure than I had realized). I still have a open slot for a nitro line down the road. I've been trimming back the length of the beer line: I purposely started longer than I figured I needed (9 feet each); I've cut them back a foot or so, and they're pouring pretty good, but I may cut them back a bit more.

Bottom line: I'm happy, SWMBO is happy, and our friends are very happy. Life is good.
 
Last thing I would have done different would have been to make friends with someone with actual wood shop tools (and skills); an actual clamp setup would have worked much better than the ratchet straps I used to glue together the slabs.

I'm not going to lie, this is awesome. I was asking myself how I could accomplish this without clamps (assuming you had them) and this gem pops up! I Love it. It seems to have worked out pretty well, how did you go about doing this?

Cheers!
 
I'm not going to lie, this is awesome. I was asking myself how I could accomplish this without clamps (assuming you had them) and this gem pops up! I Love it. It seems to have worked out pretty well, how did you go about doing this?

Cheers!

The guy who delivered the slabs had planed the inside edges and cut the biscuit slots, so I just had to glue things up. I assembled it upside down on a couple 2x4s and used a couple ratcheting tie-down straps to clamp everything together. Then it was onto sanding, lots of sanding. A friend with a planer or belt sander would have been nice, I just used a random orbit sander. Luckily, the top sides had been planed at the mill, so it didn't need a lot.
 
That is a really sweet build. I am impressed with the results with minimal woodworking tools.
 
I absolutely love that wood! Do you mind sharing the name of the guy you got it from?

It was a place called The Rocket Factory Timberworks, out of Rapid City SD. I stumbled on a Craigslist ad they had posted. Just happened to search for "live edge slab" and they had all these photos from their mill. Sam Chapman was the guy I worked with (and who made the deliveries to Minneapolis). But if you're outside of the SD/MN/IA general area you may be out of luck.
 
looks awesome!

just curious - what kind of weather stripping did you use between the collar and the freezer? is that a sponge neoprene? looks like it must be dense as it doesn't compress much.
 
Trying to think of something original to say here but I'm just going to raise my glass to you and say that this is AMAZING!!! I realize there are about three full pages of pretty much that same comment but what the hell does one more hurt?

Anyways, I love this and can't spare that much space but it's given me some ideas to change up the kezzer I bought on craigslist so I appreciate you sharing.
 
looks awesome!

just curious - what kind of weather stripping did you use between the collar and the freezer? is that a sponge neoprene? looks like it must be dense as it doesn't compress much.

Yes, it's a dense foam weatherstripping, and it ended up being a lot denser than I expected. I was expecting it to compress, and was worried about getting the hinges attached. I added 125 lbs of weight to the bartop to try and compress it before attaching the hinges, but it didn't make a difference.
 
Trying to think of something original to say here but I'm just going to raise my glass to you and say that this is AMAZING!!! I realize there are about three full pages of pretty much that same comment but what the hell does one more hurt?

Anyways, I love this and can't spare that much space but it's given me some ideas to change up the kezzer I bought on craigslist so I appreciate you sharing.

Thanks, we've been quite pleased with how the entire basement makeover came out, and the keezer is definitely the centerpiece. I'll need to post updated pics this weekend: I finally got my antler tap handles made, and just tonight got my Black Friday package; I've got a nitro setup to get installed (woohoo!).
 
Yes, it's a dense foam weatherstripping, and it ended up being a lot denser than I expected. I was expecting it to compress, and was worried about getting the hinges attached. I added 125 lbs of weight to the bartop to try and compress it before attaching the hinges, but it didn't make a difference.

Now that you've lived with it for awhile, do you reccomendation this type or something less dense? I've had other keezer lids really squish and deform the weather stripping too much, so was looking for a denser alternative.
 
Now that you've lived with it for awhile, do you reccomendation this type or something less dense? I've had other keezer lids really squish and deform the weather stripping too much, so was looking for a denser alternative.

This is the stuff that I went with. I was expecting the lid to come in pretty heavy, with the wood slabs and 2x6 lumber, so I thought I should go as dense as possible. However, if there is a step lower than 'Super Firm' I would probably suggest going with that. This stuff barely compresses, even with all the weight that I have. But it's definitely solid, and seems to give me a good seal.

20161204_151744.jpg
 
So, an update. I've been picking up additional hardware here and there as it went on clearance, and just received the last of my Black Friday / Cyber Monday acquisitions yesterday (the last of what I needed for my nitro tap). Attached are some photos of the current setup. I put in my soda line (tied to a 3 gal keg on the hump; running a root beer recipe that I've been tweaking). I also installed the stout faucet, tied to a nitro tank on the hump. My wife had found someone with a bunch of spike antlers; I picked up some hardware at the local hardware store and got them threaded on (although we'll probably rework the one on the stout faucet when we get a chance). I also set up a small chalkboard tap list (just sits on rubber feet), which also acts as a bit of a guard against folks sliding stuff across the bar and knocking taps open.

So the build is pretty much complete. I still want to mount a 3-way secondary regulator inside (and possibly move the 20 lb CO2 tank outside), but that'll be later next year. For now, there are football and hockey games to watch!

20161204_135902.jpg


20161204_135931.jpg
 
So, an update. I've been picking up additional hardware here and there as it went on clearance, and just received the last of my Black Friday / Cyber Monday acquisitions yesterday (the last of what I needed for my nitro tap). Attached are some photos of the current setup. I put in my soda line (tied to a 3 gal keg on the hump; running a root beer recipe that I've been tweaking). I also installed the stout faucet, tied to a nitro tank on the hump. My wife had found someone with a bunch of spike antlers; I picked up some hardware at the local hardware store and got them threaded on (although we'll probably rework the one on the stout faucet when we get a chance). I also set up a small chalkboard tap list (just sits on rubber feet), which also acts as a bit of a guard against folks sliding stuff across the bar and knocking taps open.

So the build is pretty much complete. I still want to mount a 3-way secondary regulator inside (and possibly move the 20 lb CO2 tank outside), but that'll be later next year. For now, there are football and hockey games to watch!

Very nice build and someone has some excellent cursive skills as well.
 
That would be SWMBO, the force behind this whole project ;)

You married well sir! :mug:

My SWMBO is not nearly as involved in my, ahem, hobby, although she is understanding. My kegerator is in our dining room after all. :D I am sure if I were to take on a project of this magnitude, she would put her indelible stamp on it as well, and I am totally OK with that. ;)

I know I have said it before, but this is really well done. I hope you're enjoying it as much as I would be. :tank:
 
I thought I'd post some pics of my just-completed keezer. I didn't find a lot of examples of what I was wanting to do when I was planning this, so maybe this will give some folks inspiration. I was looking to build something bar-height (42"), with a large finished bartop surface with room for 6 bar stools around 3 sides. I wanted this to be free-standing, and wanted it to be the centerpiece of the basement renovation. I think we nailed it. Let me know if there are any questions, comments, observations.

Hello,

I want to do something like this but haven’t come up with what to use for the bar top. How do you get inside the keeze? Could you share a couple pics?
 
If you scroll up through the thread, there were a number of different photos posted; but here's a couple showing how it's set up. The collar is two separate assemblies: the lower half are 2x4s and stay fixed on the freezer (the freezer hinges are just used to attach: they don't pivot at all); the upper half are 2x6s (with dense foam weather stripping to seal) and is attached using a basic set of door hinges. I used a gas piston 'bed lift kit' I had picked up on clearance from Camping World (usually used to help lift the bed up to get to storage underneath). Those provide more than enough lift (almost too much) to keep the bar top lifted up to get to the kegs.
 

Attachments

  • 20160508_073732.jpg
    20160508_073732.jpg
    96 KB
  • 20160508_073751.jpg
    20160508_073751.jpg
    88.1 KB
  • 20160508_073851.jpg
    20160508_073851.jpg
    84.9 KB
That's beautiful, I'm still working on my acquisition of the necessary bits and bobs.
I adore that beetle kill pine, gorgeous stuff. Well done.
 
What did you use to prevent the epoxy from dripping down the sides? I have a flat (no-sided) top that I want to do the same thing to, but can't see to figure out how to prevent epoxy from running off the side. Afterall, I will only get one shot at it, lol.

You don't prevent it from dripping down the sides, typically. You want it to flow over the edges to get a level top, but there is a trick to managing when it breaks over the edge. The best way to handle it is to put drip paper/plastic down around the edges (if they overhang) or mask off the verticle walls if they don't.

I'm no expert to be sure, but you can see a lot of how-tos on this on the Tube. StoneCoat Countertops, for example, has a lot of how-to videos that would apply to most any epoxy system.

Gotcha. Thanks!
 
Back
Top