• Please visit and share your knowledge at our sister communities:
  • If you have not, please join our official Homebrewing Facebook Group!

    Homebrewing Facebook Group

Bar Top Keezer Build

Homebrew Talk

Help Support Homebrew Talk:

This site may earn a commission from merchant affiliate links, including eBay, Amazon, and others.
Do you even wood work bro? :D that is disgustingly gorgeous. Looks like something that should be on homes of the rich and famous out in Montana at a hunting mansion.
 
This is so freaking, ridiculously cool! I have been putting off kegging because I don't really have a good place in my home to locate a keezer or other kegging option. BUT... We have been thinking of replacing our breakfast room table with a bar height table. Well... why the heck not put a keezer underneath??? Going to show this to my wife tonight and we'll see what her reaction is...

My wife was a HUGE driver in this project turning out the way it did. When I was first sketching this out a year ago, I was planning something a bit simpler. But she was pretty adamant that if we do this, we do it right. She was the one that pushed to do a live-edge slab top, and found the bar stools she wanted to use. Life is good when SWMBO is happy!
 
That is absolutely awesome as can be. You have some woodworking skills my friend.

So one question, how heavy is that bar top? The way it is mounted, unevenly, does it tend to tip, especially if whoever is sitting at that end puts there weight resting on the table?

I would love to build something like this for my first house purchase. Maybe even change it up just a tad and put a tower coming up through the center so everyone could have access from the seat to pour another beer. Lol

Before I assembled the top, I weighed the upper collar and the three slabs (just stacked them up on a bathroom scale). It came in just over 120 pounds, and that was without the danish oil, poly, resin, insulation, and all the hardware and components. My conservative estimate is that it came in around 150 pounds.

I was worried about it being cantilevered too much (the guy at the lumber mill cut the slabs about 7 inches longer than I requested, because he didn't want to cut through some nice knots; and we agreed). I had assumed I would need to attach some clasps to lock the upper and lower collars when they were closed. But after I got things assembled and those door hinges attached, it's solid. If I put my full weight on the back edge (the edge I was worried about), the lid barely moves.

I was also worried about the lift cylinders (from an RV bed lift kit) forcing the lid open, but that's not an issue. I have to lift the lid several inches before the cylinders start to provide any lift. But once it's about half way open they really kick in (actually hard to close it once its open).
 
Beautiful wood work, and a great project to enjoy with friends! Thanks for sharing.
 
That is absolutely incredible! Gotta ask, how much was the top? I was looking at decorative wood for my upright fridge kegerator panel and it was going to be $50-60 for a simple 14"x14"x1/2" block.

When I first started sketching out this project, I was thinking I would just use a couple slabs of plywood, with a veneer on top, and wrap it all with bar rail. Then I started pricing bar rail (bit of an eye opener). My wife was the one that suggested going with a live edge slab. I decided to scan craigslist to see what I could find, and there was a guy running a lumber mill out of Rapid City South Dakota who made regular deliveries to Minneapolis. We looked through the photos of the beetle kill ponderosa pine slabs he was cutting, and decided that would be perfect. Ended up costing me $304 for the book-matched slabs (about 45" x 66"), all cut, planed and ready to join, delivered to my front door. That's about what I would have paid for plywood/bar rail approach I had originally planned. We're very glad we went this approach.
 
Is there a bucket under the drip tray for the drainage? Where is the electrical hooked up to?

Looks amazing. I'm guessing those seats will be like the adult version of musical chairs - people will swarm to fill them in.

I've currently got a 2-liter pop bottle hidden in the decorative can; I've got a larger bottle I'll be inserting in there at some point. For now, I just want something to collect the rinse water I use to clear out the drip tray. For the electrical, I've got a drop cord covered by a safety cover (don't want any tripping hazards). You can see things a little better in this photo.

20160510_170911.jpg
 
How did you attach the bottom collar to the fridge? Is it just the hinges on the back for the original lid? Can you show pictures of anything else you used to attach it?

Beautiful Keezer by the way!!
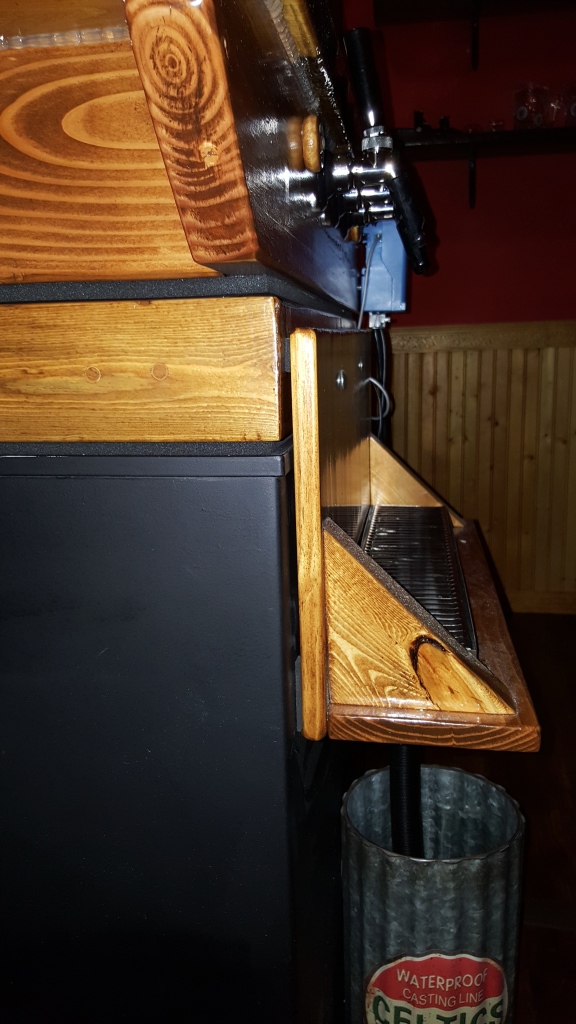
 
How did you attach the bottom collar to the fridge? Is it just the hinges on the back for the original lid? Can you show pictures of anything else you used to attach it?

Beautiful Keezer by the way!!

Yes, the original freezer hinges are just used as anchor points for the lower collar. I included the extra corner braces on the lower collar because I wanted it good and solid for the upper collar to attach to. I had intended on epoxying a couple anchor points to the inside wall of the freezer, and using a couple threaded bolts through the front two corner braces to anchor things down. But after I attached the drip tray shelf, I found I didn't need them. I have rubber pads attached to the top and bottom edges of the back of the drip tray shelf, and the shelf is carriage-bolted to the lower collar. When I tightened the shelf down, it basically clamped the lower collar to the freezer. When I laid in the insulation, I used foil tape for all the seams. That, coupled with the clamping of the drip tray shelf pretty much locked everything in place. Here's a couple more photos showing more detail.

20160510_183645.jpg


20160510_184036.jpg
 
Are you willing to share your Rootbeer recipe? Your project is fantastic! Nice job.

Don't have one yet, but I'll start experimenting. I did a kit with the kids a couple years back that actually came out quite good. But that was before I got the kegging setup; now that I can force carbonate I want to start perfecting a recipe. I'm keeping my eyes open for a good deal on a couple reconditioned 2.5 gal kegs (they'll fit up on the hump a lot easier), and I'll start trying different recipes.
 
Finished product and first pour. I currently just have 3 taps installed, but drilled holes for five. Plan is to install a nitro line next, and might put in a soda line for homemade root beer. Let me know what folks think. Thanks

This table keezer thing is.... just freaking awesome. Like knights of the round table awesome.
 
Looks great. The lift kit was a good idea. What type of hinges bear that weight? Any measure of cooling efficiency (loss of cold)? You could commercialize these and sell them around the country. I'm inspired!
 
...Don't expect many spills, but want to be prepared. I wanted the drip tray low enough that I could fill growlers without any issue (have problems trying to do that on the small kegerator I have upstairs).

Inspiring, I may attempt a similar idea. My only concern is the tap handles being above the level of the table. Someone knocking one open. Especially a slight, unnoticed one.

Thanks for writeup. Nice work!

Riley
 
Beautiful!! How did you fasten the top to the upper frame?

I assembled the slab top and upper collar upside-down, and just used some corner brackets screwed into the slab and inside of the collar to secure everything. Since I was going to cover the entire interior surface with foam insulation, I wasn't worried how the brackets would look.
 
Looks great. The lift kit was a good idea. What type of hinges bear that weight? Any measure of cooling efficiency (loss of cold)? You could commercialize these and sell them around the country. I'm inspired!

Just used brass door hinges (three of them); they're pretty heavy-duty. I used about 90 pounds of extra weight on top to compress the weatherstripping foam before I attached the hinges, to try and make sure I got a good fit when it closes. The lift cylinders are probably a bit over-powered (90 pounds lift, each), but the next size down was a shorter cylinder, and I wanted that length.

I've just been feeling the seams to see if I detect any leaks, but haven't noticed anything. I do know it goes an hour or more between cycles of the compressor. But I haven't been running the recirculation fan much at this point, so the cold air will be pooling in the freezer compartment. I'll start running the recirculation fan this weekend (to keep taps, lines cool), and we'll see what kind of a difference I see.
 
Inspiring, I may attempt a similar idea. My only concern is the tap handles being above the level of the table. Someone knocking one open. Especially a slight, unnoticed one.

Thanks for writeup. Nice work!

Riley

The plastic tap handles are just temporary; I'm planning on building my own (we're thinking of using spike antlers). So they'll be more noticeable, but they will be sticking up above the bar top. I'm a little worried that someone will slide something across the bar (i.e. a plate of nachos) and knock the taps open. I have built a little stand-alone framed chalkboard to set on the bar top to identify what's on tap, so that might act as a bit of a barrier.
 
Did you just let the epoxy pour run over the sides?

Yes, used a notched plastic trowel to spread the resin to all the edges. Caught some as it flowed over and brushed it on the edges to make sure everything was coated. It was messy, but not as bad as I thought it was going to be.
 
Back
Top