• Please visit and share your knowledge at our sister communities:
  • If you have not, please join our official Homebrewing Facebook Group!

    Homebrewing Facebook Group

Bad Kitty Brewery eBIAB

Homebrew Talk

Help Support Homebrew Talk:

This site may earn a commission from merchant affiliate links, including eBay, Amazon, and others.
Chris, when you BIAB mash is your water to grist ratio high or low. I am certainly not an expert here, just trying to learn. If the ratio is high, lots of water, what pressure are you referring to?

I add all the water for the brew at once, no sparge. I would assume there would be added pressure on the grain bed from the water above, but I could be completely wrong.


As far as the pizza pan, there is no reason to add this. The grain bed is suspended in the kettle. If you put a 30lb grain bill in there, don't think that is 30lbs of pressue weighing down on the heating element. The grain is suspended in the water. Pizza pan is just extra equipment complicating the simplicity of BIAB. BIAB = Bag + Grain + Water. Nothing else is needed. I receive on average 35 (out of 50) on my beers in competitions, nothing medal worthy yet but better then your average bear!
 
Just food for thought here. My system (b4 adding a recirculating pump recently) will pressure lock when draining water/wort from the spigot with the lid on. The Speidel Braumeister system recirculates the entire mash. The Speidel Braumeister also has slots made into the lid! So with our type of BIAB systems with the lid on, you will either need to drill a small hole for air flow or crack the lid slightly during recirculation in order to keep the bag from "pulling" toward the outlet.
 
Here is an update from yesterday's brew day, Our system is definitely getting more stable.

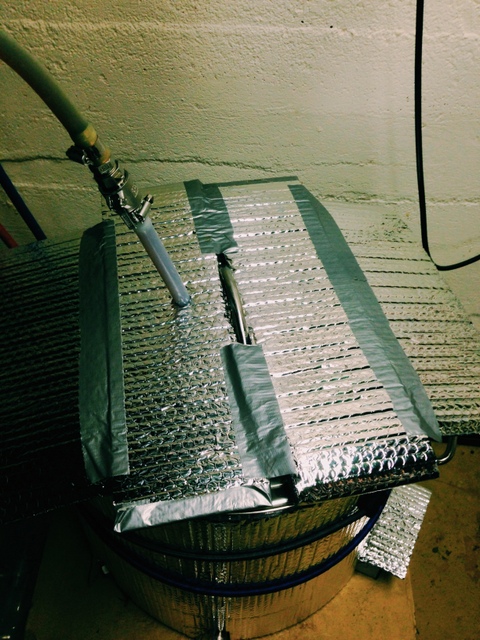
As you can see from the photos, we added Reflectix (2 layers) to the brew pot. Not surprisingly, this provided enough insulation that the element did not need to fire that often. We also made a hat for the lid. We put the recirc hose in the center of the mash (had previously been putting it on the side, opposite the pickup tube). I think this significantly helped recirculate the hot wort. The next step will be to drill a hole in the lid, so the lid can be all the way on.

The other big improvement was the 16" aluminum pizza screen. I made legs for it with 2.5" machine screws, washers, and finishing nuts. $2.25 per nut! I am relieved to say the screen did not collapse, though the screen is clearly deformed after one use. The legs were placed strategically around the element, and above the pickup tube. The big gaps in the spacing of the legs is because the screen rests on the fittings for the element and the valve. The tabs are a stainless brace, cut in half, to wedge the screen against the sides of the pot, to keep the screen from moving side to side.

The most interesting finding was that we had a vacuum lock throughout the mash. That is presumably why the screen is deformed. We had good luck with the pump running at about 50%, the bag was firmly stuck in place, but we did not drain all of the wort from underneath the screen and we did not have cavitation. Yambor44, the lid was more than a little open. I think the issue is the concrete oatmeal created by the fine mesh bag and the double crushed grain. I wonder if a slightly more coarse bag would allow the wort to flow more easily?

We managed to hold the mash between 151-153 pretty easily, though still with occasional stirring, albeit less stirring than before. We still need to move the RTD to the pump output, to minimize the temperature differences. As it stands, the SV needs to be a few degrees higher than our target mash temp.

Finally, I think we will ditch the pickup tube. I'm not sure it is doing anything except making it easy to pickup trub. We haven't had great luck whirlpooling, but the gunk does settle to the bottom pretty quickly. I'm thinking that without the tube, the valve will sit high enough above the trub after letting it rest for 15 minutes. There's always one more thing to experiment with...

3.jpg


1.jpg


5.jpg


2.jpg
 
Hi Schwartz,

I have a setup like yours seen here -

https://www.homebrewtalk.com/f170/first-run-ebiab-w-pics-410168/

I have too struggled with temp fluctuations and pump recirculation issues.

I got a bigger weave bag and went to a single grind (was grinding 3x before ebiab) and used a sparge arm connected to my pump.
I was able to get 1 degree of change between my PID temp and my temps at the top of the kettle.
But I can not leave my mash alone for fear of the dry fire (and I did already ruin one batch and element with a dry fire).
My original thought was I could leave my setup for an hours while mashing and keep spot in temps.... so far that is FAR from the case.

I am have gone back to double grind and not pumping.
I stir every 20 mins or so and insulate the kettle with a blanket, but temp will still stratify by 4-5 degrees after some time.

I have a stir motor on order, and am hoping this will solve all my issues.
As you know... stirring will keep consistent temps and I will have NO dry fire issues.

Not many eBIAB guys seem to use stir motors though?

PJ has great pics of the motor he uses.

any way... thought I would share...
Nice build and good luck.

thanks Kevin
 
The trials and tribulations continue. The first photo shows the solution we came up with for managing the condensation that drips back into the pot from the ventilation system. We suspended the pot lid for the last 5 minutes of the boil using a bungee. This actually worked really well for keeping condensation from the fan out of the pot. In the future I think we can position it with a slight tilt, beyond the side of the pot, so condensation from under the lid falls to the floor, instead of into the pot.

It's good to start with a positive right? The second photo shows what is left of the pizza screen false bottom. It worked well on the first brew day, but yesterday it failed catastrophically from the weight of the bag. The screws and washers literally tore the aluminum to shreds. Fortunately the bag only got a couple of small holes.

To close on a positive note (sandwich), despite this setback, we had a great brew day. Temperatures were the most steady yet and we had 83% efficiency with a 4-step mash.

Next plan: calling Chad at Arbor Fabricating.

7.jpg


6.jpg
 
OK, how about trying a bag custom-fit so that it cannot reach the element? :)
 
I bought a perforated pizza pan and mounted stainless steel bolts, washers and lock nut through it to create a false bottom. It works great and doesn't deform.
 
jeffmeh said:
OK, how about trying a bag custom-fit so that it cannot reach the element? :)
That could be an elegant solution, thanks! Ordered a wilserbrewer bag last night, 2-3/4" shorter than the height of the pot, to keep the bag away from the element and the pickup tube. I'll keep you posted.
 
Regarding temperature stratification, it's my opinion, after personal experience, that the PID controllers are not well suited to slow changing systems with lots of thermal mass. The PID over corrects and then it takes a while to cool off and you get these wild swings. If you operate the PID in manual mode and start around 50% and then bump up or down to get your mash in temp you'll find a percentage that works consistently. I run the same PID I use on my brew controller on an oven and it keeps it +\- 1F . By coincidence, the oven has a 5kW heater in it. It would probably work better on a RIMS where the temp sensor was directly down stream of the element. It would tune up better because it could sense and correct faster.

One other thing I did was spread the element out some so it wasn't heating in such a concentrated area. If the fixed part of the element is at 6 o'clock, the free end is bent out to 4 o'clock.

One other suggestion on the PID is to run 100% until you are within 10-20 deg of you mash in temp then turn it over to PID control. That's how the Braumiser Arduino code is written.
 
Thanks for the bag order! I shipped yesterday. Just my opinion, but the crushed and mangled pizza screen above was likely caused by the pump suction due to a clogged filter bag, not the weight of the grain. I have no idea what bag material you are using, perhaps turn the pump down. The only time i realized a reduced runoff through a bag, I had a percentage of wheat in the grist. Things I might consider...

1. Throttle back your pump, a trickle should be all you need in a closed system with insulation on the kettle.
2. Using slightly coarser filter / bag material / or less flour in the crush / or use some rice hulls.
3. wrap a piece of pizza screen around the element to make an element guard...not that I think the bag is going to scorch...just a bit of insurance.
4. Heavy duty false bottom.

Good luck solving your issues! You have accurately pointed out why I have neglected to build a fancy E-BIAB system and prefer to keep it ghetto simple making manual temp adjustments and just wrapping the kettle in a large comfortor.

What size batches? I would imagine that large 20 gallon kettle provides a large cooling surface area ratio if only doing 5 gallon batches.
 
The bag arrived today. Dang! That was fast, thanks. Yes, I'm doing 5 gal batches, though I went with the 20 gal pot in order to do the occasional 10 gal batch. With the Reflectix, it really seems to hold the temperature pretty well. I'm looking forward to trying the new bag.
 
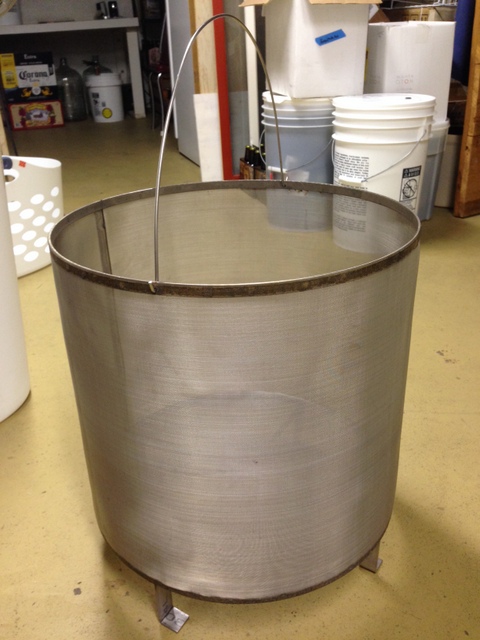
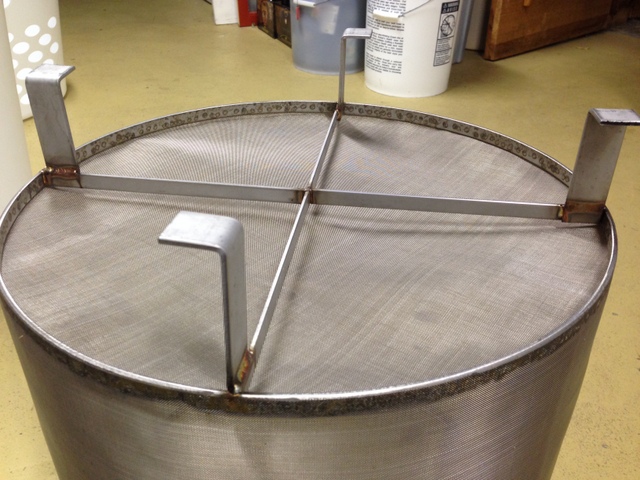
Checkout our new stainless steel basket from Arbor Fabricating. Chad was great to work with. The feet have 3" of clearance, well above the element and the pickup tube. I sent Chad a piece of voile fabric that my bag is made of and he measured it as 200 microns x 600 microns, so we decided to go with 400 micron mesh. While it has only been one brew, I am thrilled with how well it worked. The temperature was rock solid throughout a 4-step mash (no stirring, no fussing) and cleanup was a snap (just hose it out).

You can also see the return tube that is now going through the lid and the hole the wort created in the mash bed. That's the next challenge... how to do a better job dispersing the work across the grain bed. I'm thinking a circular series of Loc Line nozzles, but I'd appreciate any other suggestions.

Finally, you can see the mash plate. Chad also makes these, but this is just an old aluminum pot lid that I had around. It worked fine, though next time we will push more aggressively. Our grain retention rate for this batch was 0.12 gallons per pound of grain. I hope to get that down closer to 0.10 gal/lb. I would have preferred to do a simple medium gravity beer for our first batch, but our schedule called for a 1.082 dopplebock. We drained the wort into another pot and then did a 2 gallon rinse, then poured back the "first runnings" back into the main pot. This gave us a mash efficiency of 68%, which I think is decent for a high gravity beer in BIAB setup.

Really looking forward to the next batch!

photo (13).JPG


photo (9).JPG


photo (11).JPG


photo (12).JPG


photo (10).JPG
 
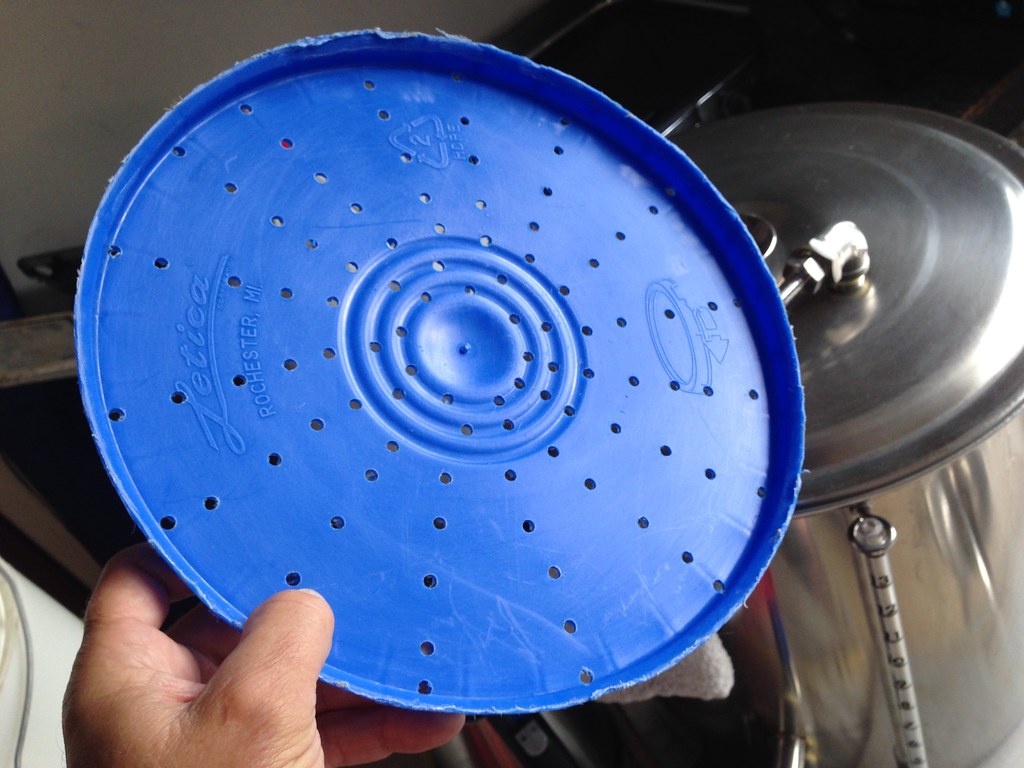
I use a bucket lid for dispersion. Drilled a series of holes in the lid then lay it on the grain bed. Wort comes thru the lid of the pot, hits the plastic lid and disperses thru the holes.
 
How much was that bucket? I would love to eliminate all plastic in my brewing process and getting rid of the bag would be awesome. Single vessel, no bag. . . Sweet!
 
How difficult have you found the mesh basket to clean? With a bag, I dump, hose it out well, and throw it in the washing machine.
 
How much was that bucket? I would love to eliminate all plastic in my brewing process and getting rid of the bag would be awesome. Single vessel, no bag. . . Sweet!

The basket is 16.5" wide x 15" tall, with 3" feet. It cost $150 plus shipping. Certainly not cheap, but given how well it work and how many problems it solved, I am thinking it was well worth the cost.
 
How difficult have you found the mesh basket to clean? With a bag, I dump, hose it out well, and throw it in the washing machine.

Jeffmeh, it wasn't a whole lot harder than what you do with your bag. We dumped the grain in the composter, turned the basket upside-down in the driveway and hit it with the hose for less than a minute. There was no grain stuck in the mesh after that. At 16.5" wide, it is wider than the utility sink in the basement, so I need to get a tub so I can hose it out inside in February in Michigan.
 
Jeffmeh, it wasn't a whole lot harder than what you do with your bag. We dumped the grain in the composter, turned the basket upside-down in the driveway and hit it with the hose for less than a minute. There was no grain stuck in the mesh after that. At 16.5" wide, it is wider than the utility sink in the basement, so I need to get a tub so I can hose it out inside in February in Michigan.

Thanks. Any sense of how fine a crush you can use relative to the voile bag? My guess is that it would be similar, even though your 400x400 micron openings are larger than 600x200 openings in the bag, but I am speculating.
 
We did the same crush as with the bag, 2x times through at the tightest setting at our LHBS.

Nice. I crush pretty fine and generally get high efficiency with the bag, and would not want to give that up.
 
Back
Top