Arduino Automated Brewing System

Homebrew Talk - Beer, Wine, Mead, & Cider Brewing Discussion Forum

Help Support Homebrew Talk - Beer, Wine, Mead, & Cider Brewing Discussion Forum:

This site may earn a commission from merchant affiliate links, including eBay, Amazon, and others.
Joined
Sep 21, 2016
Messages
6
Reaction score
3
Long time listener, first time caller... I figured I would post about my automated brewing project that I recently completed. Hopefully others may find it slightly useful.

I had been brewing 5 gallon batches using the BIAB method for about 2 years when I stumbled upon The Electric Brewery (http://www.theelectricbrewery.com/). Something about it intrigued me. We had been using a rusty turkey burner to heat, then wrapped in towels to mash, followed by batch sparges that required hoisting the (often times very heavy) bag above the bottom of the pot. The Electric Brewery seemed an elegant solution in comparison, and could also easily be implemented as a 10G system, which would save time.

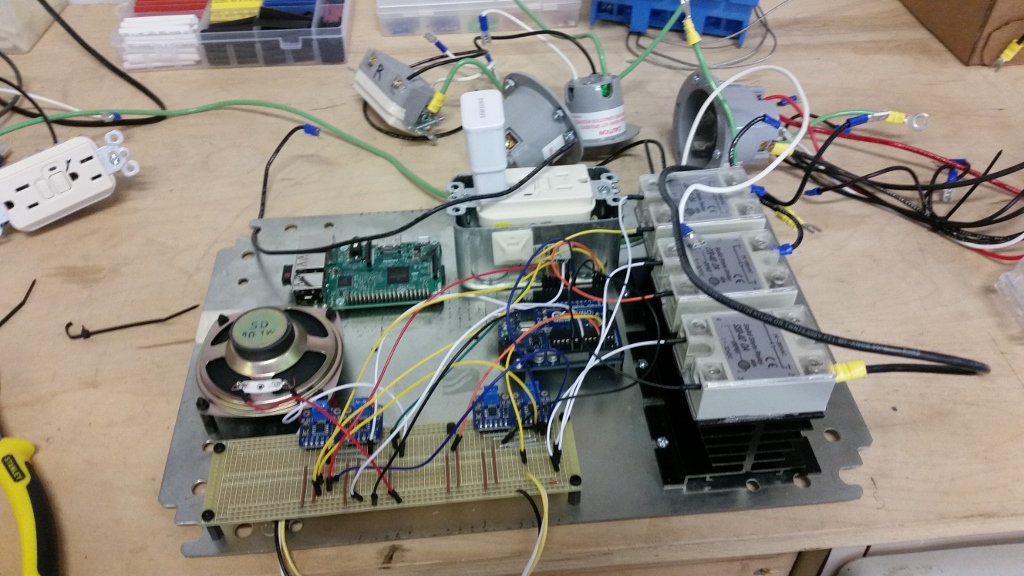
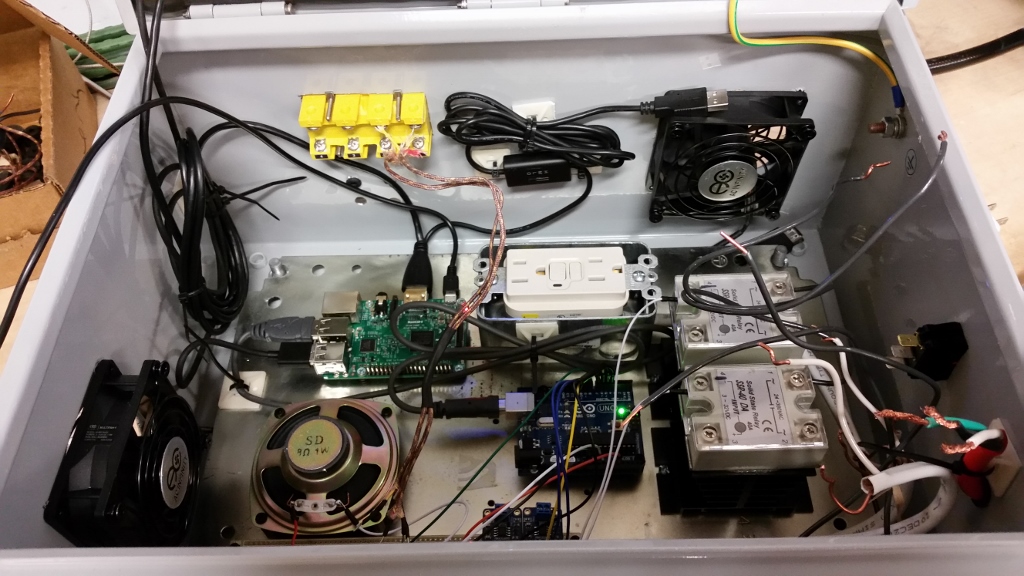
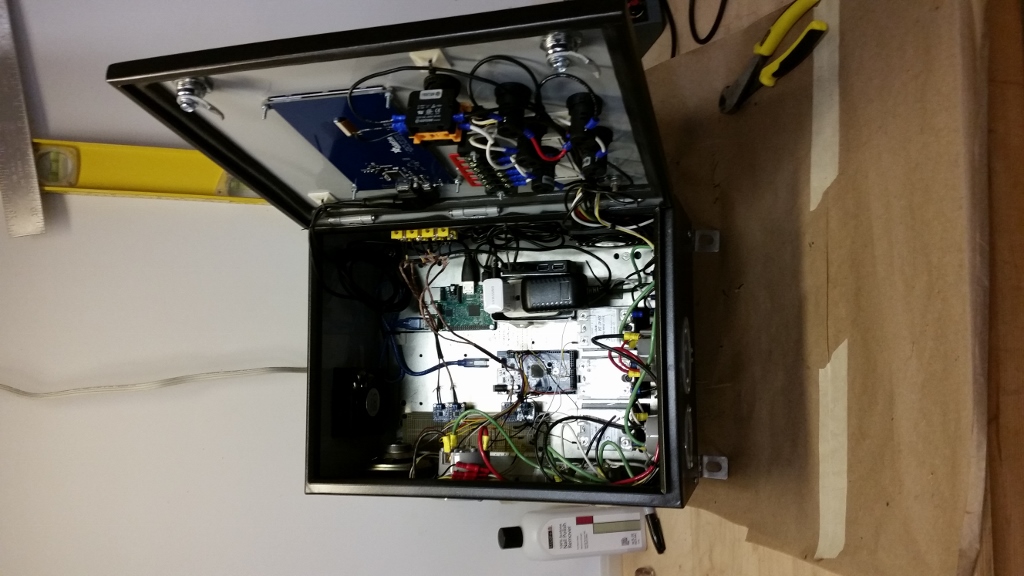
I am not an electrician/electrical engineer, nor could I really afford the $2300 assembled panel cost from the website, so I decided to go about it slightly differently. Since I am one of the weirdos who actually likes programming, and I had some experience using Arduino for other little pet projects, I opted to use that as the basis for my system. It really turned out to be quite a simple solution: a Rasberry Pi, which provides a graphical user interface, would drive and Arduino, which is relatively easy to program, which would in turn control three solid state relays (one for heating element, one for a mash pump, and one for a water pump). So, the project began ... but before you keep reading, here are some pictures of the final setup to keep you interested ...

If you are familiar, you will notice that most of the hardware looks an awful lot like the Electric Brewery. That's because it is. Only change was really in the controller.

20160709_162946 (576x1024).jpg


20160713_181251 (576x1024).jpg
 
First round of purchases were basically just a proof of concept. I wanted to make sure I could easily program something that would control the relays before sinking too much money in.
1) QTY 1 - Ieik Mega 2560 R3 ATmega2560-16AU (Amazon)
2) QTY 3 - Solid State Relay - 40A (Sparkfun). Overkill for my application, but simple to use.
3) QTY 1 - Solderable Breadboard (Amazon). I already had a solderless one; this would make it permanent.
4) A bunch of jumper wires I already had laying around for hobbies and whatnot.

This round turned out to be relatively quick. Simply tell Arduino which pin the relay is connected to (other side goes to ground) and then set the pin to either HIGH (on) or LOW (off). You can search the internet for most of the Arduino commands and syntax. You don't really need much of a programming background; another reason I chose this method.

Second round of purchases stepped it up a bit. I wanted to make sure that the Raspberry Pi could drive the Arduino and provide a simple user interface. I had originally started programming it so that it would be entirely based on text I/O over the serial port. This turned out to be a gigantic pain and eventually switch the controlling it using a Processing GUI (sexy!). More on that later. I also started to mess around with thermocouples in this step. While Electric Brewery uses RTDs, which are probably more accurate and less noisy, they were not the easiest to implement with Arduino. So, simple K-type thermocouples would have to do ... a little digital smoothing algorithm fixes any noise issues (again, more on that later)
1) QTY 1 - Rasberry Pi 3 (Adafruit). It's got WiFi capabilities built-in, which make it easier to transfer files.
2) QTY 1 - HDMI 7" 800x480 Display Backpack (Adafruit). Small enough to fit in a case, and provided enough pixels for what I needed.
3) QTY 1 – Thermocouple Panel Mount Block (McMaster Carr). I knew I’d need 4 thermocouples in the end, and I wanted to be able to remove them as needed, so this was the solution.
4) QTY 4 - Thermocouple Amplifier MAX31855 (Adafruit). There are many one-wire solutions that could’ve been used, but this was definitely the least programming-intensive option. Just required a few extra wires to be soldered.
5) Some extra K-type thermocouple wire (McMaster Carr). Connects the mount block to the amplifier.
6) Some cheap thermocouples from Amazon. Not the final solution, but they mostly worked for what I was trying to do at this point which was to make sure the Arduino could interpret correctly.
 
Third round of purchases was where the project finally started to look like a brewing controller. This is where I bought the box to put everything in and started to mount a lot of the hardware.
1) QTY 1 - BUD Industries Series Sheet Metal Box (Amazon). Definitely overkill for what I needed, but I didn't want to mess around with plastic as it could crack.
2) QTY 3 - GFCI Outlets (Any hardware store)
3) QTY 3 - SSR Heat Sinks (Amazon). I had read that the SSRs can get quite warm, especially under sustained high-amp loads.
4) QTY 1 - USB Fan set (included two fans)(Amazon). I set up in a pusher-puller configuration within the case to keep air flowing past the heat sinks.
5) QTY 1 - Adafruit Speaker - 3" Diameter (Amazon)
6) All of the other plug interfaces required for interacting with mains power (McMaster Carr). Details for all of these can be found on the Electric Brewery Website. Kal has a much better description of each of them, and options for where you can buy them.
7) A bunch of 10 gauge (for dealing with 240VAC/30A circuits) and 14 gauge (for dealing with 120VAC/15A circuits) wire. I bought most of this from Amazon, but you can also purchase from a local hardware store. Make sure to get the stranded stuff, as its hard enough to squeeze it all in without having to deal with the solid core.

Below are a few pictures of how the board layout started to come together. The Raspberry Pi is in the top left, Arduino is around the middle of the board, and the SSRs are on the right side.

20160503_192701 (1024x576).jpg


20160404_181757 (1024x576).jpg
 
Final round of purchases got the controller buttoned up. Then it was just up to buying the remaining pots, fittings, etc to complete the setup. As these were basically just the same as the Electric Brewery, I will refer you there for more details as it does a way better job of describing than I ever could.
1) QTY 5 - Alpine Tech L22 LED (Amazon). Various colors and voltages.
2) QTY 1 - Alpinetech PFL-22 Push Button (Amazon). Turns the whole system on provided that power is connected.
3) QTY 1 - Potentiometer and knob. For controlling boil cycle.
4) QTY 3 - Terminal blocks and jumpers (McMaster Carr). For distributing 120VAC around the case efficiently.
5) A bunch of spade connectors for connecting to terminal blocks. Don't cheap out, get nice ones. I found the cheap ones on Amazon don't crimp very well.
6) Some black paint.

All-in-all, the controller cost somewhere in the neighborhood of $500-600, which is a lot cheaper than the assembled model mentioned earlier, and provides basically the same results. It allows the heater and pumps to be controlled independently and provides a fully-automated mashing setup (even for step mashes). So far I have only used it for one brew day since brewing in the summer isn't my favorite, but I was able to load my mash profile and walk away for about 2 hours without any interaction. Only had to come back to change hoses around for draining and sparging.

I will post some snipits of the Arduino and Processing scripts later once I have some time to clean them up and comment them so that they're actually human readable.

20160508_194224 (576x1024).jpg
 
Nice!!! Would love to see the interface. Did you code the PID algorithms? Any automation or is it all just for UI?

I originally was going to use a PID algorithm to control temperature. Arduino had a PID library that is supposed to be somewhat easy to implement as long as you can tune that. I found out pretty early in sub-system testing though that this may be unnecessary in my setup. Luckily a 10G HERMS system has a awful lot of thermal mass, so a simple less than-greater than temperature control sufficed quite nicely.

I did find out rather quickly though that K-type thermocouples were incredibly noisy. I had expected some noise, but +/-5 degrees F constantly was a bit alarming to me. Since the heater was being driven on/off based upon this signal, something needed to change. I was able to find a digital smoothing algorithm online that was easy to adapt and implement. Basically it takes a 5 (I think) second rolling average and throws out the lowest and highest values. This is used to control the temperature of the HLT, and the wort is just recirculated through that. Using this type of setup, I am able to control the temperature of both vessels to within about 1 degree with no problem, which is close enough for me (definitely better than my previous method of wrapping it in towels and waiting). Therefore, I scrapped the PID idea.

As for automation, the mash is completely automated. Preheat the water to the strike temp, add grains, and kick off the mash cycle. It is able to step the temperature for multiple rests or mash out by itself by just adjusting the set temp on the HLT probe. Mash temp is along for the ride. Boil is not really automated, other than switching from 100% ON to a duty cycle once it hits 208 degrees (duty cycle set by panel potentiometer as percentage of a second) and turning everything off and sounding an alarm one the timer is up. Chilling is pretty much the same thing. It will continue to recirculate through my counterflow chiller until it hits the set temp, then turn everything off. Due to the HERMS setup, I do need to move hoses around quite a bit between steps, so I don't know what more to automate there.

One place where I will be looking to improve moving forward is with sparging. The one batch I've done so far took me a little longer than I would like to adjust the two pumps to be at equal flow rates. I know there are some commercially available options for this (Blichmann has some autosparge add-ons), but I'd like to see if I could make something work myself.

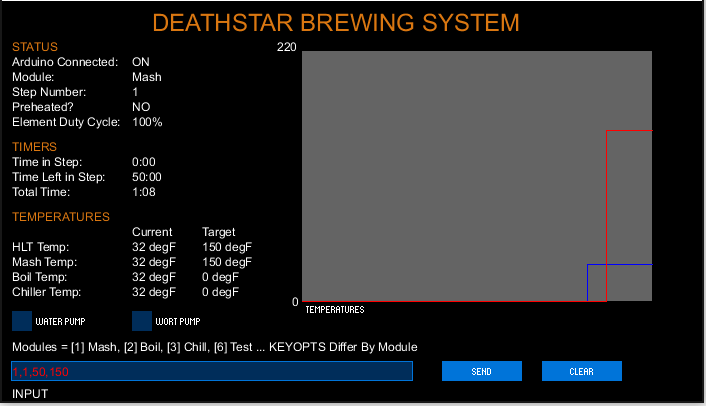
A picture of the interface (not final, but one I had saved to my PC) is attached. Commands are sent to the Arduino using the input line at the bottom. In the pic, I chose to mash (Option 1) using 1 step for 50 minutes at 150 degrees, for istance. Pumps are controlled using the checkboxes, or via hard coding in the script. If the Arduino gets a command, then it starts doing something different. Otherwise, it continuously echos all of the other information (timer, temps, and other statuses) back to the GUI. I found this to be a far simpler method of controlling compared to my original idea which was text I/O based over the Serial port (horrible idea). It just took a little while to figure out how to program the ControlP5 script in Processing since the internet wasn't the biggest help in this area.

brewing_gui.png
 
I'm ready to setup my 10g hers system and wanting to automate the process. I'm not to keen on the whole programming stuff and would like to either buy something ready to go like a plug and play type of deal. Anyone have any good suggestions for a place to start for automation??????
 
What about the flow meters you are using in your setup? Did they not hold up over time?


No, they are working well, but they take some lifting to set up, which can be done given the Arduino backbone here.

I am only using one flowmeter now to control sparge water input rate. Matching the two was a bit tricky as they won't calibrate accurately easily. I use a capacitive sight glass fluid sensor for controlling draining.
 
.... It just took a little while to figure out how to program the ControlP5 script in Processing since the internet wasn't the biggest help in this area.

I am working on a similar project but currently have UI run via 2x LCD character displays from the Arduino. I bought an Rpi for the with the intent of offloading UI to it and doing nearly exactly what you described via serial or I2C. Would you feel comfortable sharing your processing code or providing a couple links to useful resources you used? No hard feelings if the answer is "no". Processing is one route I intend to evaluate in 2017 as it seems the most straight forward.

Nice work btw. I'll be reading more of your posts later.
 
Would you feel comfortable sharing your processing code or providing a couple links to useful resources you used? No hard feelings if the answer is "no". Processing is one route I intend to evaluate in 2017 as it seems the most straight forward.

No problem. The only way I was able to get through the ControlP5 aspect was to do a lot of experimenting with the examples provided, so utilizing my script may be an easier way to get started.

I had intended to upload a copy of the script a while ago, but didn't take the time to apply any comments. I've since added a couple to help understand what each portion of the code is doing. Basically, the arduino and Processing scripts pass data back and forth across the Serial stream using comma delimited lines of numbers and text since they are easy for both to interpret using readily available operations. If the arduino receives something from Serial, it changes its actions. Otherwise, it just spews information into the data stream every second or so and the Processing script takes the 10 pieces of info back from the arduino (times, temperatures, and statuses) and displays them.

Hope this helps you get started. Let me know if you have any other questions.

View attachment autobrewer_processing.pdf
 
Excellent and Thanks! I am in the middle of building my arduino only solution now. After I get that ironed out I'll start trying to tie in the RPi for a better interface. Hope to use your example as a jumping off point this summer.
 
Hey, I'm a little late to the party here, but was just admiring your project. I have written a simple BIAB serial port driven sketch for the Arduino. I originally used a 4x20 LCD and a more complex control panel, but life kind of got in the way, and I decided to do something simple.

I think my goal is to write a java program that will drive the Arduino, so that I might be able to skip the pi. Either way, using software to control things and display data is far easier than using the LCD display and push buttons!

Agreed... this was the impetus for BruControl's development.
 
Back
Top