Anyone else Sculpture-less, RIMS-less and HERMS-less? How do you do it?

Homebrew Talk - Beer, Wine, Mead, & Cider Brewing Discussion Forum

Help Support Homebrew Talk - Beer, Wine, Mead, & Cider Brewing Discussion Forum:

This site may earn a commission from merchant affiliate links, including eBay, Amazon, and others.

BoxofRain

Well-Known Member
Joined
Sep 6, 2008
Messages
475
Reaction score
1
Location
Long Island
I have two propane burners a 7 gallon HLT, 9 gallon BK and a 10 Gallon Cooler MLT. Looking for ideas on how and what to set them up on. I'd love to take the burners off the ground but I'm not sure what to put them on and how to make it safe. Any ideas? What's your method? Have at it.
 
http://yogensha.net/gallery/main.php?g2_itemId=3440

That photo is a bit old, but that's basically how I've been brewing AG for about a year and a half now. The BK is just high enough to siphon into the fermenter, and the MLT is just high enough to drain into the BK when it's on the burner stand. I'm batch sparging, so I don't have to worry about elevating an HLT or pumping.
 
I set my mash tun cooler on the side table of my grill, I have a burner for heating water , and one for boiling, the water is heated in the original fryer pot, and dumped in the tun by hand. the tun is high enough to drain into the kettle while on the burner and then I just pick up the kettle after chilling and raise it high enough to drain into the carboy. since getting a pump, I just let it do all the moving for me while I simply flip valves and move quick disconnects around. soo much easier. and I use a folding table to hold my mash tun and other assorted bits for brewing.
 
Great stuff guys. Any ideas on what kind of table I can put my burners on that would handle the weight of a HLT and BK and not burn up? I was thinking maybe a card table with wonderboard on top but that may be flimsy. Suggestions?
 
I've got a 10 gallon rubbermaid cooler mash tun, a 52 quart tamalera as a kettle, and a 20 plate Duda Diesel plate chiller.

I generally use my stepladder and some 2x4s to gain height. I put the 2x4s across various rungs depending on how high I need it.

For example, I mash on the ground, pick it up and put it on the 2x4s, and drain into my kettle which is sitting on the ground. I then pick that up and set it on the burner.

After boiling, I put the lid on the kettle and *carefully* lift the kettle up onto the 2x4s which are set a little bit higher, and then hook up the plate chiller on a little shelf-thing that's in the garage, and then it's output goes into the fermenter which is sitting on the ground.

The only sketchy part is the lifting of the kettle up to the 2x4s, but considering that I'm doing 5 gallon batches in a pot big enough for 10, there's a lot of slosh room in there, and I haven't scalded myself yet.

If pumps were cheaper ($50 or so), or I brewed more, I'd go that route.
 
I have a 52qt cooler mash tun, 40qt kettle to heat water, a keggle for the boil, and a 55k BTU burner.
I set the mash tun at working height, heat the strike water and add to my tun with a pitcher. During the mash I heat sparge water. When it comes to temp I remove it from the burner and put the keggle on. The height of my mash tun is set to drain into the keggle and the burner puts the keggle at the perfect height to put a bucket under.
I have thought about a stand, but I would have to make it KD because I need the room in my garage when not brewing.
 
I've been thinking about heating the HLT and moving it up to drain into the mash tun, then keeping the mash tun on the ground until I have to drain to sparge. I just can't figure out a good rhythm. Wish I could figure out a good way to burn high.
 
I used to use left-over bricks. Then I saw a discussion on here about using angle iron to make a sculpture so I obtained some used bed frames for free on Craigslist and assembled :)
 
my set up depends on the weather, but the tailgate of my truck works great as my 2nd teir. and you can climb in the truck bed to dump the sparge water so no lifting up to far.
 
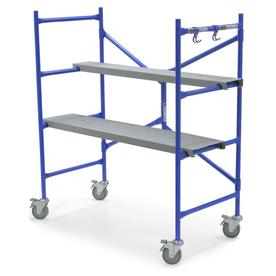
I've used tables, landscaping bricks, patio furniture...whatever holds it! I recently made a stand out of 2x4s and plywood. No worries about heat, as long as they are on the burner stand, up off the wood.

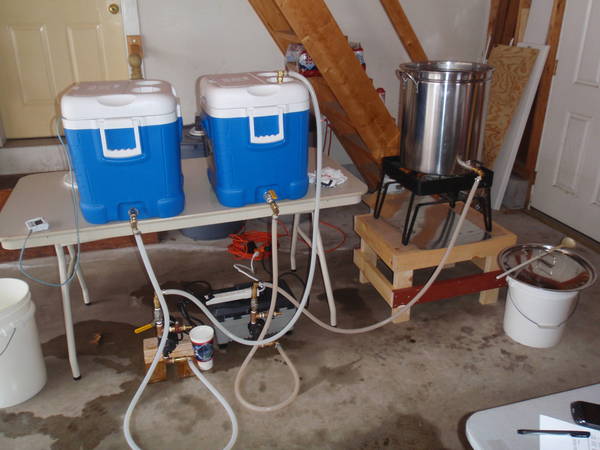
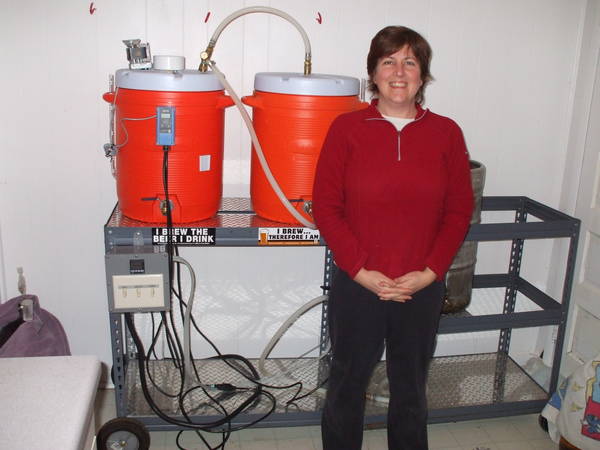
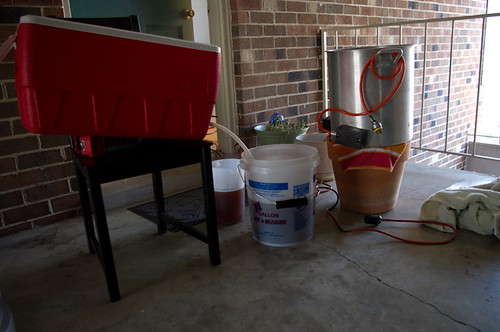
Here are some pics of mine, from when I used all-gravity with smaller pots and then up to keggles, and then on to a single tier, with a pump.

https://www.homebrewtalk.com/f51/brew-rig-sculpture-evolution-206033/

If I could suggest anything that would make your brew day easy its:
  • March Pump
  • Sight Glass / Thermometer Combo
Of course you'll also need to install ball valves, some hosing and quick disconnects-if you don't already have any of them, for the pump. The sight glass makes knowing exactly what volume you have a simple task, and gives you a quick indication of temp(especially for sparge/strike water)

As for the pump...I can't even tell you how nice it is, not to have to pick ANYTHING up once its full of liquid! Just swap out hoses, and kick on the pump. It's SOOO great!! My brew buddies who used to help me transfer full kettles/keggles of boiling hot water/wort really appreciate it too!! :D

Whats nice is you don't have to buy everything at once. You can work up to the single tier, which is what I did. I didn't have the march pump or the stand worked out, before I had my sight glass and ball valves/quick disconnects. Of course I DID go with the ridiculous 3 piece stainless ball valves and qd's, but I knew it was going on my keggles, and they would be a permanent fixture, so why not get exactly what I want.

Funny enough, this past weekend I wanted to brew a small batch, with the remaining base malt I had, so I ended up busting out my OLD smaller pots, and doing a BIAB - starting on my stove, and ending on a single SQ14 burner in my garage. It was a breeze of a brew day(other than learning the few quirks of BIAB) but it was really fun, and kind of nice not having to set EVERYTHING up. My downfall though, is my brewstand has to be broken down, moved, and set back up to brew. Rinse & repeat. Kind of a pain, and with my stand not on wheels, I really can't do it myself. That's next on the list...after new bottling bucket setup, and a bulk order of base malt!

Cheers! Have fun with your setup! Putting it all together is one of the best parts, second only to brewing on it!!
:mug:
 
I'm a single-vessel brewer, but I use cinder blocks to raise the propane burner like the picture in the first link. I set mine vertically to get more height. It is extremely stable.
 
Here is my current rig in action. It was my first run as a single tier, since I added the second pump and a return port on the MLT. Before this I had the HLT raised up for gravity fly sparge. The cooler lids are injected with spray foam, and I preheat them with hot tap water prior to filling with strike or sparge water. The MLT keeps mash temps stable within 1 degree for an hour.

It was also the first run with the wood kettle stand under the SQ14. I made it high enough to allow gravity feed to the carboys with a funnel on top. I put a thin piece of aluminum under the burner to reflect heat and catch drips. Overall I was very happy with this setup - it worked well. I have a couple of kegs and have been contemplating a stand with wheels, but at this point I think I'm going to roll with this for a while...

P3021276.JPG


Check out my gallery for more images during Kolsch brew day last week:

https://cdn.homebrewtalk.com/gallery/showgallery.php?cat=1014

Mike
 
Rather than setting up a Rube Goldburgesque brew sculpture, get a one gallon plastic pitcher and simply use that to move your sparge water and strike water. Simply reach into the pot and scoop out a gallon at a time....your only moving a few gallons at a time. Pretty simple really...actually easier/faster IMO than waiting for your sparge water to drain through a piece of tubing.
 
Got a picnic table or pickup truck? Used to bottle from the back of my truck- perfect height. I use my counter in my apartment to gravity drain all my vessels. I may have missed it, but do you have a garage, yard, etc? Kyle
 
Well, here is my "original":

4189-DSCF0085.JPG


And here is my current:

DSCF2197.JPG


As you can see, it's just some shelving. I've changed up the HLT and control panel, but the "sculpture" remains the same.
 
I wanted a set up that could be thrown up and torn down fairly quickly, this is what I came up with.
home_brewery_by_bashiba1-d3b529w.jpg


The HLT Burner fits perfectly on a cast Iron Patio Furniture table that holds the weight very easily, got it at Target. The Cooler is resting on 4 Plastic Trays that normally hold Coca-Cola 1-liter bottles. The pump has quick release fittings and can be moved easily and connected to the boil kettle for chilling.
 
Wow some great setups here. Ok...I'm getting some ideas. Still need to raise up my HLT burner. To answer conan's question. I have a garage and a yard but am planning on setting this up (weather permitting) on my back deck. In the winter, I want to use the same setup in the garage. (so I'm trying to avoid relying on my patio furniture. )
 
I used to 3 tier off my roommates broken down jeep in the garage. HLT on the roof, MLT on the hood and kettle on the burner on the ground. The only pain in the butt was taking 6 gallon full kettle up a ladder to fill the HLT.
 
Rather than setting up a Rube Goldburgesque brew sculpture, get a one gallon plastic pitcher and simply use that to move your sparge water and strike water. Simply reach into the pot and scoop out a gallon at a time....your only moving a few gallons at a time. Pretty simple really...actually easier/faster IMO than waiting for your sparge water to drain through a piece of tubing.

+1 simple and efficient


Would love to get a closer look at this. Hooks on the side. That top plank could hold tools and incidentals. Burn or mash on the bottom plank. Can move planks around too. And the best thing is that it will do double duty on jobs around the house. Statistics are lacking though. Going to look for it on another site.
 
My setup may be unique in that I've got two Sanke kegs that aren't used for heating, mashing, or boiling... they're a table. I set a piece of plywood on the sankes, then a couple cinderblocks on the plywood. That raises the cooler mash tun high enough to gravity feed into the kettle. The kettle is on a burner that is on more cinderblocks, which raise it high enough to gravity feed into carboys.

It all breaks down into seven cinderblocks, two sankes, and a piece of plywood, and that storability is most important to me since I live in a small space. I can't wait to build a sculpture and turn the sankes into brewing vessels, but it doesn't make sense for me to cut up the sankes just to buy more cinderblocks to support the plywood that used to be supported by sankes, all when I'm out of space as it is.
 
Here is my current rig in action. It was my first run as a single tier, since I added the second pump and a return port on the MLT. Before this I had the HLT raised up for gravity fly sparge. The cooler lids are injected with spray foam, and I preheat them with hot tap water prior to filling with strike or sparge water. The MLT keeps mash temps stable within 1 degree for an hour.

Mike

Mike, what kind of temperature probe are you using there?
 
Mike, what kind of temperature probe are you using there?

It is a TruTemp 3528-21 that I picked up at Target for around $15, and I modified it to be waterproof based on Bobby_M's technique:

https://www.homebrewtalk.com/f11/remote-probe-thermometer-wort-proofing-26905/

I has been very accurate for the past couple of years. The only annoyance with this particular model is that it automatically shuts off after 10 minutes or so to conserve battery.
 
I've posted about it before, but, so far, I'm happy with the brew ladder and my little pump. I know it's easy to mount a March or similar pump on the bottom step and will probably do that some day. It's nice to just be able to fold it up at the end of the day. I've also built it so that the hoses attach to the ladder for easy storage.

IMG_03002.JPG
 

Latest posts

Back
Top