ANVIL FOUNDRY ALL-GRAIN BREWING SYSTEM

Homebrew Talk - Beer, Wine, Mead, & Cider Brewing Discussion Forum

Help Support Homebrew Talk - Beer, Wine, Mead, & Cider Brewing Discussion Forum:

This site may earn a commission from merchant affiliate links, including eBay, Amazon, and others.
That wort looks great! So are you sparging then? If yes I'm curious about your mash efficiency since you didn't have to squeeze the bag.
Yes I am sparging. But my sparge process is different than how the anvil foundry is intended. Ive posted pics in this thread that I have ditched the malt pipe and just use the bag inside the kettle with a brewzilla false bottom. So to sparge, I sparge with the bag in place while doing a slow drain/pump of the wort to a second kettle. Once the wort line gets to the top of grain bed, I gently and slowly add one quart at a time to the top of the grain bed of sparge water. Im convinced that sparging with the bag in place without disturbing the grain bed at all, gets a slightly better sparge than lifting the bag full. Nonetheless, after about 10minutes of the last sparge quart being added to grains, I lift the bag to gravity drain while pump the wort back to the foundry. My mash/lauter efficiency yesterday with hitting preboil volume was 82.4%.

To get that clear wort in the end, I think this is a combination of 3 things: 1) If I don't have to bag squeeze, there is less gunk going to the BK, I find that one good squeeze generally still gets clear wort out but any more and the gunky/cloudy stuff starts coming out, 2) I use whir floc on EVERY beer, even NEIPAs - they still turn out hazy at the end but not "murky" which I don't prefer, and 3) after I finished chilling yesterday at 2pm, I wheeled my cart over to the minifridge with fermenter, then attended to family "stuff". So at 5:30pm (3.5hrs later) it was nice and settled.

Yes, it does make for a longer brew day overall, but by the time 5:30 came along the ONLY things I still had to clean was the foundry and pump and the attached hoses. A one hour hot PBW cycle during dinner time was all that was needed. Ideally, I would love to be able to dump it all in the fermenter immediately, but with free roaming hops and other cold break, etc - it does take time to settle in that tall narrow foundry. So thats how I do it overall and being flexible with my time allows me to do it this way as well which may or may not be feasible for others.

Cheers
 
Last edited:
Yes I am sparging. But my sparge process is different than how the anvil foundry is intended. Ive posted pics in this thread that I have ditched the malt pipe and just use the bag inside the kettle with a brewzilla false bottom. So to sparge, I sparge with the bag in place while doing a slow drain/pump of the wort to a second kettle. Once the wort line gets to the top of grain bed, I gently and slowly add one quart at a time to the top of the grain bed of sparge water. Im convinced that sparging with the bag in place without disturbing the grain bed at all, gets a slightly better sparge than lifting the bag full. Nonetheless, after about 10minutes of the last sparge quart being added to grains, I lift the bag to gravity drain while pump the wort back to the foundry. My mash/lauter efficiency yesterday with hitting preboil volume was 82.4%.

To get that clear wort in the end, I think this is a combination of 3 things: 1) If I don't have to bag squeeze, there is less gunk going to the BK, I find that one good squeeze generally still gets clear wort out but any more and the gunky/cloudy stuff starts coming out, 2) I use whir floc on EVERY beer, even NEIPAs - they still turn out hazy at the end but not "murky" which I don't prefer, and 3) after I finished chilling yesterday at 2pm, I wheeled my cart over to the minifridge with fermenter, then attended to family "stuff". So at 5:30pm (3.5hrs later) it was nice and settled.

Yes, it does make for a longer brew day overall, but by the time 5:30 came along the ONLY things I still had to clean was the foundry and pump and the attached hoses. A one hour hot PBW cycle during dinner time was all that was needed. Ideally, I would love to be able to dump it all in the fermenter immediately, but with free roaming hops and other cold break, etc - it does take time to settle in that tall narrow foundry. So thats how I do it overall and being flexible with my time allows me to do it this way as well which may or may not be feasible for others.

Cheers

I did see that but wasn't sure if you were doing that every batch. You're essentially doing a hybrid fly/batch sparge by trying to match the outflow of the wort. So have you compared your method of pumping the wort out vs. just lifting the bag and sparging through it? I guess with a bag you can't really elevate the grain bed, you have to twist up the bag and hold it that way?

I'm going to continue using the grain pipe with a bag in it. Vs pumping out the wort I plan to just raise the grain pipe and sparge through it. The bed will remain undisturbed and the pipe should do a pretty good job directing water flow through the grains. If I can maintain 75% and put less effort into the squeeze then I'll likely make this my regular method regardless of the size of my grain bill.

On the clarity, if you're using whirlfloc (I do the same) I'd be willing to bet you wouldn't see much of a difference in clarity on the final beer if you just went straight to the fermenter and didn't let the trub settle in the kettle. I don't wait, let the full volume that the down tube will allow to run into the carboy and was very impressed at the clarity after the first batch with nothing more than whirlfloc and a 24 hour cold crash before kegging it. The wort on that first batch was super cloudy as well.

When I make changes I try to quantify the results. I'm all for a new process or extra steps if it adds up to being worth the extra time.
Yes, I switched from the bag in malt-pipe as you are doing now to this two vessel, sparge-in-place approach a few brews ago. Ive done 5 brews now with this. Initially, I was thinking of only doing this process for big OG beers requiring a ton of grains and lots of sparging and maintaining the bag in malt-pipe for smaller, more common batches, but I really just wanted to focus on one process for all to get everything dialed in. As for comparison of the methods, when I was doing bag in malt-pipe, the only way I sparged was to lift the malt-pipe which doesn't disturb the grain bed and sparged through the malt-pipe and bag prior to lifting the bag out to drain. I haven't done sparging any other way other than what Im doing now and sparging through the raised malt-pipe. Honestly, it never really appealed to me to try and do some sort of pouring sparge water over a raised bag or doing a dunk sparge, to me moving a bag around (other than hoisting it vertically with a pulley) full of grains and liquid to do this appeared messy and I just didn't want to try these other sparge methods out.

Nonetheless, if I am averaging, my mash/lauter efficiencies with going the bag in malt-pipe route were consistently 75-76% (~25 brew avg) and I got a couple at 78% with more simpler grain bills and less grains (pale ales).

In comparison, with my current method, Ive gotten: 80% (imperial stout), 82% (belgian dubbel), 79% (NEIPA), 83.3% (Pale Ale) and yesterday's NEIPA at 82.6%. So Im happy with the results and its a modest little bump in efficiency, nothing an extra half pound of grain couldn't fix lol. You are right in that Im really doing a manual "poor mans" version of a fly sparge lol.
I also agree with you in that even without waiting for wort to settle in the kettle prior to putting in the fermenter, which I did a LOT of this, my beers definitely cleared appropriately - I do a nice cold crash as well. My NEIPAs were hazy, pale ales cleared well, etc. Im sure the whirl floc helped with this a lot as the trub in the fermenter pancakes quite nicely. However, for a few brews where I was using a ton of oats (flaked and malted) @ ~45% of the grain bill - big Oat Cream DIPAs, I was getting excessive trub into the fermenter to the point where my losses at kegging were too much and coming up a little short of the full keg AND a couple of these beers were quite "sharp" to taste. So that was really my motivation to start trying to keep trub to a minimum especially for my NEIPAs Im also dumping 6-8oz of free roaming dry hops too so thats a lot of extra volume in the end.

Im fine with some trub in the fermenter as I found it really doesn't cause any adverse effects, unless its excessive. So if my schedule allows me to wait some, I'll let it settle. But if Im in a pinch for time, I have no issue with putting in fermenter as soon as its chilled either.

Cheers!

You're always very detailed, thanks! We'll see how it goes during tomorrow's session. I've got the Spincycle, my new hop spider and a sparge to experiment with so it should be a fun one.
 
I’m 5 brews in on my foundry. The first few batches felt a little awkward as I worked through lots of change, but I feel like I‘m slowly figuring out my new process. My last batch, I felt really dialed in. Hit all my numbers, and transferred it into keg tonight.

So far the thing that I find I’m still struggling with is cleanup. For some reason I was anticipating it being quicker and easier than what I was used to, but so far it’s not been the case.

Just curious...what’s the easiest way everyone has found to clean their foundry at the end of the brew day?
After putting wort into fermenter, I dump the left overs in a pail, give it a good squirt of water to get loose debris out, then refill with clean water. Then hook up hoses/pump -> run a little water through pump into pail to get any gunk out of hoses -> add PBW to the kettle then throw in malt pipe, recirc disc, set it up like you are mashing and let the kettle heat it and do a CIP while you have a beer, eat, etc. After about an hour, I come back to it and start disassembling parts and rinse with water and dry with microfiber cloth. Using a nonabrasive sponge EVERYTHING comes out squeaky clean with zero scorch marks on the element. May not be quick, but its very easy and takes about 20-30minutes tops after the CIP and that includes taking pump apart to inspect but its always perfectly clean too. I don't take apart the ball valve on the foundry every brew but do that separately once every couple of brews. The ball valve will get some buildup over time in it even if CIPing so keep that in mind.
 
You're always very detailed, thanks! We'll see how it goes during tomorrow's session. I've got the Spincycle, my new hop spider and a sparge to experiment with so it should be a fun one.
Not a problem at all, your welcome. My responses are often long winded yes, but Im just trying to give as much info as possible and my reasons for my decisions so peeps can make informed decisions for themselves depending on their situations. I LOVE the spin cycle for chilling. works like a dream for that. Since you are using a hop spider, the placement of the spin cycle probably won't be as critical to avoid a clogged pump compared to me who lets the hops roam free. I put my spin cycle directly over the ball valve pointing to the right side and my dip tube points to the right as well which helps avoid hops plugging the pump.

This is what I love most about the foundry: compared to other all-in-one systems that have internal pumps and lots of other parts, the foundry is easily the most flexible and adaptable IMHO to allow the brewer to accessorize and brew how they want to!
 
After putting wort into fermenter, I dump the left overs in a pail, give it a good squirt of water to get loose debris out, then refill with clean water. Then hook up hoses/pump -> run a little water through pump into pail to get any gunk out of hoses -> add PBW to the kettle then throw in malt pipe, recirc disc, set it up like you are mashing and let the kettle heat it and do a CIP while you have a beer, eat, etc. After about an hour, I come back to it and start disassembling parts and rinse with water and dry with microfiber cloth. Using a nonabrasive sponge EVERYTHING comes out squeaky clean with zero scorch marks on the element. May not be quick, but its very easy and takes about 20-30minutes tops after the CIP and that includes taking pump apart to inspect but its always perfectly clean too. I don't take apart the ball valve on the foundry every brew but do that separately once every couple of brews. The ball valve will get some buildup over time in it even if CIPing so keep that in mind.
What is a CIP?
 
Just to clarify with folks getting good efficiency using a bag, are you using the bag in the malt pipe or just the bag alone? Another brewday in the books with 64% efficiency... really hoping to get in the 70%+ range. Full volume, fine crush, stir every 15 minutes, re-circulation pump, bag +malt pipe. Ugh!
 
Noob, with the spin cycle I was thinking that 12 inches is not long enough to really work as a whirlpool because measuring 12 inches from the top submerges the nozzle maybe 1 or 2 inches below the 5.0 gallon mark. Is this enough or does it cause cavitation and bubbles? Thanks :mug:
 
Noob, with the spin cycle I was thinking that 12 inches is not long enough to really work as a whirlpool because measuring 12 inches from the top submerges the nozzle maybe 1 or 2 inches below the 5.0 gallon mark. Is this enough or does it cause cavitation and bubbles? Thanks :mug:
I’m not sure to be honest. I have the 18 inch version and put it pretty low so that it’s right over the dip tube
 
Just to clarify with folks getting good efficiency using a bag, are you using the bag in the malt pipe or just the bag alone? Another brewday in the books with 64% efficiency... really hoping to get in the 70%+ range. Full volume, fine crush, stir every 15 minutes, re-circulation pump, bag +malt pipe. Ugh!

Both ways using the bag should definitely yield mash/lauter efficiencies in the 70s as you get this dialed in.

Some things to consider:
1) how are your pre boil volumes? are they high?
2) how fast are you recirculating at? Too fast could cause channeling perhaps, or stuck mashes. Go slow.
3) crush - if it is super fine like flour this may cause channeling or stuck mashes because you are recirculating. Ive settled on 0.030" gap size and its the best of both worlds IMHO.
4) are you stirring the entire grain bed or just the top third?
I’m not sure to be honest. I have the 18 inch version and put it pretty low so that it’s right over the dip tube
Did not even realize there was an 18 in version. That would obviously make a huge difference. Someone posted a link and it was to the 12 in version. Thanks for the reply. :mug:
 
Well, I'm officially in love with this 10.5 AF system. Brewed the 4th batch today and snagged 82% mash efficiency which vastly exceeds my expectations for this thing.

  • Brewing with the grain pipe and The Brew Bag 400 micron made to fit it.
  • Got the strike water up to temp and moved 1 gallon into a small cooler for sparging later.
  • Mashed for 90 minutes, started recirculating at 15, stirred the top half of the bed every 15 and mashed out at 168 for 10 minutes.
  • Lifted the grain pipe up and let it drain completely.
  • I cool sparged today, meaning the water I pulled at the beginning was used as is when it came time with no additional heating. Temped at 125 after sitting for nearly 2 hours. Just poured it over slowly, one cup at a time, until the full gallon was through.
  • Barely had to squeeze the grain bed to get my pre-boil volume and the wort was pretty clear once I had what I needed.
I did miss my volume into the fermenter by about a tenth of a gallon so it looks like I'll need to bump my boil off a little. Otherwise a flawless session that should produce a very tasty saison.

The 6"x14" hop spider with adjustable hanger worked fantastic as did the 18" Spincycle, very happy with both of those additions. Assuming I can maintain 80% with this pretty simple method I'll stick with it. Next brew session I'm going to grab a gravity reading starting at the 1 hour stir to see if I can cut back on the mash time. I'm expecting to find that I'm good to go at an hour. Then I'll start cutting every other stir, see how that goes. The goal would be a 1 hour mash with one stir half way through.
Great job man! cheers!
 
Both ways using the bag should definitely yield mash/lauter efficiencies in the 70s as you get this dialed in.

Some things to consider:
1) how are your pre boil volumes? are they high?
2) how fast are you recirculating at? Too fast could cause channeling perhaps, or stuck mashes. Go slow.
3) crush - if it is super fine like flour this may cause channeling or stuck mashes because you are recirculating. Ive settled on 0.030" gap size and its the best of both worlds IMHO.
4) are you stirring the entire grain bed or just the top third?
1) My pre-boils are bang on everytime without squeezing anything.
2) I open the ball valve maybe a little less than half way to cut down on pump speed.
3) I ask for my crush at -2 (they use the SS crusher) at my LHBS which is 0.039 in.
4) I'm maybe sticking my paddle in there a little deep but ill have to keep an eye on this.

Thanks for the input!
ok, your pre boil vols aren't interfering with this. Great! when you say the "ball valve" are you referring to the valve on the foundry or do you have a valve on the output of your pump as well? If its the valve on the kettle, Id say open it all the way so you have full flow to the pump and use the clamp (if you have the recirc package) to lower the flow on the outlet side. I'd aim for a slow ~1quart/minute flow. Measure it with water to see where you are at. The crush, IMHO could very well be your issue. I don't consider 0.039 very fine at all. If you had white wheat or malted oats in that grain bill, these grains might not have been crushed very well at that gap at all which could easily explain poor efficiency. Im not sure how fine your LHBS can go with the brew tech mill, but I'd ask for as low as they can go to be honest. Find it hard to believe that mill couldn't go finer than 0.039" gap. while using the bag in malt-pipe, Ive found my efficiencies went up dramatically when I got in the 0.026-0.032 range. At least below 0.035 would help you a lot I think. Ive settled on 0.030" as it seems to be the best balance of getting great conversion efficiency but not too small as to interfere with stuck spares. If you are doing full volume brews, I simply go as tight of a gap as you can. What was your grain bill for this brew? If I were you, Id focus your attention on that crush for sure. if you are using a bag, you can certainly go finer which will help with conversion efficiency for sure.

I just looked up the SS brew tech mill (wasn't familiar with it because I use a cereal killer) and it can go as low as -5 setting. Ask your LHBS what the -3, -4, and -5 settings equate to in terms of gap size. If -2 is ~ 0.039", Id imagine you might want to try -4 or -5 settings to get into the 0.030-0.032 range. Should help you a lot I think.
 
I'm 5 batches into my 6.5 Foundry, the last 2 utilizing the 240V-GFI "adapter cord" so I still have 120V functionality. Works a treat.

I ferment in kegs, and I still had my cooler for mashing that I continue to utilize.

A 6.5 can easily handle a 4.5-4.75 wort load into a corny, give it some Fermcap and you're golden. I specifically went for the 6.5 as a corny will likely be my max batch size for the time being. By utilizing a brew bag with a cooler for MAIB, it can handle it.

I do batch sparging in the cooler, and with a $4 ratcheting pulley, no issues. My mash eff is in the 70-74% range thus far, which is fine by me.

With 120V, it really needs to stay at 100% to get a "lightly" rolling boil. At 240V I had to dial it back to 60-70% and still nearly had some boil overs. It's super handy to be able to flip between the two when circumstances require.

I've never used the included malt pipe. Don't have a pump either, tho that may change in the future.

Only thing I'd change is the chiller. The SS coil is going to be re-purposed as a pre-chiller in a cooler of ice/salt water (again, stuff I already had). Looking at a Cu.S.S. chiller designed specifically for these AIO units to set in the kettle.

With a brew bag, cleanup of the spent grains is a breeze. Just dump the grains, and spray down the inside-out bag, then hang to dry. I sanitize the bag periodically in starsan, so far so good. Cooler cleaning is trivial as the bag handles all of the cruft.

I use a SS hop filter hanging off the side of the kettle. Got the 10", but will prolly get the 13" as it goes nearly to the bottom of the 6.5 kettle. Very little hop matter to deal with in the kettle proper, no mesh on the spigot dip tube. I use a mesh funnel to catch the last dregs as I drain into the ferm-keg.

For cleaning the kettle, do an initial rinse with hot water and a gentle cleaning with a plastic scrubby. I made up some "DIY PBW" by mixing up some Oxy-Clean FREE with some Tri-Sodium Phosphate (TSP) from a local Ace Hardware painter's section. Re-fill the kettle with water and warm it to 120-130 with 1 scoop per gal of the DIY PBW. Give it an hour and everything is cleaned.

I do a final scrub/rinse with barkeeper's friend to let the SS passivate.

Even with a non-pump mashing regimen, my last "brew day" took 4 hours. That's including the time it took to get the strike water up to temp. If I'd used the timer to have it ready when I woke up, I may have been able to knock it down to 3 hours... all in, including cleaning.

Amazing piece of kit.
 
1) My pre-boils are bang on everytime without squeezing anything.
2) I open the ball valve maybe a little less than half way to cut down on pump speed.
3) I ask for my crush at -2 (they use the SS crusher) at my LHBS which is 0.039 in.
4) I'm maybe sticking my paddle in there a little deep but ill have to keep an eye on this.

Thanks for the input!

Agree with Noob. Open the kettle valve all the way and use the clamp on the outlet side to control flow. That being said, the valve half open is likely way too fast. And your crush could be much finer since you're using a bag. If they won't change the mill setting then at least have them double mill it.
 
I'm 5 batches into my 6.5 Foundry, the last 2 utilizing the 240V-GFI "adapter cord" so I still have 120V functionality. Works a treat.

With 120V, it really needs to stay at 100% to get a "lightly" rolling boil. At 240V I had to dial it back to 60-70% and still nearly had some boil overs.

Can you link to what cord you're talking about?

One of the main reasons I'm not in a rush to switch over to 240 is your comment about boil overs. The hops only care about 212 degrees, as long as you're hitting that they'll do their thing. Low boils are more predictable and just as effective.
 
Can you link to what cord you're talking about?

One of the main reasons I'm not in a rush to switch over to 240 is your comment about boil overs. The hops only care about 212 degrees, as long as you're hitting that they'll do their thing. Low boils are more predictable and just as effective.

240V GFI for Anvil Foundry - SS Brewing

Brian put up a great YT video detailing the 240V-GFI adapter cord I use. Mine is nearly identical to his. Only differences were that I was able to find a 12ga 120V heavy duty extension cord that I used for the "Load" side, rather than doing separate cord+plug.

I have a NEMA14-30 240V dryer outlet in my townhouse, just off the kitchen, so I used this plug:

Miady NEMA14-50P - and removed the 4th neutral plug, as it is not needed for the Anvil running at 240.

I chose the Anvil specifically for it's ability to do 120 or 240 with just the flip of a switch (and the appropriate outlet wiring).

It does make things go a clip faster, but I also agree that 120V does make good beer. :cool:

P.S. Another brewer here was able to find a pre-wired GFI so all one needs to pick up are the appropriate plugs on each end for 240V and 120V!

240-GFI pre-wired
 

Attachments

  • 2021-03-03 (1).jpg
    2021-03-03 (1).jpg
    15.3 KB · Views: 16
  • 2021-03-03 (2).jpg
    2021-03-03 (2).jpg
    27.1 KB · Views: 14
  • 2021-03-03.jpg
    2021-03-03.jpg
    23.8 KB · Views: 14
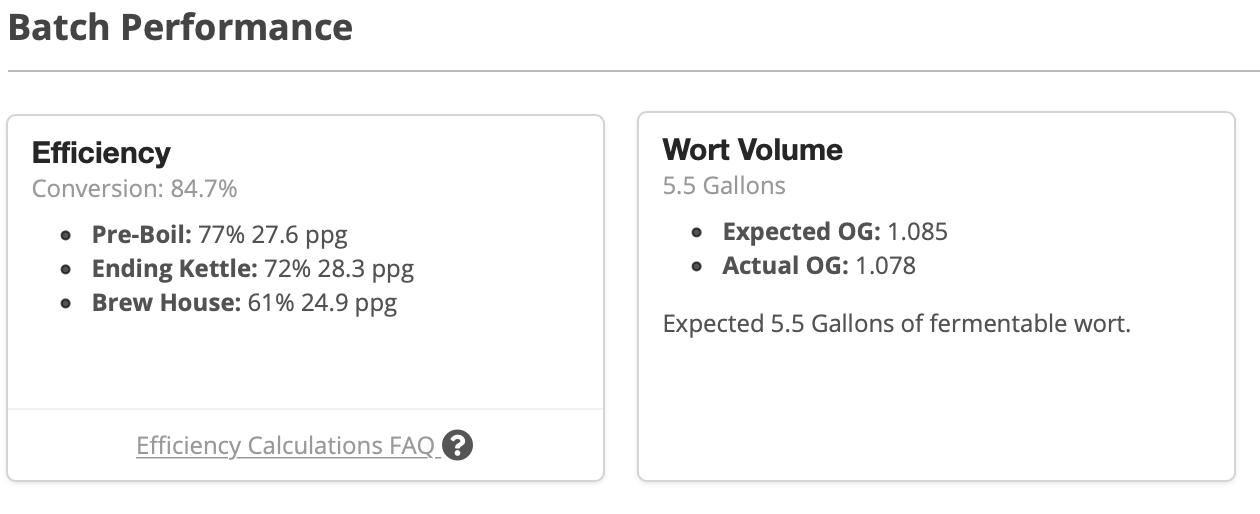
What "brewhouse" efficiency are you all using when designing your recipes? I'm using brewersfriend, and the past 2 that I've done with a 70% setting and my numbers have been low. Not terribly, but enough that I guess I'm a little irritated about it. Just trying to figure out if my expectations are too high, or if I'm truly messing something up.

Maybe my equipment profile is messing up the #s? I'll admit to just kind of stumbling my way through that, and using one of the AF profiles I found on BF as a template.

I'm fairly close to just saying F it, adjusting the recipes for 60% and then just roll with it.

I'm working on dialing in my hardware profile in Brewfather these days. Started with a 120V profile for the first brews.

My BREWHOUSE eff is right around 65-67%, and keeps inching up with every tweak I make to the kit. I'm totally fine with this, personally. It's all about getting the system to kick out reliably repeatable batch results.

My MASH eff using MAIB started at 70% for the first batch and up to 74% for the last one. I feel the heat-holding capacity of my cooler is making my lack of a circulation pump less evident. :)

Only 2 batches complete using 240V, so I'm still getting the grain absorption and boil off estimates better nailed-down.

The tricky part at 240V is, unlike 120V... you can have a boil at 65% power and the 6.5 will easily boil over at 100% if filled with 20L/5.2gal of wort, so the boil off rate can potentially be all over the place (no pun intended).

At 120V, just keep it at 100%, so the maths get easier as there is less variation.
 
Yeah..I feel like that is exactly where I want to be at. If the BH efficiency is low, so be it. I just want some consistency. This was for the tropical stout that I made last week.

Screen Shot 2021-03-09 at 8.07.57 AM.png


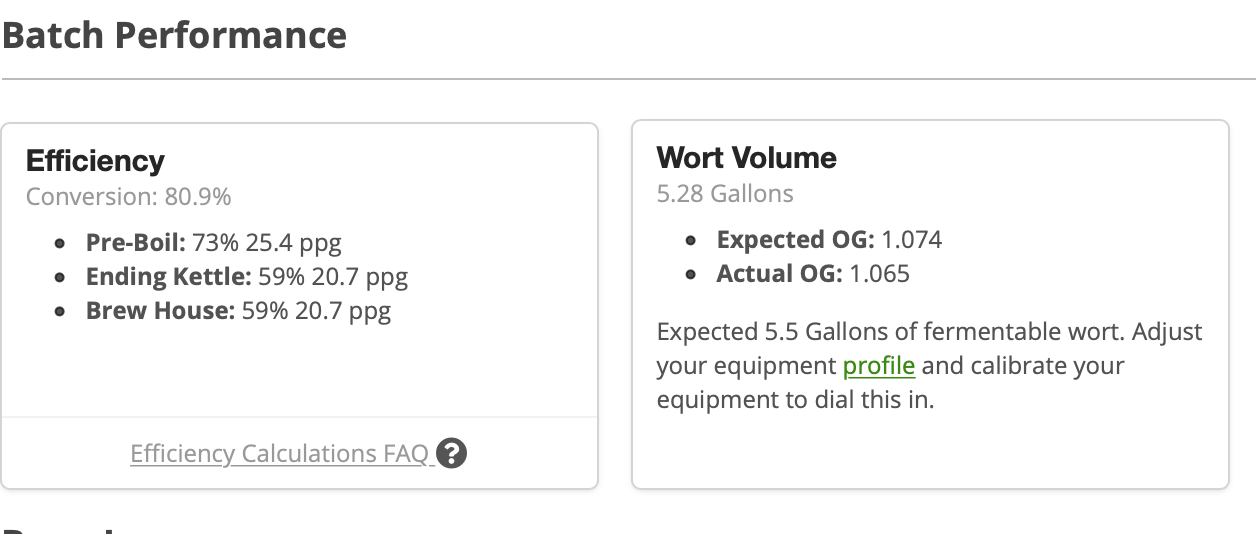
Okay..whatever, so I'll adjust the profile as suggested. Just mucked w/the numbers a bit, can't even really remember what I did.

Yesterday's session ended up w/this. This was a strong ale.

Screen Shot 2021-03-09 at 8.08.07 AM.png


So I adjusted my profile again, not sure why..but I did this last night. Physically measured out the actual kettle losses and reduced that by .2 quarts, and reduced the 'mash-tun addition' (drainable volume below your mashtuns false bottom) to 4, as it was set to 6 quarts for some reason.

And yes..I'll agree w/your comment about boil off rate. With yesterday's I had my power set to 100% (w/240) so that I would get to 5.5 into the fermenter. I brew with a bag in the malt pipe, and haven't quite settled on how much I want to bother squeezing. At the moment, I'm at a:

After it is done draining into the AF, set the malt pipe into a Home Depot bucket, press on the bag a bit with a half assed effort, or until I'm tired of burning my hands (which yesterday was 3 times) and dump whatever I managed to squeeze out into the AF.
 
240V GFI for Anvil Foundry - SS Brewing

Brian put up a great YT video detailing the 240V-GFI adapter cord I use. Mine is nearly identical to his. Only differences were that I was able to find a 12ga 120V heavy duty extension cord that I used for the "Load" side, rather than doing separate cord+plug.

I have a NEMA14-30 240V dryer outlet in my townhouse, just off the kitchen, so I used this plug:

Miady NEMA14-50P - and removed the 4th neutral plug, as it is not needed for the Anvil running at 240.

I chose the Anvil specifically for it's ability to do 120 or 240 with just the flip of a switch (and the appropriate outlet wiring).

It does make things go a clip faster, but I also agree that 120V does make good beer. :cool:

P.S. Another brewer here was able to find a pre-wired GFI so all one needs to pick up are the appropriate plugs on each end for 240V and 120V!

240-GFI pre-wired

Thanks for the info and pictures! I have the ability to put 240 in my garage where I brew pretty easily and the switchable aspect was also one of the reasons I bought the Anvil. But so far I'm not seeing the need. I have the time to brew, my goal is more about making that brew day as easy as possible. The AF continues to check all the boxes and I should further simplify things in the next few batches.
 
I picked up some medium-duty vinyl gloves from a local ACE hardware, really helps with the heat if you wanna put the squeeze on things, get a good grip tho, they get slick! ;)

Do you re-circulate with a pump or do any sparging with the malt pipe+bag sitting atop the kettle?

Since I do the cooler mash, I drain off 1st runnings to the kettle before I ratchet up my bag (which makes it A LOT lighter), then let it hang over a Homer bucket much like you do.

Just prior to this, I have my sparge water warmed up to temp in the Anvil, and drain it into a corny keg for a few mins to clear the kettle for the 1st run.

I lower the bag back into the cooler, then add the sparge water just like any other batch sparge routine... also add the Homer bucket dregs into the kettle. I drain off 2nd runnings, then give the bag a decent squeeze. The gloves really help.

You're doing bigger beers too, which may be playing a part in this quandry?

So far mine have only been moderate gravity, think 1.060 pre-boil was my highest.

My profile also has zero mash-tun deadspace, cuz after draining I tip the cooler to get the last few drops into the kettle. It's only a 5 gal round Igloo from Wally world, so it's not at all heavy.
 
Yeah..I feel like that is exactly where I want to be at. If the BH efficiency is low, so be it. I just want some consistency. This was for the tropical stout that I made last week.

View attachment 721629

Okay..whatever, so I'll adjust the profile as suggested. Just mucked w/the numbers a bit, can't even really remember what I did.

Yesterday's session ended up w/this. This was a strong ale.

View attachment 721630

So I adjusted my profile again, not sure why..but I did this last night. Physically measured out the actual kettle losses and reduced that by .2 quarts, and reduced the 'mash-tun addition' (drainable volume below your mashtuns false bottom) to 4, as it was set to 6 quarts for some reason.

And yes..I'll agree w/your comment about boil off rate. With yesterday's I had my power set to 100% (w/240) so that I would get to 5.5 into the fermenter. I brew with a bag in the malt pipe, and haven't quite settled on how much I want to bother squeezing. At the moment, I'm at a:

After it is done draining into the AF, set the malt pipe into a Home Depot bucket, press on the bag a bit with a half assed effort, or until I'm tired of burning my hands (which yesterday was 3 times) and dump whatever I managed to squeeze out into the AF.

I've had Beersmith set at 68% BH efficiency since starting with the AF. After yesterdays batch though I'll be moving that to 71% and expect when it's all said and done I'll end up around 75% BH with an 80% average on the mash.

Check out my method from yesterday. Nothing unique, but it's what I'm likely going to do for every batch moving forward. I set the malt pipe so I can see the kettle markings with a flash light, just squeeze until I hit my volume and then toss it over into a bucket to get it out of the way.
 
Yeah..I feel like that is exactly where I want to be at. If the BH efficiency is low, so be it. I just want some consistency.

Okay..whatever, so I'll adjust the profile as suggested. Just mucked w/the numbers a bit, can't even really remember what I did.

I wanted to comment on this separately. With every system there's a learning curve. And the only way to get to consistency, is good data. Keep recording your volumes and gravity, keep making adjustments here and there, and you will ultimately end up with consistent numbers. Focus on the basics first especially volumes, they are really the key to getting a system dialed. Once you've got those dialed then you can start tweaking process (temp, stir, crush, sparge, etc.) to improve your efficiency numbers. But volumes and anything that impacts them have to come first.

I did three separate "dry" runs on this system before I actually chucked grains in. Filled it to volume, timed temperature steps to mash in and boil, and boiled for a full hour to verify the evap rate. You can do this to verify all your volumes (other than grain absorption) without spending a dime.
 
I picked up some medium-duty vinyl gloves from a local ACE hardware, really helps with the heat if you wanna put the squeeze on things, get a good grip tho, they get slick! ;)

Find somewhere that carries BBQ supplies and get a set of heavy grilling gloves. I use mine mostly for smoking meat but they make really good brewing gloves too.
 
Im curious: how many gravity points is everyone gaining for a one hour boil on average? Include in your answer whether you are 120V or 240V and the % power you are using for the boil.

The reason why Im asking is that my volumes are generally spot on (I even add up all the losses at the end + the amount into the fermenter) to check and make sure it all adds up to what beersmith thinks I should have after taking into account the cooling shrinkage, yet I always get a 8point gravity increase for a 60minute boil. Im on 240V, 0.77gal boil off rate @87% power, 4% cooling shrinking. Despite my volumes adding up correctly, which tells me my boil off and cooling shrinkage are correct, beersmith expects me to gain 10 points from my boil. I know this is close, but driving me nuts. The only way I can configure beersmith to adjust my points gained from boil to 8points is to either change boil off rate OR lower the cooling shrinkage to 2% - but then this messes with my volumes at the end a little bit. Luckily I can easily compensate for this because I overshoot my mash lauter expected gravity while hitting preboil volumes and then I can hit the OG. Would rather just hit the numbers all the way through rather than compensating one error for another lol.

I will be creeping my BH upwards to more accurately hit my mash/lauter efficiency but this doesn't rectify the 10point gravity beersmith tells me I should be getting from the boil.
 
240V GFI for Anvil Foundry - SS Brewing

Brian put up a great YT video detailing the 240V-GFI adapter cord I use. Mine is nearly identical to his. Only differences were that I was able to find a 12ga 120V heavy duty extension cord that I used for the "Load" side, rather than doing separate cord+plug.

I have a NEMA14-30 240V dryer outlet in my townhouse, just off the kitchen, so I used this plug:

Miady NEMA14-50P - and removed the 4th neutral plug, as it is not needed for the Anvil running at 240.

I chose the Anvil specifically for it's ability to do 120 or 240 with just the flip of a switch (and the appropriate outlet wiring).

It does make things go a clip faster, but I also agree that 120V does make good beer. :cool:

P.S. Another brewer here was able to find a pre-wired GFI so all one needs to pick up are the appropriate plugs on each end for 240V and 120V!

240-GFI pre-wired
https://teamequip.com/search.php?se...et+Strips+20A/240V+In-Line+GFCI+25+FT+T165552
That's what, to me, appears to be the same 240V gfci with a pre-wired 25' cord.
 
Im curious: how many gravity points is everyone gaining for a one hour boil on average? Include in your answer whether you are 120V or 240V and the % power you are using for the boil.

The reason why Im asking is that my volumes are generally spot on (I even add up all the losses at the end + the amount into the fermenter) to check and make sure it all adds up to what beersmith thinks I should have after taking into account the cooling shrinkage, yet I always get a 8point gravity increase for a 60minute boil. Im on 240V, 0.77gal boil off rate @87% power, 4% cooling shrinking. Despite my volumes adding up correctly, which tells me my boil off and cooling shrinkage are correct, beersmith expects me to gain 10 points from my boil. I know this is close, but driving me nuts. The only way I can configure beersmith to adjust my points gained from boil to 8points is to either change boil off rate OR lower the cooling shrinkage to 2% - but then this messes with my volumes at the end a little bit. Luckily I can easily compensate for this because I overshoot my mash lauter expected gravity while hitting preboil volumes and then I can hit the OG. Would rather just hit the numbers all the way through rather than compensating one error for another lol.

I will be creeping my BH upwards to more accurately hit my mash/lauter efficiency but this doesn't rectify the 10point gravity beersmith tells me I should be getting from the boil.

Gravity, in beer at least, isn't an exact science. And the number of points you pick up will be impacted by the overall sugars in the wort. Lower gravity beers won't gain as much as big ones. If I'm within a point or two I don't sweat it too much. And as you mentioned, if your volumes are correct then I wouldn't mess with anything.

What are you using to take your gravity reading? Sure it's calibrated? If it's a hydrometer are you temp correcting the value? How many beers are you having between readings? 🤣

I'm only a few batches in but I'd say my average at this point is 7 additional points from pre-boil to OG. Most of them were sub 5.5% abv beers. This is on 120v at 100% power for the boil. I have it set at 0.5 gallons for boil off but think I need to bump that to 0.6, and 4% shrinkage.
 
Im curious: how many gravity points is everyone gaining for a one hour boil on average? Include in your answer whether you are 120V or 240V and the % power you are using for the boil.

I'm seeing what your're seeing. :)

Last 2 batches I was running 240V around 75% during the boil.

My brown ale gained 9 points (1043 -> 1052). The WeeHeavy was 8 points (1054 -> 1062).

Brewfather was off by a point on each, both upwards (10pts for the brown, 9pts for the WeeHeavy). I didn't do any heavy analysis as to the why tho.
 
I'm doing wheat beers and have a hard time with scorching between steps. Last times I tried decoctions, and the one before I removed the malt pipe and stirred while heating between the steps.

I read that recirculating would help by pumping the flour at the bottom into the pipe.

This gave me an idea and would like to know if anyone tried it or see a potential problem with it. Instead of pumping the bottom, could I revert the flow and pump the wort back into the bottom? Would that prevent the residues from settling on the heating element?
 
Gravity, in beer at least, isn't an exact science. And the number of points you pick up will be impacted by the overall sugars in the wort. Lower gravity beers won't gain as much as big ones. If I'm within a point or two I don't sweat it too much. And as you mentioned, if your volumes are correct then I wouldn't mess with anything.

What are you using to take your gravity reading? Sure it's calibrated? If it's a hydrometer are you temp correcting the value? How many beers are you having between readings? 🤣

I'm only a few batches in but I'd say my average at this point is 7 additional points from pre-boil to OG. Most of them were sub 5.5% abv beers. This is on 120v at 100% power for the boil. I have it set at 0.5 gallons for boil off but think I need to bump that to 0.6, and 4% shrinkage.

LOL thanks for making me laugh on this reply. I actually don't drink alcohol at all during my brewday because I normally brew in morning/early afternoon and have to attend to family etc. So I only have 1 beer typically which is opened after chilling to pitch temps lol. As for gravity readings, I take hydrometer readings both preboil and into the fermenter to get OG. Always take them at 60degreesF which is what my hydrometer is calibrated to and its spot on.

Ive had a couple of 7point gains but by far most of mine are 8 point gains where my average OG is in the 1.068-1.070 neighborhood (~7-7.5% ABVs). So this is comforting that others are seeing this too. Agreed that if volumes add up, no sense in trying to accommodate this by messing with another parameter in beersmith. Just me being annoyed if Im not within +/- 1 gravity point lol. Perhaps I need to drink more during brew day to relax a little more? :bigmug:

With beers that big I really wouldn't sweat 1-2 points. The only other things I could recommend are making sure you give the wort a really good stir before taking any samples, and maybe do some digging into the software you're using to see if this is a common occurrence with other users. If it's "always" telling you there should be a 10 point spread then something isn't right.

Beersmith has always been rock solid when it comes to numbers for me, it's what I love about it. But I'm not perfect, so there will always be variances.
 
ok, your pre boil vols aren't interfering with this. Great! when you say the "ball valve" are you referring to the valve on the foundry or do you have a valve on the output of your pump as well? If its the valve on the kettle, Id say open it all the way so you have full flow to the pump and use the clamp (if you have the recirc package) to lower the flow on the outlet side. I'd aim for a slow ~1quart/minute flow. Measure it with water to see where you are at. The crush, IMHO could very well be your issue. I don't consider 0.039 very fine at all. If you had white wheat or malted oats in that grain bill, these grains might not have been crushed very well at that gap at all which could easily explain poor efficiency. Im not sure how fine your LHBS can go with the brew tech mill, but I'd ask for as low as they can go to be honest. Find it hard to believe that mill couldn't go finer than 0.039" gap. while using the bag in malt-pipe, Ive found my efficiencies went up dramatically when I got in the 0.026-0.032 range. At least below 0.035 would help you a lot I think. Ive settled on 0.030" as it seems to be the best balance of getting great conversion efficiency but not too small as to interfere with stuck spares. If you are doing full volume brews, I simply go as tight of a gap as you can. What was your grain bill for this brew? If I were you, Id focus your attention on that crush for sure. if you are using a bag, you can certainly go finer which will help with conversion efficiency for sure.

I just looked up the SS brew tech mill (wasn't familiar with it because I use a cereal killer) and it can go as low as -5 setting. Ask your LHBS what the -3, -4, and -5 settings equate to in terms of gap size. If -2 is ~ 0.039", Id imagine you might want to try -4 or -5 settings to get into the 0.030-0.032 range. Should help you a lot I think.
Will do! thanks again for the input, ill go down to -3 or -4 (0.033 and 0.028 respectively) next time. Also the "ball valve" i mentioned was the one on the anvil. I just found it was easier to do that than the pump. Next brew day ill give some results. Cheers!
 
I'm doing wheat beers and have a hard time with scorching between steps. Last times I tried decoctions, and the one before I removed the malt pipe and stirred while heating between the steps.

I read that recirculating would help by pumping the flour at the bottom into the pipe.

This gave me an idea and would like to know if anyone tried it or see a potential problem with it. Instead of pumping the bottom, could I revert the flow and pump the wort back into the bottom? Would that prevent the residues from settling on the heating element?
Barbarossa you want to draw from the bottom and deliver to the top so the water can go through the grain again. You want to increase the flow through the grain and gravity is your best bet. Are you using a bag? That may be the easiest way to reduce the flour from the wort. :mug:
 

Latest posts

Back
Top