
AAHHHH Long Trail. Take me back to skiing in Vermont!
You are using an out of date browser. It may not display this or other websites correctly.
You should upgrade or use an alternative browser.
You should upgrade or use an alternative browser.
Another Keezer Build
- Thread starter specialized
- Start date

Help Support Homebrew Talk:
This site may earn a commission from merchant affiliate
links, including eBay, Amazon, and others.
OP
OP
specialized
Well-Known Member
It sure is. I got it for christmas. I saw them online at one point, there is some guy that takes unique beer bottles and converts then into drinking glasses. I'll dig up the link when I get a chance later.
OP
OP
specialized
Well-Known Member
seeing as i'll be tiling my keezer tonight allow me to chime in.
I had originally planned on just Liquid nailing my tiles to the wood, but after drooping my tile off to the "Pro" to have him polish my edges he said that Liquid nails was basically jerry rigging it and that my granite would be falling off and breaking in 6 months.
I have since purchased some 1/4" FibeRock Aqua board from Home Depot, some thin set and I am going to actually lay tile like it's supposed to be done.
but since you have a wood frame all the way around already and no worry about tiles falling off the side of the lid I'd just DGAF and use Liquid Nails.
-=Jason=-
Can you elaborate on the pro polishing your edges. I've never cut tiles and would appreciate any hints or warnings. Im looking to do slatetoo
Can you elaborate on the pro polishing your edges. I've never cut tiles and would appreciate any hints or warnings. Im looking to do slatetoo
well I was going to have "exposed" edges and well they aren't polished. I called around to several Tile contractors in my area and the going rate was about $10 a square foot to polish. he ended up doing mine for $60 cash and even cut my side pieces for me.
check out my keezer build in my sig I'll take better photos tonight after I grout of the polished edges.
-=jason=-
OP
OP
specialized
Well-Known Member
Here's the link I promised http://www.etsy.com/shop/nickpaul
OP
OP
specialized
Well-Known Member
I’ve been holding off on tiling the top because weight has become an issue to me. I’m afraid that the hinges are going to fail at it’s current weight and don’t even want to think about it how heavy the lid will be after tiling. In order to mitigate this issue I’ve been thinking about adding a damper and attach it to the underside of the lid and the frame.
Has anyone attempted something like this before? Any reputable websites from which to buy dampers? How would I go about installing a damper? Also is there a practical way I can determine the stroke length I’ll need, instead of just guessing?
Finally, will a damper keep weight off of the hinges? Or will it just aid in opening/closing?

$479.00
$559.00
EdgeStar KC1000SS Craft Brew Kegerator for 1/6 Barrel and Cornelius Kegs
Amazon.com


$20.94
$29.99
The Brew Your Own Big Book of Clone Recipes: Featuring 300 Homebrew Recipes from Your Favorite Breweries
Amazon.com


$176.97
1pc Commercial Keg Manifold 2" Tri Clamp,Ball Lock Tapping Head,Pressure Gauge/Adjustable PRV for Kegging,Fermentation Control
hanhanbaihuoxiaoshoudian

$53.24
1pc Hose Barb/MFL 1.5" Tri Clamp to Ball Lock Post Liquid Gas Homebrew Kegging Fermentation Parts Brewer Hardware SUS304(Gas MFL)
Guangshui Weilu You Trading Co., Ltd

$28.98
Five Star - 6022b_ - Star San - 32 Ounce - High Foaming Sanitizer
Great Fermentations of Indiana


$58.16
HUIZHUGS Brewing Equipment Keg Ball Lock Faucet 30cm Reinforced Silicone Hose Secondary Fermentation Homebrew Kegging Brewing Equipment
xiangshuizhenzhanglingfengshop

$719.00
$799.00
EdgeStar KC2000TWIN Full Size Dual Tap Kegerator & Draft Beer Dispenser - Black
Amazon.com


$44.99
$49.95
Craft A Brew - Mead Making Kit – Reusable Make Your Own Mead Kit – Yields 1 Gallon of Mead
Craft a Brew


$7.79 ($7.79 / Count)
Craft A Brew - LalBrew Voss™ - Kveik Ale Yeast - For Craft Lagers - Ingredients for Home Brewing - Beer Making Supplies - (1 Pack)
Craft a Brew


$10.99 ($31.16 / Ounce)
Hornindal Kveik Yeast for Homebrewing - Mead, Cider, Wine, Beer - 10g Packet - Saccharomyces Cerevisiae - Sold by Shadowhive.com
Shadowhive

$159.99 ($26.66 / Count)
3M High Flow Series System BREW120-MS, 5616001, For Brewed Coffee and Hot Tea, Valve-in-Head Design
SpaceCityProviders


$76.92 ($2,179.04 / Ounce)
Brewing accessories 1.5" Tri Clamp to Ball Lock Post Liquid Gas Homebrew Kegging Fermentation Parts Brewer Hardware SUS304 Brewing accessories(Gas Hose Barb)
chuhanhandianzishangwu

$53.24
1pc Hose Barb/MFL 1.5" Tri Clamp to Ball Lock Post Liquid Gas Homebrew Kegging Fermentation Parts Brewer Hardware SUS304(Liquid Hose Barb)
yunchengshiyanhuqucuichendianzishangwuyouxiangongsi

![Craft A Brew - Safale BE-256 Yeast - Fermentis - Belgian Ale Dry Yeast - For Belgian & Strong Ales - Ingredients for Home Brewing - Beer Making Supplies - [3 Pack]](https://m.media-amazon.com/images/I/51bcKEwQmWL._SL500_.jpg)


$22.00 ($623.23 / Ounce)
AMZLMPKNTW Ball Lock Sample Faucet 30cm Reinforced Silicone Hose Secondary Fermentation Homebrew Kegging joyful
无为中南商贸有限公司


$33.99 ($17.00 / Count)
$41.99 ($21.00 / Count)
2 Pack 1 Gallon Large Fermentation Jars with 3 Airlocks and 2 SCREW Lids(100% Airtight Heavy Duty Lid w Silicone) - Wide Mouth Glass Jars w Scale Mark - Pickle Jars for Sauerkraut, Sourdough Starter
Qianfenie Direct

OP
OP
specialized
Well-Known Member
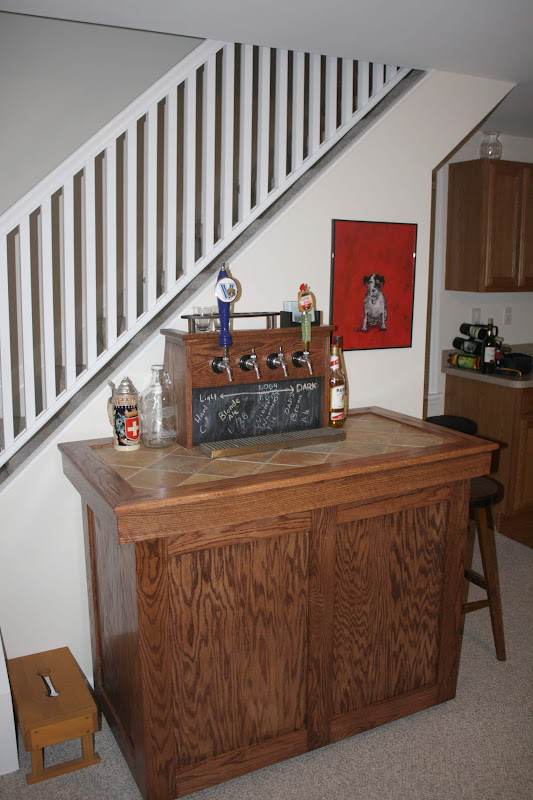
Well it has been a long time since I updated this thread. Right when I finished up the keezer I moved. It has taken a while to get settled in, but now everything's fitting into place.
Everyone, let me know what you think.
Everyone, let me know what you think.
2puttbird
Well-Known Member
Outstanding ... love the 45° angle on the tile ... well done!
jjmicrobrew
New Member
this is my next project, glad you posted the pics, yours look great, this will guide me with some great ideas.
That really looks great!
I don't mean to ask a stupid question, but I have 0 carpentry experience and I'm going to try to make a keezer much like this one in the next few weeks. Just bought my freezer today!
The question I wanted to ask is, earlier when you showed the 'exploded view' of the frame and the other piece...did you put both of those against the Keezer? Why wouldn't you just use the outside frame?
Awesome Keezer! I'm going to try to put my own spin on it if I can figure this out!
The question I wanted to ask is, earlier when you showed the 'exploded view' of the frame and the other piece...did you put both of those against the Keezer? Why wouldn't you just use the outside frame?
Awesome Keezer! I'm going to try to put my own spin on it if I can figure this out!
OP
OP
specialized
Well-Known Member
I don't mean to ask a stupid question, but I have 0 carpentry experience and I'm going to try to make a keezer much like this one in the next few weeks. Just bought my freezer today!
The question I wanted to ask is, earlier when you showed the 'exploded view' of the frame and the other piece...did you put both of those against the Keezer? Why wouldn't you just use the outside frame?
Awesome Keezer! I'm going to try to put my own spin on it if I can figure this out!
I'm not sure I fully understand your question, but here goes:
The reason I built a frame that surrounded the freezer, rather than attach the plywood covering directly to the freezer has to do with how freezers work. Freezers exchange heat through their 'skin'. If you directly apply anything to the outside wall of the freezer you're going to make it less efficient. Thus driving up the cost to cool your beer (freezer will have to operate longer - draining more electricity). Also, the lifetime of your freezer would most likely be shortened, because it will have to work harder to cool.
Because of those concerns I built a frame that basically put distance between the freezer walls and the outside covering. The framing is not secured against the freezer in any way. I can still slide the freezer out the back if I need to. I did this so that if my freezer breaks for whatever reason I can replace it with the same model, without having to build a brand new keezer. The picture you were looking at was just during my assembling of the keezer. The plywood no longer separates from the frame.
Hope that helps, if you need any more help feel free to ask.
OP
OP
specialized
Well-Known Member
I have seen your pictures of the front and side panels and wanted to know how the framing and 1/4 or 1/8 inch inserts were joined? Looks like you inserted the thin panel into the 1 by 2. Any sketch of what you did?
The plywood panels were attached to the oak borders by routing the inside edge of the oak borders the same thickness of the plywood. I then glued the panels in from behind.
I used dowel joints to connect all of the larger pieces together. You can buy an inexpensive dowel joint maker from any hardware store which will allow you to make the joints with a cordless drill.
I attached the paneling to the framing using wood glue and finishing nails in a nail gun. I added woody putty to hide the nails, sanded everything down even, and then stained and sealed.
I'll see if I can find any pictures from when I made this that might help.
Pictures would be great! I think I understand though and never investigated the dowel maker. I am so close to pulling the plug and trying this myself.
OP
OP
specialized
Well-Known Member
Pictures would be great! I think I understand though and never investigated the dowel maker. I am so close to pulling the plug and trying this myself.
I say go for it. You'll learn a lot in the process. Just remember always practice on a scrap piece before trying the real deal. Especially true when working with the dowel rig. Fortunately you'll have to build the framing first which can have some imperfection since it will be hidden in the end.
---Still looking for pictures. But looking like I posted everything I took in this thread.
Luke Mulkey
New Member
- Joined
- Feb 19, 2020
- Messages
- 1
- Reaction score
- 0
Could you also send me the sketchup Mr. Jester ? Looking to do another cloneLooking good so far!
")
PM sentCould you also send me the sketchup Mr. Jester ? Looking to do another clone
Hey Jester! Been reading all of your stuff and wanted to know if you could PM some plans. My first keezer build so any help I could leverage would be awesome!PM sent
Happy to send you the files - PM me your email address and I will get em to ya.Hey Jester! Been reading all of your stuff and wanted to know if you could PM some plans. My first keezer build so any help I could leverage would be awesome!
out of curiosity, what kind of lines(gas and liquid) are you running with your keezer? Keeper is looking nice. It also is given me some ideas to do with mine. Thanks for sharing.
for the condensation issue, I have more of a frozen issue. But I read somewhere on here that people use a small portable dehumidifier to correct that issue. I bought this and am giving it a try (https://www.amazon.com/gp/product/B000H0XFCS/ref=ppx_yo_dt_b_asin_title_o01_s02?ie=UTF8&psc=1 )
for the condensation issue, I have more of a frozen issue. But I read somewhere on here that people use a small portable dehumidifier to correct that issue. I bought this and am giving it a try (https://www.amazon.com/gp/product/B000H0XFCS/ref=ppx_yo_dt_b_asin_title_o01_s02?ie=UTF8&psc=1 )
Similar threads
- Replies
- 7
- Views
- 908
- Replies
- 15
- Views
- 1K
