• Please visit and share your knowledge at our sister communities:
  • If you have not, please join our official Homebrewing Facebook Group!

    Homebrewing Facebook Group

Analyzing and Visualizing the Benifits of Continuous Hopping?

Homebrew Talk

Help Support Homebrew Talk:

This site may earn a commission from merchant affiliate links, including eBay, Amazon, and others.

Jsmith82

Well-Known Member
Joined
Jan 25, 2011
Messages
648
Reaction score
14
Location
St. Louis
Let's start by stating I have 9 days off in a row starting Saturday, time to brew some beers! :mug:

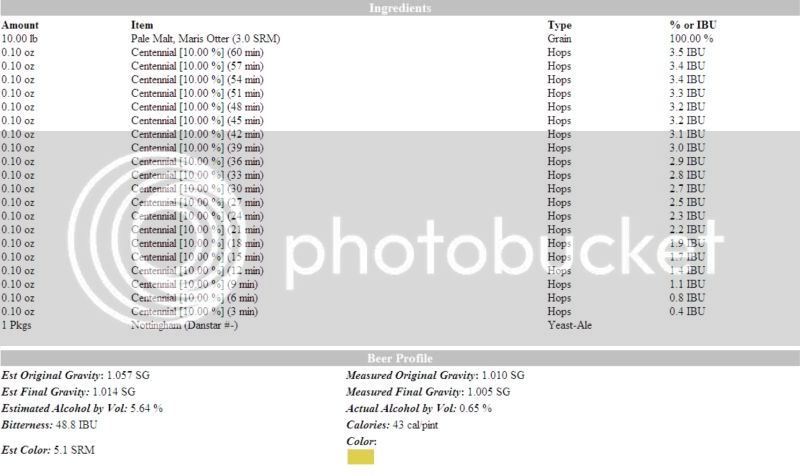
Long story short, I've decided first up on deck will be a Maris Otter / Centennial SMaSH IPA (first time using both). Starting off with a normal hop schedule, I toyed with the idea of hopping continuously every 3 minutes for the 60 minute boil just for the hell of it to see what I would get in the end (Not a stranger to continuous hopping, as long as I have cold beer to drink I'll throw hops at the wort all night long).

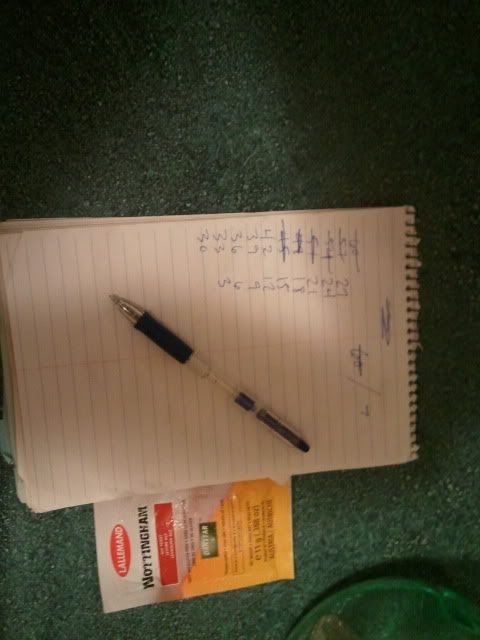
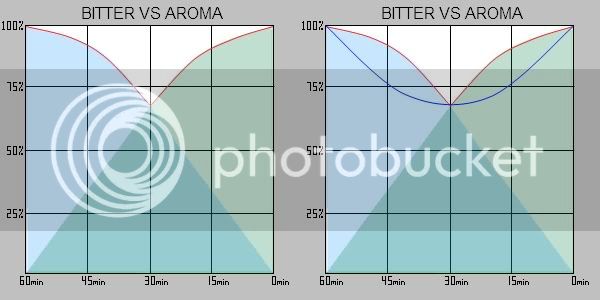
I put this together to help visualize:
hop_utilization.jpg


Apologies for my 5th grade art.

Breaking down the chart you have a 60 minute boil, on the left is your bitterness, on the right is your aroma, the bottom of the chart shows the time line of the boil, the left part of the chart shows the bitterness / aroma utilization percentage of the hops based off of when they are added.

My question is, does continuous hopping model the red line on the left chart, or the blue line on the right chart, or am I totally off my rocker here and it's something totally different? It's been described from DFH as creating an all around whole hop utilization to achieve the best of both worlds, but is that really the case here? Per HBT Wiki: "Pioneered by Dogfish Head brewery, this technique involves adding multiple small hop additions throughout the boil to get a full, rounded hop bitterness and flavor"...
 
I'm a little thick so pardon my questions. :drunk:

Would you mind explaining what the colors are and what they mean? And why do you have two graphs? :confused:

I'm just in on this one for my own education.
 
Sure!

The question: I'm trying to figure out the benefits of continuous hopping vs traditional hopping and if it in fact better utilizes your hop for both aroma and bitterness.

The Base: So the bottom of the graph, from left going right, labels the boil time in 15 minute increments 60 (start) -> 45 -> 30 -> 15 -> 0min (end). The "blue" fill of the graph that starts at the upper left sloping to the bottom right corner symbolizes the bitterness of your hop. The further into the boil it goes, the bitterness effect of the hop falls lower (scaled using the percentages on the left side of the chart). Opposite of that, the green fill symbolizes the aroma utilization of your hop hence at 60 min its extremely low, but further you go into the boil, the higher it goes.

The reason there are 2 charts: Which better shows what continuous hopping does?

Plausible on graph 1: See the red line that follows the bitterness ratio downwards then meets in the middle with the aroma ratio, then follows it back up.

Plausible on graph 2: See the blue line that starts in the upper left corner but arcs downwards and back up to the upper left corner.


Really I'm here out of curiosity, I've only continuously hopped DFH clones, my normal style is to drop a big bitter addition then blast the last 10-15 minutes. I was hoping somebody may be able to clarify the benefits..
 
I would think your hypothesis would be true. Considering how layering would impart bitterness and aroma through the whole spectrum, rather than a grouping of less characteristics. My question would be could the tongue and nose distinguish the difference?
 
My question would be could the tongue and nose distinguish the difference?

Exactly! :)

Benefits or a gimmick, or would it even matter in the end?

I've settled on doing continuous additions for my SMaSH for the fun of it, but I'm officially on board for an experiment, got the time off anyways and more beer is always good to have!

Regular IPA - 1 gal batch
1.5lbs DME
.1 carafoam
60min - .5 cascade
10min - .16 cascade
07min - .16 cascade
05min - .16 cascade
Nottingham Ale

Continuous IPA - 1 gal batch
1.5lbs DME
.1 carafoam
60min - .065 cascade 56min - .065 cascade
52min - .065 cascade 48min - .065 cascade
44min - .065 cascade 40min - .065 cascade
36min - .065 cascade 32min - .065 cascade
28min - .065 cascade 24min - .065 cascade
20min - .065 cascade 16min - .065 cascade
12min - .065 cascade 08min - .065 cascade
04min - .065 cascade
Nottingham Ale

Identically:
1.066 OG
1.016 FG
6.5%ABV
54-56IBU

Not going to dry hop either one to showcase only what was contributed in the boil. I'll invite some friends over and have them blindly taste each.
 
Subscribed! I find this really interesting. I like how you are using cascade as a constant for your experiment. I really think your on to something, this could change the philosophy behind hop additions.
 
Have you run any IBU calculations with Centennial (should be close to double that of Cascade)? I've done the NB Two Hearted clone which is also all Centennial and a nicely balanced between bittering and flavor/aroma. That recipe only called for 1 oz at 60 min to 30 minute mark before adding the second 1 oz. I don't think I'd want half my hops added before the 30 minute mark. Curious as to your results though.
 
i'm about to try the same sort of continuous hopping in a pale ale with the added twist of no sparge. just for kicks.
 
Exactly! :)

Benefits or a gimmick, or would it even matter in the end?

I've settled on doing continuous additions for my SMaSH for the fun of it, but I'm officially on board for an experiment, got the time off anyways and more beer is always good to have!

Regular IPA - 1 gal batch
1.5lbs DME
.1 carafoam
60min - .5 cascade
10min - .16 cascade
07min - .16 cascade
05min - .16 cascade
Nottingham Ale

Continuous IPA - 1 gal batch
1.5lbs DME
.1 carafoam
60min - .065 cascade 56min - .065 cascade
52min - .065 cascade 48min - .065 cascade
44min - .065 cascade 40min - .065 cascade
36min - .065 cascade 32min - .065 cascade
28min - .065 cascade 24min - .065 cascade
20min - .065 cascade 16min - .065 cascade
12min - .065 cascade 08min - .065 cascade
04min - .065 cascade
Nottingham Ale

Identically:
1.066 OG
1.016 FG
6.5%ABV
54-56IBU

Not going to dry hop either one to showcase only what was contributed in the boil. I'll invite some friends over and have them blindly taste each.

I like this idea. One thing I'd do differently, is keep the last hop addition at the same time. In the regular IPA you have your last hop addition at 5 mins and in the continuous you have it at 4 mins. that extra minute could be a "big deal". DO both at at either 4 mins or 5 mins (doesn't matter). Just the scientist in me speaking.
 
Very interesting experiment.

+1 to temptnmonkey - you should just drop the last addition on the first batch to 4 min.

For some reason when I think of continual hopping, I picture myself standing around munching on chips, drinking a beer, and blindly throwing individual hop pellets over my shoulder at the boil. Maybe a hook shot or two
 
Have you run any IBU calculations with Centennial (should be close to double that of Cascade)? I've done the NB Two Hearted clone which is also all Centennial and a nicely balanced between bittering and flavor/aroma. That recipe only called for 1 oz at 60 min to 30 minute mark before adding the second 1 oz. I don't think I'd want half my hops added before the 30 minute mark. Curious as to your results though.

I have, here's a screen shot:

CO_SMaSH.jpg


For only 2 ounces of hops, this SMaSH is pulling some heavy IBUs due to the many additions on the early end, however as the bitterness ratio falls the aroma ratio is always increasing so I'm predicting that it will balance (the right chart from my first post). I'll be throwing an ounce in 7 days before I bottle as well.

As for the 2 experimental brews, I'm going to the LHBS today and will probably be brewing them both tonight, I'll be sure to take pictures.. I was even talking to SWMBO about doing a time lapse .gif of the continuous brew just for the fun of it.

I have made adjustments to the Regular IPA, moved the late addition to 4 but I also adjusted the amounts to the following:

Regular IPA - 1 gal batch
1.5lbs DME
.1 carafoam
60min - .44 cascade
10min - .19 cascade
07min - .19 cascade
04min - .18 cascade
Nottingham Ale

I dropped the bitter end to match the IBUs of the continuous IPA, each should now pull 38-39 in the first half of the boil, then the remaining will come from the second half. I've also been contemplating ditching the 3 late additions in the regular IPA and adding .56 (remainder of the ounce) at 7 minutes, this would match the IBUs of the Continuous but would truly be 1 bitter addition and 1 aroma addition.

Thoughts or feedback on this? Leave 3 late adding the last at 4 minutes, or add it all at the middle mark, 7 minutes.

For some reason when I think of continual hopping, I picture myself standing around munching on chips, drinking a beer, and blindly throwing individual hop pellets over my shoulder at the boil. Maybe a hook shot or two

You pretty much hit the nail on the head! :p When we brewed the 120, it was literally my buddy and myself with a couple of stools pulled up to the pot with a clipboard checklist for additions (we actually did the 40 additions over 2 hours, 1 every 3 minutes). We were going behind the back, distance, etc.. Having fun with it. I can't find the picture but I took one of our empties after the boil was complete, I think 120 takes about 11 beers split between 2 people to brew :mug:
 
Finally made it by the LHBS, they were out of cascade but had...

Amarillo?!?!!

Well that was a no brainer! I haven't seen amarillo around for months, prost to that! I'm brewing everything off tomorrow, pics to come.
 
So this has been the craziest week of my life, I didn't get anything brewed, I did however find out that I'm going to be a Dad!! Our first!!

Pretty much spent my vacation with Mrs Jsmith discussing plans and reorganizing, etc.. The "honey-do" has grown immensely over the past 7 days. I'll have a lot of free time this week to do the small batches so I'm playing it by ear, thinking maybe Wednesday night, saving my SMaSH for the upcoming weekend.

Sorry for the procrastination, but what a legitimate reason! I'm so excited :mug:
 
Not trying to hijack the thread, but on the topic of 1g batches, what is best to ferment a 1g batch in? I want to try something similar.
 
Not trying to hijack the thread, but on the topic of 1g batches, what is best to ferment a 1g batch in? I want to try something similar.

I use 1 gallon jugs with blow off tubes, once fermentation has calmed, pull the hose and put in a CO2 lock. The Mr. Beer Keg works well also, you can usually find them on Amazon or Ebay for very cheap. They can fit up to 2.5 gallons (more I believe but you wouldn't want to fill it that high). I've done 1 and 2 gallon batches in them before, worked awesome.

Only concern, since the lid is designed to let minimal CO2 escape and there is no water lock, I NEVER open the lid. Probably overly paranoid b/c I'm sure there is a nice layer of CO2 protecting everything but meh, don't need to open it anyways, might as well be safe.


Thanks IB74!
 
OK!!!

Got my buddy lined up to come over tonight around 9pm, got 2 liters of N/A carbed apple cider for the misses, got some HB in the fridge for myself, this experiment goes down TONIGHT!

I WILL have some pictures up tomorrow!
 
Brews completed, the boil off ratio though was WAY different than BeerSmith predicted, I'm good with it though - 1 pack Nottingham split between about 1.5 gallons of beer should be plenty of yeast to make up for the higher gravity. Here we go:

Everything together and ready:
2011-09-16203437.jpg


Hop split - 2 for beer 1, 20 for beer 2:
2011-09-16203450.jpg


Steeping the grains:
2011-09-16204545.jpg


Mashed and sparged, bringing up the heat:
2011-09-16210626.jpg


Double boil on!
2011-09-16220950.jpg
 
Tracking the additions:
2011-09-16213436.jpg


Buddy actually showed up with a 4 pack of DFH 90min! That is rare if you live in St. Louis! Picture worthy..
2011-09-16214130.jpg


Cooling down, double bay sink swapping:
2011-09-16222722.jpg


Sanitizing my blow off tubes, corks, bottles, and the bag used to strain each batch (I do NOT strain out my beers but because of the minimal amounts, I figured it may be beneficial):
2011-09-16225131.jpg


Labeled up, yeast poured, capped, and hosed:
2011-09-16231716.jpg
 
Last up, home for the next 4 weeks; welcome to the brew closet:
2011-09-16232241.jpg


We'll see what happens in the end. Should be interesting... :)
 
2011-09-17085432.jpg


Just woke up, been about 10 hours, each brew had about 1.5 inches of krausen and is starting to make noise. Last pic for a while..

We have liftoff!
 
Nice pics, I wonder if it would be possible for you to send a couple bottles to a beer guru on this site to help judge the final product. But I don't know probably be difficult with such limited quantities.
 
I definitely want to recruit a couple people from this topic to try the 2 blindly and post thier results. I figure I'll label one X and the other 0, then tell which is which after opinions have been posted.

The krausen had risen to the cork in both jugs btw..
 
Well I'm no beer genius but I would totally be in on the experiment. You could tone the trial samples down to 4 oz and have more people participate... do they make 4 oz containers???

I don't know maybe it would be better to have novice palates (atleast mine) than to have more mature analysis'. More like how the general populace would respond to your method.
 
Back
Top