• Please visit and share your knowledge at our sister communities:
  • If you have not, please join our official Homebrewing Facebook Group!

    Homebrewing Facebook Group

All Stainless Heatstick design

Homebrew Talk

Help Support Homebrew Talk:

This site may earn a commission from merchant affiliate links, including eBay, Amazon, and others.
that is one problem with how most of us use the elements is that there is no anodes. In my RIMS tube I have an Aluminum 1.5" to 1" bushing that acts as an anode to prevent rusting. I don't know how one would be used in a heat stick.
 
that is one problem with how most of us use the elements is that there is no anodes. In my RIMS tube I have an Aluminum 1.5" to 1" bushing that acts as an anode to prevent rusting. I don't know how one would be used in a heat stick.

Could I just introduce some Aluminum to the TC pipe? Maybe some Aluminum foil at the top clamp?
 
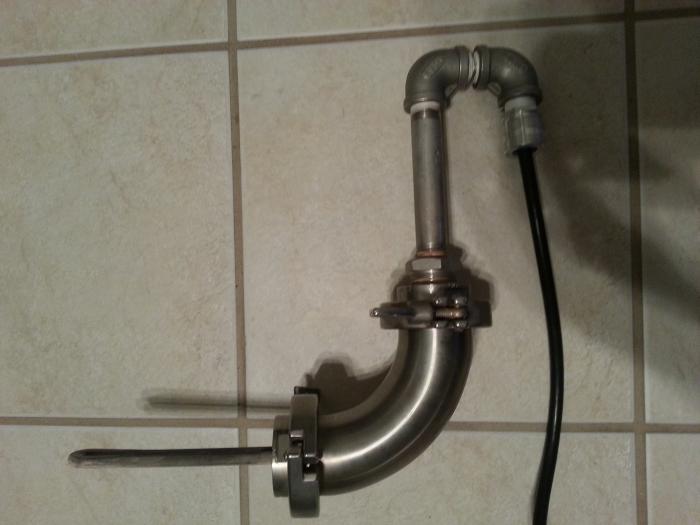
Here is one I made a couple of years ago. The hardest part was getting the local machine shop to tap the adapter for the element. Glad to see there is a place to buy them now. I used 1/2 stainless pipe instead of all sanitary. It displaces less volume and cost much less. I made it so it hangs over the rim of my pot.

20130723_222135.jpg
 
Crazy Idea?

What if you put a tee right on top of the 90 and added a temperature probe? I'd like to make something like this that I can drop in to any sized MLT or HLT and then move it to the BK when I'm ready.
 
JR, no I didn't 'encapsulate' the electrical, if you're meaning pour JB Weld around the element wiring? I wanted a unit that I could easily take apart and/or change elements if I wanted/needed. I have had no issues with leaks with this system. NOT that it couldn't happen, but always use a CFI receptical and check the tube for moisture regularly.

On the rust... Just from reading the forums, you will see this talked about with elements. However, I haven't had an issue as bad as yours. However, I always remove it HOT (not ON) and after a little cooling, I dry what is left on the unit & element. Lastly, I soak the unit in cleaner at the end of the brew day, rinse and dry before putting away. Maybe this helps mine. Could your area water make it more likely to occur?

Hope this helps,
Robert
 
Here is one I made a couple of years ago. The hardest part was getting the local machine shop to tap the adapter for the element. Glad to see there is a place to buy them now. I used 1/2 stainless pipe instead of all sanitary. It displaces less volume and cost much less. I made it so it hangs over the rim of my pot.

How did you go from the TC to the 1/2" pipe?
 
Thanks for the reply. I was thinking of some food safe silicone for the encapsulation. I will only use the stick with GFCI, but I think I'd just feel better if it were encapsulated. I was just going to wrap a strip of paper around black part where the element connections are, and encapsulate with the silicone. It would be a little tougher to change the element, but not nearly as bad as JB weld. Should still be able to remove the silicone if needed.

For my water Chemistry, I found a water report, but it didn't include most of the figures brewers look for. I did test the ph and it was around 8.

JR, no I didn't 'encapsulate' the electrical, if you're meaning pour JB Weld around the element wiring? I wanted a unit that I could easily take apart and/or change elements if I wanted/needed. I have had no issues with leaks with this system. NOT that it couldn't happen, but always use a CFI receptical and check the tube for moisture regularly.

On the rust... Just from reading the forums, you will see this talked about with elements. However, I haven't had an issue as bad as yours. However, I always remove it HOT (not ON) and after a little cooling, I dry what is left on the unit & element. Lastly, I soak the unit in cleaner at the end of the brew day, rinse and dry before putting away. Maybe this helps mine. Could your area water make it more likely to occur?

Hope this helps,
Robert
 
Crazy Idea?

What if you put a tee right on top of the 90 and added a temperature probe? I'd like to make something like this that I can drop in to any sized MLT or HLT and then move it to the BK when I'm ready.

Not sure I understand or if it's a great idea but you might be able to use a TriClamp T in place of the 90. You would need another clamp/gasket and whatever needed to create/mount/seal the temp probe.

Robert
 
Here is one I made a couple of years ago. The hardest part was getting the local machine shop to tap the adapter for the element. Glad to see there is a place to buy them now. I used 1/2 stainless pipe instead of all sanitary. It displaces less volume and cost much less. I made it so it hangs over the rim of my pot.

Thanks for sharing. Yeah when I originally designed, I considered something similar. But since I wanted all stainless steel and could order everything from one company, so I went all TC sanitary. Also like the idea I can reuse all the parts for other projects and/or other uses in my brew house if I wanted/needed. I didn't hang it because if I wanted to use it in different BK's (sizes) or in my MLT (much deeper) I could too.

Robert
 
Well it depends on your configuration but as pictured above:

2" TC Pipe x 20" $38
2" 90 degree Elbow $14
(3) 2" Clamps $22.50
(3) 2" Silicone Gaskets $1.05
Pipe Holder $6 (optional)
Element Adapter $10
ULWD Element $17
Shipping $12
Total : $120.55
*Optional Element Guard Kit $36

Pretty expensive but I have VERY happy with it!

Hope this helps,
Robert
GypsyBrew

Forgive my ignorance but when building this I need 4 clamps not 3. I know the guard kit comes with one clamp but that just attaches the plate to the adapter still need a clamp to connect that to the pole and then the two clamps for the elbow and the adapter. Am I missing something?

EDIT: Think I got it figured out did you just use the end cap on the end of the 20" pole? No extra adapter needed...thanks again for any help.

heatstick 1.jpg


heatstick 2.jpg
 
Forgive my ignorance but when building this I need 4 clamps not 3. I know the guard kit comes with one clamp but that just attaches the plate to the adapter still need a clamp to connect that to the pole and then the two clamps for the elbow and the adapter. Am I missing something?

EDIT: Think I got it figured out did you just use the end cap on the end of the 20" pole? No extra adapter needed...thanks again for any help.

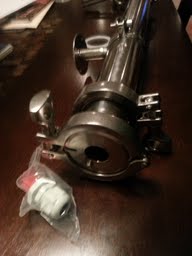
Yep correct, I only used the End Cap (from the EGK w/ strain relief & ground lug) on the end of the pipe... I originally bought the Element Guard Kit and their Element Adapter because I was still working on the design. Although I ended up only using the Element Adapter (see my post #5 & #12 pics), having both came in handy. You need to take in account how long the heat stick would be below the bend/90 where it would sit in the MLT/BK. This is why I just used the EA because of the diameter of my BK. The EGK comes with wire connectors, shrink wrap, ground lug, wire strain relief, and a drilled end-cap that has a slit cut in it so you can easily see if you had a leak without taking it apart, so I used this on the end of my heat stick instead. Folks might be able to request just the EGK end-cap & parts from StillDragon if wanted.

I had also noticed the nice element socket I bought to tighten the heating element into the Guard Kit housing (which I didn't end up using) wouldn't fit down inside it. So a cheapo (thin metal one) might work better.


Hope this helps,
Robert
 
Just to update, the build has continued to work great and I have been very happy with it! Only change made was the Strain Relief (came in the EGK). I replaced the original (cheapo quality) with a Arlington Industries 'LPCG50-1' (bought locally at a ACE hardware store). No issues with wire/cable size either. Much better.

I thought StillDragon had since changed the Stain Relief in their EGK but FoCobrewguy's picture above looks like original one I had. Maybe until they use up what they already had in stock?

Robert
 
Thanks for the quick response. I don't have space issues but will probably keep it like yours. I can use the kit in my other kettle so works out just fine. Great idea I've been putting off making my heatstick because of my concerns with the jb weld design. I would much rather drop a few more bones to have something that will last a lot longer like this will.
 
Thanks to the OP for sharing this design!

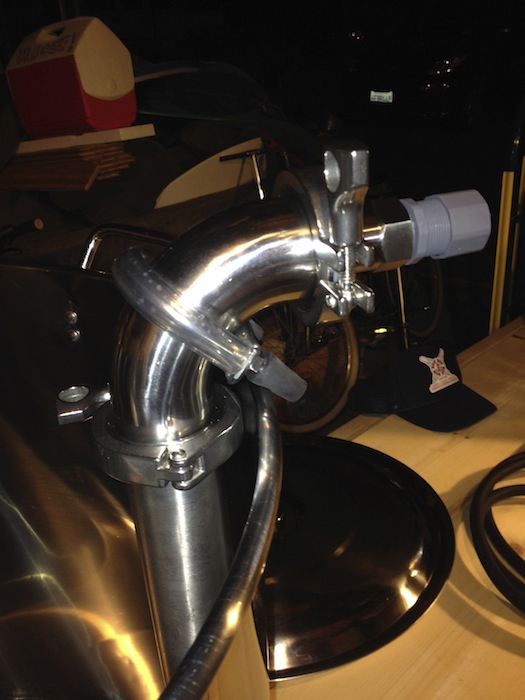
I really got inspired by it and decided to build one. Here's my version using a TC long elbow 90 I found on eBay and the rest of the TC components from StillDragon and a 5500w element.

I'm using a stainless U-clamp wrapped in tubing for the hanger.

IMG_1641.jpg


IMG_1643.jpg
 
That's a 2" TC to 3/4" NPT adapter.

I emailed SD to see if I could just get their end cap from the EGK but they only sell it as part of the kit. So, I found the adapter on eBay and plan to drill and tap a small hole to attach the ground wire and a small hole for leak testing. It's a bit bulky, but it was cheaper that buying the EGK just for the end cap.

I thought about just using a TC end cap but I don't think have the means to cut a ~1" hole through 1/4" thick SS to attach the strain relief.

Cheers,
Dan
 
Why'd you go with two 45's on top?

I ended up deciding that I am going to get ferrules welded to keggle, but I still kind of want to make heat sticks so my eKeggle can come together like Voltron.
 
Back
Top