BrewingRugger
Well-Known Member
Go with the ten gallon. You will reget have a 5 gallon mash tun!!!!

Famous last words. Neither did I. Neither did almost anyone that started out brewing 5 gallons. Remember- you can make small batches and small beers with the bigger cooler. But you can't make bigger batches and bigger beers with the smaller cooler. If you get the bigger one right away, you keep your options open, and you won't wind up with a five-gallon paperweight if/when you go big.
Now, if I had missed my temps and needed to add water, I would have been SOL..


![Craft A Brew - Safale S-04 Dry Yeast - Fermentis - English Ale Dry Yeast - For English and American Ales and Hard Apple Ciders - Ingredients for Home Brewing - Beer Making Supplies - [1 Pack]](https://m.media-amazon.com/images/I/41fVGNh6JfL._SL500_.jpg)


Thanks for all the support and suggestions and I certainly didn't intend to start an argument between people.
Couple questions, what is the difference between (regular) sparging, batch sparging, and fly sparging? I was under the impression that sparging was basically "rinsing" the mashed grains with water roughly at 170F for 10 mins. then draining it out into your kettle that already contains the first runnings?
Good suggestion on going used and I think I might purchase a false bottom to make things easier and less messy!
Couple questions, what is the difference between (regular) sparging, batch sparging, and fly sparging?
")
Thanks for all the support and suggestions and I certainly didn't intend to start an argument between people.
)There's batch sparge, fly sparge, and no sparge - don't know of any "regular" sparge. But put simply:
No sparging is just that - you use more grains countering for the loss of sugars by not sparging
Batch sparging - after draining off your first runnings you add sparge water (dependent on how many sparges you plan to do meaning 1, 2, 3, etc). So let's say we do a double batch sparge like I do currently: I drain the first runnings then add the first batch sparge water, say for this example 2 gallons of sparge water, stir it up, let it sit for 5 minutes or so, then vorlauf which is to clear your running of particulate matter, then drain into the kettle that has your first runnings. After all the liquid is drained you add the second addition of sparge water, stir, wait 5 minutes or so, then vorlauf and drain again into your kettle. At the end you have your full preboil volume.
Fly sparging - you use another vessel (typically called a hot liquor tank) that contains your hot sparge water. From that vessel, usually elevated over the mash tun so it can gravity drain, you slowly trickle the water evenly over the grain bed to rinse the grains. This typically takes a longer amount of time as it's a slower flow. As that is going on you are also slowly draining the mash tun into the boil kettle as you want to be sure with this method that you keep about 1/2" or so of water consistently over the top of the grain bed. You basically don't want the grain bed going dry or draining faster than the addition of sparge water. You vorlauf as well with fly sparging but if I recall it's a one time thing since afterward the sparge is a constant flow.
That's a rough description so if I missed anything or messed up any info cut me some slack
Rev.
Save yourself some $$ and skip the false bottom - then put that money towards the 10 gallon cooler. You can make a manifold out of CPVC pipe for less than 5 bucks. Search for the directions on HBT.
Go with the bigger cooler.
I started out with a 7 gal and ended up moving up to a 10 after changing to 7 gal batches.
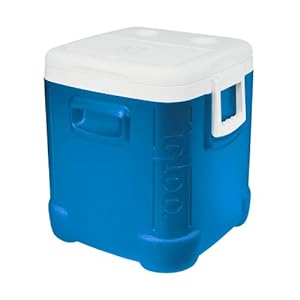
Unless you're dead set on a round cooler, rectangular ones can be had a lot cheaper. Igloo's ice cube is a great cooler for the money. I see these 48 qts for $30 at Academy all the time
Rectangular coolers do appear to be MUCH cheaper and then I can make my own manifold! How are coleman coolers or is there any brand or model that seems to perform better than another?

I just finished some searching and making your own manifold sounds like a great idea! I might even go the copper route if I feel ambititous enough.


LOL. You go grrrrllll.I don't know about your numbers, but with my 72% efficiency, I'm limited to 1.065 beers with my 5 gallon MLT. I have a purchased false bottom, with the traditional ball valve.
Are using brass valves and other misc. parts ok? My local lowes and HD do not sell stainless parts.
Stick to your guns and boycott crappy businesses. Brass fittings are great.
Yes, using brass is fine. The whole lead thing in brass is rather blown out of proportion, it's only small trace amounts and we're adults, not babies.
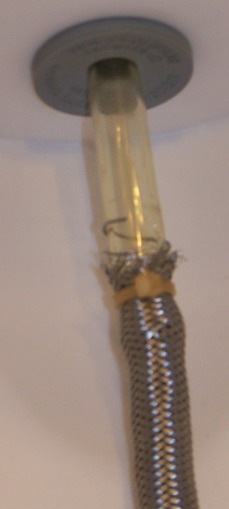
I'm certain you gotta be able to find a 10 gallon round Rubbermaid cooler somewhere online for quite cheap. Try Amazon, Ebay, Craigslist, the classifieds here, etc. I would skip the false bottom and get a bazooka screen (or a braid) like I mentioned earlier, they're like $17 or less. You'll need to crimp/fold the end as they are typically 12" long so you need to fold like an inch or so but that's super simple. I started my first AG batch with a false bottom and opened the spigot to zero flow. I later found that the false bottom doesn't sit completely flat and was slightly warped. Not sure if that was a one off problem or if many are a bit warped but I'd tend to think many are as it would be difficult to ensure they're all perfectly flat, or that the bottom of your cooler is for that matter. Since returning my false bottom and using the bazooka screen everything has been flawless for me.
Rev.
s2cmpugh said:That's the plan and I'm going to start ordering my ingredients online too.
Thanks for the tip on the bazooka tube! I think I'm going to go that route; simple, cheap, and very effective. However, now I need help on what fittings, valves, washers, and gaskets I need. Will any of these https://www.homebrewtalk.com/f51/cheap-easy-10-gallon-rubbermaid-mlt-conversion-23008/ parts work using the bazooka tube?
Home Depot currently has a 10 gallon cooler in stock for around $40.
The build should be exactly the same. The bazooka screen should attach as easily as the SS braid.
s2cmpugh said:They can't slide on because they have a 1/2" MPT fitting on the end. Video Link: http://www.amazon.com/Bazooka-Screen-brew-kettle-mash/dp/B003ISY2DC
Home Depot currently has a 10 gallon cooler in stock for around $40.
The build should be exactly the same. The bazooka screen should attach as easily as the SS braid.
using all those parts EXCEPT the 3/8" FEMALE barb adpater. In its place will be the 1/2NPT bazooka tube that screws onto the inside part of the cooler/valve assembly to "sandwhich" everything together. Am I correct?
When you install it after crimping the end to fit in the MLT just make sure to hand tighten the bazooka screen - you don't need to go nuts and tighten the hell out of it and will only risk damaging the screen or the fitting that holds onto it.


