• Please visit and share your knowledge at our sister communities:
  • If you have not, please join our official Homebrewing Facebook Group!

    Homebrewing Facebook Group

30A Circuit 220v to 110v Switch

Homebrew Talk

Help Support Homebrew Talk:

This site may earn a commission from merchant affiliate links, including eBay, Amazon, and others.
I have both pids and the DSPR310D sitting in my closet... They both did the same thing, regulate temps and set off alarms.. The EZboil was easier to tune and was a bit better suited to use for the task but both actually did what I used them for just as well.. Its just my opinion and im not trying to criticize but all of this is going to require more work and have more potential for an accident than it would be worth for me.

No criticism taken — you definitely have a good point!

I gotta ask though, how do other people deal with this issue with a RIMS system on a 30A circuit? Just use lower powered elements like you stated initially?
 
No criticism taken — you definitely have a good point!

I gotta ask though, how do other people deal with this issue with a RIMS system on a 30A circuit? Just use lower powered elements like you stated initially?
Yes. Use 4500W elements for both your HLT & BK (selected with a 3-position ON-OFF-ON switch and two contactors) along with a 1500W 240V element for your RIMS tube. This will keep your max heating element current to 25A. Note that a 120V 1500W RIMS element won't cut it, as your max element current would now be 35.4A on one of the hot legs.

Brew on :mug:
or a person could use a 4500w in the hlt and a 5500w in the BK since the rims doesnt run while the bk does (at least in my setup.) I also get away with an 1800w rims and never had the breaker pop or had more than a 28amp draw with my pumps on.
 
or a person could use a 4500w in the hlt and a 5500w in the BK since the rims doesnt run while the bk does (at least in my setup.) I also get away with an 1800w rims and never had the breaker pop or had more than a 28amp draw with my pumps on.
Yeah, an 1800W@240V would be OK, and you would probably be OK with a 2000W @240V (with only 1 Chugger type pump running at a time.)

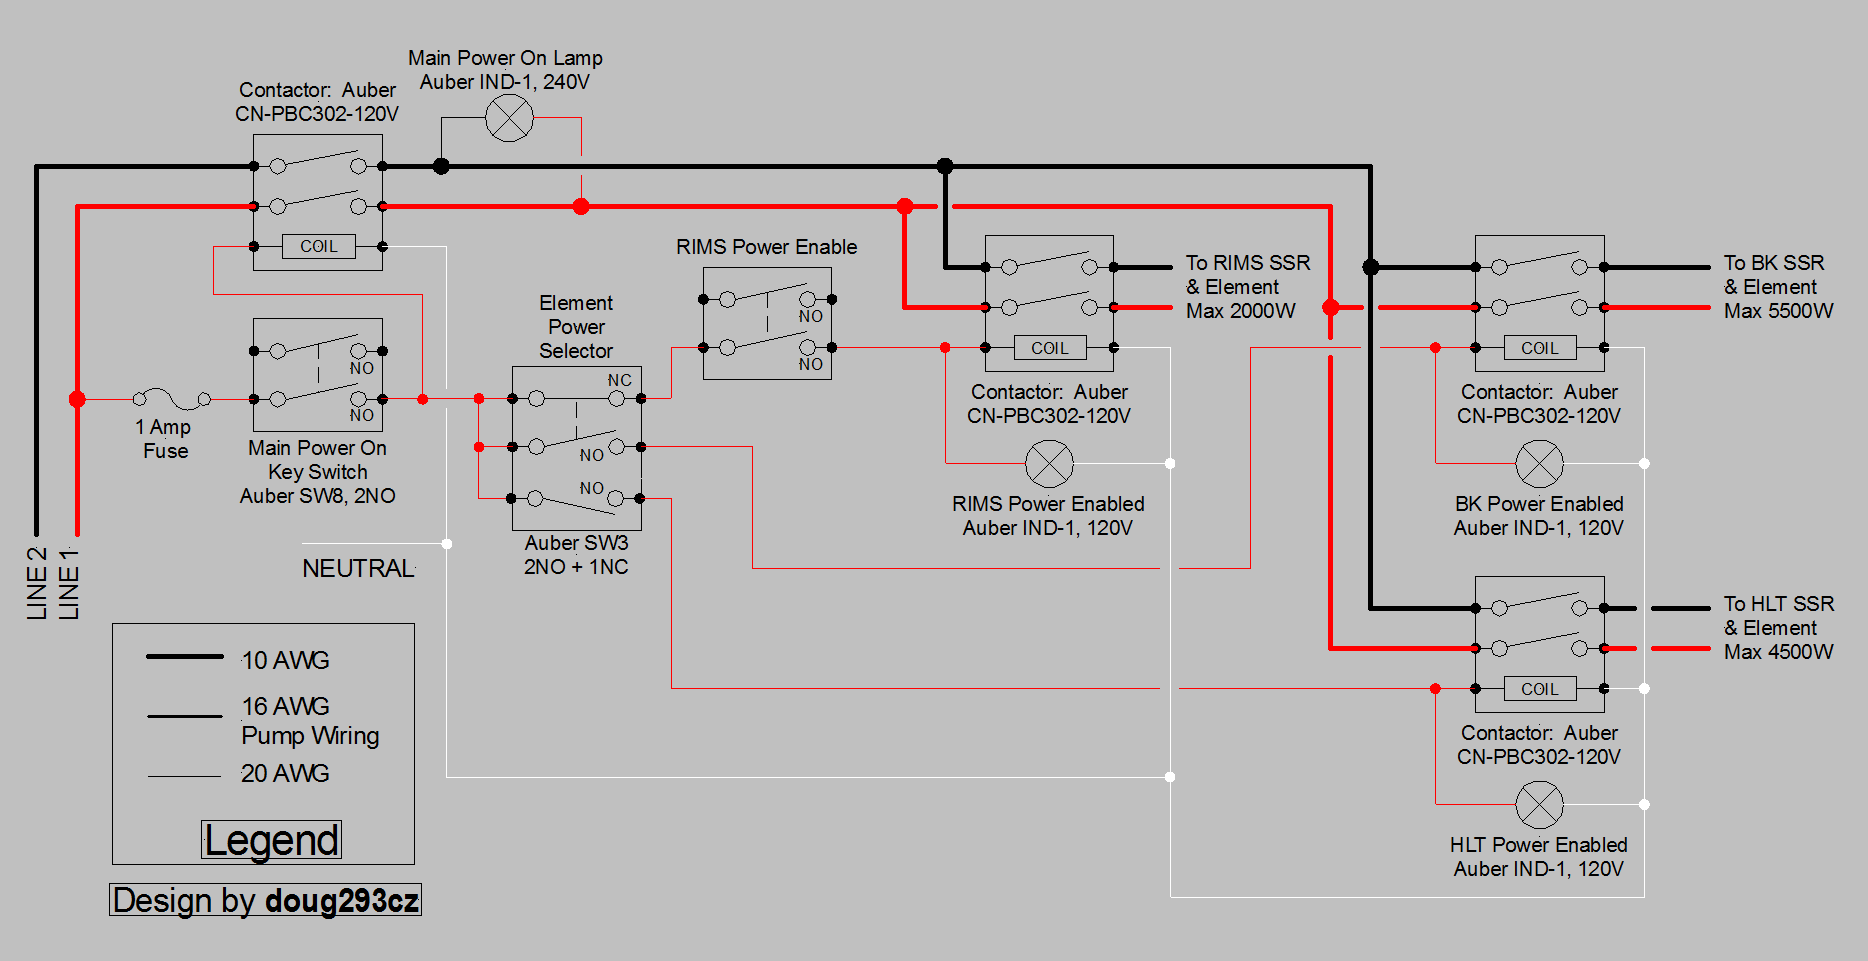
In order to use a 5500W for the BK, the switching needs to be a little more complicated than for 2X 4500W. But, now that I think about it, it might be almost trivial to arrange an interlock to prevent the RIMS and BK from being on at the same time. I'll post a partial schematic later.

Brew on :mug:
I uses a relay with a NO and NC contact with one feeding the other coil. so only one would work at a time.. works well.
 
I uses a relay with a NO and NC contact with one feeding the other coil. so only one would work at a time.. works well.
But the switch also has to disable the RIMS element when the 5500W element is enabled in order to prevent over current possibilities. The more I think about it, the simpler it actually gets.

Brew on :mug:
 
But the switch also has to disable the RIMS element when the 5500W element is enabled in order to prevent over current possibilities. The more I think about it, the simpler it actually gets.

Brew on :mug:

Simpler?! :confused:

I'm sure glad I have you gurus helping me out with this...
 
Yes. Use 4500W elements for both your HLT & BK (selected with a 3-position ON-OFF-ON switch and two contactors) along with a 1500W 240V element for your RIMS tube. This will keep your max heating element current to 25A. Note that a 120V 1500W RIMS element won't cut it, as your max element current would now be 35.4A on one of the hot legs.

Brew on :mug:

Thank you for making a point to specify the 240v for a 1500W element. Everything I'm finding for 1500W is on 120v...
Any source you'd recommend to shop around?

@augiedoggy — I’m doing an in depth read on your build now! That 36” 1800W element must be a unicorn — I can’t find anything over 18” [emoji13]
 
Last edited:
One thing to be aware of. If you use a switch to flip between 120v and 240v you need to make sure it is rated for the amperage you have going across it. It is best to have the switch flip a relay to do the swap.
 
One thing to be aware of. If you use a switch to flip between 120v and 240v you need to make sure it is rated for the amperage you have going across it. It is best to have the switch flip a relay to do the swap.

Thanks for mentioning this! It’s come up implicitly in the conversations above, but still worth pointing out —

In fact, I tried finding a switch that can handle a 30A load at a decent price, and it still makes sense to just buy a lower rated switch w/ a contractor [emoji13]
 
OK, here's what I came up with for the enabling switching. The RIMS element can be enabled when the HLT/BK element select switch is in the OFF position or the HLT position, but not if the switch is in the BK position. The SW3 normally comes with 2X - NO switch blocks, and needs to have an NC switch block added to the side with the switch block used to control the BK contactor. Not shown, but a good idea, is to wire an NO switch block on the RIMS pump switch in series with the RIMS element enable switch.

Three Element 30A Partial.PNG


Brew on :mug:
 
Nice! Now I just gotta source a 2000W element and I’m off to the races!!!

Thank you for this @doug293cz! A picture speaks a 1000 words... this is much clearer to me now!
 
@augiedoggy

Taking a page out of your book, I found this guy:
https://rover.ebay.com/rover/0/0/0?mpre=https://www.ebay.com/ulk/itm/322963471395

The nice thing is I’m pretty sure this will fit in my Thrifty RIMS tube...

Tricky parts:

1) Because it’s so short I’m concerned about achieving the recommended ULWD rating.

2) The base doesn’t appear to be threaded so I’d have to figure out how to mount it...

3) Because it’s so short and the wattage much lower than I’ve been using, could this thing be used to step mash? At least get to mash out?
I use compression fittings I drill out the slightly smaller area at the base and slip the elements through backwards, (its in my thread)

there are a number of smaller elements like that on ebay that do have threaded bases though, I see them all the time.

the density is kinda high on that one too , Id go lower wattage or larger diameter/longer length myself. my first rims used a 1000w 10" element and I still scorched at the base with it.
 
Last edited:
But the switch also has to disable the RIMS element when the 5500W element is enabled in order to prevent over current possibilities. The more I think about it, the simpler it actually gets.

Brew on :mug:
Ah good point,
That can be accomplished with NO/NC relays too but I accomplish it by using a $10 stainless flow switch wired to my rims ssr which kills the rims unless liquid is recirculating though it (above 1 gpm or so
Thank you for making a point to specify the 240v for a 1500W element. Everything I'm finding for 1500W is on 120v...
Any source you'd recommend to shop around?

@augiedoggy — I’m doing an in depth read on your build now! That 36” 1800W element must be a unicorn — I can’t find anything over 18” [emoji13]

)... since I dont sparge at above 1 gallon per minute the rims would never be active while theres wort in the BK..there up there just takes a lot of weeding through them.. I just bought 2- 28" 2200w cartridge heaters for my 3 bbl rims tube for the nano.
 
Well, now I see what happens when I don't check my threads for a while. You guys have been hard at work.:yes:
This project has evolved significantly since I last checked in.

It occurs to me that SSVR control starts looking pretty good once you start adding more than a couple of elements or more than a couple power settings for those elements.

Then try to do it all and stay within the limitations of your power source.
 
@augiedoggy - I found a cartridge heater: 1700W 39” x 3/8” diameter... the length is great, but I’m concerned if the diameter is too small..?
 
Sweet! Any idea how this’ll handle step mashing a 10 gallon batch?!
I can raise a 10 gallon mash just over 2 degrees per minute with my 1800w element. (theres a time delay limited to the flow of my rims pump which is set to about 1.5/ 1.8 gallons per minute )
 

Latest posts

Back
Top