2.5 vessel single-element electric brewery

Homebrew Talk - Beer, Wine, Mead, & Cider Brewing Discussion Forum

Help Support Homebrew Talk - Beer, Wine, Mead, & Cider Brewing Discussion Forum:

This site may earn a commission from merchant affiliate links, including eBay, Amazon, and others.

WesBrew

Supporting Member
HBT Supporter
Joined
Jun 28, 2018
Messages
963
Reaction score
1,430
Location
The South
Another electric conversion build thread. Feel free to post thoughts, recommendations, whatever. this isn't something I'm good at. space limited people might get something out of it.

Have a finished room with tv, sink, a/c. Not much brew space and it must be a putawayable setup, not set and forget

The plan: use my two 15g vessels and a sort of dummy lautering/sparge pot and run a single element, single pump off single 240v outlet with a batch sparge.

Strike & Sparge water heated up in BK. Strike pumped over to MT. Mash would be recirculated with pump through a ss immersion chiller (sitting in the BK with already hot sparge water) and regulated with a controller. sort of a herms. Finished wort drained into pot & sparge water pumped to MT from BK. When the BK is empty, switch pump line to the pot, pump the wort up to the BK. Business as usual there except will be electric controlled and will have a steam condenser on the BK. then, pump lines switched to the plate chiller...there you have it. clean and put the whole thing on shelf. Legit or complete disaster?

1.Power: 30a or go bigger? if I decided to do b-t-b brews, the BK will be under 50% pwr and could use a smaller element on the pot, and stay with 30a but not sure. have a guy to do it now so I need to figure that out.
2. Steam: Brundog's stem condenser. which I've just recently completed as well as a TC ripple element. Has a 1.5" TC into a 2" T with spray nozzle...etc. you can check out that thread. super cool.
3. Controller will be a brew commander.


Photo album:
https://www.amazon.com/photos/album/A1PKCSZNICUJ4A:2N8mPUhITBucbcq3wi-VPg
 
Last edited:
30A is fine for a single element system. You only need more amps if you want to run over about 7000W worth of elements at the same time.

Brew on :mug:
 
Thanks for the input. I was thinking I could go with 40a if I wanted to do back to back brews, but since the 5500w boil element would only run at 30-40%pwr I could still maybe run a 2500w element simultaneously on the second pot to heat up strike water for beer #2. I guess I'd need two outlets on this circuit to do that
 
Thanks for the input. I was thinking I could go with 40a if I wanted to do back to back brews, but since the 5500w boil element would only run at 30-40%pwr I could still maybe run a 2500w element simultaneously on the second pot to heat up strike water for beer #2. I guess I'd need two outlets on this circuit to do that
I misread. I thought you were only going for 1 element. For 8000W worth of elements, go with 40A.

Brew on :mug:
 
I do almost exactly what your describing and it works pretty well. I'm still building up to a dedicated 3rd vessel, but it does the job for now. There's a bit more moving around of hoses than I'd like currently though.
 
I do almost exactly what your describing and it works pretty well. I'm still building up to a dedicated 3rd vessel, but it does the job for now. There's a bit more moving around of hoses than I'd like currently though.
I did a couple of imaginary dry runs to figure out all of the hoses and fittings to do this. Definitely a lot of hose swapping. might need a tub to dump hoses out while swapping. I've even kicked around eliminating the mash tun and doing single vessel brew-in bag in the kettle to avoid all of that.
 
I’m in a similar situation. Planning electric for a basement brew space. But basement is multipurpose: wood working, home improvement, seed starting, general storage, second fridge/kegerator, pantry, and two cats. I’m building out a dedicated cabinet on casters. 5’-6’ long, 24” wide, space for storage of hot side brewing materials and equipment. Sub panel with GFCI on the cabinet. I have a 40 A outlet in the basement already, so I am planning feeding that via unpluggable extension cord to the cabinet sub panel. Then step down to 30 amp for the heating element. And service other 120v receptacles and lighting from the sub panel. I don’t plan on a pump right now. But could easily wire it up later.

The more amps you have the larger gauge wire you’ll need.
 
My 2 cents:

30a vs. 50a: For a single element setup, 30a is plenty of power. 6 gauge wire (50a) is a lot harder to install and more expensive than 10 gauge (30a). However, if you are like me, you will inevitably upgrade things over time; it's a lot cheaper to run the bigger wires first and you only have to do it once. If you have a really long run of wires from your electric panel to the outlet, you may even need the bigger wire for 30a, since the voltage drop for a really long run can add up. That's something to have an electrician check out if you don't know how to calculate it.

Highly recommend the steam condenser! - first brew day I did without one got really foggy. Had to open windows and move a lot of air, which kind of defeats the whole "brew inside away from the weather" point of indoor brewing (at least for me; where I live, it's either cold or hot/humid - never seems to be ideal brewing weather!)

Depending on your batch size and the gravity of the beer, you could eliminate the intermediate vessel for draining the mash tun.

I typically will pump my entire sparge volume into the Mash Tun before draining it; just do it relatively gently and let the lower density water sit on top of the mash (kind of how a black and tan works). Pump the mash directly to the now empty boil kettle. I still get the same mash efficiency as when I did a true fly sparge. Kind of a hybrid between batch and fly sparging.

For my setup, I have a 10 gallon cooler mash tun and make 5 gallon batches. The mash tun size is the biggest limitation, since you have to fit the mash + sparge water into it. For me, it works out to about a maximum O.G. of 1.080 for a 5 gallon batch. I'm OK with that, since I rarely brew anything higher than that; if I do, I just reduce the batch size. Since you have a 15 gallon mash tun, it will be different depending upon your batch size.

Sorry for the side question. What flow rate are you using when you do your hybrid sparge?
 
Sorry for the side question. What flow rate are you using when you do your hybrid sparge?

For pumping over the sparge water, I generally watch the top of the mash tun in the beginning and go slow enough so that it doesn't mix too much with the mash below. Once there are a few inches of clear water on the top of the mash, I open up the valve and go faster. Generally takes me about 10 minutes to transfer the sparge water into the mash tun. Rough guess would be around 1 quart/min net flow, but again, I go slow at first, then speed up towards the end of the transfer.

For transferring the mash, I shoot for around the same flow rate. Initially, I thought I saw a drop in efficiency if I went too fast, but I need to do some more experiments to verify that (basically, I'm going to use that excuse to justify getting a flow meter so I can actually measure all this).
 
My 2 cents:
I typically will pump my entire sparge volume into the Mash Tun before draining it; just do it relatively gently and let the lower density water sit on top of the mash (kind of how a black and tan works). Pump the mash directly to the now empty boil kettle. I still get the same mash efficiency as when I did a true fly sparge. Kind of a hybrid between batch and fly sparging.
.
Interesting that you get the same mash efficiency. To get the most out of it I thought I would need the intermediate pot to drain the richest wort first, then do a batch sparge to rinse the rest. is that why you gently add sparge water to top and slowly drain out to the kettle?
 
With your requirement of “putawayable”, I suggest single vessel, bag, pulley hoist and element.....

All the rest is gingerbread lol jmo, less to set up and break down and most importantly clean.
Ymmv
 
Interesting that you get the same mash efficiency. To get the most out of it I thought I would need the intermediate pot to drain the richest wort first, then do a batch sparge to rinse the rest. is that why you gently add sparge water to top and slowly drain out to the kettle?

Yes, that's why I do it that way. The lower density water will just sit on top of the higher density mash liquid as long as I put it in fairly slowly to prevent mixing. Then, when I start draining the mash tun, the water at the top flows down through and rinses the grains. When you consider that's basically how a fly sparge works (water onto the top of the grain bed), my method pretty much duplicates the process without all the tediousness of monitoring the water level and matching flow rates in and out of the mash tun.

With your requirement of “putawayable”, I suggest single vessel, bag, pulley hoist and element.....

All the rest is gingerbread lol jmo, less to set up and break down and most importantly clean.
Ymmv

The only real advantage to going with more than one vessel is that it lets you play with your mash thickness (water-to-grain ratio). Various sources state that the character of the beer does vary depending on mash thickness, so if that's a variable you want to be able to adjust, multiple vessels will give you that ability. The potential higher efficiency isn't really a huge issue, since that usually only amounts to a handful of grain.
 
I’ve updated my progress with pics to my above link. The latest question is pumping mash from the mlt to the kettle. (If I’m going to do a true 2 vessel, pump from mlt to kettle) I have valves at the bottom of both vessels. I think I remember reading that it’s not good to limit flow into pump. Do any of you think I need to add another port to the kettle for a valve to limit flow after pump? Or can that slow flow from mlt fill from the bottom valve in the kettle
 
when I click on your link it seems to take me to my account, I tried logging out of amazon and then it wants me to log in.

You are right you should not limit the input to the pump, there should be a valve on the output of pump for flow control.
 
Can see your pictures now. A flow drawing of your setup ideas might be helpful.

Not sure you really need another port on your boil kettle unless you want a more solid connection. You could just put the hose into the kettle. I do think You do need a valve on the output of the pump. It looks like you have a valve going into the mash tun maybe you could put that on the end of the hose that comes from the pump or just on the pump itself.


After rereading your approach it is sort like how I brewed on propane but I did not use a pump. I had a cooler, one kettle and one burner, and would sparge into buckets until sparge water in boil kettle was done then would move wort to boil kettle.
 
I've got a 10 gallon pot with a valve too, I was thinking simplicity and trying to keep just the two large vessels on top of the counter. I could take that valve off and put it on the pump. problem solved.
-a triclover port/valve near the top of the kettle would look sexy, but wow, the triclover valves are wicked expensive. thats about $75 to look cool.
 
Last edited:
**I'm planning to heat full volume water in kettle. pump strike over to MLT & dough in. once settled, recirculate with pump through a herms coil in the kettle with remaining hot water. when the mash is done, gently pump over remaining kettle water on top of mash, then pump the mash liquid over to the empty kettle. brew as usual on electric, juggle hoses again, pump wort through plate chiller & into fermentor. seems legit but haven't tried it yet.
*I have the option to use the 10g pot on the floor to gravity drain the mash into, run a sparge, then pump all the liquid up to the kettle.
* I could also probably eliminate the oversized insulated mash tun, do biab in the 10g pot wrapped with insulation but I don't have a lid for it.
 
Last edited:
I have a march pump with a riptide head and have troubles trying to go slow. If you are trying to do the semi fly sparge that was mentioned earlier in the thread you might want to do some testing to see how slow you can run your pump. Locate your pump so it represents the lift your pump will see when you brew.

To fly sparge you need a slow drain so the clean water has time wash/push the higher gravity wort down. If you go to fast then might end up with lossy efficiency. When I batched sparge it seemed that it does take a few minutes to get the remaining wort to mix with the fresh water and wondering if too fast of a fly sparge might be worst efficiency than typical batch sparge. A slow gravity drain to the 10gal pot then pumping to the kettle is not all that bad.

I have a 3 vessel 1 pump setup. I gravity feed to the boil kettle. I need to manually throttle my pump from HLT to mash tun while sparging. Mash tun output is left hands off mostly.
 
ran two beers through. while I've got everything working pretty well, I'll say its a hassle using this big-ace mash tun for 5 gallon batches. small space. I mentioned before I'd like to find a way to downsize to biab. unload the big 15 gallon insulated tun. could get a false bottom and use the extra 10 gallon pot I've got for traditional-mashing 10 gallon batches if I can't do them in the kettle.
Dernord 5500w ripple element sits 3 1/16" above bottom of 15 gallon kettle. will a wilser bag be ok laying on the element a little if the power percentage is reduced on the controller? I also have the thermowell sticking out in there two at 4 1/8" above bottom. not sure if that will be an issue. If not, maybe I could try one of the false bottom grates from Bobby_M; and a bag from wilserbrewer
 
Last edited:
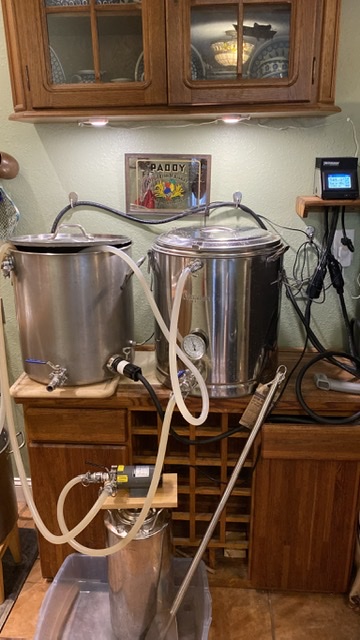
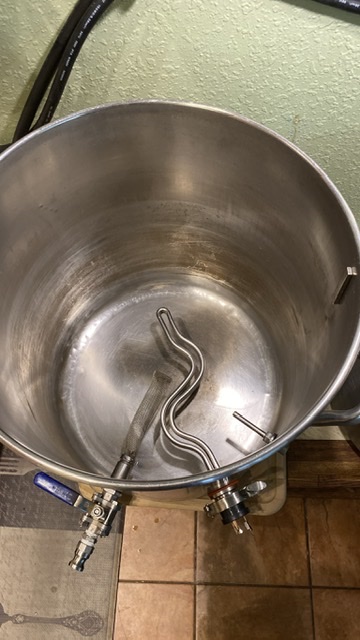
Photos of setup. The kettle with the hoses inside is a 10 gallon. Only used to catch water from steam condenser, which works like magic Love it! Lots more room with smaller kettle and easier to clean. @BrunDog
 

Attachments

  • 46472547-E0FF-438E-AF90-0542CCCFCCB4.jpeg
    46472547-E0FF-438E-AF90-0542CCCFCCB4.jpeg
    92 KB · Views: 65
  • 64BB6741-8552-4BE3-9BCF-402507517886.jpeg
    64BB6741-8552-4BE3-9BCF-402507517886.jpeg
    90.8 KB · Views: 62
  • 8604A919-5BD4-4042-B257-D42652910977.jpeg
    8604A919-5BD4-4042-B257-D42652910977.jpeg
    80.8 KB · Views: 68
  • 35BF02B9-F9F2-4432-BB0D-2747DC80858F.jpeg
    35BF02B9-F9F2-4432-BB0D-2747DC80858F.jpeg
    3.2 MB · Views: 53
Last edited:
not sure if its normal but i'm getting some heat in one of my cables. at the wall, beginning of cable/outside of the plug is getting 115deg for a couple of inches and then is normal temp until i get to the connection with the brewcommander plug. at that end the last couple inches of cable were at 125. The cable going from BC to the kettle was 84deg, except at the element, where it was around 125, which is probably normal due to the heat. is this ok or should i be taking this cable apart to check?
i have either a camco or dernord 5500w element. sometimes im wondering if im getting 100% pwr.
The heat comes from resistance in the connections. The previous advice to go check the tightness of the connection is good.

And no, you are not getting full power out of your element. Any place heat is generated is power lost. You lose 20-35W in your SSRs, even if you have very low losses in your other connections.

Let's do a little math. SSRs are typically spec'ed at 1.5V max on voltage drop, so let's assume that yours is 1.0 volts. That means if your incoming voltage is 240.0V, then you only have 239.0 volts left after the 1V lost in the SSR. An element rated at 5500W @ 240V has a resistance of 240^2 / 5500 = 10.47 ohms. At 239V the power will be 239^2 / 10.47 = 5456W. Since you have some heating in your wires, let's assume that the total resistance of all connections is 1 ohm. Now the total resistance is 11.47 ohms, and the current will be 239V / 11.47 ohms = 20.84A. The power to the element is then 20.84^2 * 10.47 = 4546W!

As you can see, resistance in your wiring not only causes heating where you don't want it, it also can significantly reduce the max power you can deliver to your element.

Brew on :mug:
 
I just had to replace a socket recently. I had a little dried on wort or smutz on one of the prongs of the elements and it got cooked/burnt causing heat build up in the socket.

Good to check your exposed prongs on elements to make sure they are clean.
 
Got it apart. sure enough, black wire took 1.5-2 turns on either end. only .5-.75 turns on the white and green wires. i wanted to check the plug at the element but can't figure out how to get it apart. No screws.
 
The cheap soft plastic-black l6-30r connector failed me. I think doug293cz mentioned somewhere, they aren't good. It was a purchased cable. The connecter got sloppy over time with use and started to melt on last boil.
i'm replacing with some heavy duty nylon parts that screw together.
 
Last edited:
Otherwise the E Brewery has been doing great. Have since just set up a HLT and mounted a herms coil to it with its own element. Switching the connecter between two elements helped wear it out fast....but it was junk to begin with
 
Nice job on your brewery! I just had the same thing happen on one of the prongs on my boil element. It caused some charring on the plug. I just changed it out and got a new plug end and a new element. The connecting and disconnecting over many brew days over the years caused the connection to loosen up. Then it gets hot which causes this to happen. It is good to always check the connections each brew day while it is running and also to have spare plugs, elements, and parts on hand to fix issues as they arise. Good to see you enjoying your rig!

John
 
Back
Top