1st beer attempt ever....with lots of pics - BIAB

Homebrew Talk - Beer, Wine, Mead, & Cider Brewing Discussion Forum

Help Support Homebrew Talk - Beer, Wine, Mead, & Cider Brewing Discussion Forum:

This site may earn a commission from merchant affiliate links, including eBay, Amazon, and others.
Just my opinion, but I would keep it in the mid 60's and forget bringing it up to low 70's.. You're gravity looks good to me, so I don't think you need to raise temps. I'm a bit new still, so somebody more experienced might not agree.
 
By my numbers, that's 71% attenuation. Did I miss what yeast strain you used? That seems like a very reasonable FG to me. Looking at the fermentables in your recipe, your 3.5% ABV looks about right, I guess.

Now I've looked at the original recipe, and it seems your yeast hasn't attenuated down quite as far as Schlenkerla's did. You might see some benefit from bringing the temps up a little bit. Then again, since you mashed at 150° (3° higher than Schlenkerla), you might not have gotten quite as many fermentable sugars as the original brewer. If this is the case, your yeast could certainly be done. At this point, I don't imagine it would hurt to slowly ramp the temp up, over the next week, to around 70°. Then you'll know fermentation is done, and you'll give the yeast the chance to drop it a few more points.

Either way you go with it, let us know how it turns out. That is one hell of a write-up for a first brew. Well done.
 
I think that by bring up the temperature to the low 70's will let the yeast finish the job and you will end up with a lower FG than what you have. The critical time for the ferment is right at the start while the yeast are propagating and beginning the fast ferment. Once that fast ferment slows you can let it get warmer without any off flavors. My beers stay in a room that I maintain in the low 60's for a week and then 2 to 3 weeks at 72.
 
Warming it up at this point won't hurt at all, it will keep the yeast moving a bit more and make for a better beer faster in most cases. You may drop another point or two in gravity, or not. That's up to your yeasties. ;)
 
Great post Kevin! I'm getting ready to BIAB for the first time this weekend and threads like this help alot! Good luck with your brew, hope it turns out great. :mug:
 
To all the senior members -
Thanks for checking my numbers and process - really appreciate all the help.
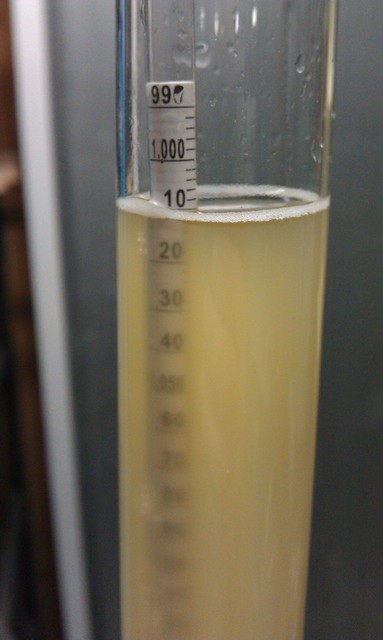
I will add a splash more of enzyme and bring it upstairs soon to try and squeeze a little more ABV out of this.

I dont need a brew chamber... I have a about 3 different basement temps, the upstairs finishing temp and the garage crash cool temps...
Of course the weather is always stable in Missouri and never changes...(yeah right...)
Seriously though -
My china ebay controller should get off the boat soon and be here.
Looking for a small chest freezer that will hold 2 carboys on CL..missed one for $50 the other day.

Wyzazz -
Thanks for adding that Revvy quote - I laugh every time I read that line :ban: If only that would be true !
And of course I appreciate the great advice on brewing.

To all the new guys who researched this hobby for a while (like me...)
Just get some equipment and do it.
Fermentation and yeast is where I wish I would have researched a little more...throwing some grain in pot is easy... but then it gets serious !
Basically as I see it... Ferment temps (based of yeast used ) finishing temps - crash temps - are all needed to get the beer to be the best it can be.

thanks again
More to come soon -
Kevin
 
Glad to be able to help in any way I can. I've gleaned tons of information from this forum so to be able to help a little is great!
 
remote probe showing I one degree high... went down in a few minutes.
Had to pull off blankets and give it a little heat after 40 minutes...dropped to 145...then it held pretty good for the rest of the time.

6631955785_a20d297e58_z.jpg


I was planning on making the leap from Extract to BIAB as well. I already got the bag ready to go. Where did you get this remote probe from? I'd really like to have that so I can cover the top of my keggle with some towels and still keep an eye on the temp.

Pics and everything look great, good work!
 
Nice write-up. I am doing the same type of thing that you did. Doing a lot of research up front and eventually I will purchase some equipment and start doing BIAB AG from the get-go. Good to see someone else doing this as well. Thanks for the post.
 
Sippin37
Where did you get this remote probe from? I'd really like to have that so I can cover the top of my keggle with some towels and still keep an eye on the temp.

Pics and everything look great, good work!

Linked above - post #37 - Bed Breakfast and B...

thanks
Kevin
 
Made another batch today - wont bore you all with the same stuff again....

It was 19 and windy... Lesson learned...
Need an electric setup with a pump... stirring and trying to keep a steady temp in this weather is not fun.

6692117661_b9947eb22a_z.jpg


Lesson learned from last time..
Get a hop bag - so I built one this morning
Lots of designs for this setup..here is what I used -
4" coupler - 2.10
Scrap 1/2 copper pipe - free
Big stainless pipe clamp - $1.xx at home depot
Hop Bag - got mine from Jeff at - Brew in a Bag - Brew In a Bag - Home

Drill a hole in coupler 5/8 and slide the pipe in place - slide up bag and use clamp - very easy

6692118239_eff2ab0c89_z.jpg


6692117391_b5f39b3285_z.jpg


My efficiency was about 95% - which higher than I wanted - 1.058 (sample was 65 F when measured)

I used a little more grain than the recipe calls for thinking my efficiency would be worse than the recipe ... it was better apparently.

8 american pale 2-row
1 Vienna
.5 Munich Malt
.25 Cara Pils

8.2 gallons starting and 5.6 after boil - triple ground the grain

1 oz tetterang for 50 minutes

- was supposed to be this recipe -
https://www.homebrewtalk.com/f62/biermunchers-helles-belles-munich-helles-ag-48985/
I had american 2 row instead of Pilsner .. sample tasted great though

6692112089_ebf7622089_z.jpg


thanks Kevin
 
I had this batch upstairs for a while then moved it to the garage for some crash cooling.

Sample from last night shown below - finished at about 1.007

6734212353_495cef0f9f_z.jpg


Sample tasted good...a little to bitter for this light brew.
Hopefully it will continue to mellow out.

Added some knox gelatin and put in in my CL find - Absocold mini refrigerator.

Will keg in a day or 2.

thanks Kevin
 
I grew up in St. Peters, went to Sts. Joachim and Ann grade school. Now in San Diego. Certainly miss those cold days sometimes.
 
Good stuff. Where is your LHBS? I go to St. Louis Wine and Beermaking in Chesterfield, however I'll admit I also order online as well to save money.
 
periwinkle -
There are limited supplies at Friar Tuck's in Ofallon at 40 and K... but I too get over to STL Wine and Beer if a need something in a hurry...otherwise I just let my fingers do the walking :)


Tonight I got the regulator on the tank, put on the 0-30 gauge ebay gauge ( I tried to get a bigger one but could not find one :) )

6758696707_faf1111bf2_z.jpg


I then drilled a hole through the side of my $80 CL refrigerator.
Ran the co2 line through and put on a disconnect.
Should be able to get 6 kegs in this refrigerator.

6758698447_c637464140_z.jpg


I used my new easy siphon to put this beer in the keg.
I found this awesome absocold refrigerator for $40 on CL the other day..and it delivered to me for free... that is another story.
This refrigerator can fit a 6.5 carboy with NO mods, wish I could find another one....

6758698481_4da2b78253_z.jpg


Here is my first keg all safe and sound.

6758698973_a62d1b7816_z.jpg


I will get the perlicks installed on the other side in day or 2.
The beer taste pretty good, very clear, maybe a bit too bitter but coming around.

thanks Kevin
 
My second batch seems to be coming along very nicely.
Supposed to be a munich helles.

Finished at 1.015 and it is now cold crashing.

1.058 og
1.015 fg = 5.6 abv
That is higher than the recipe style calls for ... not sure what else I can do.

Sample seems great.

6758699591_509dc612fd_z.jpg


thanks Kevin
 
That pressure gauge is awesome. :rockin:

Thanks !
Bigger is always better right?

The urinal is awesome

That keeps showing up in all my pics... just giving the people what they want :confused:

On a serious note -
Not sure if my regulator is working accurately.
The gauge was at 12 pounds last night and this morning it was about 10.
I burbed the keg and hit the pressure relief on the regulator and it did not go up.
So I adjusted the regulator again.
Will have to see where it is when I get home.

It seemed very touchy when I was trying to set it last night.
I thought this was tested/rebuilt from the guy I bought it from.

thanks Kevin

Close the main valve on the regulator (going out to the keg), purge the regulator, set it at whatever PSI you want it to be at, then open that valve back up. It "should" stay there and stop "walking".

As for the urinal, I've always been partial to this one...

keg-urinal.jpeg
 
Nice writeup! Jeff's bags really are great. I'm pretty sure I could fit inside of mine and doubt it would rip if someone lifted me. Hmmm....
 
Hi Kevin,
I swapped kegs with you tonight. Is that the picture of fate or irony? ... with the beer in the foreground and urinal in the background. ;)
TPH

My second batch seems to be coming along very nicely.
Supposed to be a munich helles.

Finished at 1.015 and it is now cold crashing.

1.058 og
1.015 fg = 5.6 abv
That is higher than the recipe style calls for ... not sure what else I can do.

Sample seems great.

6758699591_509dc612fd_z.jpg


thanks Kevin
 
Hello All,

I installed my 2 shanks/Perlicks the other day.
I hooked up my Accuflex Bev-Seal Ultra barrier line to the shank - Keg and that was a bit of a pain.

Not much to installing the faucets, get a step bit and blast through the side of the refrigerator. I plan on installing 6 faucets...got them all marked out.

6799535615_4512b1ffa8_z.jpg


I ordered a bunch of tap handles over the last week. I got this Becks first in the mail. $6.19 delivered.... got to love ebay.

6799536161_1433c4a7b4_z.jpg


This is the first pour... I think a little of that foam is starsan that I did not come out of the line.

6799537929_3c3ac2c31e_z.jpg


Same glass

6799538629_a6ff3ca5d2_z.jpg


After the second glass it seemed to taste better and not much foam... hardly any actually....not sure if the beer is all carbed up yet.

I guess this hobby might work out :mug:

thanks Kevin
 
Do you have the recipe for this beer? That is the lightest colored homebrew I have seen. :)
 
Hello All,
I brewed yesterday and made a few tweaks to things that worked out well, so I thought I would share.

I brewed BMs Centennial Blonde yesterday -
https://www.homebrewtalk.com/f66/centennial-blonde-simple-4-all-grain-5-10-gall-42841/

Only change was I added 4 oz of left over 6 row and had to up the hop schedule to .3 oz to keep the IBU at 22 ish.

I have learned that my process yields about me about 87% efficiency and thus I need to up my hops to keep the recipe IBU. (or lower my grain amount)

The recipe was to be 1.040 and I was shooting for 1.045 and hit 1.047.
That is 87% per tastybrew calculator.

6921554925_39e8798761_z.jpg


I also found a link on here somewhere that mentioned a neat trick to aerate wort by adding a piece of racking cane with a 1/16" hole in the middle of the boil kettle drain tube.

Hard to see the hole but if you look close you can see it and the line of air it SUCKS in.

6775440562_d5003a5251_z.jpg


I put the cooled wort up on the table, stirred it hard for a minute, let it rest for 20-ish to settle out some, then put on the tub and open the valve, dump in 3 gallons, stop... dump yeast... then let it rip again until it the kettle stop draining.
I leave about 1/2 gallon of trub in the kettle cause my pick up tube is kind high...

6921555609_e6001fc141_z.jpg


All that foam is from the dumping the wort into the carboy, the wort had NO foam in the kettle.
After a few hours I saw Nottingham starting to work, wort was at 62.
Next morning about 15 hours later, air lock was going, wort was at 60.

Hope this helps someone.
thanks Kevin
 
Hello All,
I brewed yesterday and made a few tweaks to things that worked out well, so I thought I would share.

I brewed BMs Centennial Blonde yesterday -
https://www.homebrewtalk.com/f66/centennial-blonde-simple-4-all-grain-5-10-gall-42841/

Only change was I added 4 oz of left over 6 row and had to up the hop schedule to .3 oz to keep the IBU at 22 ish.

I have learned that my process yields about me about 87% efficiency and thus I need to up my hops to keep the recipe IBU. (or lower my grain amount)

The recipe was to be 1.040 and I was shooting for 1.045 and hit 1.047.
That is 87% per tastybrew calculator.

6921554925_39e8798761_z.jpg


I also found a link on here somewhere that mentioned a neat trick to aerate wort by adding a piece of racking cane with a 1/16" hole in the middle of the boil kettle drain tube.

Hard to see the hole but if you look close you can see it and the line of air it SUCKS in.

6775440562_d5003a5251_z.jpg


I put the cooled wort up on the table, stirred it hard for a minute, let it rest for 20-ish to settle out some, then put on the tubing and open the valve, dump in 3 gallons, stop... dump yeast... then let it rip again until it the kettle stop draining.
I leave about 1/2 gallon of trub in the kettle cause my pick up tube is kind high...

6921555609_e6001fc141_z.jpg


All that foam is from the dumping the wort into the carboy, the wort had NO foam in the kettle.
After a few hours I saw Nottingham starting to work, wort was at 62.
Next morning about 15 hours later, air lock was going, wort was at 60.

Hope this helps someone.
thanks Kevin
 
How doesn't the sleeping bag melt..

I'm assuming that you mean when wrapping a pot with the sleeping bag for mashing. When you wrap the mash tun (boil pot if you are doing BIAB) you can hold the temperature without adding heat so your sleeping bag should never get warmer than about 160 F. and it won't melt at that temperature. When the mash is over you remove it and begin heating again for the boil.
 
I'm assuming that you mean when wrapping a pot with the sleeping bag for mashing. When you wrap the mash tun (boil pot if you are doing BIAB) you can hold the temperature without adding heat so your sleeping bag should never get warmer than about 160 F. and it won't melt at that temperature. When the mash is over you remove it and begin heating again for the boil.

I actually had problems with my insulation melting just with the heat on the bottom sides of my keggle even though the heat was off. Now I only put the insulation jacket on about 2/3 of the way down and then I lower it about 15 mins later to avoid melting it again...
 
I actually had problems with my insulation melting just with the heat on the bottom sides of my keggle even though the heat was off. Now I only put the insulation jacket on about 2/3 of the way down and then I lower it about 15 mins later to avoid melting it again...

I have not had any issues with melting thus far.
Soon as I turn off the burner and I stir the mash a bit... make sure temp is where I want it and wrap it up.
But - with the corners of the burner sticking out I dont actually get the blankets really tight against the bottom of the keg, more of a tent effect actually. (which is not the best approach to hold the heat in...)

The other day it was very windy, gusting to 30 mph and 40 F outside temp and I did not have the bottom wrapped very tight.
I had the mash set at 151 watched it for 5 minutes with no change in temp, then I had to run an errand.
That errand took longer than I wanted and when I got back the mash was 141, after 70 minutes. (in the past I have had better luck holding the heat, but that wind was killing Tuesday)
I pulled the blankets, cranked the heat hard, kept stirring and ran the mash up to 170 then pulled the bag. (my current process.... after mash time.... crank heat and to do a semi sparge I guess you call it... )
Let it drip for 15 minutes as it hung from the ladder and kept the heat on until it started to boil.

thanks Kevin
 
Kevin,

Looks like we're pretty much neighbors. Just saw the link on GBS so I came over here to look. Great thread. I've done a few extract batches and just bought some voile at the craft store by mid-rivers to make up a bag and start doing BIAB. Good stuff man. That beer looks incredible!
 
awesome first (and second) brew days...

i'm definitely the flying by the seat of my pants taking in a ton of information and switching up way too many things every time i brew.

quick question though... i'm sure you sanitize everything before using it, but you dont fear any kind of contamination or bacteria from keeping an in use urinal only a few feet from where you brew/ferment/rack/keg/etc...?

i'm not talking about handwashing and things of that nature, just the usual bacteria you might expect from a working urinal...
 
Kevin,

Looks like we're pretty much neighbors. Just saw the link on GBS so I came over here to look. Great thread. I've done a few extract batches and just bought some voile at the craft store by mid-rivers to make up a bag and start doing BIAB. Good stuff man. That beer looks incredible!

HI -
thanks for saying hello, look me up during the next meeting, looking to go all electric very soon with my setup.
It will be awesome.

awesome first (and second) brew days...

i'm definitely the flying by the seat of my pants taking in a ton of information and switching up way too many things every time i brew.

quick question though... i'm sure you sanitize everything before using it, but you dont fear any kind of contamination or bacteria from keeping an in use urinal only a few feet from where you brew/ferment/rack/keg/etc...?

i'm not talking about handwashing and things of that nature, just the usual bacteria you might expect from a working urinal...

No Fear !
I dont pee on my equipment I dont really do any brewing or racking over there... I do kind of ferment a few feet from it though I guess..
No issue at this time, 7 batches down so far.

thanks for asking :drunk:
Kevin
 
Reminds me of my first brew day a couple weeks ago. I was like you, tons of research and parts gathering before ever brewing a beer. Hell, I even had to teach myself how to weld for this.
I'm just now enjoying my first brew, fresh from the tap, and it's delicious.

Here's a shot of my first brew day.

image-522943883.jpg
 
Back
Top