• Please visit and share your knowledge at our sister communities:
  • If you have not, please join our official Homebrewing Facebook Group!

    Homebrewing Facebook Group

1-Gallon Brewers UNITE!

Homebrew Talk

Help Support Homebrew Talk:

This site may earn a commission from merchant affiliate links, including eBay, Amazon, and others.
since you kettle sour and ferment at 95˚F, it couldn't be simpler or harder to mess up.

Oh one note: I like the tartness where it is, but if you'd like a milder version, kettle sour at ~86˚ instead for the same two days (mine hit 3.2, this strategy will be closer to 3.4-3.5 which is more of a textbook target - and this is, I should mention, using the absolute champion SourPitch which, you guessed it, you can reseal and make up to 10 (!) kettle soured 1 gallon batches with if you have a vacuum sealer and bags)
 
If you use fresh raspberries, it might be better to freeze and then thaw them first. It breaks down the cell walls and releases more juice!

Interesting recipe... going to add it to my list!

You're not really getting more juice out of the fruit by freezing them first that isn't happening by the cells swelling in complete hydration in the beer. The difference with freezing first is that you will rupture the cell walls with freezing and extract the juice quicker.
 
Oh one note: I like the tartness where it is, but if you'd like a milder version, kettle sour at ~86˚ instead for the same two days (mine hit 3.2, this strategy will be closer to 3.4-3.5 which is more of a textbook target - and this is, I should mention, using the absolute champion SourPitch which, you guessed it, you can reseal and make up to 10 (!) kettle soured 1 gallon batches with if you have a vacuum sealer and bags)
Or just get philly sour and your souring agent and yeast are a single purchase! :)
 
Or just get philly sour and your souring agent and yeast are a single purchase! :)

True, and since it's not like the insane speed of this beer is a necessity, and because I'm not looking for any particular weird yeast character, I very well may switch to that at some point. The brewery I work at is about to use it in a Gose (after having done a kettle-soured version first), so I'll get to check it out first hand!
 
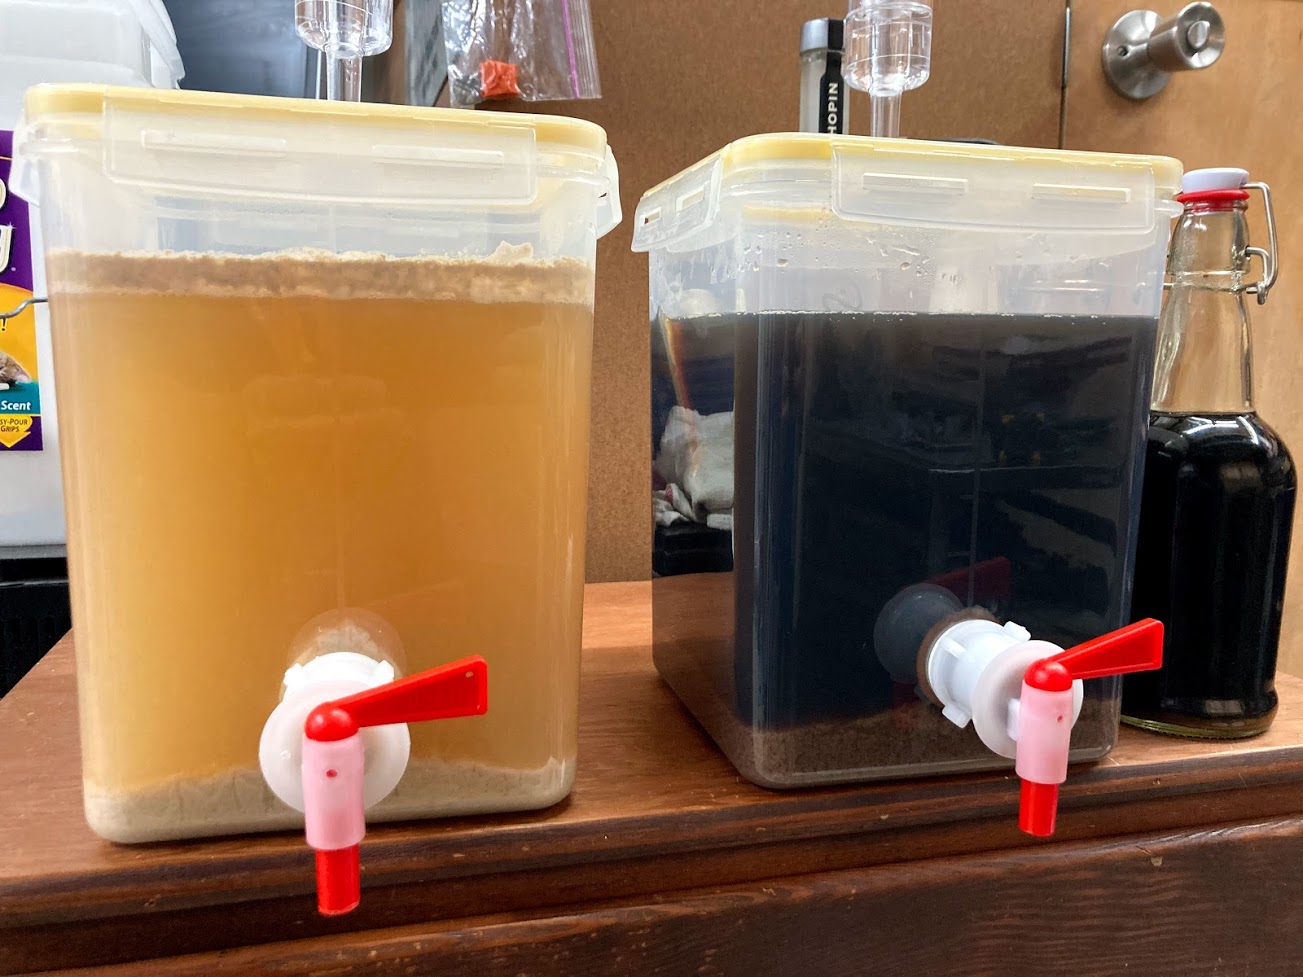
I've got three of these little experiments going now. These are 5L polypropylene containers, probably not as high quality as the Cambro ones, but I do like that lid snaps down in place. The snaps on the side compress the silicone gasket around the rim which made them water tight, until I drilled a hole in the lid for the airlocks. I added the spigots on two of them, the other two are au natural for the time being. Liking them a lot so far, they stack really well when empty (and no airlock)... if I could only figure out a way to stack them while they're fermenting.

WIc9vGUP_o.jpg
 
Those are sick! I love the sealing gasket, I'd kill for the ability to cold crash without oxidation risk, and those spigots are life changers, especially if you're bottling (though they're a noticeable improvement either way). Hell of a pair!
 
With "Hop Sampler", one generally only needs one or two bottles for the initial sample.

Has anyone left the remaining bottles for 30 / 60 / 90 days to see how they taste at that point in time?
 
... but for now, here's a video I made of what I claim to be the most advanced one gallon brewery (shots fired!)

Just finished watching your video... thank you for posting. I am curious on what kettle you are using. My main reason for asking is that I am trying to understand the wall thickness so that I can get a solid non-flimsy surface to connect to.
 
Just finished watching your video... thank you for posting. I am curious on what kettle you are using. My main reason for asking is that I am trying to understand the wall thickness so that I can get a solid non-flimsy surface to connect to.

Well thanks for watching! Maybe I should finally get around to editing and uploading that brew day video...

As for the kettle, I'm using this, which is evidently like 202-grade Stainless, but I've had no off flavor or degradation issues. It may look cheap, but it's not flimsy, and as someone who has drilled like four big holes in this thing (3 and 4 being the element and then the tri-clamp housing for the element), I'd be reticent to use anything thicker-walled. Heck, I even installed a comically huge tri-clamp fitting for my element recently, and while I had to literally sit there and hammer the wall surrounding the hole flat so that the fitting would seal, the kettle holds water some ten-ish brews later.

But yeah, to answer your question, the wall is pretty thin (I dunno, half a millimeter?), but it can hold a decent amount of weight, so far up to a heating element and a fairly heavy tri-clamp rig

2020-07-29 12.28.37.jpg2020-07-29 12.28.33.jpg2020-07-29 12.28.30.jpg
 
I just finished a 6 quart mash -- making some bottles of 1.040 wort to pressure cook and use later to make yeast starters. And I can see the appeal of 1 gallon (or thereabouts) brewing. I did everything easily on my kitchen stove without any special equipment except a paint strainer bag for Home Depot.

Now I need to drag out the pressure canner and see if all these bottles fit...
 
I'm going to make a full post soon, with brew day footage and pictures of each piece of gear and their magnificent Valhalla of a cabinet, but for now, here's a video I made of what I claim to be the most advanced one gallon brewery (shots fired!)

Let me know if there's anything in particular you'd like to see or know, for instance the like 20 different mash heating options I've considered and how to build them all

Cheers!

Enjoyed your video. I like seeing how different people approach small batch brewing. I have to know, though... where did you find a 1650 watt fold-back heating element short enough to fit in a kettle that small?
 
Enjoyed your video. I like seeing how different people approach small batch brewing. I have to know, though... where did you find a 1650 watt fold-back heating element short enough to fit in a kettle that small?

Glad to hear it! And same, there's an absolute zoo of options, it's great to see. And yeah, that is indeed a challenge, and an especially pressing one I faced for my RIMS tube, since I had to use as small of a radius of tubing as possible since V is proportional to r^2 for a cylinder.

In any case, my go-to for electric brewing is generally brewhardware.com, and here's the element. They have a serviceable element housing, that I actually use (it's very light which is great), but the cadillac of element housings is this, granted it's triclamp only, so you'll need something like this, and even then you'll find that you need, like, two fat silicone gaskets that you have to buy individually. Pretty insane, right?

One last thing, though - they're not even remotely Low Wattage Density or ULWD, but Stick Heaters can't be beaten for space, and if I were building a simple water heater, or a "f*** it" tiny RIMS tube, I'd consider using one. This one's too long for one gallon, but these are too expensive - I'm sure a middle ground exists.
 
Good evening all!

I just got into the brewing game and started with a one gallon "Craft A Brew" American Pale Ale I received as a gift. This Saturday will be bottling day and so far everything has seemingly went well. I already have the itch to begin another beer before even knowing if I have succeeded in the first! I am interested in brewing a one gallon NEIPA and will be following the "Craft A Brew" steps for their NEIPA, however, I purchased my own variety of hops (Galaxy, Citra, Cashmere) to try instead of what their kit provides. Being extremely new to the brewing field and wishing I had paid more attention in high school chemistry, my solid plan for the NEIPA has gotten more confusing the more I read online. My question (which I am sure has been asked a thousand and one times) is is there a general rule of thumb in amount of grain, hops and yeast to follow when brewing this type of beer per gallon? I have read the 1.25-1.5 lbs/gallon for grain, but the hops and yeast amounts I am a bit confused on. Thanks in advance for the information!
 
My question (which I am sure has been asked a thousand and one times) is is there a general rule of thumb in amount of grain, hops and yeast to follow when brewing this type of beer per gallon? I have read the 1.25-1.5 lbs/gallon for grain, but the hops and yeast amounts I am a bit confused on. Thanks in advance for the information!

Someone with more expertise on IPAs is sure to follow with better specific advice, but the broad strokes response:

- Welcome to brewing!
- I'd recommend just following other people's recipes for, like, 5-10 batches before considering doing your own; even if your recipe is excellent, your method is sure to be flawed, and so there'll be no real way to know what went well or not in your recipe beyond "I liked these hops" or maybe "that was a ton of crystal malt in retrospect, my bad;" you may even want to just buy pre-made kits from reputable sources, Brooklyn BrewShop for instance
- Speaking of them, I'd recommend two books, namely the obvious one and a second, specific-to-one-gallon book that's a solid repository of recipes (I've tried a few, not all, but they're bangers)
- they also have a second book that's maybe good? And after, like, 10-20 brews, you're allowed to buy this - such is the will of the gods
- I begrudgingly offer this, though you'll need BeerSmith more or less the second you stop brewing kits, if for no other reason than record keeping (and there are like a million reasons)
- For hazies, I'm no expert, but there are a range of tricks - a number of breweries only add hops at Whirlpool and later in order to avoid the majority of...bittering, let's say (isomerization, don't sweat the details) and hop oil loss, and to get that haze, you'll need to employ a combination of a haze-friendly yeast (London Ale III and Voss Kveik, say, Lallemand's, are common), and malt selection (people like, what is it? White wheat malt and flaked barley? Someone will have a specific answer there)

Good luck, and if you need a small batch quality cheat code, grab something like this (for posterity: a thermoelectric wine fridge with a built-in temperature setter)
 
Good evening all!

I just got into the brewing game and started with a one gallon "Craft A Brew" American Pale Ale I received as a gift. This Saturday will be bottling day and so far everything has seemingly went well. I already have the itch to begin another beer before even knowing if I have succeeded in the first! I am interested in brewing a one gallon NEIPA and will be following the "Craft A Brew" steps for their NEIPA, however, I purchased my own variety of hops (Galaxy, Citra, Cashmere) to try instead of what their kit provides. Being extremely new to the brewing field and wishing I had paid more attention in high school chemistry, my solid plan for the NEIPA has gotten more confusing the more I read online. My question (which I am sure has been asked a thousand and one times) is is there a general rule of thumb in amount of grain, hops and yeast to follow when brewing this type of beer per gallon? I have read the 1.25-1.5 lbs/gallon for grain, but the hops and yeast amounts I am a bit confused on. Thanks in advance for the information!
Just a word of caution about being extremely new to brewing and attempting a neipa. It's not a hard beer to brew, but it's a hard beer to brew right if you're a new brewer without the ability to do a closed transfer between the fermentation vessel and your serving vessel (bottles I assume). If you have no way to limit oxygen exposure when bottling you're likely to be disappointed with the final product where neipas are concerned. Might be better to cut your teeth on a nice Porter or even a red ale, they're much more forgiving. Either way, welcome to the brewing hobby and good luck!! :mug:
 
NEIPA is going to be avoiding oxidation as the biggest problem from the time you add your dry hops to keggng. You won't end up with the bright orange color if you bottle Haze you can get by using some oats also. But brew what you want and see how it ends up. You will still have beer!!!
 
In any case, my go-to for electric brewing is generally brewhardware.com, and here's the element. They have a serviceable element housing, that I actually use (it's very light which is great), but the cadillac of element housings is this, granted it's triclamp only, so you'll need something like this, and even then you'll find that you need, like, two fat silicone gaskets that you have to buy individually. Pretty insane, right?

I should have known! BrewHardware.com is awesome! It's been a few years since I looked at 1650W elements and they were usually a minimum of about 11" long. 1650W in about 8.5" and low power density to boot is great!

I was going to ask about mounting to the pot, too. I'd suspect sealing with a pot radius that small is tricky. Sounds like fat silicone gaskets do the trick. I thought this might work well, too: pull-through bulkhead tool from brewhardware.com plus silver solder.

Cheers!
 
I was going to ask about mounting to the pot, too. I'd suspect sealing with a pot radius that small is tricky. Sounds like fat silicone gaskets do the trick. I thought this might work well, too: pull-through bulkhead tool from brewhardware.com plus silver solder.

Cheers!

Woah! That thing is absolutely rad, and $30? Holy smokes, yeah, I mean screw gaskets if you have a friend with a welder, or yeah maybe silver solder - the point of the tri-clamp is for the thing you're hooking up to that to be temporary, not the connection itself, so yeah that's probably by far the best solution

And indeed, I literally had to hammer the wall of the kettle flat by hand to get it to seal - relativity 101: we almost never experience the curvature of space time because we're ants on a blanket that feels locally flat, and similarly you can get a gasket to seal for a 1/4" hole no problem, but 2" or so? No way
 

Attachments

  • 1610750921345.gif
    1610750921345.gif
    42 bytes
Thanks everyone for the replies/information! Seems as though there is a lot less room for error when bottling as opposed to kegging. I am thinking my next purchase will be a 128 ounce pressurized keg being that they are fairly affordable and will help out in the long run, cheers!
 
Thanks everyone for the replies/information! Seems as though there is a lot less room for error when bottling as opposed to kegging. I am thinking my next purchase will be a 128 ounce pressurized keg being that they are fairly affordable and will help out in the long run, cheers!

Speaking of that, I love my Torpedo kegs, but I've been eyeing these KegLand ones for quite some time now...if you think you might want a 2L once in a while, this offers some flexibility since much of the cost is in the (transferable) lids
 
Update! Here’s a pic of my “DDH Triple Threat” on day 6. Reading up on a bunch of tips so will be kegging it around day 12. The strange looking black line is a result of my cracked iPhone lense, but I’m happy with the color so far!
 

Attachments

  • ADBE7B3F-1606-418F-86DF-BE9F859A4FEB.jpeg
    ADBE7B3F-1606-418F-86DF-BE9F859A4FEB.jpeg
    1.7 MB
Back
Top