inr brewing - basement brewery build

Homebrew Talk - Beer, Wine, Mead, & Cider Brewing Discussion Forum

Help Support Homebrew Talk - Beer, Wine, Mead, & Cider Brewing Discussion Forum:

This site may earn a commission from merchant affiliate links, including eBay, Amazon, and others.
The FedEx guy delivered my new brew kettle and mash tun last night. Life is getting in the way of my unpacking. Making a modified Centennial Blonde as my first all grain brew when everything 's set up and running with the pump, chiller and connects I just bought from Bobby. Christmas came early this year :ban: image.jpg
 
12/21/2015 update

got my six-tapper drip tray for the keezer today. tray and grill individually wrapped in plastic, tons of paper in the box, well packaged:

20151221_144930_resized_zpszhlimtgc.jpg


protective cover on the grill:

20151221_191742_resized_zpsshyirdgs.jpg


she's a beauty:

20151221_191950_resized_zps9lyvycmk.jpg


started some work on the keezer tonight. finally cut the box away:

20151221_160330_resized_zps7nuba9qt.jpg


figured i should probably plug this thing in and make sure it works before i get too nuts. light is on and the compressor is running:

20151221_160515_resized_zpso0yj8rqq.jpg


to squeeze an extra two kegs up on the compressor hump, i need to add a collar. freezer construction is such that wit the keg and disconnects, i'm going to need about 8". too small for a 2x8 and i didn't want to fool around with weirdo spacers so decided on a 2x10 collar. one big issue is that the cord from the compressor hump to the lid for the light will be too short once the collar is on there. i pop open the compressor access door. the cable coming in on top (left side) is the main incoming power, bottom cord is the cord out to the lid for the light.

20151221_160801_resized_zpscvbrehvi.jpg


a bit tough to see in the photo above but there is a connector for the cord out to the lid. i unscrewed the clamp holding the cord down, hoping there would be enough slack in the cord to work with the collar but no dice.

20151221_161551_resized_zpsok9ut72b.jpg


my first though was to splice a longer piece of wire into the cord, to give it enough length to hook back up to the connector and still work with the tall collar. that approach would require two splices and have one fundamental flaw: the light would only work if the freezer was running. i'll be using an inkbird controller for temperature regulation and plugging the freezer into the inkbird. with the light 'downstream' of the main power cord, there will be no light from the lid lamp unless the compressor is running. so i decide to scrap the connector all together and splice a whole new plug on the end of the lid light cord:

20151221_181246_resized_zpsyuoqqvgh.jpg


i ran to menards and grabbed a three foot extension cord, designed for splicing into tools or similar corded devices. first splice on:

20151221_181932_resized_zpsmlgpwgsx.jpg


i staggered the splices so they weren't adjacent to one another. this will make for a 'lower profile' cover over the splices, make it look more like a cord:

20151221_183158_resized_zpszfluoniu.jpg


and all spliced up. it is important to plan out the amount of wire to cut and splice (i.e. short on one end, long on the other):

20151221_184435_resized_zpsvinfacnh.jpg


finally some shrink tube. be sure to slide the shrink tube on the cord before making splices:

20151221_184619_resized_zpshc5yac2d.jpg
 
Although it's true you can clean the sight glass when the top nut is taken out you can't clean the gunk inside the 90* bend or around the weld-less nut on the inside unless disassembled.
I find it easy to do with the brush from inside the kettle. Quick and easy. Not having to take the sight glass off a Blichmann at all during cleaning I find much simpler. That said, all 3 kettles are on the hot side of the brewing process so regardless of which kettle you use, you don't even really need to clean in there, at least not after every brew.

Our sight glass shields have laser etched volume markings every half and full gallon.
Cool. I like them and stand corrected.

Our false bottom does not have any protrusions.
I wasn't clear: The dip tube that goes all the way to the center is a protrusion.

We choose to have the pick up tube draw from the center to promote a good flow through the grain bed and reduce the chance of channeling towards the side walls.
I don't think you'd need to do that given the ledge the false bottom sits on (like Blichmann) which eliminates side wall shunting. Not having the large dip tube go 1/2 way across the bottom makes mashing in / stirring easier (IMHO).

As I said before, both are nicely built kettles. Always good to see more options for brewers!

Cheers,

Kal
 
my kettles will be arranged like kal's (bk, mlt, hlt, from left to right). in hindsight, i wish i would have placed the sight glass for the hlt on the left side of the kettle. this would more or less place the mlt and hlt sight glasses adjacent to one another, very easy to match flow rates while sparging.
 
Where did you get that drip tray? I think it's just what I need for my keezer. Love your build thread by the way.
 
Where did you get that drip tray? I think it's just what I need for my keezer. Love your build thread by the way.

kegconnection. they make them for two thru six tappers:

http://www.kegconnection.com/wall-mounts/

went with this model since i can 'sandwich' the vertical surface of the tray (the one with the holes) in between the rough and finish wood of my keezer collar. seems like a very solid support. can't take all the credit for finding them, i blatantly stole the idea from GrainToGlass and his keezer build:

https://www.homebrewtalk.com/showthread.php?t=515869
 
my kettles will be arranged like kal's (bk, mlt, hlt, from left to right). in hindsight, i wish i would have placed the sight glass for the hlt on the left side of the kettle. this would more or less place the mlt and hlt sight glasses adjacent to one another, very easy to match flow rates while sparging.


Now that's a good idea! That might need to be implemented.....
 
kegconnection. they make them for two thru six tappers:

http://www.kegconnection.com/wall-mounts/

went with this model since i can 'sandwich' the vertical surface of the tray (the one with the holes) in between the rough and finish wood of my keezer collar. seems like a very solid support. can't take all the credit for finding them, i blatantly stole the idea from GrainToGlass and his keezer build:

https://www.homebrewtalk.com/showthread.php?t=515869


Thanks for the link. I will be purchasing immediately.
 
12/22/2015 update

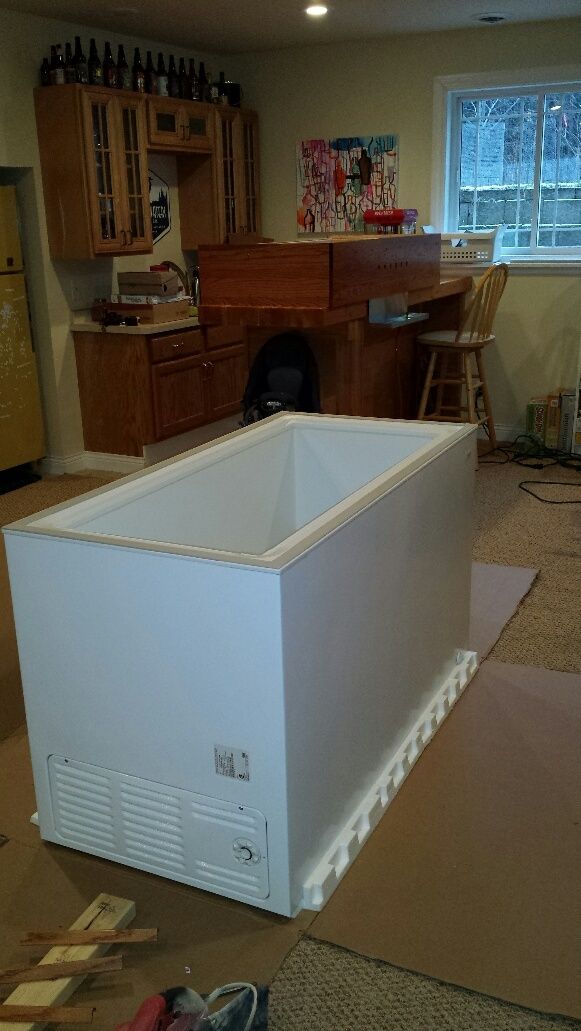
took some time off from work in the afternoon to make some headway on the keezer. i found out some relatives will be coming over for dinner on christmas eve and it will be nice to not have this naked chest freezer sitting in the middle of the room.

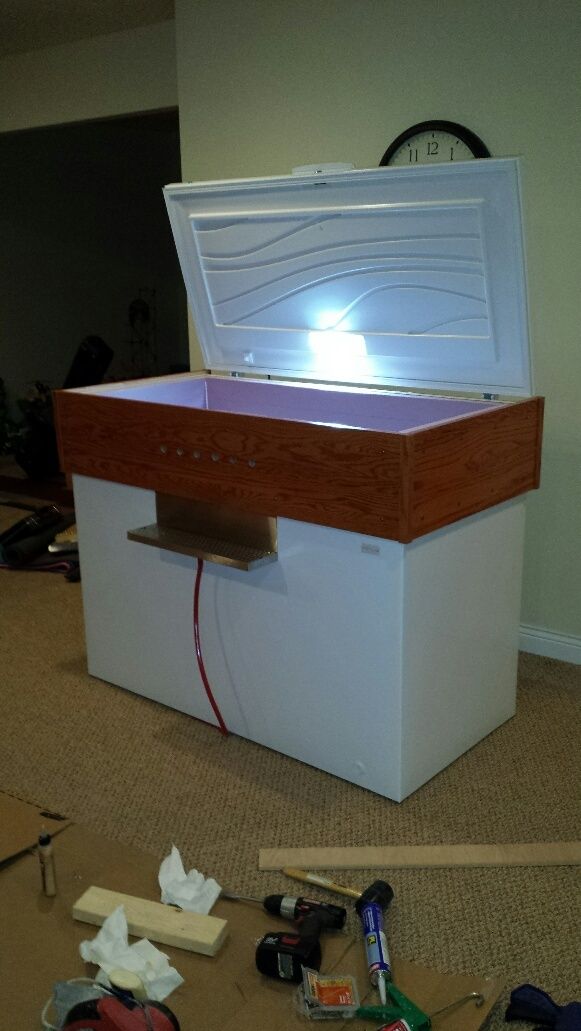
first step is to remove the lid. i put some wire in the hinges so once it is removed, they don't accidentally snap back and rip my face off my skull:

20151222_133300_resized_zps6h4dhkn3.jpg


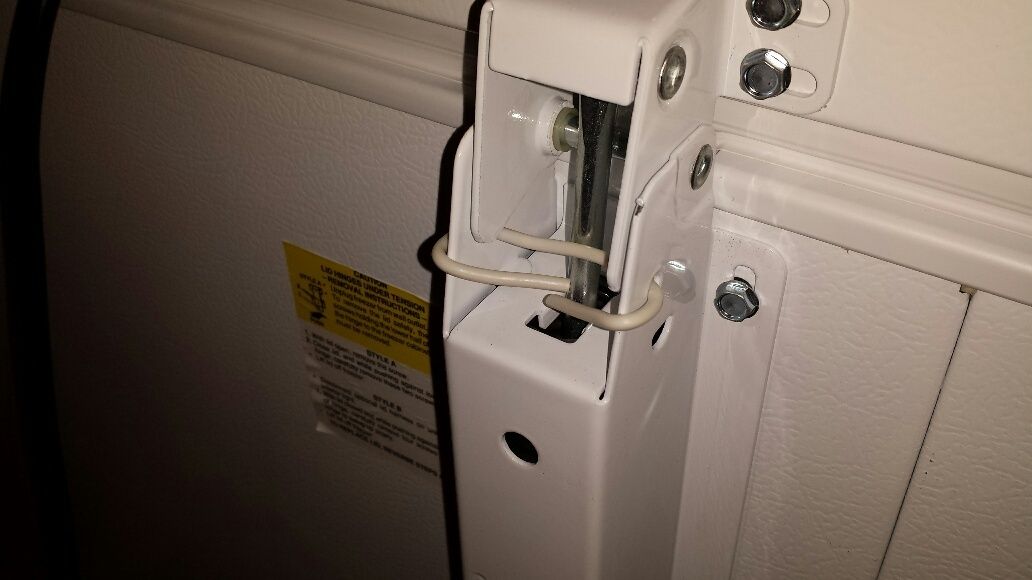
hinge bolts removed. they jumped back a bit, good thing i had that wire in there:

20151222_133447_resized_zps2jddyaao.jpg


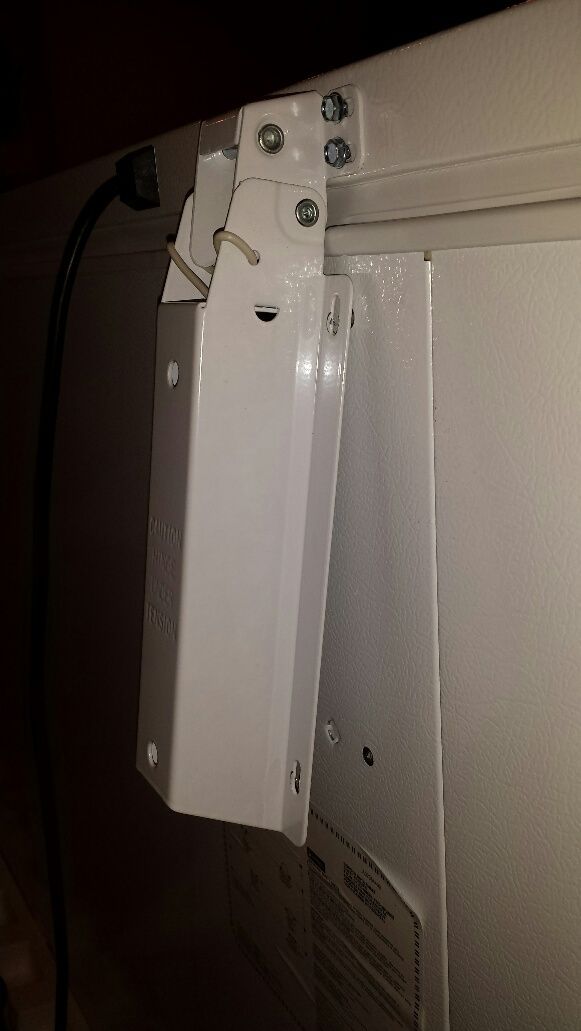
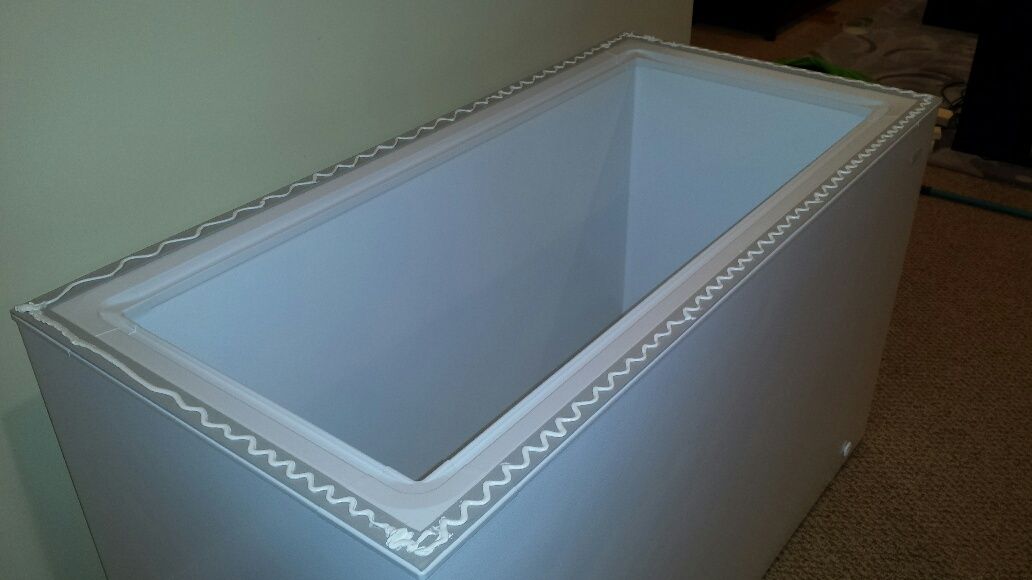
and the lid removed:

20151222_134342_resized_zps0sciddme.jpg


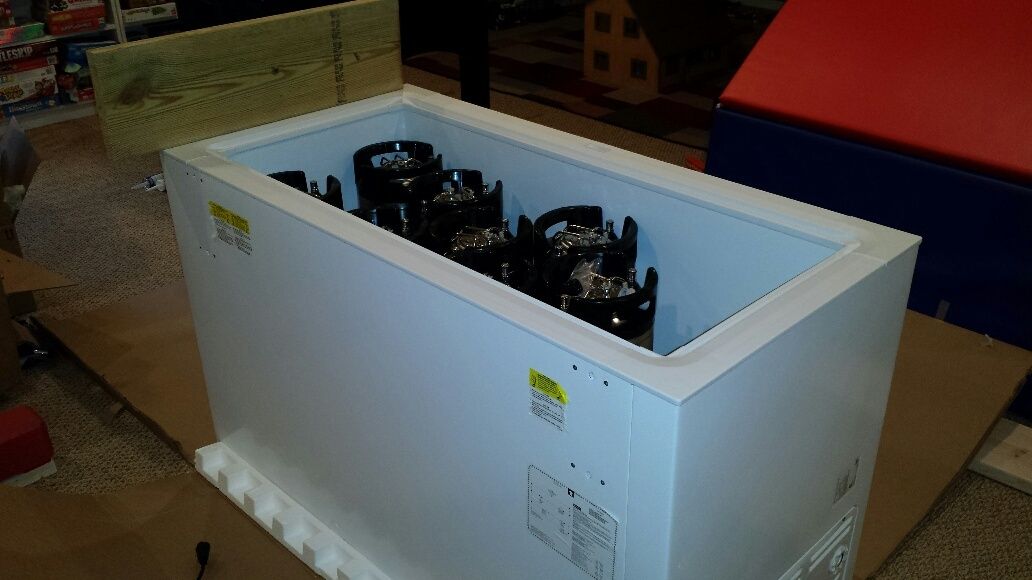
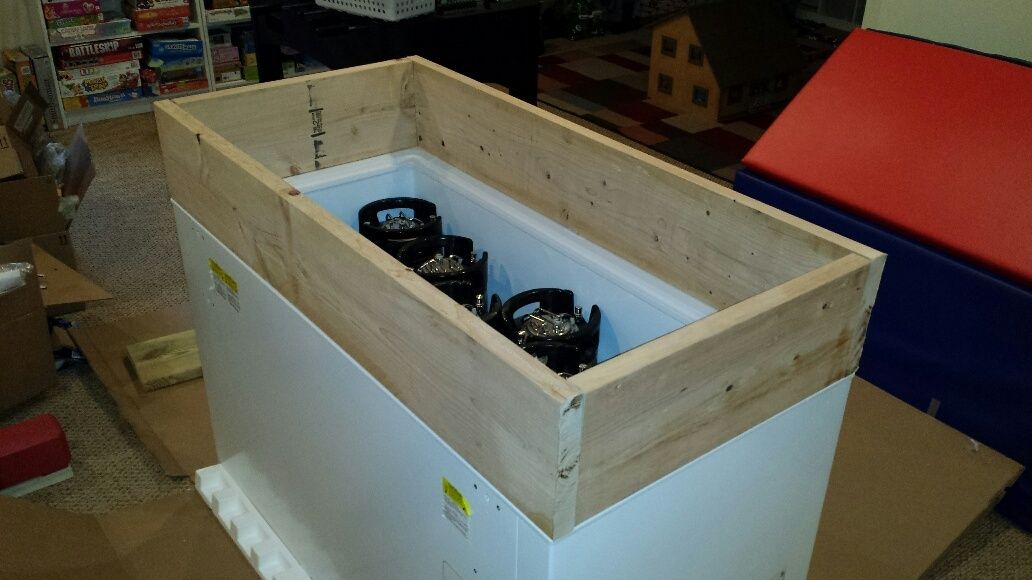
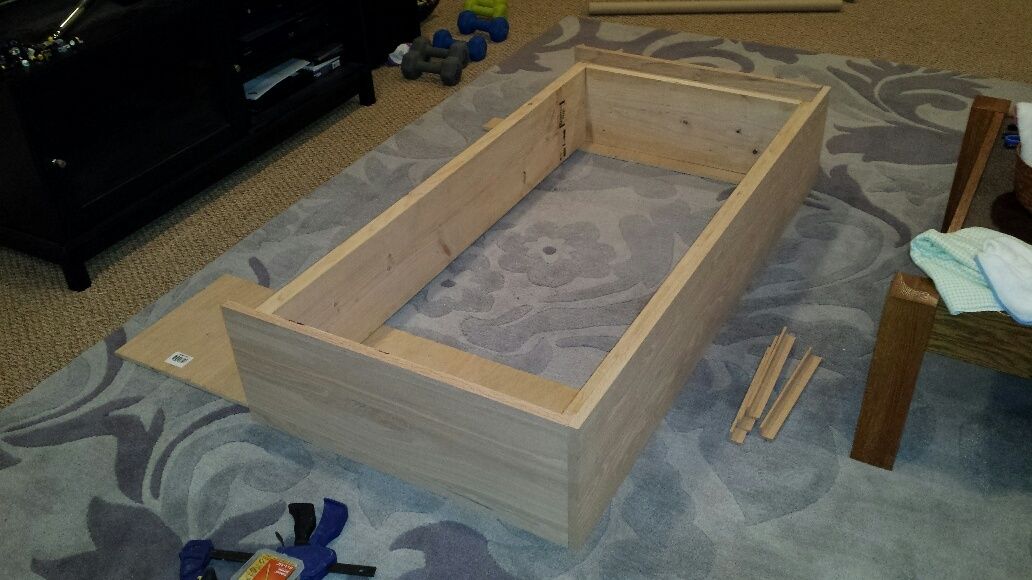
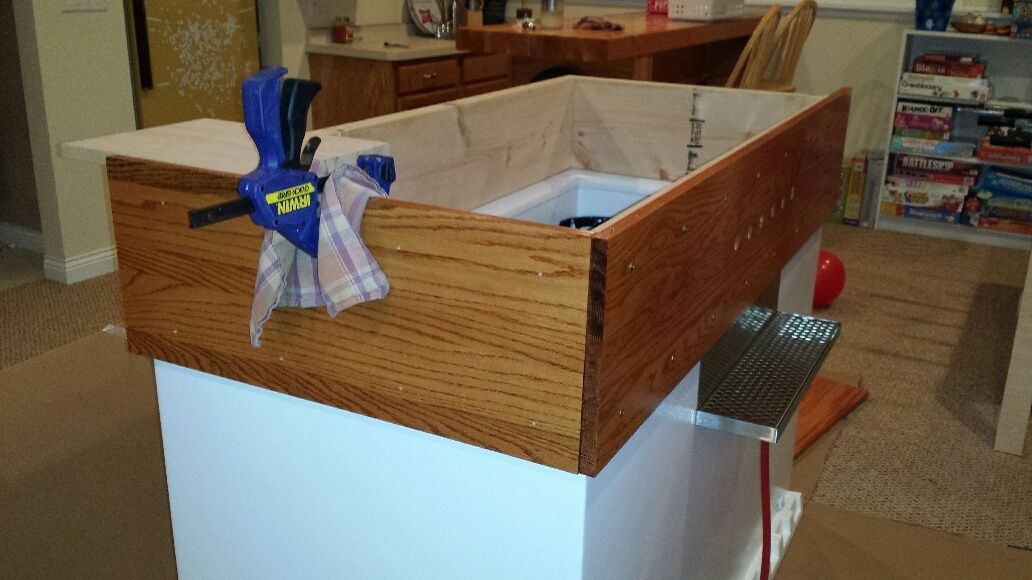
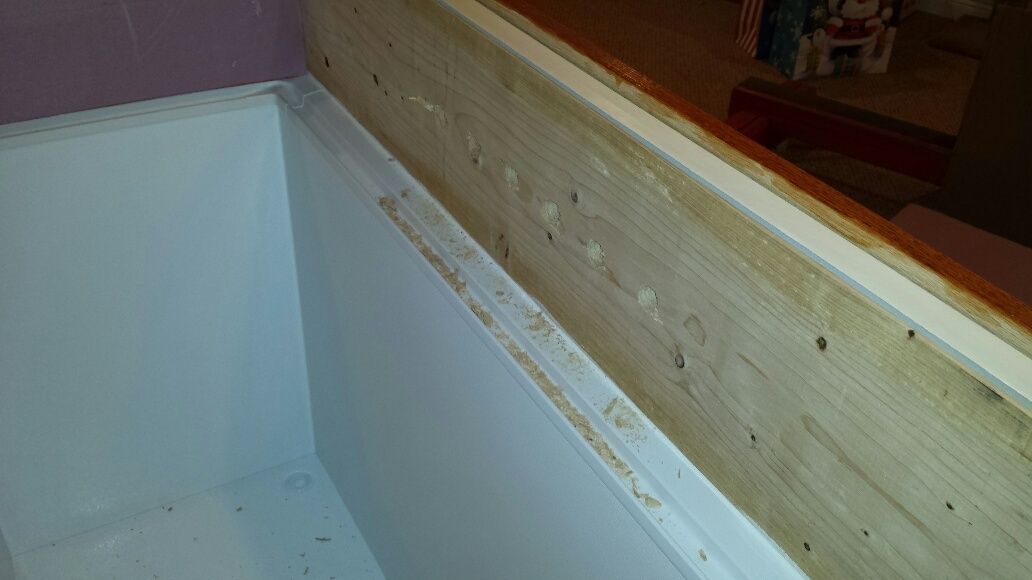
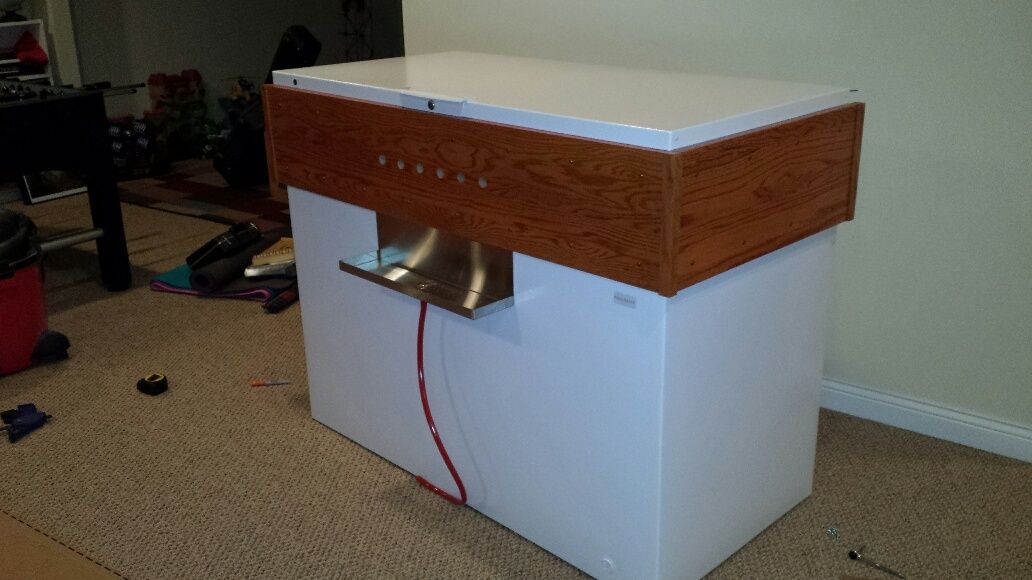
i went with 2x10 for the collar, this will allow me to put two kegs on the compressor hump. collar pieces cut and test fit in place:

20151222_143130_resized_zpsvnfbl31e.jpg


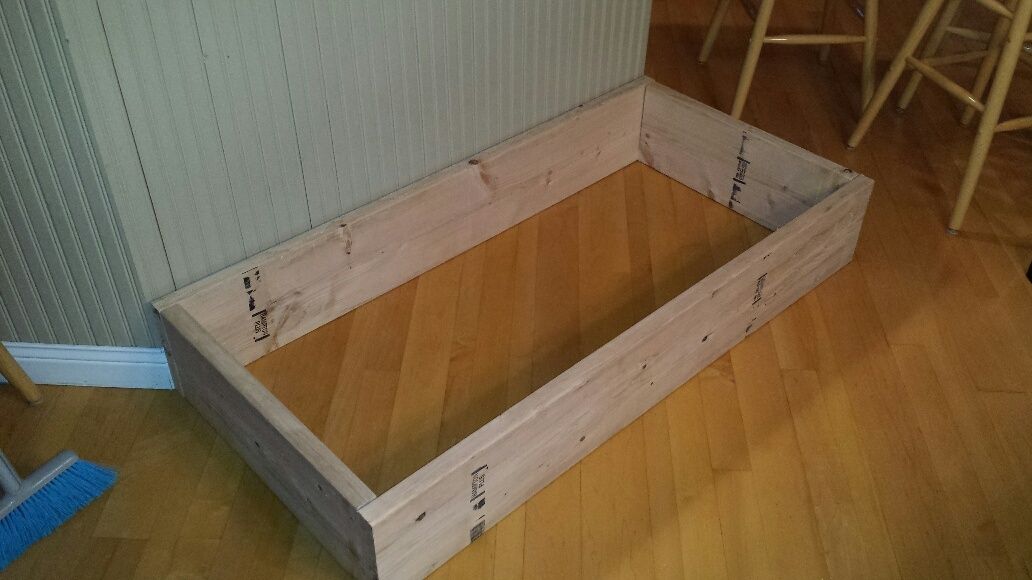
screwing the collar together. i needed a firm work surface so the breakfast bar in the kitchen was drafted:

20151222_144614_resized_zpsvws5pkro.jpg


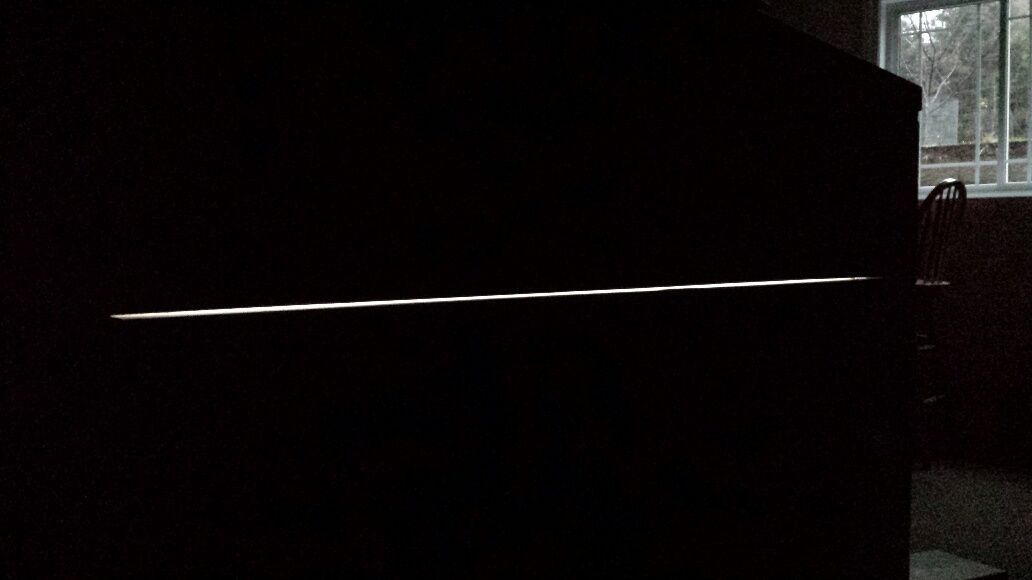
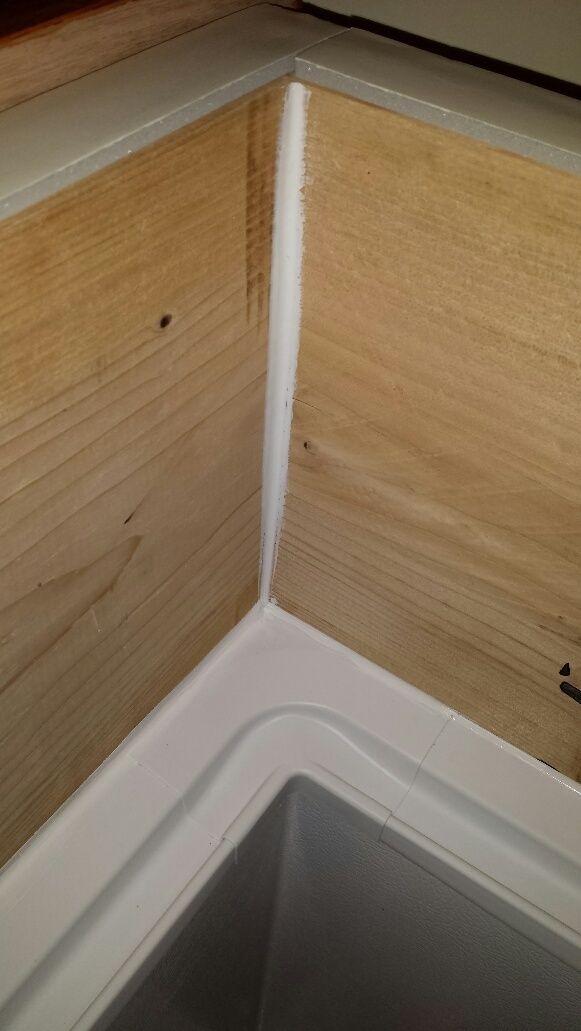
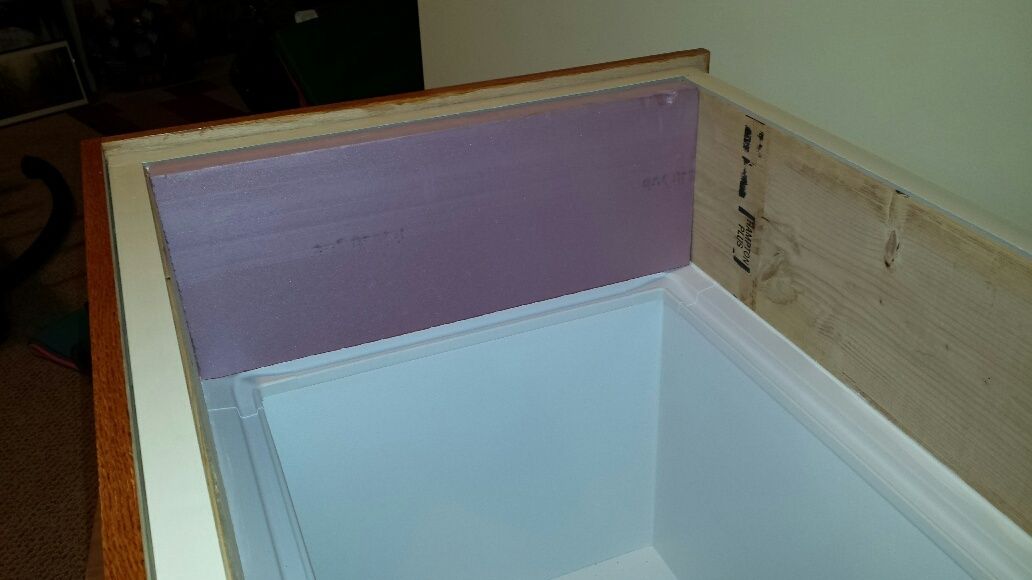
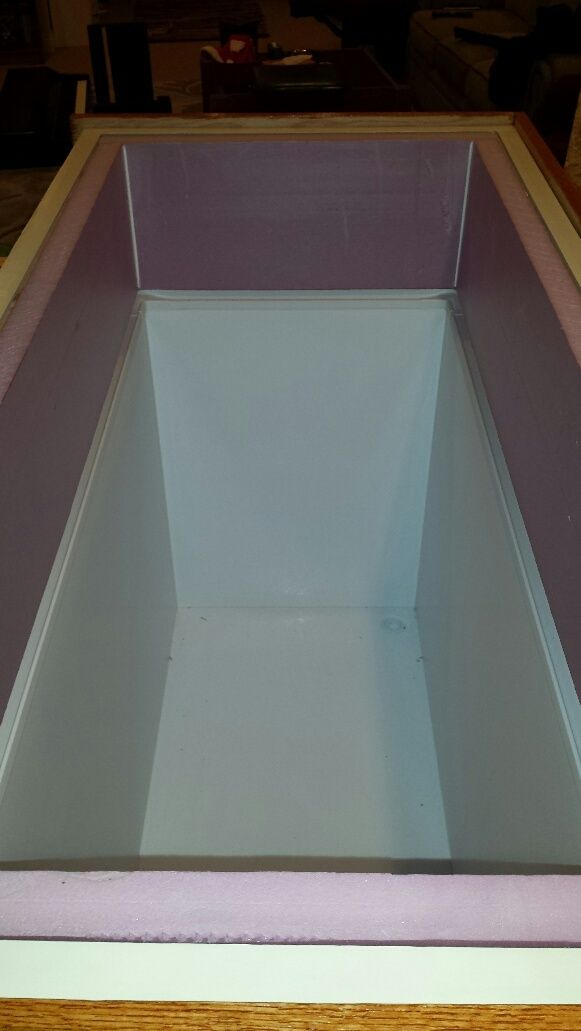
i put the screwed together collar on the freezer for a test fit. sort of a crappy photo but with the lid light on, you can see a pretty decent gap between the wood and the freezer body:

20151222_160613_resized_zps9shtfeuk.jpg


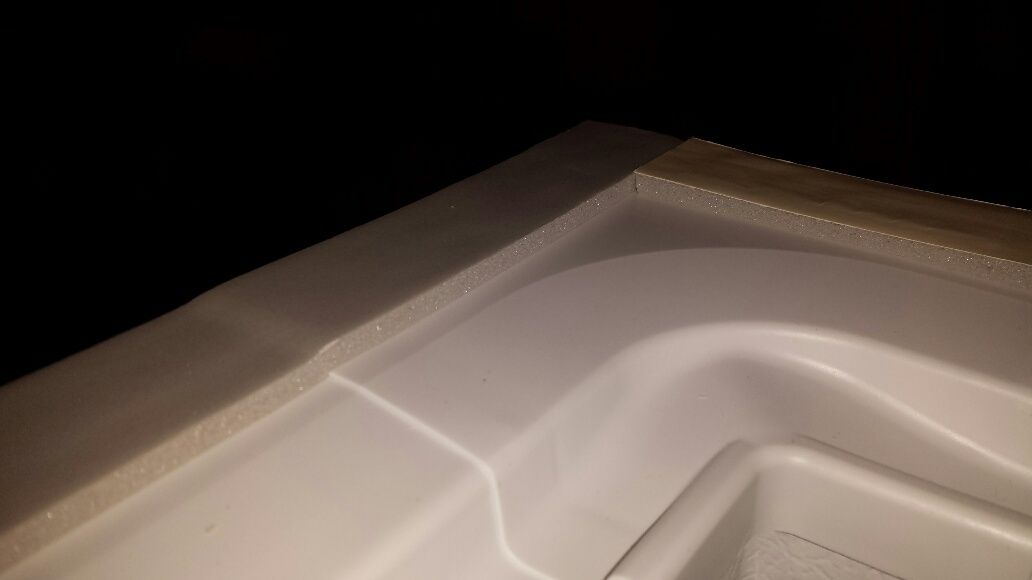
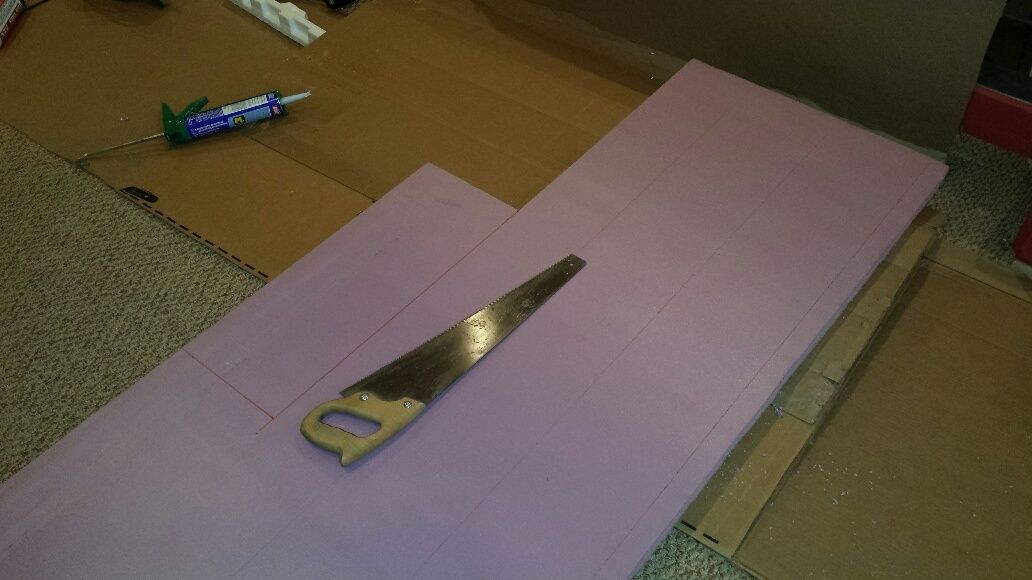
solution: adhesive strip foam!

20151222_161403_resized_zpsgs1ibmhx.jpg


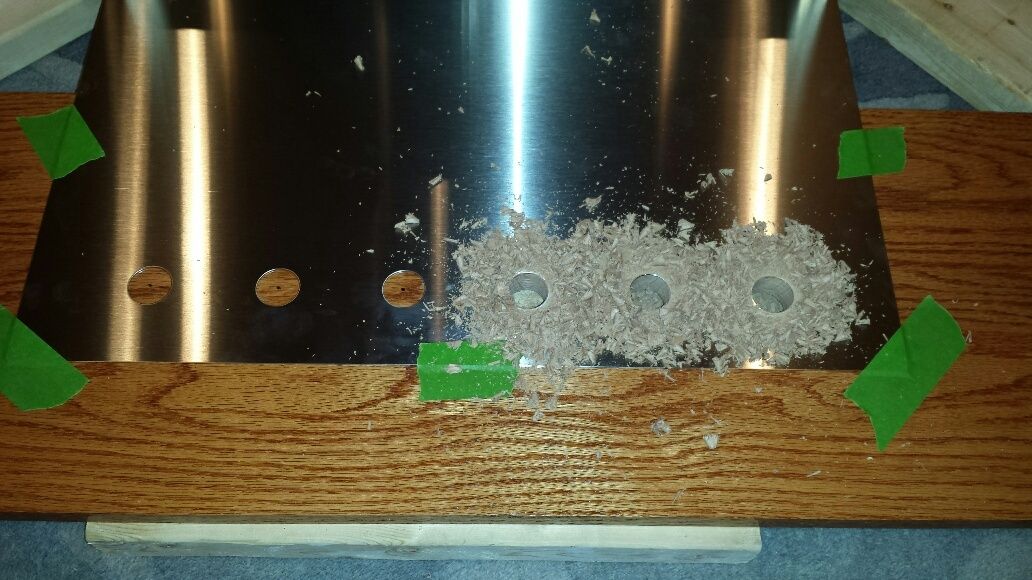
now time for the finish wood that will cover the rough 2x10 collar. i'll need 1x12 to get decent coverage over the rough collar. some high tech jig work to get the cuts marked:

20151222_164102_resized_zpsekyln9ke.jpg


and a high-tech cutting setup in the garage:

20151222_172304_resized_zpsknazohz2.jpg


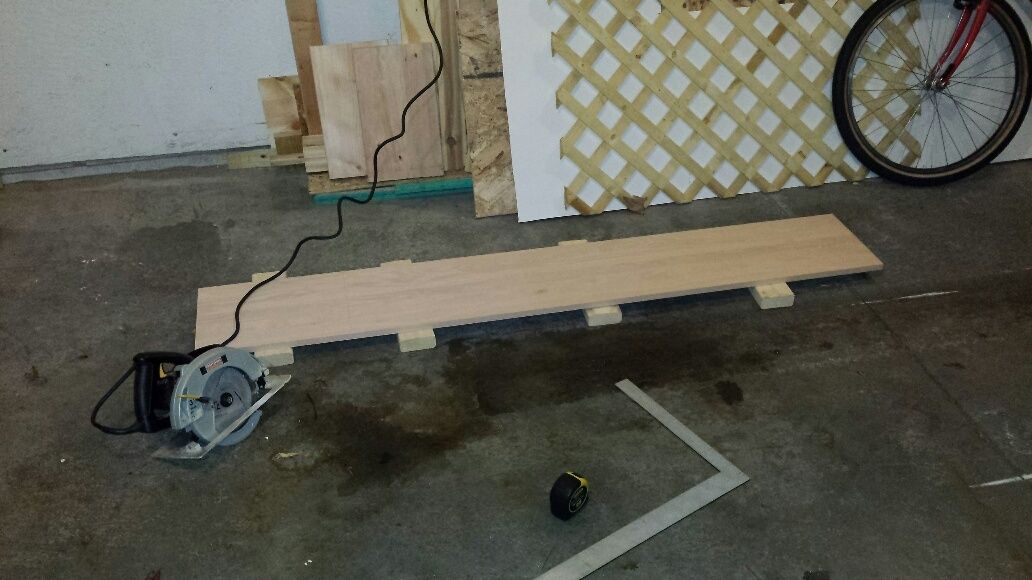
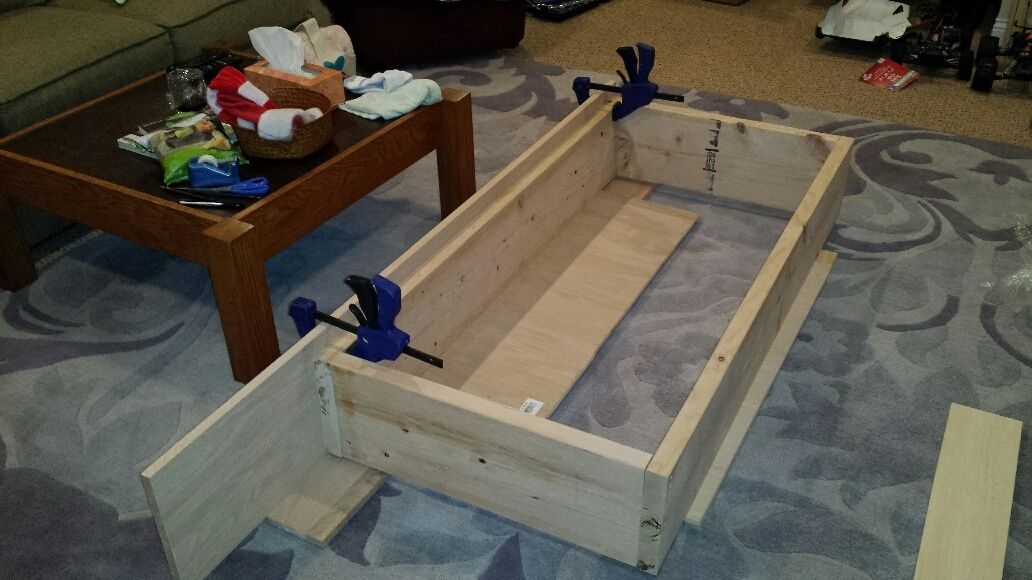
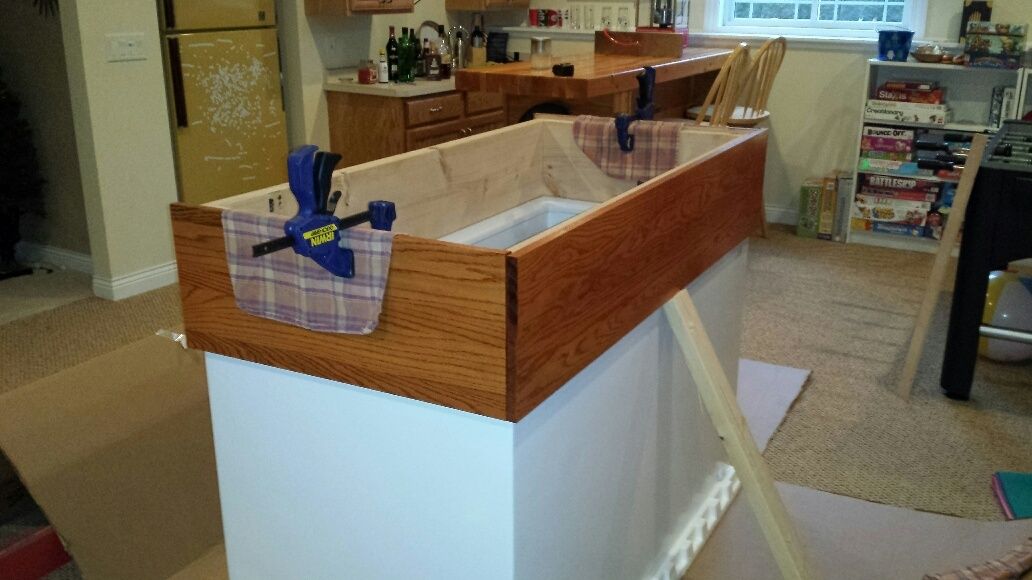
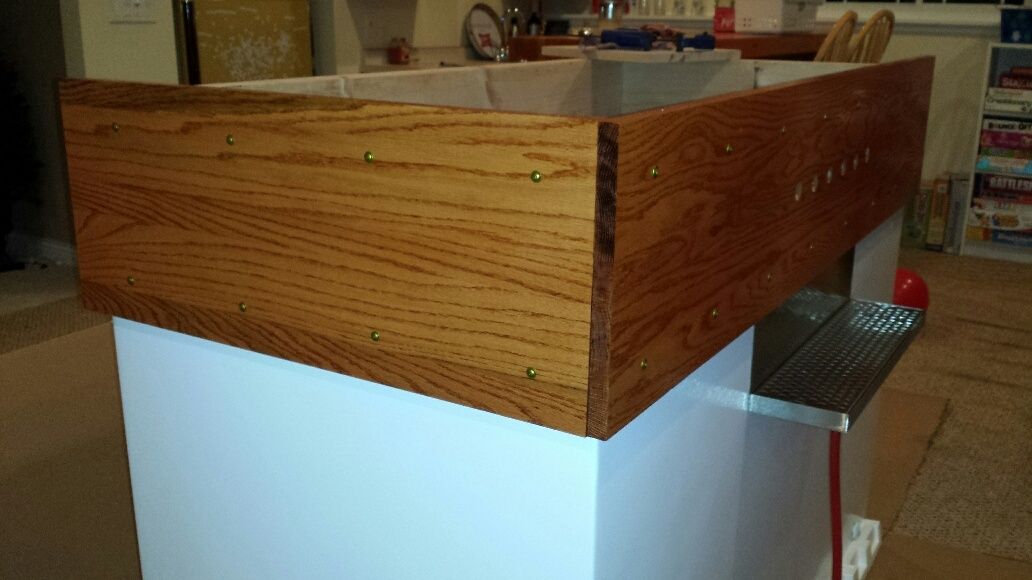
everything cut and test-fit together:

20151222_175742_resized_zpspzdvqw7k.jpg


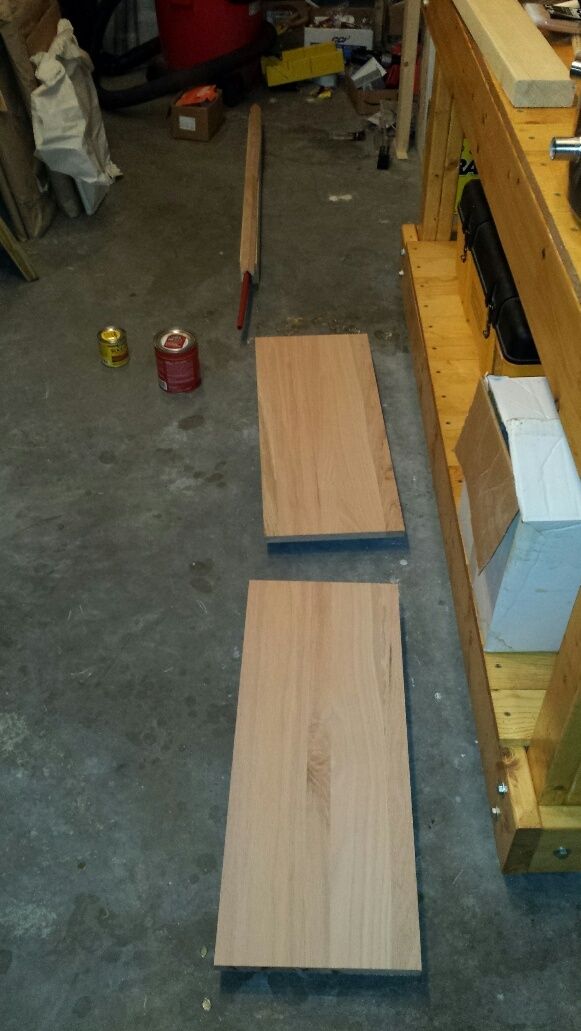
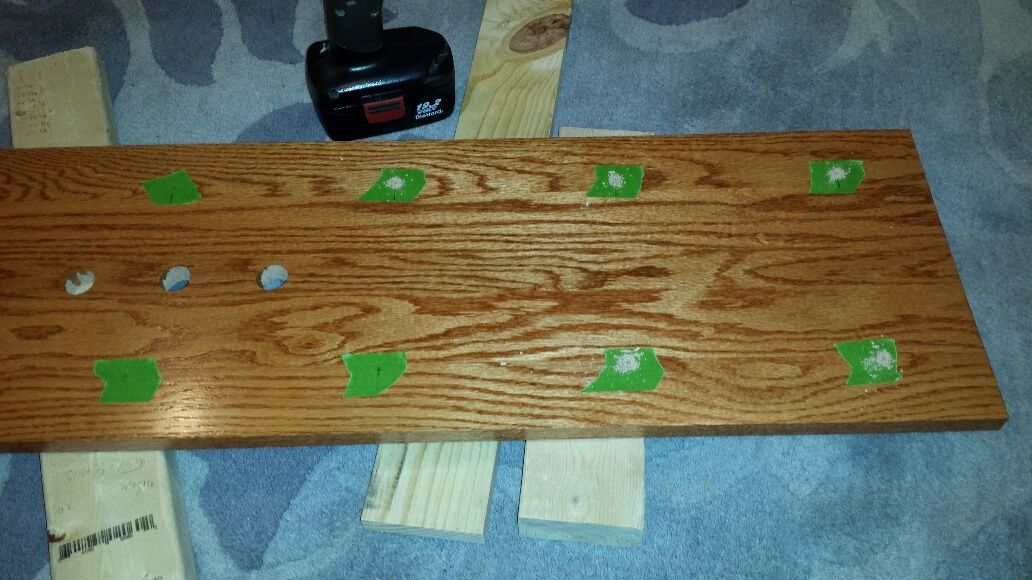
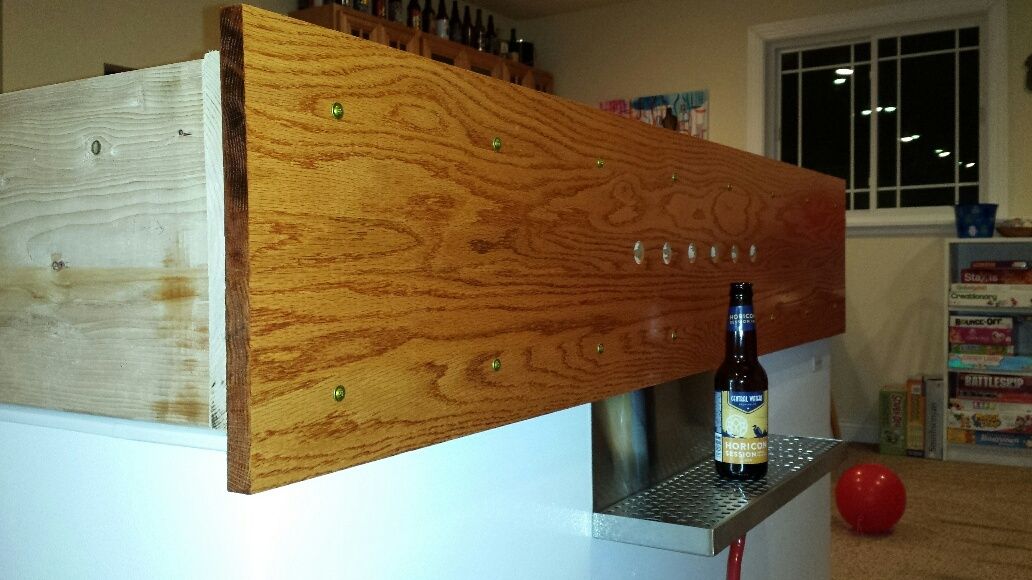
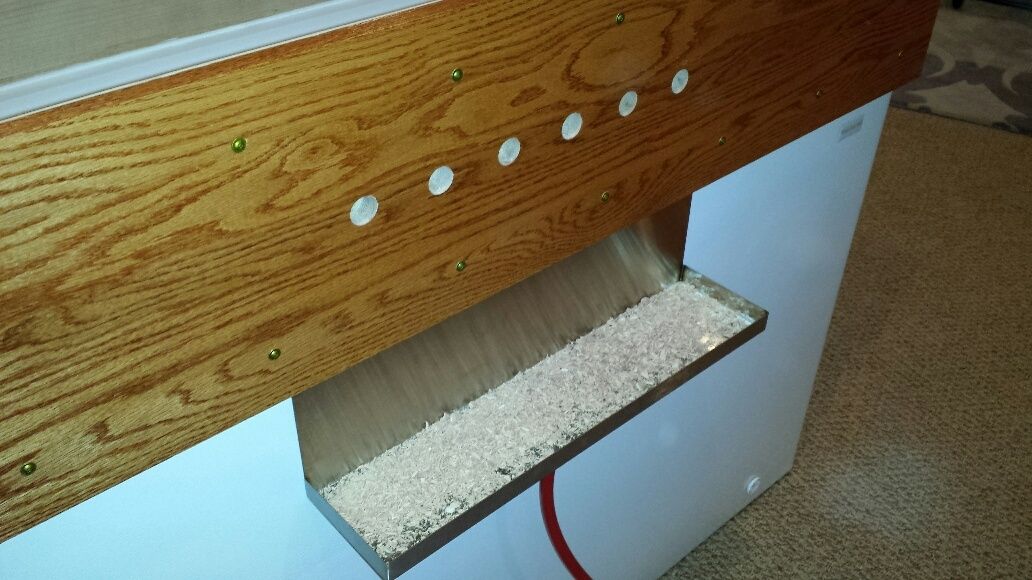
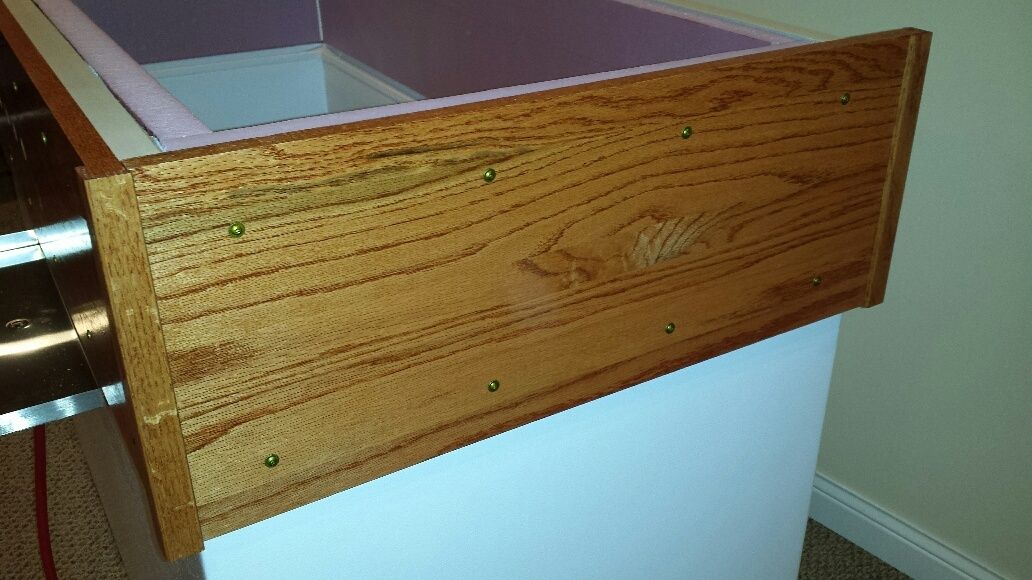
i went with oak since it was 20% off at menards. also grabbed a little stain, for my high-tech staining lab. in the background are some oak outside corners for finishing off the collar. i bought a piece at menards but came home to discover a scrap piece of outside corner left over from my bar build. just enough length!:

20151222_182947_resized_zpsr1h3m6qq.jpg


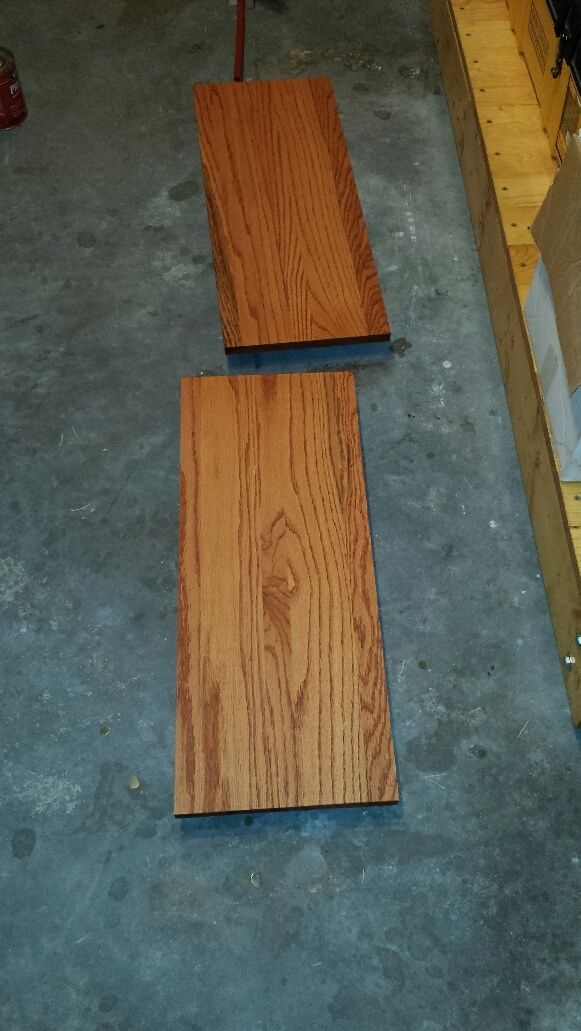
and stain applied, i went with 'gunstock' for the color. this will dry overnight and then it will be time for a couple coats of poly:

20151222_201603_resized_zpsatswteff.jpg
 
12/23/2015 update

cool and moist here, taking forever for the stain to dry. i was hoping to apply some poly in the morning but ended up waiting until about 2 pm. and was also hoping to apply a second poly coat last night but it just wasn't dry enough down in the basement. poor air movement as well. i finally decided to bring the oak upstairs into the sun room. not that it will be sunny but there is a ceiling fan in there. good air movement plus it is warmer than the basement.
 
12/24/2015 update

merry christmas, everyone! keezer build continues! poly dried overnight so i sanded and did a test fit:

20151224_083846_resized_zps1dbnozsy.jpg


looking pretty good so time to drill holes for the shanks. careful measuring and temporary tape to hold everything in place:

20151224_085524_resized_zpsnroh2jkc.jpg


time to let the drill bit fly:

20151224_090511_resized_zpsppqjsmdo.jpg


after cleaning everything up, time for some poly:

20151224_095010_resized_zpslqknutqg.jpg


i let it dry in the basement for only a couple hours before moving to the fan-powered sun room. it is also much drier here today and the poly dried extremely fast. by 2 pm, i was ready to do some more work. i wanted to attach the finished oak to the rough collar with some pan-head cabinet screws but didn't want to risk a crooked screw or splitting the wood or hitting a know or similar so i decided to pre-dill the oak. i put more temp tape on the wood to mark the hole locations:

20151224_160924_resized_zpszfcyrkct.jpg


drilling away:

20151224_161604_resized_zpse9fzekhx.jpg


finished holes:

20151224_162048_resized_zps3xmnybra.jpg


and another test fit:

20151224_164831_resized_zpsgpicz1mv.jpg


drip tray temporarily supported. the vertical face is slid between the rough collar and finish board, with the drilled wood holes lining up with the pre-drilled holes in the stainless steel face:

20151224_165404_resized_zpsk0iwtsgj.jpg


installed:

20151224_170603_resized_zps3r4sinci.jpg


a test fit of one of the sides:

20151224_170822_resized_zpspwnhh0qk.jpg


and all screwed in:

20151224_171226_resized_zpsk1sojkko.jpg


repeat for the other side and throw the lid on there:

20151224_171723_resized_zpsttruqkxa.jpg


i stil have some corner oak trim to install. pieces are all cut, stained and coated in poly, just need to glue them on. also need to tweak the hinges a bit, lid gets to close to the front face, not the best seal on the lip of the collar.
 
12/28/2015 update

got home from some out of town holiday action and immediately jumped back into the keezer. i removed the lid and collar, setting the collar on the bar in the background. that collar was heavy with the oak on there, plus i had to be careful of the drip tray:

20151228_140207_resized_zpsfh169kio.jpg


more or less slid into the final position:

20151228_141114_resized_zpsvq0h8bx6.jpg


laying down some adhesive caulk:

20151228_141932_resized_zpspckhhlwt.jpg


collar set in place, caulking the joints in the rough lumber as well as between the lumber and the keezer top:

20151228_143525_resized_zpsowzk23zq.jpg


i had some 1.5" xps foam board left over from my basement bathroom project, began cutting to pieces for insulating the collar:

20151228_145526_resized_zpsl3vbchuj.jpg


first piece in position. i used pl300 foam board adhesive to attach the foam to the collar. it was a tight friction fit so the adhesive might be overkill but i had some old adhesive lying around:

20151228_145534_resized_zpsrj3yrkme.jpg


before getting all the foam on, i decided to bore out the shank holes in the rough collar lumber. might be a hassle to do once the foam is on there, not sure how well the speed bit will cut the foam:

20151228_150928_resized_zpsjgiavkmq.jpg


20151228_150935_resized_zpsyy49o8rl.jpg


final foam pieces in place, with some caulk on the foam seams:

20151228_154244_resized_zpsawpr501x.jpg


oak outside corner trim pieces glued onto the collar corners:

20151228_160655_resized_zpspq0knmuh.jpg


and done! (for now):

20151228_161104_resized_zpsqoj2hche.jpg


20151228_161949_resized_zpshbg239uf.jpg
 
Can't believe I haven't came across your build thread until now. I'm super jealous that you're building an electric single-tier! That's one of my dreams when I have enough funds and the right space. Great looking keezer as well. I'm glad I was able to pass on some inspiration!

:mug:
 
1/5/2016 update

happy new year! no building today but got some goodies in the mail, namely my new mlt from spike! i already covered most of their new v3 kettle features with the hlt i got a few weeks ago but some new stuff with this one. it arrived in the same packaging as the hlt:

IMG_1887_zpsvkl1loaa.jpg


extra piece of cardboard on top when i opened the box:

IMG_1888_zpsgbtv41hy.jpg


cardboard was padding for the false bottom:

IMG_1889_zpspepbkru6.jpg


this thing is heavy! i saw some recent threads where folks were complaining about warped false bottoms. this piece from spike is bombproof. very little volume underneath:

IMG_1890_zpsjdtmg6vh.jpg


a nice d-ring for lifting the false bottom:

IMG_1891_zpso4xapx8b.jpg


the support 'ring' in the middle forms an additional filter for any grain pieces that sneak through the main filter:

IMG_1892_zpsinicrloc.jpg


lid wrapped in plastic again:

IMG_1893_zpsrvz7b9mo.jpg


shipping tube for the sight glass, same as the hlt:

IMG_1894_zps05hi0q46.jpg


sight glass:

IMG_1895_zpscn3fsbjh.jpg


same issue as with the hlt, very faint volume markings. i saw in the v3 thread that spike will be replacing these for those interested:

IMG_1896_zpstf1g3fhu.jpg


additional smaller tube in the box. there wasn't one of these with the hlt:

IMG_1897_zpsjkvcqukg.jpg


tube had the pickup tube:

IMG_1898_zpsja9kett0.jpg


clean cuts, smooth welds:

IMG_1899_zpslxcf609y.jpg


IMG_1900_zpskaynjrq7.jpg


friction fit for easy removal:

IMG_1901_zps9uk3dmcz.jpg


test fit in the false bottom opening:

IMG_1902_zpsjwpin9ul.jpg


same packaging as before, double-wall box with foam bottom:

IMG_1903_zpsklrxp3xv.jpg


and here it is, all wrapped up:

IMG_1904_zpsrdzu6y2c.jpg


handle detail:

IMG_1905_zps3nylxmri.jpg


excellent welding:

IMG_1907_zps5xn3jvux.jpg


internal volume marks:

IMG_1908_zpsdfmgbh9g.jpg


well, we have a problem. went to set the false bottom in the kettle, no dice. huh? i pulled out the tape measure, it is about 17.5" internal diameter on the kettle but about 19.25" diameter on the false bottom. a look at spike's website revealed this is the diameter for the 30 gallon kettles. whoops! i e-mailed spike about the issue and an hour and half later, i get a response. they apologized and are getting the appropriate false bottom mailed out tomorrow, with a return label for shipping the 30 gallon model back. a little bit of a hassle but i am months away from firing this thing up anyway. can't complain about their customer service, very responsive and professional:

IMG_1909_zpsusp8s6r2.jpg


i set the pickup tube in there just for fun, pretty cool shot. the pickup tube is the correct length for a 20 gallon kettle, only the false bottom had an issue:

IMG_1910_zpseyjqtxtu.jpg


sight glass test fit:

IMG_1911_zpspi9suexr.jpg


my htl had a couple scratches on the exterior but this one is flawless:

IMG_1912_zpspkvpbc6m.jpg


and hanging out with the brother (sister?). the mlt didn't come with a custom tag like the hlt, i presume they removed it before shipping:

IMG_1914_zps6zu4cigu.jpg


bling:

IMG_1917_zpsaepilok9.jpg
 
1/15/2016 update

the replacement 20 gallon false bottom from spike showed up today. i was expecting a very flat box but it was actually a cube:

IMG_1918_zpsonfysykq.jpg


packaging wasn't as nice as the kettle but got the job done. i had some concerns it may have gotten bent during shipment but no worries, flat as a pancake! the return label for sending back the 30 gallon false bottom was also included:

IMG_1919_zps5pgrcnnh.jpg


size now etched into the false bottom :)

IMG_1921_zpsrn2vcvhw.jpg


resting on top of the 30 gallon false bottom for a size comparison:

IMG_1923_zpsby8pwjea.jpg


resting inside the kettle. sits nicely on the stepped edge and the extra 'ring' of mesh underneath adds extra support in the center of the kettle:

IMG_1924_zpsnoyh9ihi.jpg


photo of the pickup tube hole, very little dead space underneath:

IMG_1925_zpsmsfmdgjp.jpg


and a shot with the pickup tube inserted:

IMG_1926_zpsbmzmmspg.jpg


closeup of the pickup tube inserted:

IMG_1928_zps7swldybe.jpg
 
That looks to be really well made. I'm very jealous. I almost regret purchasing a single vessel system now.
 
1/22/2016 update

my brew panel kit from electric brewing supply showed up today!

20160122_183425_resized_1_zpsg3k1bps3.jpg


two generic boxes but well taped. the boxes were picked up at electric brewing supply at about 4:15 pm on thursday and bounced through six cities before arriving at my home at 2:30 pm on friday. pretty wild ride! smaller box was just the enclosure:

20160122_183537_resized_1_zpsqcq1cjfu.jpg


the scorch marks are from the cnc machine they use to pre-cut the enclosure. it was only $50 extra to have them cut all the holes. this also included the taps for the receptacles on the bottom of the panel and the heat sink. plus all the openings are straight, even and true. definitely worth $50. close-up of the bottom and top:

20160122_183532_resized_1_zpso6phngie.jpg


20160122_183545_resized_1_zpsio4sgxsq.jpg


the silver 'bars' in the left opening of the photo above is actually the din rail inside the enclosure. the panel ships with the din rail already mounted to the back panel:

20160122_183625_resized_1_zpsdlfzwr0z.jpg


the baggies contain the key for opening the enclosure and mounting hardware for the enclosure. a shot of the back:

20160122_183851_resized_1_zps9gp9nee3.jpg


and a shot of the inside door. they cleaned up some of the cutting remains at the shop:

20160122_183631_resized_1_zpsjtfqxxes.jpg


on to the second box:

20160122_183955_resized_1_zpszriocybp.jpg


kit includes a printed copy of the wiring guide, in color and ring bound, which allows the book to remain open on a given page without closing on itself:

20160122_184009_resized_1_zpsx6otdkok.jpg


20160122_184018_resized_1_zpsbs2okoie.jpg


there were two smaller boxes in side the larger box:

20160122_184049_resized_1_zpsbbovkm0f.jpg


well packed with shipping peanuts:

20160122_184143_resized_1_zpsagkcu3vw.jpg


first box contents. terminal block components, indicating lights, switches, circuit breakers, ssrs and contactors:

20160122_184412_resized_1_zpspio5fjvs.jpg


electric brewing supply actually have their name printed on the boxes and components:

20160122_184430_resized_1_zpsz4uua4ew.jpg


second box of goodies. pids, timer, poly braid, shrink tubing, extra contact blocks, name tags and temp probe components. very nice feature of the 'complete' diy kit they offer, temp probes are included:

20160122_184629_resized_1_zpskgylirlr.jpg


there were some items shipped loose in the larger box. plugs, receptacles, dryer cord and an extra enclosure key:

20160122_184808_resized_1_zpsbfqwwvor.jpg


another loose item in the box, the heat sink. my order was slightly delayed and they indicated they were waiting on heat sinks. last communication was that the heat sink would ship separately but looks like they came in:

20160122_184835_resized_1_zps9qfnr74c.jpg


20160122_184857_resized_1_zpsd4h9fgxd.jpg


final box, the wiring kit. kit comes with multiple color/size wire for easy circuit identification. also includes all the spade terminals:

20160122_185002_resized_1_zpszbqgtkqh.jpg


20160122_185031_resized_1_zpsxka0ipac.jpg


20160122_185115_resized_1_zpszrbovv96.jpg


and a test fit of one of the pids, just for fun. i needed to file a little more welding debris to get it to fit, looks like i'll have a little clean-up on all the openings:

20160122_185522_resized_1_zpsjds8hbsb.jpg


i was hoping the door devices would cover up the scorching such that i wouldn't need to paint the enclosure. the outlets, heat sink and switches cover it up but not the pids/timer. looking at getting some powder coating done.
 
I started on my kit from Electric Brewing Supply about a week ago, but had to stop to go back to work...won't be able to get back to it for 3 months now.:( I was missing a few parts in my kit, called them up and it was sent out that day.....those people are great! My heat sink should be arriving at the house in the next few days. Keep the pictures coming, I'm interested in how your panel build goes.

Scott

mine actually came with some extra parts. it is almost as if they shipped me a 50 amp kit. for example, i have an additional 32 amp circuit breaker.
 
1/24/2016 update

while deciding what i want to do for painting the enclosure, i figured i would start some type of work on the control panel so i decided to mount the various components to the back panel. step one was removing the back panel from the enclosure, to make the work a little easier:

20160124_144124_resized_zps1xq5n0e4.jpg


back of the back panel, showing the tapped din rail connections:

20160124_144134_resized_zpswjv7cv13.jpg


the parts to be mounted:

20160124_144607_resized_zpslem8jssn.jpg


progress shot. mounted the main contactor, boil/hlt contactors, main breaker, control power breaker and safe-circuit relay:

20160124_150508_resized_zpszi7wds2g.jpg


the end covers don't quite on the terminal blocks:

20160124_150812_resized_zpscus0v30d.jpg


the two 'nubs' on the end cover are supposed to rest in the two round 'holes' near the top of the block. they are filled with plastic so a little drilling was needed to make them functional:

20160124_150823_resized_zps5po708v4.jpg


terminal blocks mounted:

20160124_153220_resized_zpsovi9utn9.jpg


close-up of the jumper bars and screws. note the 'barrier' insert between the 3rd and 4th block, to ensure isolation between the two sets of blocks:

20160124_154525_resized_zpsv7njvye5.jpg


and all the components mounted. extra parts in the foreground:

20160124_162626_resized_zpsigidjabc.jpg


you may notice some slight layout differences between the last photos and the final. it wasn't until i was finished that i noticed i had completes the 50 amp layout (mine is a 30 amp panel). it would have worked but i would have had a spare circuit breaker on the din rail, as well as the terminal blocks being in some less than convenient locations. so i had to take 20 minutes or so to rework some of the layout. :p
 
That's gonna be a beauty! It's funny how we all have different talents. I can make a control box with all the cut outs, and holes for everything to fit nice, but I can't wire the thing to save my life! So I am selling the original one I made and I bought Kal's box already wired to fit my needs. You bought a box and had them make the holes and cut outs, and you obviously have mad electronic skills, and your gonna wire that box up in no time. Heck it looks like you have enough electronic stuff there to wire up New England on a separate grid!

Lots of luck wiring her up!

John
 
I don't understand the cut quality... In the pics it looks like there is ragged material on the edges. Is that correct?

the pic is a little crappy but there is some slight weld slag (is that the term?) on the edge of the cut. i mean, it isn't like a sawtooth but it also isn't perfectly smooth either. as i understand it, this is fairly common with plasma cutters, especially on 'cheaper' machines. i wouldn't care about the rough edge but the devices don't fit in most of the holes. and by 'don't fit' i mean it is a very tight squeeze. a minute or so on each hole with a hand file and it should be fine.
 
1/26/2016 update

i filed down the rough edges on the cutout in the panel face. the outlets on the bottom are large enough to fit everything just fine and the top openings are more than large enough for the ssrs. used a bastard file on the din openings and used a ream on the circular openings. only took about 20 minutes. and of course, i needed to do a test fitting of all the devices:

20160126_193839_resized_zpscc9fqxg4.jpg


once everything was on, the burn marks from the cutting aren't nearly as apparent:

20160126_193808_resized_zpsjui0qtzi.jpg


the lights/switches barely show anything:

20160126_193803_resized_zps2hz1ftjk.jpg


so now i have a conundrum: do i paint the panel or just leave it as? i looked into powder coating but the guy told me the metal needs to be bare, meaning i would need to chemically strip it or spend, like, hours sand blasting the thing...and i don't have a sand blaster anyway.

thoughts? prayers? anyone else just leave their panel 'rough'?
 
I built my original control box and it was beige just like yours. Here is a link to it, as it is for sale right now. I had mine powder coated and you can see in this link how great a job they did powder coating it. https://www.homebrewtalk.com/showthread.php?t=570222

I used Brothers Powder coating and if you search their link you can ship it to them and they will powder coat it and ship it back to you, if you can't find anyone around your neck of the woods to do it. I didn't sand anything. I dropped it off and they did the rest! Here is a link to their site if you want to check it out.
http://www.brotherspowdercoating.com/eng/what-is-powder-coating/

Hope this helps,

John
 
No doubt powder coating is awesome and durable. The epoxy paint that is on there is really durable but my OCD wouldn't allow those marks to be there. Personally, for a few bucks and a couple days, I would paint it. Needs a really good sand to get the substrate right. Use good paint and cure appropriately (1 week minimum).
 
I agree with Brundog, I'm such a perfectionist on stuff like this. Your spending a ton on this build as it is, and you want it done right, since you will have it basically forever. Every time you look at your control box and see the marks you will say to yourself, "I should have got it powder coated", or "I should have just went ahead and painted it". So a little sanding and some high quality spray paint and you will be very happy in the end. Powder coating is also a very good durable finish and it will be more scratch resistant. But if you scratch the spray painted surface you can still give it a quick touch up too.....

John
 
I hit mine with a coat of primer, then the same hammered metal paint that's on Kal's site. Beige/gray just doesn't do it for me. I spent a good 10 minutes staring at all the spray paints trying to figure out what finish I preferred. My vote is to invest the time for paint.
 
Back
Top