HOWTO - Make a BrewPi Fermentation Controller For Cheap

Homebrew Talk - Beer, Wine, Mead, & Cider Brewing Discussion Forum

Help Support Homebrew Talk - Beer, Wine, Mead, & Cider Brewing Discussion Forum:

This site may earn a commission from merchant affiliate links, including eBay, Amazon, and others.
Status
Not open for further replies.
this is the result i get, and i tried twice thinking it maybe a typo.


root@debian:/home/john# deb http://http.debian.net/debian/ wheezy main contrib non-free
bash: deb: command not found
root@debian:/home/john# deb http://http.debian.net/debian/wheezy main contrib non-free
bash: deb: command not found
root@debian:/home/john#

I am getting dejected. Maybe I will have to find another way out. Maybe getting this adapter is a temporary solution till i figure this wireless thing out.

Couple of things
1) I'm sorry, my mistake, I told you the wrong thing. The example you gave said "add a "contrib" component to /etc/apt/sources.list". What they ment was add that following line of text to the file located at /etc/apt/sources.list, that wasn't a bash command.
2) There is a learning curve to the linux console, the first thing I do when I get a response like that, or any command line error response, is copy and past that error message into google. When I googled your error message I was promptly rewarded with this page and it clued me in to my error.

Good luck!
 
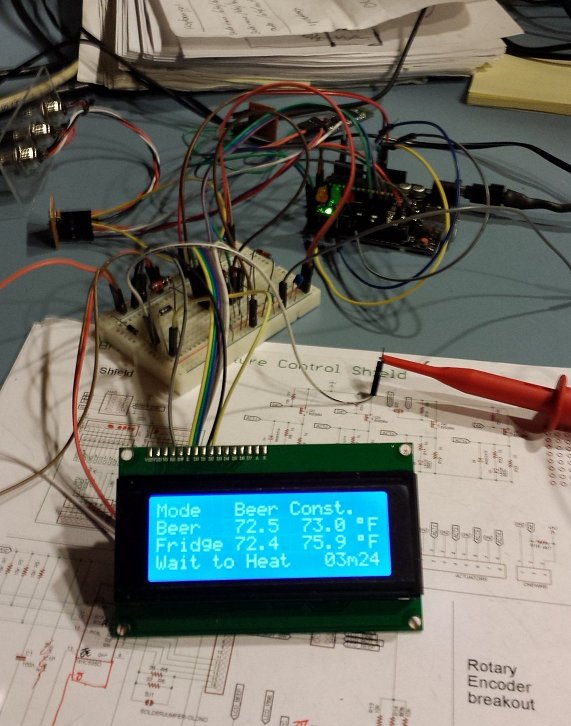
LCD arrived today, promptly patched together the shift register wiring, etc, and got it lit successfully. Good start.

But cramming these into my tiny project boxes will be a challenge due to the carrier board height. There'll definitely be some physical mods required to something - either the boxes or the carrier boards or both. I'm pretty sure I can sacrifice a razor saw to slice a few millimeters off the bottom edge of the board if it comes down to that.

fwiw, I found a spec for the DM2004A white-on-blue 20x4 parallel displays and one parameter that caught my eye is the backlight voltage maximum shown as 4.2V and not the 5V specified for the rest of the display. I imagine running the backlight at 5V will shorten the life of the LEDs. I actually found 3.4V is more than sufficient - two diode drops with a 22 ohm series resistor...

Cheers!

brewpi_lcd_01_sm.jpg
 
Hey all,

Thanks for all of the help getting this set up to make it a pretty easy process for me. I did notice a couple of things as i put it together and wanted to add my 2 cents where applicable.

First off the "Publicly accessible BrewPi" code linked in the first post appears to need some updating. I found that it would never actually display any graphs or fill out the LCD display. so I dug in and updated the code provided by FuzzeWuzze. See below:

  1. Goto /var/www
  2. Code:
    sudo mv index.php admin.php
    (this moves the default brewpi webpage to a new location)
  3. Create a file with vi or nano called index.php and add the contents of the code block below (Mostly fixes in the Javascript section of the file)

Code:
<?php
/* Copyright 2012 BrewPi/Elco Jacobs.
* This file is part of BrewPi.

* BrewPi is free software: you can redistribute it and/or modify
* it under the terms of the GNU General Public License as published by
* the Free Software Foundation, either version 3 of the License, or
* (at your option) any later version.

* BrewPi is distributed in the hope that it will be useful,
* but WITHOUT ANY WARRANTY; without even the implied warranty of
* MERCHANTABILITY or FITNESS FOR A PARTICULAR PURPOSE. See the
* GNU General Public License for more details.

* You should have received a copy of the GNU General Public License
* along with BrewPi. If not, see <http://www.gnu.org/licenses/>.
*/

// load default settings from file
$defaultSettings = file_get_contents('defaultSettings.json');
if($defaultSettings == false){
		die("Cannot open default settings file: defaultSettings.json");
}
$settingsArray = json_decode(prepareJSON($defaultSettings), true);
if(is_null($settingsArray)){
		die("Cannot decode defaultSettings.json");
}
// overwrite default settings with user settings
if(file_exists('userSettings.json')){
		$userSettings = file_get_contents('userSettings.json');
		if($userSettings == false){
		die("Error opening settings file userSettings.json");
		}
		$userSettingsArray = json_decode(prepareJSON($userSettings), true);
		if(is_null($settingsArray)){
		die("Cannot decode userSettings.json");
		}
		foreach ($userSettingsArray as $key => $value) {
		$settingsArray[$key] = $userSettingsArray[$key];
		}
}

$beerName = $settingsArray["beerName"];
$tempFormat = $settingsArray["tempFormat"];
$profileName = $settingsArray["profileName"];
$dateTimeFormat = $settingsArray["dateTimeFormat"];
$dateTimeFormatDisplay = $settingsArray["dateTimeFormatDisplay"];

function prepareJSON($input) {
//This will convert ASCII/ISO-8859-1 to UTF-8.
//Be careful with the third parameter (encoding detect list), because
//if set wrong, some input encodings will get garbled (including UTF-8!)
$input = mb_convert_encoding($input, 'UTF-8', 'ASCII,UTF-8,ISO-8859-1');

//Remove UTF-8 BOM if present, json_decode() does not like it.
if(substr($input, 0, 3) == pack("CCC", 0xEF, 0xBB, 0xBF)) $input = substr($input, 3);

return $input;
}

?>

<!DOCTYPE html >
<html>
	<head>
		<meta http-equiv="content-type" content="text/html; charset=utf-8" />
		<title>BrewPi reporting for duty!</title>
		<link type="text/css" href="css/redmond/jquery-ui-1.10.3.custom.css" rel="stylesheet" />
		<link type="text/css" href="css/style.css" rel="stylesheet"/>
	</head>
<body>
	<div id="beer-panel" class="ui-widget ui-widget-content ui-corner-all">
		<?php
			include 'PublicBeerPanel.php';
		?>
	</div>

	<!-- Load scripts after the body, so they don't block rendering of the page -->
	<!-- <script type="text/javascript" src="js/jquery-1.11.0.js"></script> -->
		<script type="text/javascript" src="js/jquery-1.11.0.min.js"></script>
		<script type="text/javascript" src="js/jquery-ui-1.10.3.custom.min.js"></script>
		<script type="text/javascript" src="js/jquery-ui-timepicker-addon.js"></script>
		<script type="text/javascript" src="js/spin.js"></script>
		<script type="text/javascript" src="js/dygraph-combined.js"></script>
		<script type="text/javascript">
			// pass parameters to JavaScript
			window.tempFormat = <?php echo "'$tempFormat'" ?>;
			window.beerName = <?php echo "\"$beerName\""?>;
			window.profileName = <?php echo "\"$profileName\""?>;
			window.dateTimeFormat = <?php echo "\"$dateTimeFormat\""?>;
			window.dateTimeFormatDisplay = <?php echo "\"$dateTimeFormatDisplay\""?>;
		</script>
		<script type="text/javascript" src="js/main.js"></script>
		<script type="text/javascript" src="js/device-config.js"></script>
		<script type="text/javascript" src="js/control-panel.js"></script>
		<script type="text/javascript" src="js/maintenance-panel.js"></script>
		<script type="text/javascript" src="js/beer-chart.js"></script>
		<script type="text/javascript" src="js/profile-table.js"></script>
	</body>
</html>
Next create another new file with vi or nano called PublicBeerPanel.php with these contents (Fixes display of BrewName variable with decoded URL formatting)
Code:
<?php
/* Copyright 2012 BrewPi/Elco Jacobs.
* This file is part of BrewPi.

* BrewPi is free software: you can redistribute it and/or modify
* it under the terms of the GNU General Public License as published by
* the Free Software Foundation, either version 3 of the License, or
* (at your option) any later version.

* BrewPi is distributed in the hope that it will be useful,
* but WITHOUT ANY WARRANTY; without even the implied warranty of
* MERCHANTABILITY or FITNESS FOR A PARTICULAR PURPOSE. See the
* GNU General Public License for more details.

* You should have received a copy of the GNU General Public License
* along with BrewPi. If not, see <http://www.gnu.org/licenses/>.
*/
?>
<div id="top-bar" class="ui-widget ui-widget-header ui-corner-all">
	<div id="lcd" class="lcddisplay"><span class="lcd-text">
		<span class="lcd-line" id="lcd-line-0">Live LCD waiting</span>
		<span class="lcd-line" id="lcd-line-1">for update from</span>
		<span class="lcd-line" id="lcd-line-2">script...</span>
		<span class="lcd-line" id="lcd-line-3"></span>
	</div>
	<div id="logo-container">
		<img src="brewpi_logo.png">
		<div id=beer-name-container>
			<span>Fermenting: </span><span><?php echo urldecode($beerName);?></span>
			<span class="data-logging-state"></span>
		</div>
	</div>
</div>
<div class="chart-container">
	<div id="curr-beer-chart-label" class="beer-chart-label"></div>
	<div id="curr-beer-chart" class="beer-chart" style="width:815px; height:390px"></div>
		<div id="curr-beer-chart-controls" class="beer-chart-controls" style="display: none">
		<div id="curr-beer-chart-buttons" class="beer-chart-buttons">
			<div class="beer-chart-legend-row">
					<button class="refresh-curr-beer-chart" title="Refresh"></button>
				<div class="beer-chart-legend-label">Refresh Chart</div>
				<br class="crystal" />
			</div>
			<div class="beer-chart-legend-row last">
					<button class="chart-help" title="Help"></button>
				<div class="beer-chart-legend-label">Help</div>
				<br class="crystal" />
			</div>
			</div>
		<div id="curr-beer-chart-legend" class="beer-chart-legend">
			<div class="beer-chart-legend-row time">
				<div class="beer-chart-legend-time">Date/Time</div>
			</div>
			<div class="beer-chart-legend-row beerTemp">
				<div class="toggle beerTemp" onClick="toggleLine(this)"></div>
				<div class="beer-chart-legend-label" onClick="toggleLine(this)">Beer Temp</div>
				<div class="beer-chart-legend-value">--</div>
				<br class="crystal" />
			</div>
			<div class="beer-chart-legend-row beerSet">
				<div class="toggle beerSet" onClick="toggleLine(this)"></div>
				<div class="beer-chart-legend-label" onClick="toggleLine(this)">Beer Setting</div>
				<div class="beer-chart-legend-value">--</div>
				<br class="crystal" />
			</div>
			<div class="beer-chart-legend-row fridgeTemp">
				<div class="toggle fridgeTemp" onClick="toggleLine(this)"></div>
				<div class="beer-chart-legend-label" onClick="toggleLine(this)">Fridge Temp</div>
				<div class="beer-chart-legend-value">--</div>
				<br class="crystal" />
			</div>
			<div class="beer-chart-legend-row fridgeSet">
				<div class="toggle fridgeSet" onClick="toggleLine(this)"></div>
				<div class="beer-chart-legend-label" onClick="toggleLine(this)">Fridge Setting</div>
				<div class="beer-chart-legend-value">--</div>
				<br class="crystal" />
			</div>
			<div class="beer-chart-legend-row roomTemp">
				<div class="toggle roomTemp" onClick="toggleLine(this)"></div>
				<div class="beer-chart-legend-label" onClick="toggleLine(this)">Room Temp</div>
				<div class="beer-chart-legend-value">--</div>
				<br class="crystal" />
			</div>
			<div class="beer-chart-legend-row state">
				<div class="state-indicator"></div>
				<div class="beer-chart-legend-label"></div>
				<br class="crystal" />
			</div>
			<div class="beer-chart-legend-row annotation last">
				<div class="toggleAnnotations dygraphDefaultAnnotation" onClick="toggleAnnotations(this)">A</div>
				<div class="beer-chart-legend-label" onClick="toggleAnnotations(this)">Annotations</div>
				<br class="crystal" />
			</div>
		</div>
	</div>
</div>
<div id="chart-help-popup" title="Beer graph help" style="display: none">
	<p>This chart displays all temperatures and state information logged by BrewPi.
	Not all temperatures are shown by default, but you can toggle them with the colored dots.</p>
	<p>Click and drag left or right to zoom horizontally, click and drag up or down to zoom vertically. Double click to zoom out.
	When zoomed in, you can hold shift to pan around. On your phone or tablet you can just pinch to zoom.</p>
	<p>The state information is shown as colored bars at the bottom of the graph, explanation below.</p>
	<div class="state-info"><span class="state-color state-idle"></span><span class="state-name">Idle</span>
		<span class="state-explanation">
			No actuator is active.
		</span>
	</div>
	<div class="state-info">
		<span class="state-color state-cooling"></span><span class="state-name">Cooling</span>
		<span class="state-explanation">
		The fridge is cooling!
		</span>
	</div>
	<div class="state-info"><span class="state-color state-heating"></span><span class="state-name">Heating</span>
		<span class="state-explanation">
		The heater is heating!
		</span>
	</div>
	<div class="state-info"><span class="state-color state-waiting-to-cool"></span><span class="state-name">Waiting to cool</span>
		<span class="state-explanation">
		The fridge is waiting to start cooling. It has to wait because BrewPi has just cooled or heated. There is a a minimum time for between cool cycles and a minimum time for switching from heating to cooling.
		</span>
	</div>
	<div class="state-info"><span class="state-color state-waiting-to-heat"></span><span class="state-name">Waiting to heat</span>
		<span class="state-explanation">
		Idem for heating. There is a a minimum time for between heat cycles and a minimum time for switching from cooling to heating.
		</span>
	</div>
	<div class="state-info"><span class="state-color state-cooling-min-time"></span><span class="state-name">Cooling minimum time</span>
		<span class="state-explanation">
		There is a minimum on time for each cool cycle. When the fridge hits target but has not cooled the minimum time, it will continue cooling until the minimum time has passed.
		</span>
	</div>
	<div class="state-info"><span class="state-color state-heating-min-time"></span><span class="state-name">Heating minimum time</span>
		<span class="state-explanation">
		There is a minimum on time for each heat cycle too. When the fridge hits target but has not heated the minimum time, it will continue heating until the minimum time has passed.
		</span>
	</div>
	<div class="state-info"><span class="state-color state-waiting-peak"></span><span class="state-name">Waiting for peak detect</span>
		<span class="state-explanation">
		BrewPi estimates fridge temperature overshoot to be able to turn off the actuators early. To adjust the estimators, it has to detect the peaks in fridge temperature.
		When BrewPi would be allowed to heat/cool by the time limits but no peak has been detected yet for previous cycle, it waits in this state for a peak.
		</span>
	</div>
</div>

Secondly I worked out a way host both the Password Protected BrewPi site as well as the one with all of the configurable buttons removed with only a few minor changes. See Below:

  • Putty/SSH into your BrewPi system(or keyboard if its hooked up to a monitor).
  • Run the following commands to enable htaccess
  • cd /etc/apache2/sites-available
  • sudo nano default
  • change file to look like this where under Directory /var/www there is AllowOverride All
    Code:
    <VirtualHost *:80>
            ServerAdmin webmaster@localhost
            ServerName BrewPi
    
            DocumentRoot /var/www
            <Directory />
                    Options FollowSymLinks
                    AllowOverride None
            </Directory>
            <Directory /var/www/>
                    DirectoryIndex index.php
                    Options Indexes FollowSymLinks MultiViews
                    AllowOverride All
                    Order allow,deny
                    allow from all
            </Directory>
    
            ScriptAlias /cgi-bin/ /usr/lib/cgi-bin/
            <Directory "/usr/lib/cgi-bin">
                    AllowOverride None
                    Options +ExecCGI -MultiViews +SymLinksIfOwnerMatch
                    Order allow,deny
                    Allow from all
            </Directory>
    
            ErrorLog ${APACHE_LOG_DIR}/error.log
    
            # Possible values include: debug, info, notice, warn, error, crit,
            # alert, emerg.
            LogLevel warn
    
            CustomLog ${APACHE_LOG_DIR}/access.log combined
    </VirtualHost>
  • Now its time to restart apache:
  • cd /usr/sbin
  • sudo apache2ctl -k graceful
  • Go to /var/www directory
  • Create a file using vi editor called .htaccess and inside of it put the following, modify the first line where it is bold and replace it with what you plan to call your Private PHP file.
    Code:
    <FilesMatch "admin.php">
    Allow from all
    authuserFile /var/www/private/.htpasswd
    AuthName "YOUR LOGIN HERE"
    AuthType Basic
    <Limit GET POST>
    require valid-user
    </Limit>
    </FilesMatch>
    <FilesMatch "beer-panel.php|config.php|configuration.php|control-panel.php|maintenance-panel.php|previous_beers.php|program_arduino.php|s ave_beer_profile.php|start_script.php">
    Order deny,allow
    Deny from All
    Allow from 192.168.1.
    </FilesMatch>
  • Edit the last allow line that says Allow from 192.168.1 to match up with whatever your local LAN IP address scheme is. You dont need wildcards or subnet masks or anything else.
  • Create a directory called private(to store the above .htpasswd file), and go into it.
  • Type htpasswd -c .htpasswd <UserName>, it will pop up asking you for a password, and make you repeat it.
  • Your done! If you try going to Http://YourBrewPiWebSite.com/admin.php it will now ask you for a password and take you to the "Full BrewPi site". But if you go to http://YourBrewPiWebSite.com it will take you to the "Public Site" without the need for a password.
  • Also make sure obviously that if you want to access this from the external world that your RPI is port forwarding properly through your router.
 
Day_trippr would you ou post details of how what and where you've placed things on your breadboard Id really like to get mine working. Cheers
 
Thanks Prymal! I had all but given up on making a public page! I will be giving this a try! Your write up seems pretty clear. Thanks for taking the time for those of us less compooter literate. :mug:
 
ITS ALIVE!!!! ITS ALIVE!!!!

I downloaded the software/firmware and then installed it using the package installer/add and remove software program, rebooted and completed the install. Thing is that I dont know which worked, the package installer or the add/remove software program. At this point, I dont really care (although I might in the future if I have to do this again), I am just happy the wireless is working.

Thanks for all the help here. I know I have been a real PITA, by my posting on this thread.

Now moving on to getting the parts to get this thing brewpi going. Hope it will not be as difficult as installing my wireless driver. LOL:D

Lol thats why everyones here, dont worry about it glad you got it working its problems like this that get well documented here that help someone later down the line with the same problem.
 
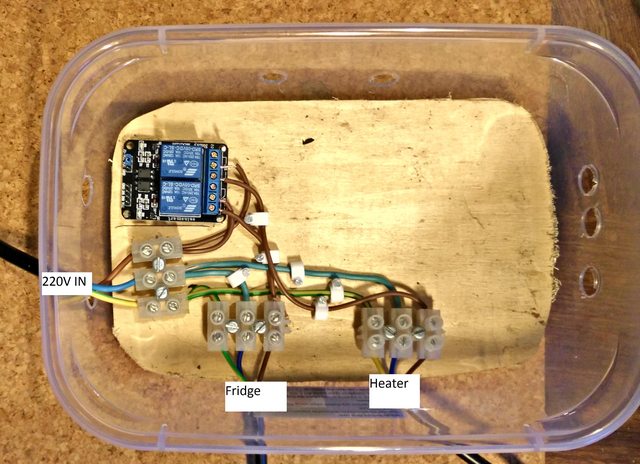
Hi I've a quick question to any Europe based homebrewers who've built one - is my wiring ok here; I'm not sure if i've converted the 110v schematic to 220v correctly and I don't want to start a fire! I haven't added the Raspi, Arduino & temperature sensors yet but I will once i've checked out the potentially dangerous part... Thanks to FuzzeWuzze for this excellent thread and happy new year everyone!

JDE3KL4l.jpg
 
Mine is all connected that way using UK wiring the Pi and arduino the relay operates up to 240v I think so there really isn't any difference in terms of wiring other than the power flowing through the wires.
 
Mine is all connected that way using UK wiring the Pi and arduino the relay operates up to 240v I think so there really isn't any difference in terms of wiring other than the power flowing through the wires.

Good to know! Thanks
 
What's that sitting on though someone commented earlier that having the relay in a wooden box was looking for disaster
 
What's that sitting on though someone commented earlier that having the relay in a wooden box was looking for disaster

The relay, junction boxes and raspberry pi are mounted on a small sheet of plywood... Is it something to do with the relay starting a fire? I'll make up some sort of steel heatsink for it if necessary.
 
For me it was the Sainsmart relay in a cigar box which makes sense really not found a decent project box that I can house everything in yet including an LCD
 
Some fridges have their own internal timers and such that require the fridge to shut down after a said time no matter what. The thing is those timers don't work unless power is being supplied to the fridge, which doesn't happen if you control your fridge from the outlet using a temp controller and it isn't currently in cooling mode. Brewpi had a wait period for initial startup and so do many refrigerators, meaning that brewpi will wait 10 minutes, the turn power on to the fridge which could take up to 15 minutes to start depending in the brand and model. The only way to fix these issues is to replace the internal thermostats with the brewpi relays or to fuse the compressor and fans in the on state.

So, I set it to fridge constant again (higher temp), and it ran perfectly for about two weeks, and then the it stopped cooling. I plugged the fridge into another outlet, and it worked fine, and there was no power being pushed to the arduino controlled outlet. Nothing changed about my installation, but it seems like there is a flaky component or connection somewhere. Any thoughts on how to troubleshoot?
 
You need to test the relay/arduino somehow. You can see in the graph where it was turned on and off. Now you need some way to see if the relay is actually switching every time. Set it up with a lightbulb and record it with a camera or something. Put a clock in the shot so you can log when it's switched then evaluate the graph data as it correlates with the video.
 
Hey all,

Thanks for all of the help getting this set up to make it a pretty easy process for me. I did notice a couple of things as i put it together and wanted to add my 2 cents where applicable.

First off the "Publicly accessible BrewPi" code linked in the first post appears to need some updating. I found that it would never actually display any graphs or fill out the LCD display. so I dug in and updated the code provided by FuzzeWuzze. See below:

  1. Goto /var/www
  2. Create a file with any name you want, with a php file extension, this will be your primary entry point...give it your brewery name, or something simple like public.php it doesnt matter. This is the contents that goes in the file (Mostly fixes in the Javascript section of the file)

Code:
<?php
/* Copyright 2012 BrewPi/Elco Jacobs.
* This file is part of BrewPi.

* BrewPi is free software: you can redistribute it and/or modify
* it under the terms of the GNU General Public License as published by
* the Free Software Foundation, either version 3 of the License, or
* (at your option) any later version.

* BrewPi is distributed in the hope that it will be useful,
* but WITHOUT ANY WARRANTY; without even the implied warranty of
* MERCHANTABILITY or FITNESS FOR A PARTICULAR PURPOSE. See the
* GNU General Public License for more details.

* You should have received a copy of the GNU General Public License
* along with BrewPi. If not, see <http://www.gnu.org/licenses/>.
*/

// load default settings from file
$defaultSettings = file_get_contents('defaultSettings.json');
if($defaultSettings == false){
		die("Cannot open default settings file: defaultSettings.json");
}
$settingsArray = json_decode(prepareJSON($defaultSettings), true);
if(is_null($settingsArray)){
		die("Cannot decode defaultSettings.json");
}
// overwrite default settings with user settings
if(file_exists('userSettings.json')){
		$userSettings = file_get_contents('userSettings.json');
		if($userSettings == false){
		die("Error opening settings file userSettings.json");
		}
		$userSettingsArray = json_decode(prepareJSON($userSettings), true);
		if(is_null($settingsArray)){
		die("Cannot decode userSettings.json");
		}
		foreach ($userSettingsArray as $key => $value) {
		$settingsArray[$key] = $userSettingsArray[$key];
		}
}

$beerName = $settingsArray["beerName"];
$tempFormat = $settingsArray["tempFormat"];
$profileName = $settingsArray["profileName"];
$dateTimeFormat = $settingsArray["dateTimeFormat"];
$dateTimeFormatDisplay = $settingsArray["dateTimeFormatDisplay"];

function prepareJSON($input) {
//This will convert ASCII/ISO-8859-1 to UTF-8.
//Be careful with the third parameter (encoding detect list), because
//if set wrong, some input encodings will get garbled (including UTF-8!)
$input = mb_convert_encoding($input, 'UTF-8', 'ASCII,UTF-8,ISO-8859-1');

//Remove UTF-8 BOM if present, json_decode() does not like it.
if(substr($input, 0, 3) == pack("CCC", 0xEF, 0xBB, 0xBF)) $input = substr($input, 3);

return $input;
}

?>

<!DOCTYPE html >
<html>
	<head>
		<meta http-equiv="content-type" content="text/html; charset=utf-8" />
		<title>BrewPi reporting for duty!</title>
		<link type="text/css" href="css/redmond/jquery-ui-1.10.3.custom.css" rel="stylesheet" />
		<link type="text/css" href="css/style.css" rel="stylesheet"/>
	</head>
<body>
	<div id="beer-panel" class="ui-widget ui-widget-content ui-corner-all">
		<?php
			include 'PublicBeerPanel.php';
		?>
	</div>

	<!-- Load scripts after the body, so they don't block rendering of the page -->
	<!-- <script type="text/javascript" src="js/jquery-1.11.0.js"></script> -->
		<script type="text/javascript" src="js/jquery-1.11.0.min.js"></script>
		<script type="text/javascript" src="js/jquery-ui-1.10.3.custom.min.js"></script>
		<script type="text/javascript" src="js/jquery-ui-timepicker-addon.js"></script>
		<script type="text/javascript" src="js/spin.js"></script>
		<script type="text/javascript" src="js/dygraph-combined.js"></script>
		<script type="text/javascript">
			// pass parameters to JavaScript
			window.tempFormat = <?php echo "'$tempFormat'" ?>;
			window.beerName = <?php echo "\"$beerName\""?>;
			window.profileName = <?php echo "\"$profileName\""?>;
			window.dateTimeFormat = <?php echo "\"$dateTimeFormat\""?>;
			window.dateTimeFormatDisplay = <?php echo "\"$dateTimeFormatDisplay\""?>;
		</script>
		<script type="text/javascript" src="js/main.js"></script>
		<script type="text/javascript" src="js/device-config.js"></script>
		<script type="text/javascript" src="js/control-panel.js"></script>
		<script type="text/javascript" src="js/maintenance-panel.js"></script>
		<script type="text/javascript" src="js/beer-chart.js"></script>
		<script type="text/javascript" src="js/profile-table.js"></script>
	</body>
</html>
Next create a new file called PublicBeerPanel.php with these contents (Fixes display of BrewName variable with decoded URL formatting)
Code:
<?php
/* Copyright 2012 BrewPi/Elco Jacobs.
* This file is part of BrewPi.

* BrewPi is free software: you can redistribute it and/or modify
* it under the terms of the GNU General Public License as published by
* the Free Software Foundation, either version 3 of the License, or
* (at your option) any later version.

* BrewPi is distributed in the hope that it will be useful,
* but WITHOUT ANY WARRANTY; without even the implied warranty of
* MERCHANTABILITY or FITNESS FOR A PARTICULAR PURPOSE. See the
* GNU General Public License for more details.

* You should have received a copy of the GNU General Public License
* along with BrewPi. If not, see <http://www.gnu.org/licenses/>.
*/
?>
<div id="top-bar" class="ui-widget ui-widget-header ui-corner-all">
	<div id="lcd" class="lcddisplay"><span class="lcd-text">
		<span class="lcd-line" id="lcd-line-0">Live LCD waiting</span>
		<span class="lcd-line" id="lcd-line-1">for update from</span>
		<span class="lcd-line" id="lcd-line-2">script...</span>
		<span class="lcd-line" id="lcd-line-3"></span>
	</div>
	<div id="logo-container">
		<img src="brewpi_logo.png">
		<div id=beer-name-container>
			<span>Fermenting: </span><span><?php echo urldecode($beerName);?></span>
			<span class="data-logging-state"></span>
		</div>
	</div>
</div>
<div class="chart-container">
	<div id="curr-beer-chart-label" class="beer-chart-label"></div>
	<div id="curr-beer-chart" class="beer-chart" style="width:815px; height:390px"></div>
		<div id="curr-beer-chart-controls" class="beer-chart-controls" style="display: none">
		<div id="curr-beer-chart-buttons" class="beer-chart-buttons">
			<div class="beer-chart-legend-row">
					<button class="refresh-curr-beer-chart" title="Refresh"></button>
				<div class="beer-chart-legend-label">Refresh Chart</div>
				<br class="crystal" />
			</div>
			<div class="beer-chart-legend-row last">
					<button class="chart-help" title="Help"></button>
				<div class="beer-chart-legend-label">Help</div>
				<br class="crystal" />
			</div>
			</div>
		<div id="curr-beer-chart-legend" class="beer-chart-legend">
			<div class="beer-chart-legend-row time">
				<div class="beer-chart-legend-time">Date/Time</div>
			</div>
			<div class="beer-chart-legend-row beerTemp">
				<div class="toggle beerTemp" onClick="toggleLine(this)"></div>
				<div class="beer-chart-legend-label" onClick="toggleLine(this)">Beer Temp</div>
				<div class="beer-chart-legend-value">--</div>
				<br class="crystal" />
			</div>
			<div class="beer-chart-legend-row beerSet">
				<div class="toggle beerSet" onClick="toggleLine(this)"></div>
				<div class="beer-chart-legend-label" onClick="toggleLine(this)">Beer Setting</div>
				<div class="beer-chart-legend-value">--</div>
				<br class="crystal" />
			</div>
			<div class="beer-chart-legend-row fridgeTemp">
				<div class="toggle fridgeTemp" onClick="toggleLine(this)"></div>
				<div class="beer-chart-legend-label" onClick="toggleLine(this)">Fridge Temp</div>
				<div class="beer-chart-legend-value">--</div>
				<br class="crystal" />
			</div>
			<div class="beer-chart-legend-row fridgeSet">
				<div class="toggle fridgeSet" onClick="toggleLine(this)"></div>
				<div class="beer-chart-legend-label" onClick="toggleLine(this)">Fridge Setting</div>
				<div class="beer-chart-legend-value">--</div>
				<br class="crystal" />
			</div>
			<div class="beer-chart-legend-row roomTemp">
				<div class="toggle roomTemp" onClick="toggleLine(this)"></div>
				<div class="beer-chart-legend-label" onClick="toggleLine(this)">Room Temp</div>
				<div class="beer-chart-legend-value">--</div>
				<br class="crystal" />
			</div>
			<div class="beer-chart-legend-row state">
				<div class="state-indicator"></div>
				<div class="beer-chart-legend-label"></div>
				<br class="crystal" />
			</div>
			<div class="beer-chart-legend-row annotation last">
				<div class="toggleAnnotations dygraphDefaultAnnotation" onClick="toggleAnnotations(this)">A</div>
				<div class="beer-chart-legend-label" onClick="toggleAnnotations(this)">Annotations</div>
				<br class="crystal" />
			</div>
		</div>
	</div>
</div>
<div id="chart-help-popup" title="Beer graph help" style="display: none">
	<p>This chart displays all temperatures and state information logged by BrewPi.
	Not all temperatures are shown by default, but you can toggle them with the colored dots.</p>
	<p>Click and drag left or right to zoom horizontally, click and drag up or down to zoom vertically. Double click to zoom out.
	When zoomed in, you can hold shift to pan around. On your phone or tablet you can just pinch to zoom.</p>
	<p>The state information is shown as colored bars at the bottom of the graph, explanation below.</p>
	<div class="state-info"><span class="state-color state-idle"></span><span class="state-name">Idle</span>
		<span class="state-explanation">
			No actuator is active.
		</span>
	</div>
	<div class="state-info">
		<span class="state-color state-cooling"></span><span class="state-name">Cooling</span>
		<span class="state-explanation">
		The fridge is cooling!
		</span>
	</div>
	<div class="state-info"><span class="state-color state-heating"></span><span class="state-name">Heating</span>
		<span class="state-explanation">
		The heater is heating!
		</span>
	</div>
	<div class="state-info"><span class="state-color state-waiting-to-cool"></span><span class="state-name">Waiting to cool</span>
		<span class="state-explanation">
		The fridge is waiting to start cooling. It has to wait because BrewPi has just cooled or heated. There is a a minimum time for between cool cycles and a minimum time for switching from heating to cooling.
		</span>
	</div>
	<div class="state-info"><span class="state-color state-waiting-to-heat"></span><span class="state-name">Waiting to heat</span>
		<span class="state-explanation">
		Idem for heating. There is a a minimum time for between heat cycles and a minimum time for switching from cooling to heating.
		</span>
	</div>
	<div class="state-info"><span class="state-color state-cooling-min-time"></span><span class="state-name">Cooling minimum time</span>
		<span class="state-explanation">
		There is a minimum on time for each cool cycle. When the fridge hits target but has not cooled the minimum time, it will continue cooling until the minimum time has passed.
		</span>
	</div>
	<div class="state-info"><span class="state-color state-heating-min-time"></span><span class="state-name">Heating minimum time</span>
		<span class="state-explanation">
		There is a minimum on time for each heat cycle too. When the fridge hits target but has not heated the minimum time, it will continue heating until the minimum time has passed.
		</span>
	</div>
	<div class="state-info"><span class="state-color state-waiting-peak"></span><span class="state-name">Waiting for peak detect</span>
		<span class="state-explanation">
		BrewPi estimates fridge temperature overshoot to be able to turn off the actuators early. To adjust the estimators, it has to detect the peaks in fridge temperature.
		When BrewPi would be allowed to heat/cool by the time limits but no peak has been detected yet for previous cycle, it waits in this state for a peak.
		</span>
	</div>
</div>

Secondly I worked out a way host both the Password Protected BrewPi site as well as the one with all of the configurable buttons removed with only a few minor changes. See Below:

  • Putty/SSH into your BrewPi system(or keyboard if its hooked up to a monitor).
  • Run the following commands to enable htaccess
  • cd /etc/apache2/sites-available
  • sudo nano default
  • change file to look like this where (DirectoryIndex public-brewpi.php) = the name of the file you created above for the "public site"
    Code:
    <VirtualHost *:80>
            ServerAdmin webmaster@localhost
            ServerName BrewPi
    
            DocumentRoot /var/www
            <Directory />
                    Options FollowSymLinks
                    AllowOverride None
            </Directory>
            <Directory /var/www/>
                    DirectoryIndex public-brewpi.php
                    Options Indexes FollowSymLinks MultiViews
                    AllowOverride All
                    Order allow,deny
                    allow from all
            </Directory>
    
            ScriptAlias /cgi-bin/ /usr/lib/cgi-bin/
            <Directory "/usr/lib/cgi-bin">
                    AllowOverride None
                    Options +ExecCGI -MultiViews +SymLinksIfOwnerMatch
                    Order allow,deny
                    Allow from all
            </Directory>
    
            ErrorLog ${APACHE_LOG_DIR}/error.log
    
            # Possible values include: debug, info, notice, warn, error, crit,
            # alert, emerg.
            LogLevel warn
    
            CustomLog ${APACHE_LOG_DIR}/access.log combined
    </VirtualHost>
  • Now its time to restart apache:
  • cd /usr/sbin
  • sudo apache2ctl -k graceful
  • Go to /var/www directory
  • Create a file using vi editor called .htaccess and inside of it put the following, modify the first line where it is bold and replace it with what you plan to call your Private PHP file.
    Code:
    <FilesMatch "index.php">
    Allow from all
    authuserFile /var/www/private/.htpasswd
    AuthName "YOUR LOGIN HERE"
    AuthType Basic
    <Limit GET POST>
    require valid-user
    </Limit>
    </FilesMatch>
    <FilesMatch "beer-panel.php|config.php|configuration.php|control-panel.php|maintenance-panel.php|previous_beers.php|program_arduino.php|s ave_beer_profile.php|start_script.php">
    Order deny,allow
    Deny from All
    Allow from 192.168.1.
    </FilesMatch>
  • Edit the last allow line that says Allow from 192.168.1 to match up with whatever your local LAN IP address scheme is. You dont need wildcards or subnet masks or anything else.
  • Create a directory called private(to store the above .htpasswd file), and go into it.
  • Type htpasswd -c .htpasswd <UserName>, it will pop up asking you for a password, and make you repeat it.
  • Your done! If you try going to Http://YourBrewPiWebSite.com/index.php it will now ask you for a password and take you to the "Full BrewPi site". But if you go to http://YourBrewPiWebSite.com it will take you to the "Public Site" without the need for a password.
  • Also make sure obviously that if you want to access this from the external world that your RPI is port forwarding properly through your router.

Great writeup! I just went through everything and I have a few questions and comments. The naming convention that you used is slightly misleading, at least to me. It seems the first file that is created is actually the page that the outside world will see, using the PublicBeerPanel.php file inside of that page. The PublicBeerPanel.php file that you have listed doesn't work at all when directly accessed, instead it only displays the brewpi logo and the "Live LCD waiting for script" text, and really threw me through a loop as I was thinking that was going to be the public page. I then released what you were doing with the nested frames, for lack of a better term, in which the first page calls the modified public page.

After I figured the first file that was created was actually the entry page that you want the outside world to see, everything started to make sense. This might be better off being called "index.php" so you don't have to modify what the directory default is for the brewpi php files. It was much easier to just copy index.php and call it "admin.php" (simple as "mv index.php admin.php").

The big problem that I can't figure out is the .htaccess password protection isn't working at all. I can see the request come in through the apache log using my phone with an external ip address, but it doesn't prevent access at all.

The only thing I can think of is that I used nano to create the .htaccess file rather than vi like you indicated. Could that cause some sort of file or formatting issue?

Edit: Alright, got the .htaccess sorted. I missed the one line where you have to go from "AllowOverride None" to "Allow Override ALL". Hooray!

I am glad that you got things worked out, and thanks for the suggestions. You are right the way i was doing it added extra steps that are not needed, I was just following the original process set up for FuzzeWuzze and didn't think much about it once I got things working. I am going to update my post to take account for your thoughts.
 
So, I set it to fridge constant again (higher temp), and it ran perfectly for about two weeks, and then the it stopped cooling. I plugged the fridge into another outlet, and it worked fine, and there was no power being pushed to the arduino controlled outlet. Nothing changed about my installation, but it seems like there is a flaky component or connection somewhere. Any thoughts on how to troubleshoot?

I seem to have a similar problem. My relay no longer operates in cooling mode, but heating mode works just fine. None of my wiring or settings have changed, nor has the positioning of any of my components. After pulling apart my project box, I found that all my wires are still intact and properly connected, and everything is lighting up. Plugging my freezer directly into a wall outlet will make it fire up just as it's supposed to. I can even hear the "click" of the relay when it enters cooling mode but testing the terminals directly on the relay with a multimeter has shown me that the contacts aren't "Bridging" like they're supposed to. I guess this relay has taken a crap on me which sucks cause it's really not very old, only about two or three months at the most. I really hope that if I purchase another relay, that this doesn't happen a second time in the next few months.
 
So, I set it to fridge constant again (higher temp), and it ran perfectly for about two weeks, and then the it stopped cooling. I plugged the fridge into another outlet, and it worked fine, and there was no power being pushed to the arduino controlled outlet. Nothing changed about my installation, but it seems like there is a flaky component or connection somewhere. Any thoughts on how to troubleshoot?

I'd go check your sensors in the BrewPi software and maybe try swapping them around and setting back and see if it makes a difference? Its possibly your power relay, but the only way to know that is if you have a multimeter to test the inputs and outputs of the relay at the solder points.
 
I seem to have a similar problem. My relay no longer operates in cooling mode, but heating mode works just fine. None of my wiring or settings have changed, nor has the positioning of any of my components. After pulling apart my project box, I found that all my wires are still intact and properly connected, and everything is lighting up. Plugging my freezer directly into a wall outlet will make it fire up just as it's supposed to. I can even hear the "click" of the relay when it enters cooling mode but testing the terminals directly on the relay with a multimeter has shown me that the contacts aren't "Bridging" like they're supposed to. I guess this relay has taken a crap on me which sucks cause it's really not very old, only about two or three months at the most. I really hope that if I purchase another relay, that this doesn't happen a second time in the next few months.

My relay board has lasted quite a while, atleast since i have started this thread so i thinnk its pretty rare for them to fail. How big of a fridge are you powering out of curiosity? I could potentially maybe see a really big freezer/fridge sourcing too much current and prematurely burning these things out.
 
ok, I got the whole setup going and have a beer in the chamber. I set a profile and my beer temp is currently 2 degrees above the set temp but it's been idling for 15 minutes without kicking on the cooler. should I just keep waiting?
 
My relay board has lasted quite a while, atleast since i have started this thread so i thinnk its pretty rare for them to fail. How big of a fridge are you powering out of curiosity? I could potentially maybe see a really big freezer/fridge sourcing too much current and prematurely burning these things out.

It's a standard Kenmore stand-up freezer. It's probably 20 years old but it still works fine. I know these Relays are rated for 10 amps and I'm not entirely sure how much amperage my freezer pulls but for what it is worth, this very same freezer ran on an STC-1000 for years before I converted to Brewpi. Who knows, maybe the relay I got was a lemon. I'm going to purchase another and swap them out. The heating side still works so Ill hang onto it for another project.

If the new relay fails on me too, is there an alternative you guys would recommend?
 
ok, I got the whole setup going and have a beer in the chamber. I set a profile and my beer temp is currently 2 degrees above the set temp but it's been idling for 15 minutes without kicking on the cooler. should I just keep waiting?

How many probes are you running - and are they all tracking properly (and assigned to the right functions?)

Cheers!
 
[...]If the new relay fails on me too, is there an alternative you guys would recommend?

It depends on the failure mode. If you're frying relay points, you might set up a heavy duty slaved relay to switch the compressor and use the STC's relay to light the slave's coil.

I do as much on my keezer: the 10A relay on the Sainsmart card (or, alternatively via a toggle switch, the 10A relay inside the MH1210 mounted in the keezer lid) switches the coil on a 30A relay that actually handles the keezer.

So the two controllers only switch tens of milliamps.
The relays may die but it won't be from fried points...

Cheers!
 
Thanks to this thread I just completed my setup. I'm having an issue getting one of my temp probes to read. Otherwise it's pretty spiffy, I just need to finish putting the box together so it isn't a fire hazard. I bought a 5 pack of the temp probes so I'm going to try swapping them out once I get everything in the box.

Thanks for encouraging me to spend more cash you guys. The wife is going to kill me eventually.

Also, has anyone used a fermwrap instead of a heater? I was going to try it since I already have the wrap.
 
How many probes are you running - and are they all tracking properly (and assigned to the right functions?)

Cheers!

2 probes both are tracking just fine. beer temp is currently 70.9 (though it started at 72.1) and the profile set temp is 70. fridge temp is 59.7. I am guessing the pid is learning how long it takes for the ambient temp to drop the beer temp to the correct set temp... I hope? Last night before I brewed I left the unit on with the "beer constant" set to 68 and just sitting in my living room. the graph in the morning showed that the arduino tried to heat and cool over the course of the night even though nothing was plugged in. that is why I thought it was weird it's been sitting idle for 1h45m not trying to cool it down.
 
Any advice on difficulties with getting both probes to read? I've tried the other 4, I can still only get one reading for some reason. The arduino sees it, but the value is reading null.
 
Ha, nevermind. I'm an idiot.

I've got it going, now to make it pretty so i can post a picture or two.
 
It depends on the failure mode. If you're frying relay points, you might set up a heavy duty slaved relay to switch the compressor and use the STC's relay to light the slave's coil.

I do as much on my keezer: the 10A relay on the Sainsmart card (or, alternatively via a toggle switch, the 10A relay inside the MH1210 mounted in the keezer lid) switches the coil on a 30A relay that actually handles the keezer.

So the two controllers only switch tens of milliamps.
The relays may die but it won't be from fried points...

Cheers!


Interesting idea. I may just go ahead and wire up a secondary relay in this fashion just for the sake of peace-of-mind. I think it's sort of a blessing in disguise that this relay crapped out on me cause it gives me an excuse to rebuild the box; I've never been truly happy with it. It was just something I cobbled together to make it work quickly, and I love your idea of using toggle switches to bypass the controller if needed. I'm sure any 30A 120V relay will work but do you have a suggestion on which one to use(Or NOT use)?

*Sigh* back to Amazon.com I go...
 
Any advice on difficulties with getting both probes to read? I've tried the other 4, I can still only get one reading for some reason. The arduino sees it, but the value is reading null.

I had the same problem until i powered the whole setup down, brought the PI online without the arduino plugged in then once the Pi is up plug the arduino in and refresh the device list. Not sure if that is normal but it worked for me.
 
Read this very awesome project a lot up until I couldn't find a STC1000 that I could make the code changes too....has there been any progress in finding these currently without me having to read all 271 pages that this thread now consist of? Any links to being able to purchase the right one would be very appreciated...thanks
 
Read this very awesome project a lot up until I couldn't find a STC1000 that I could make the code changes too....has there been any progress in finding these currently without me having to read all 271 pages that this thread now consist of? Any links to being able to purchase the right one would be very appreciated...thanks

This is more of a do it yourself solution. The first post has links to all the parts you'll need. Being handy with a soldering iron helps but isn't strictly necessary. You will need to be comfortable with messing with electricity because you'll need to wire up an outlet. None of it is particularly difficult, and the diagrams in the first post for wiring are great.

After re-reading your post, Are you sure you meant to put this in the brewpi build? No STC1000 in this setup.
 
I had the same problem until i powered the whole setup down, brought the PI online without the arduino plugged in then once the Pi is up plug the arduino in and refresh the device list. Not sure if that is normal but it worked for me.


Yeah, I ended up wiping and reprogramming the arduino because I had some oddities in my device list. All is good now, thanks!
 
Thanks for the post not found....I did have it confused with another project....problem is I build this one also and could never get it to recognize my one wire's so finally gave up on it too...thanks
 
2 probes both are tracking just fine. beer temp is currently 70.9 (though it started at 72.1) and the profile set temp is 70. fridge temp is 59.7. I am guessing the pid is learning how long it takes for the ambient temp to drop the beer temp to the correct set temp... I hope? Last night before I brewed I left the unit on with the "beer constant" set to 68 and just sitting in my living room. the graph in the morning showed that the arduino tried to heat and cool over the course of the night even though nothing was plugged in. that is why I thought it was weird it's been sitting idle for 1h45m not trying to cool it down.

and now I have dropped to 0.4 below my set temp and it is still idle.
 
Thanks for the post not found....I did have it confused with another project....problem is I build this one also and could never get it to recognize my one wire's so finally gave up on it too...thanks

What problems were you having? Did it not see them at all or were they just not registering temps?
 
Status
Not open for further replies.
Back
Top