
BadNewsBrewery
Well-Known Member
This is the pumps / hoses / brew stand sub-build of my overall thread, available here.
I opted for two pumps as I wanted a single tier brew stand and I like to show gravity that I don’t always have to follow his ‘laws’! I previously used a March 809 with no problems but the pricing on the Chugger with the stainless heads was hard to beat (BrewHardware.com). I opted for the in-line head as the pumps will be mounted on the lower shelf of the stand and I don’t want to deal with hoses or fittings jutting out and hitting my shins.
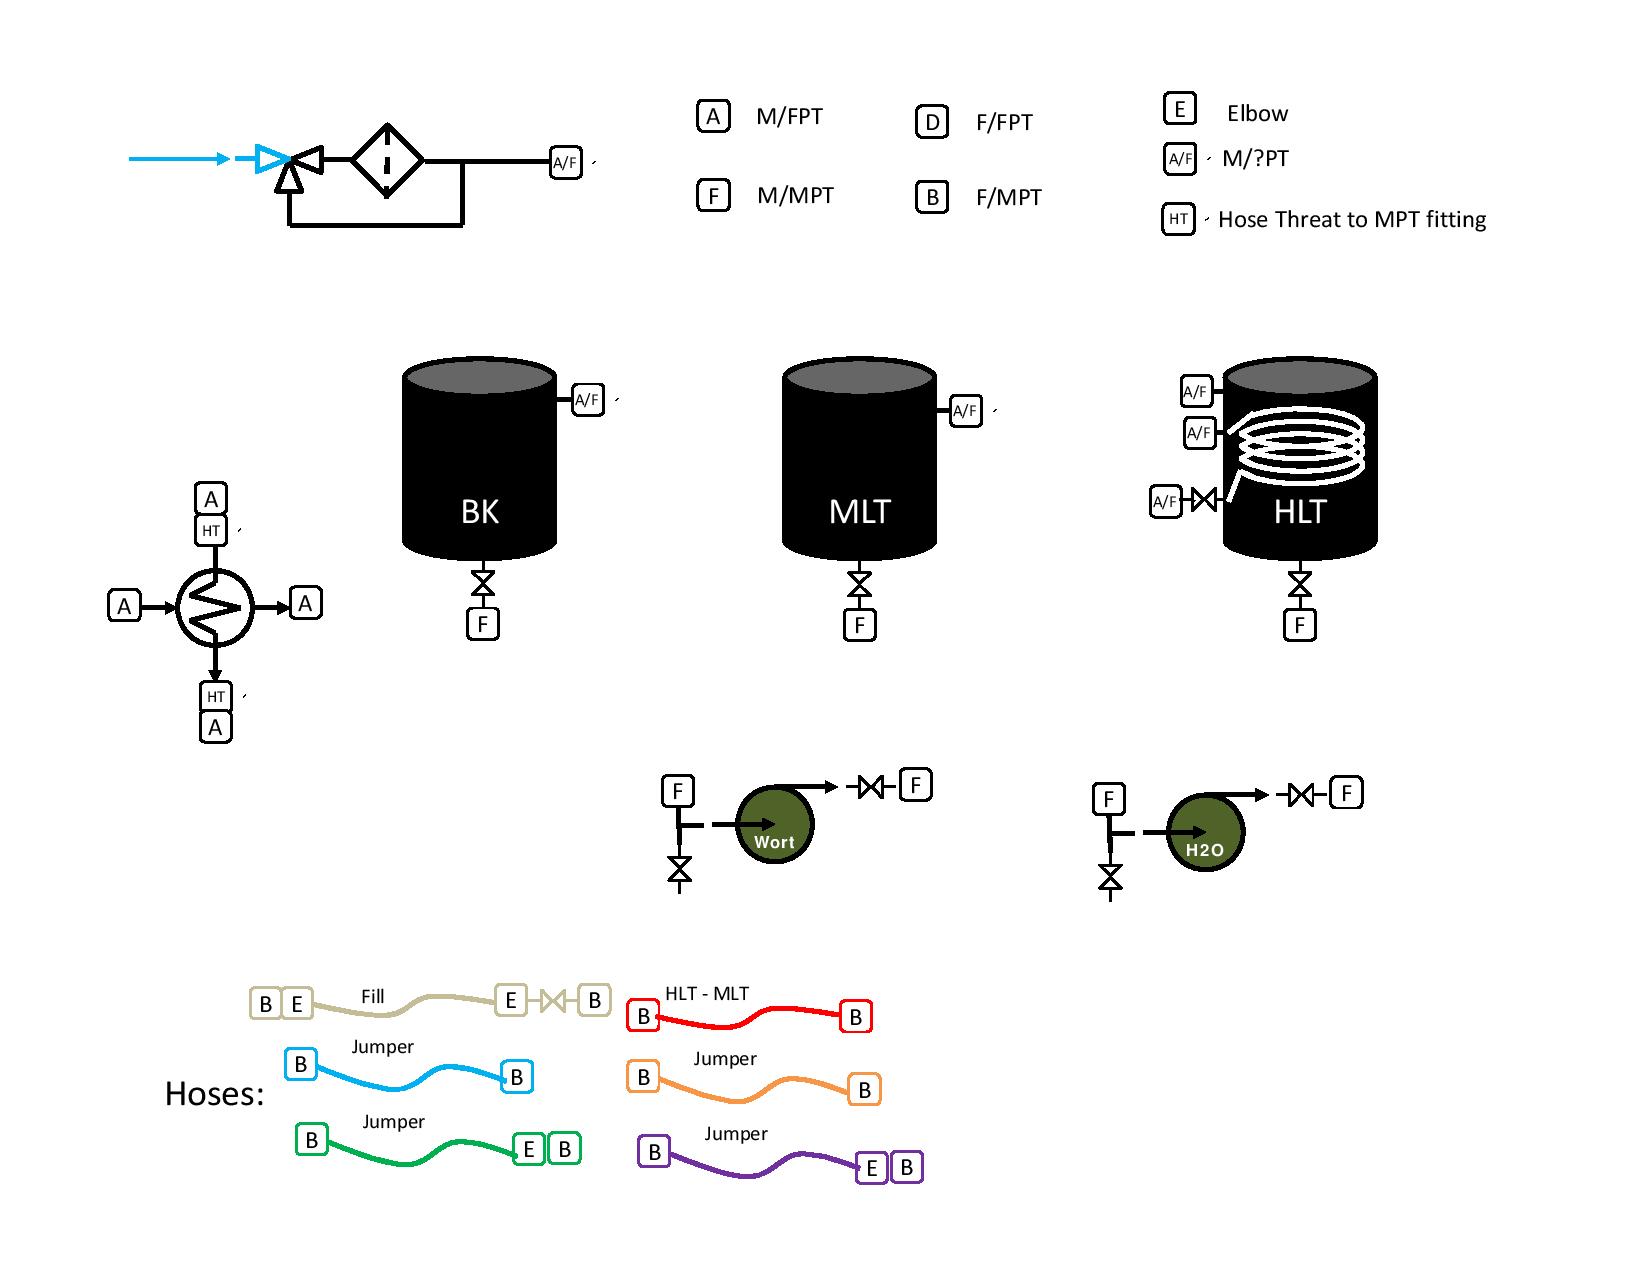
I have put a tee on the intake side of the pump. One leg of the tee goes to the pump and the other to a 2-part valve that then goes to a short flexible hose. I will use the valve to prime the pump by bleeding out the air, and also can use it to pull samples of the wort to take measurements during the lautering stage or really whenever I feel like it. It also helps with the cleaning process. There are numerous methods for priming the pumps, but this one has never failed for me in the past.
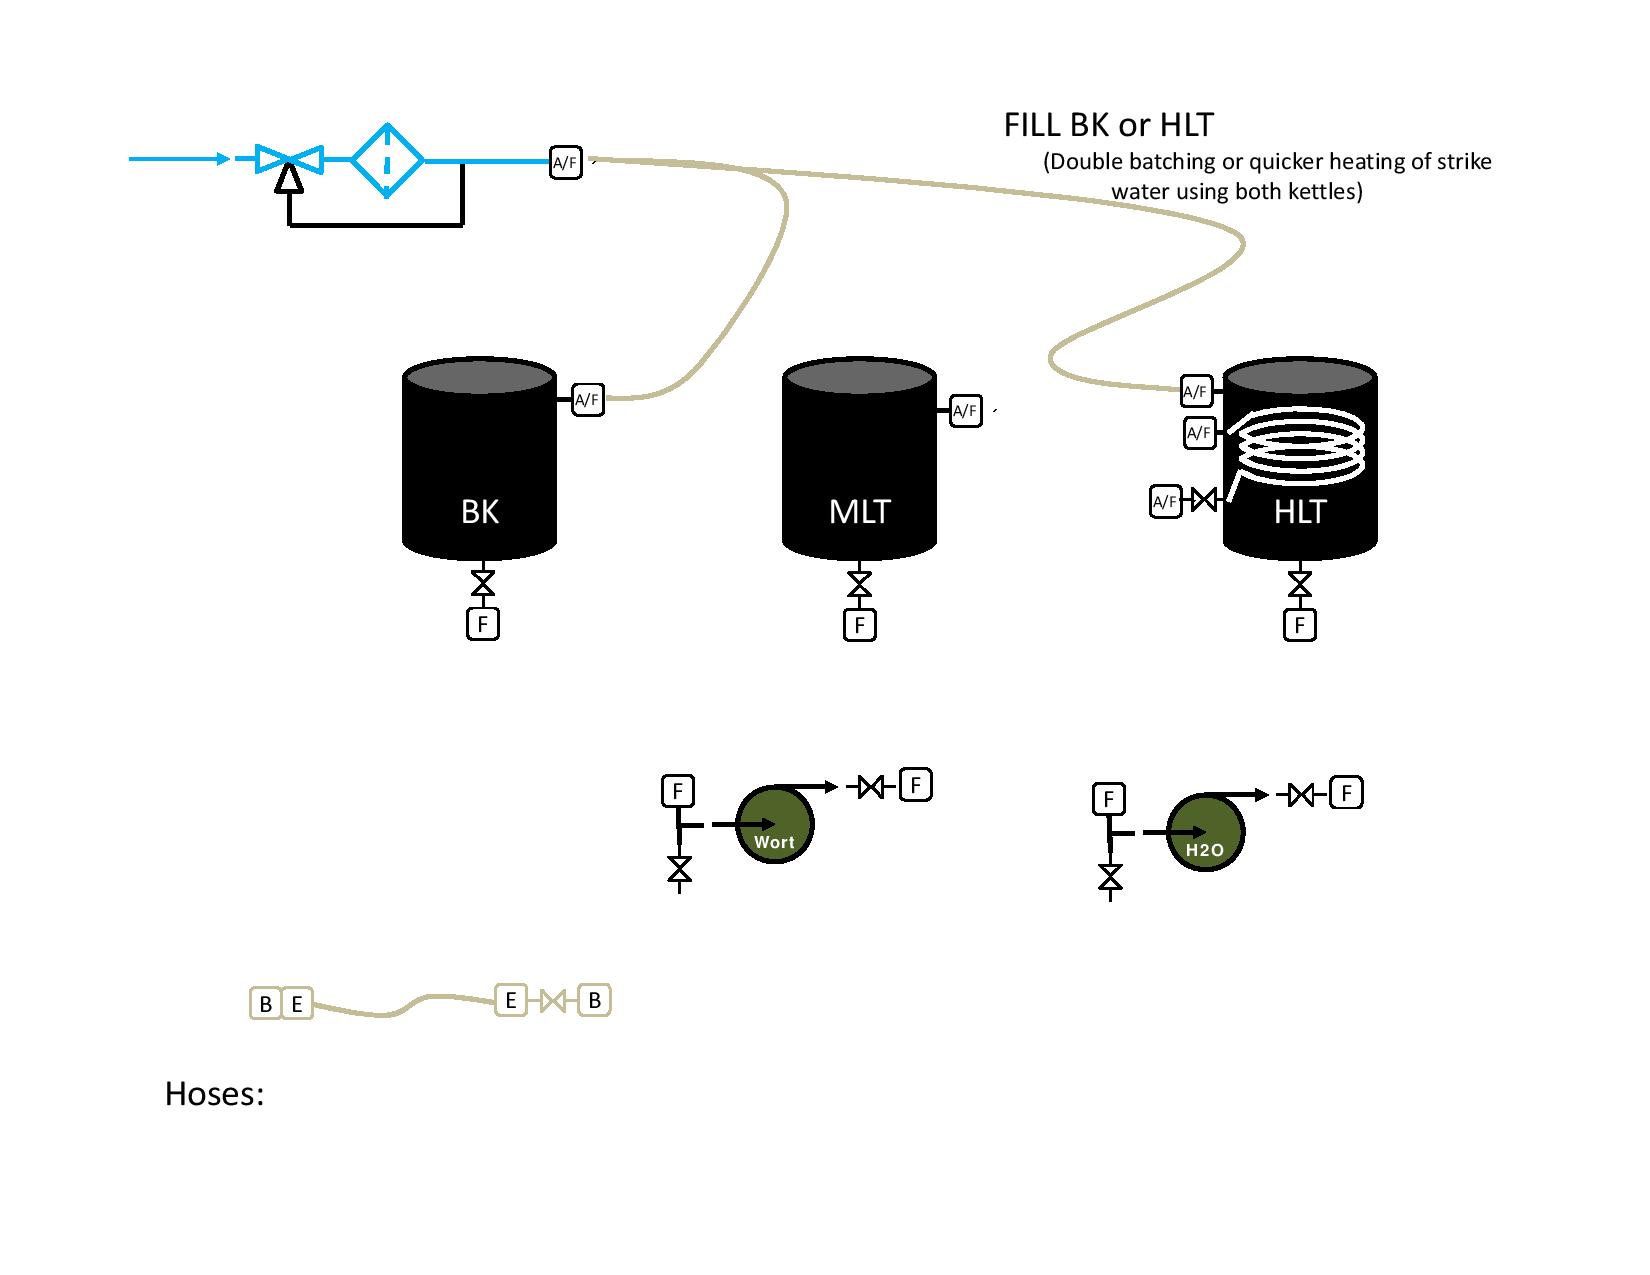
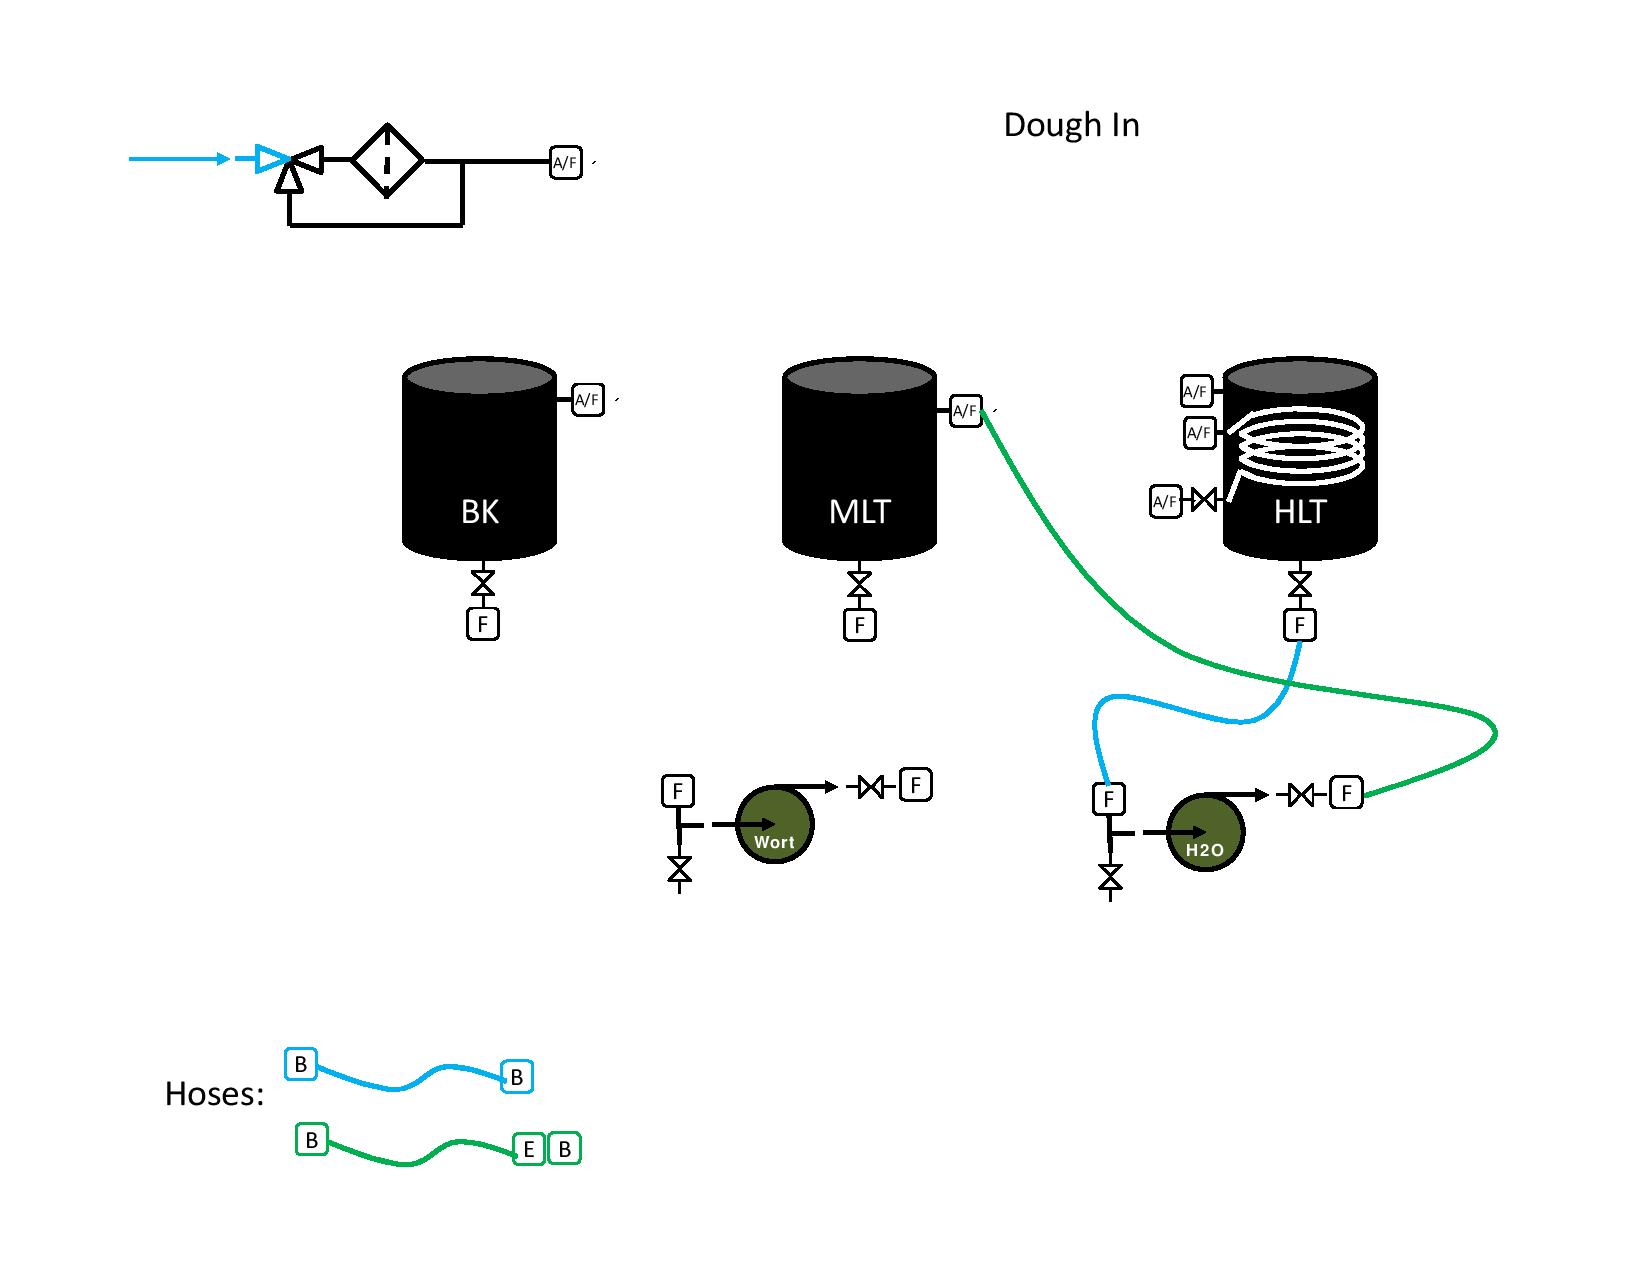
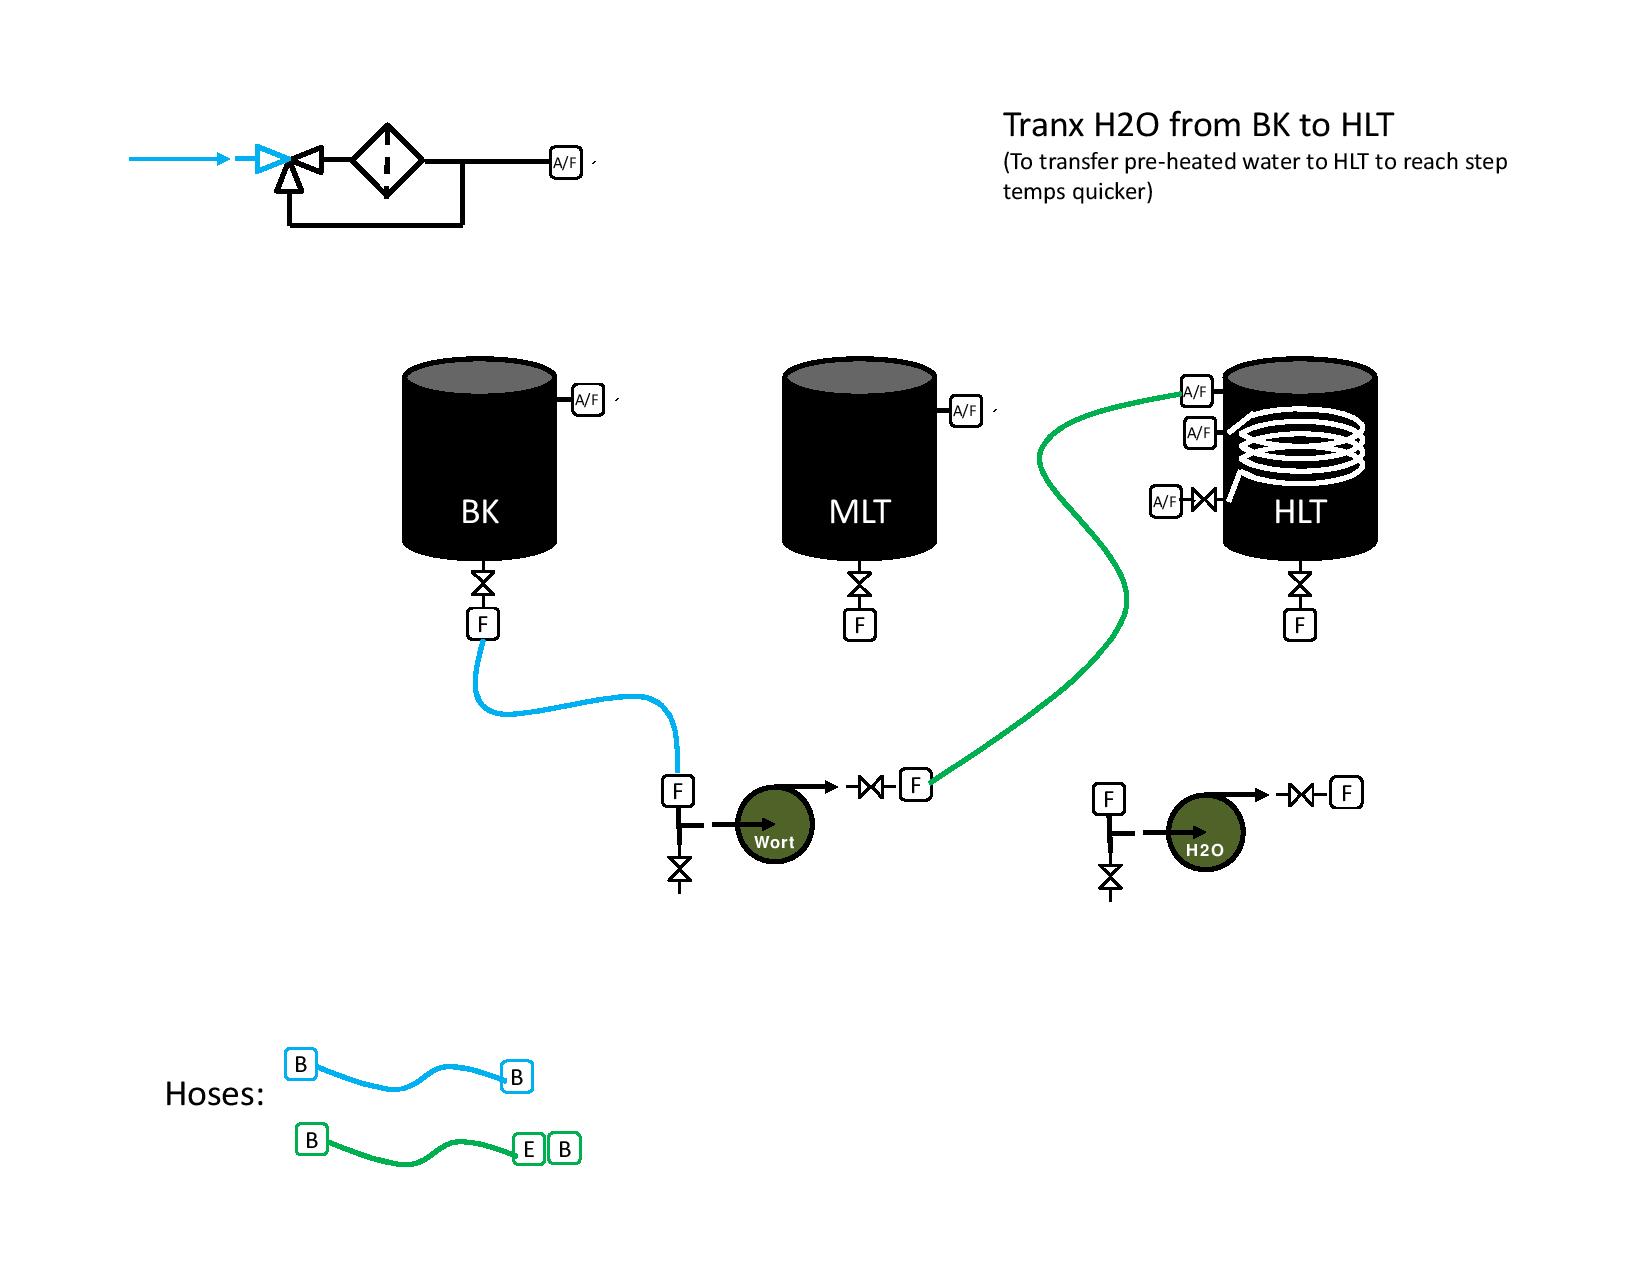
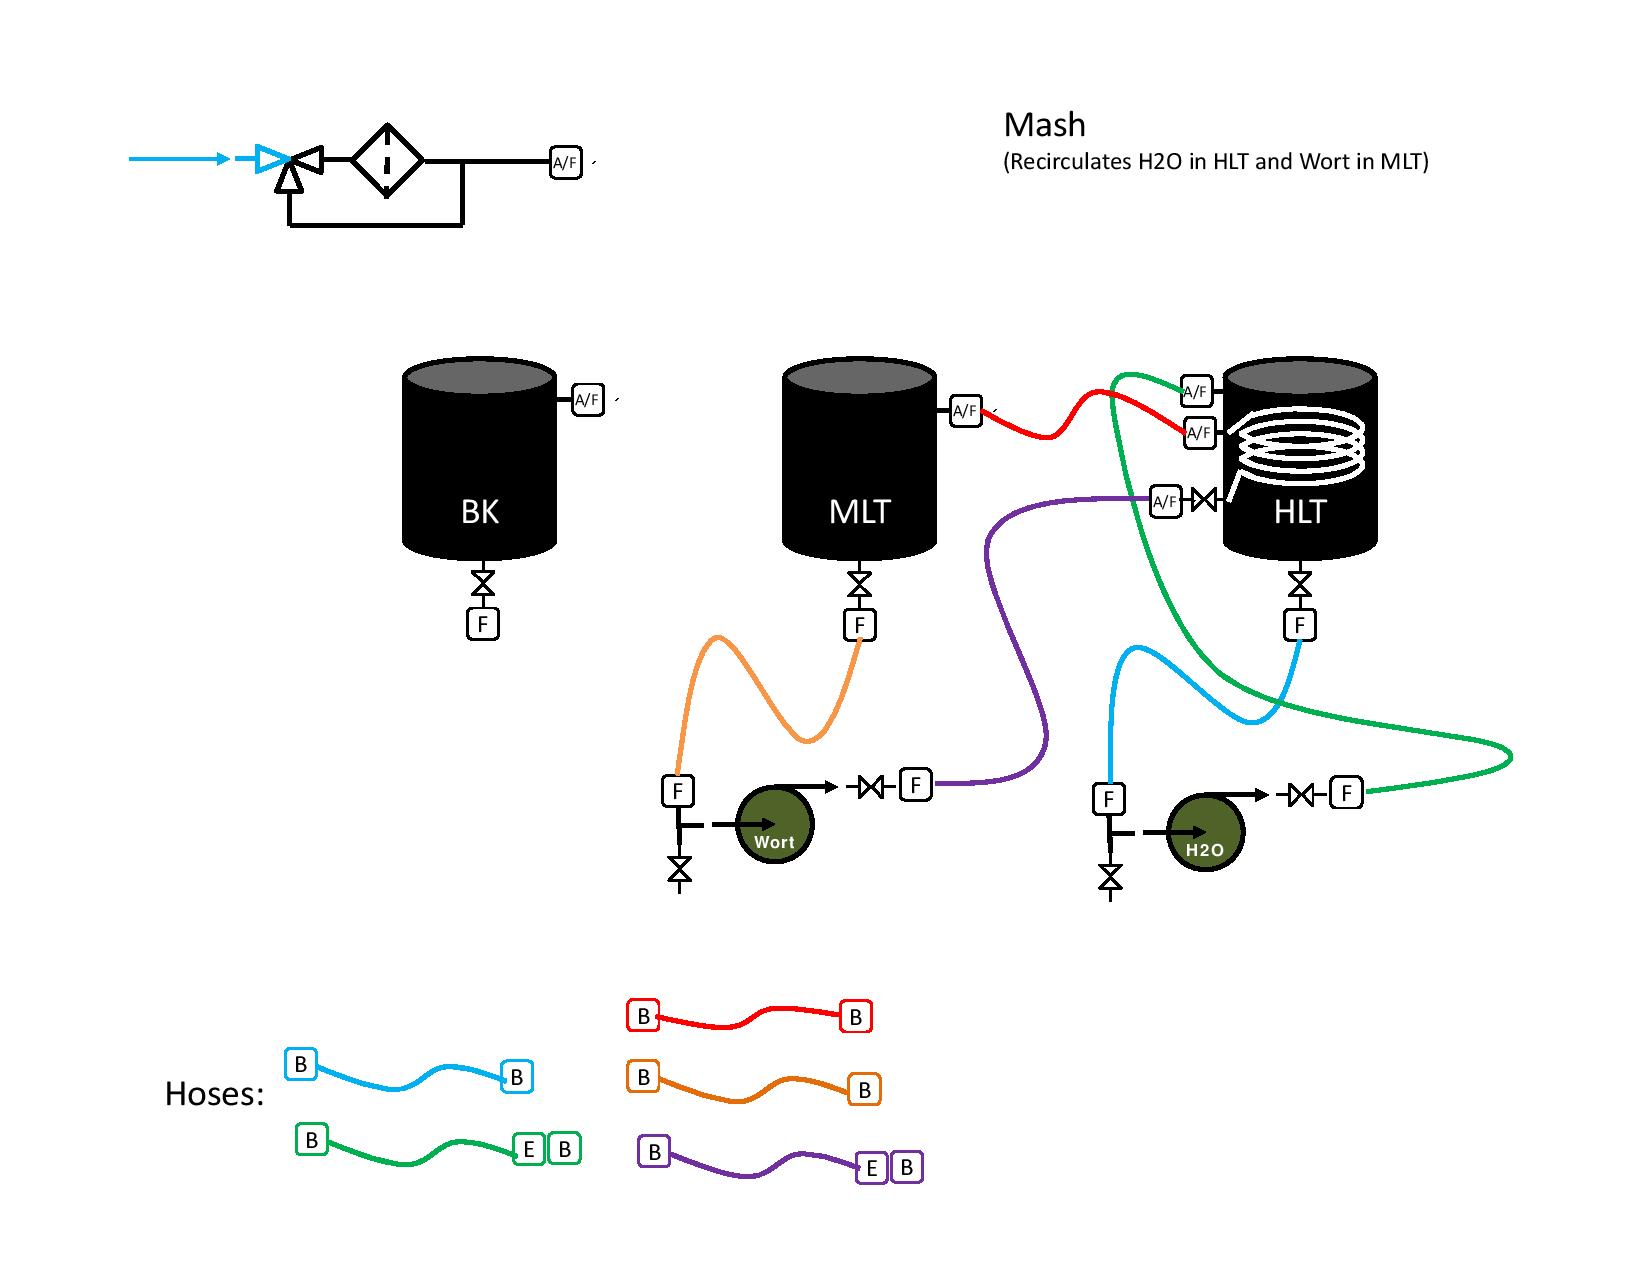
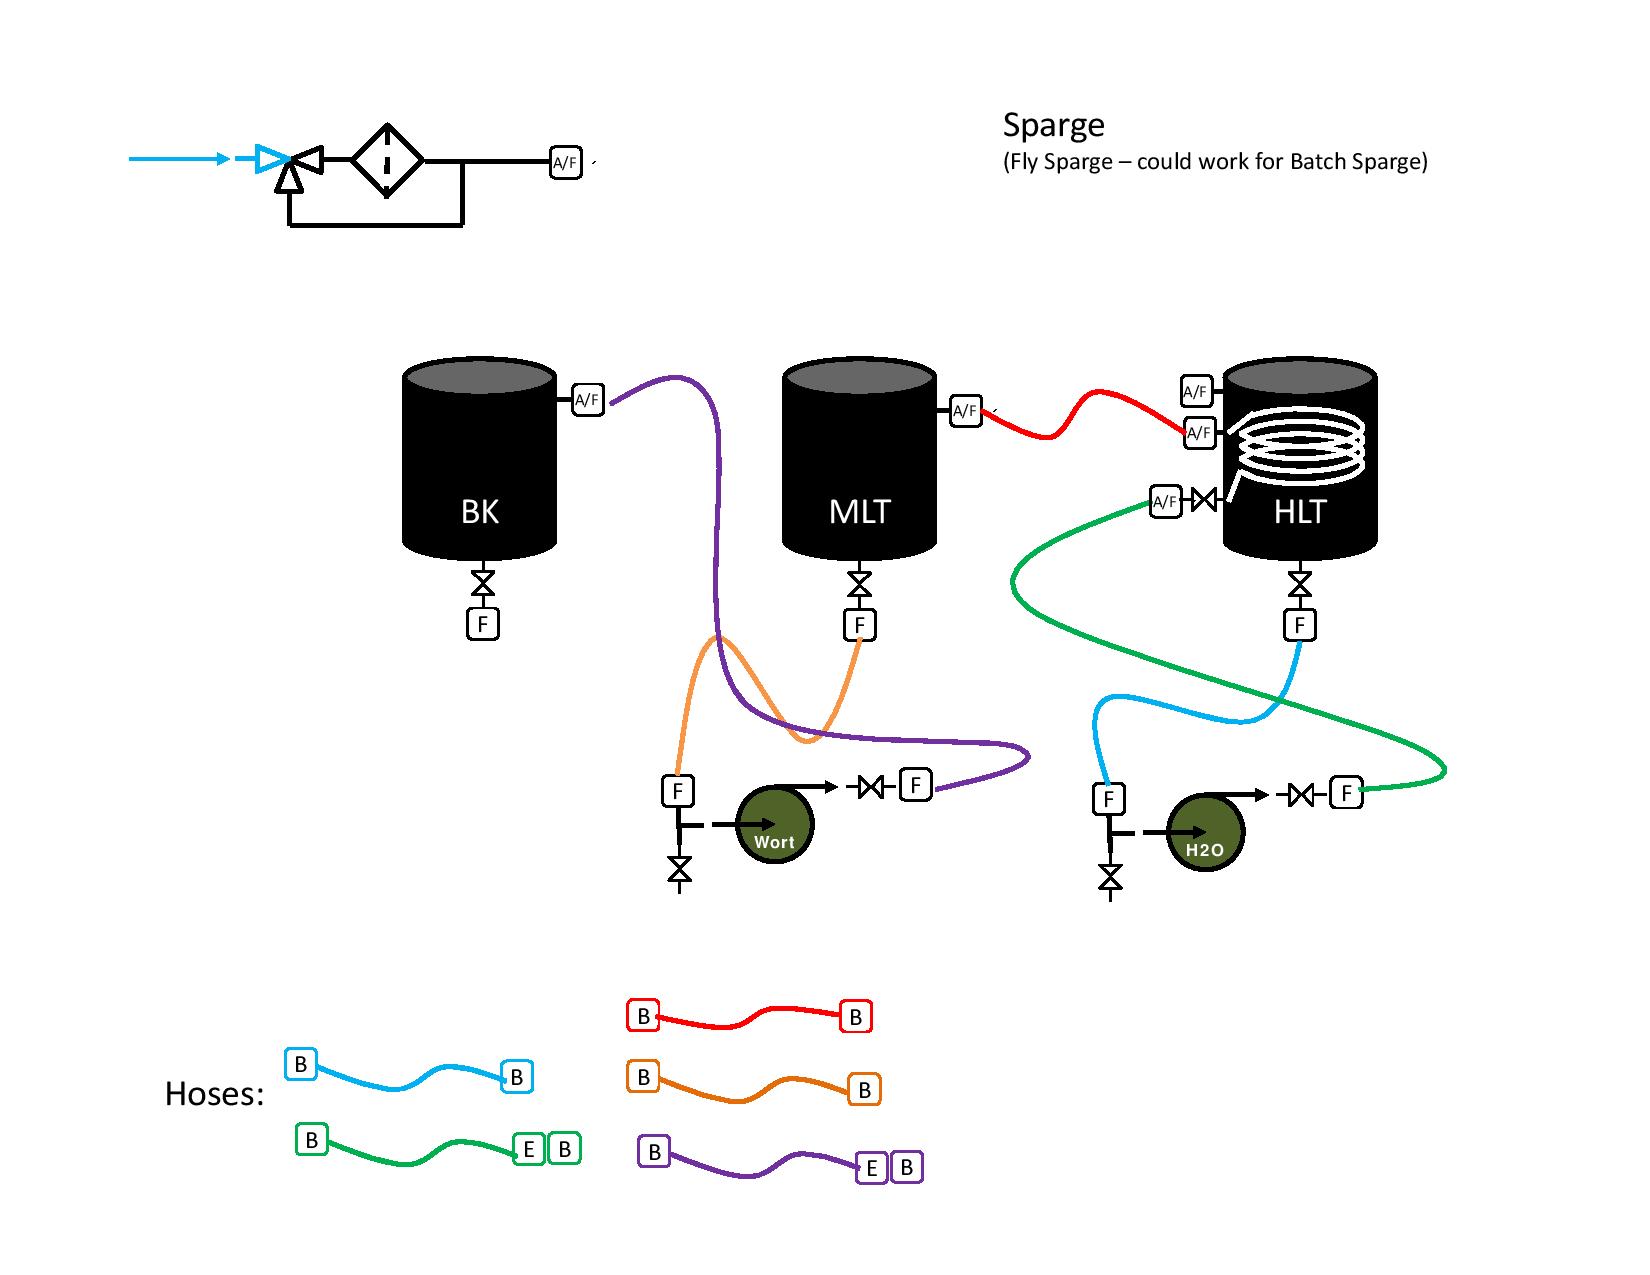
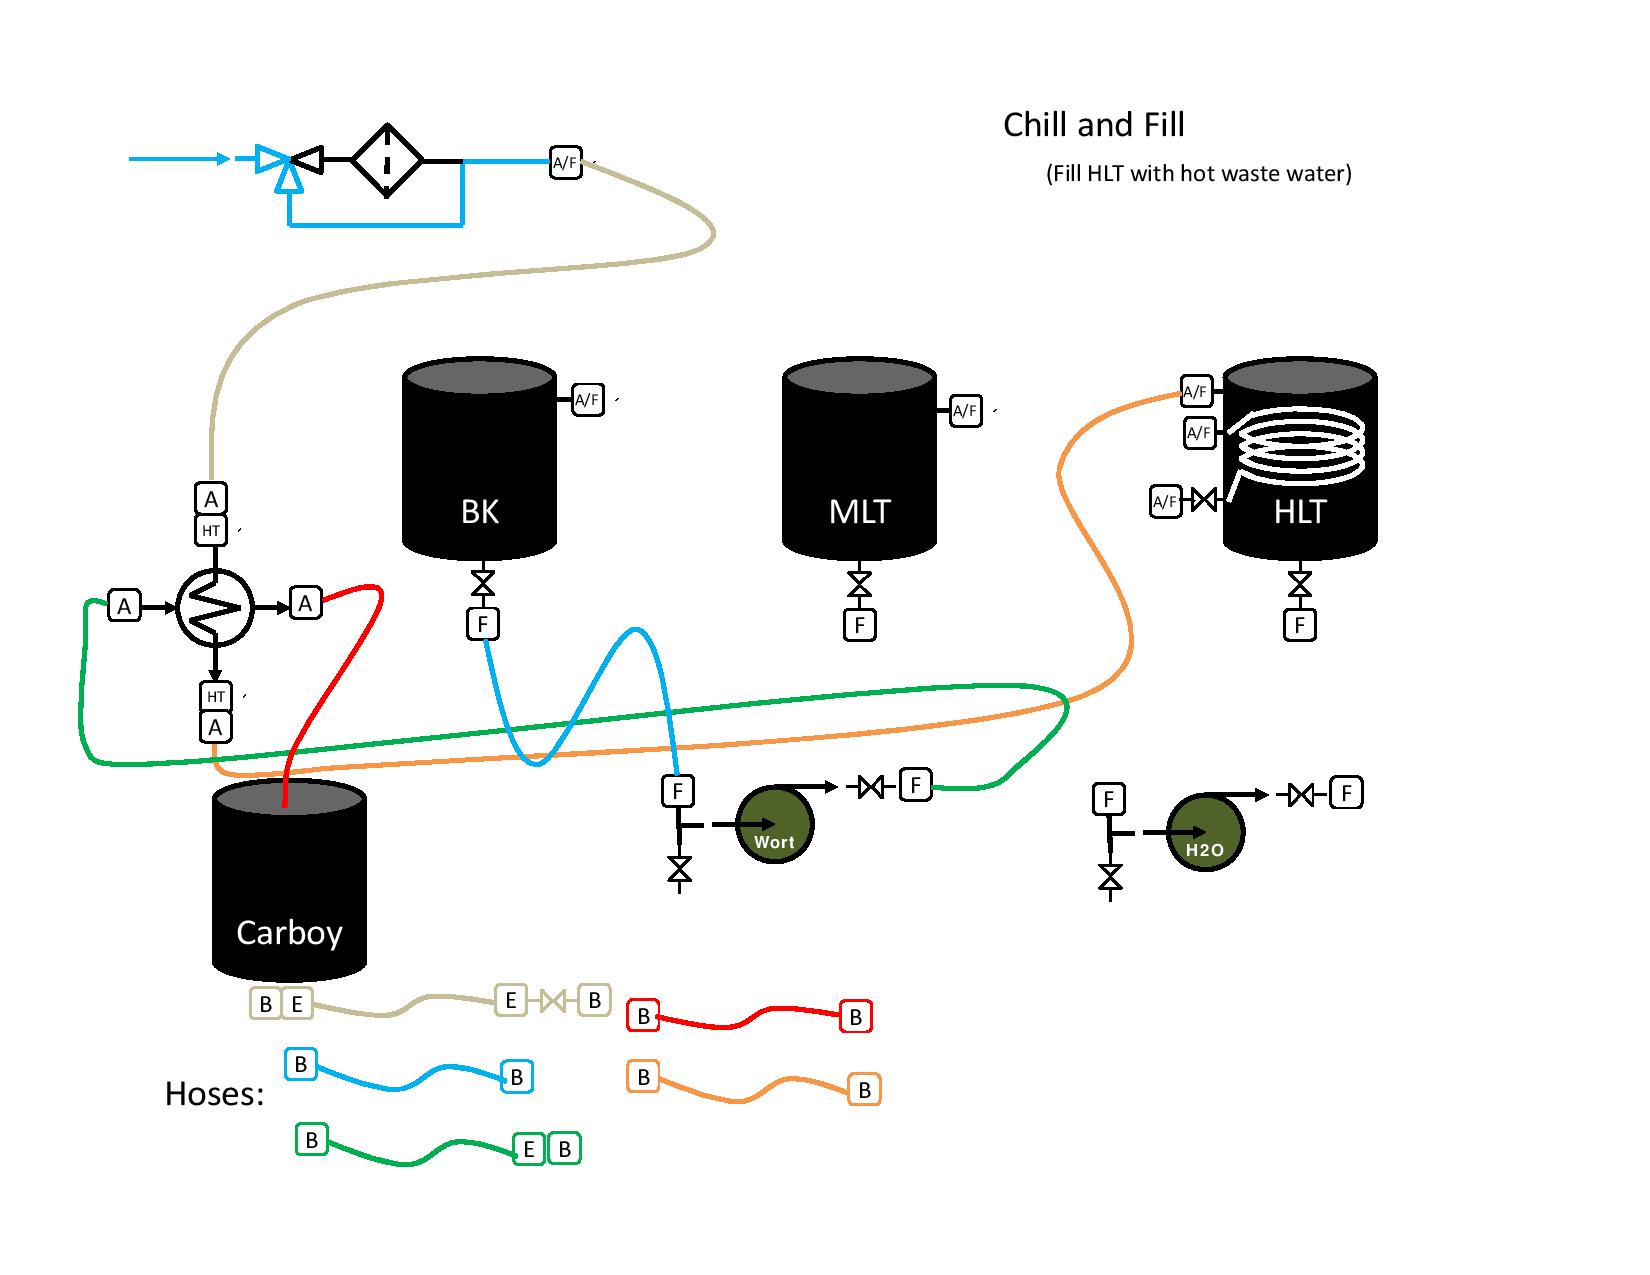
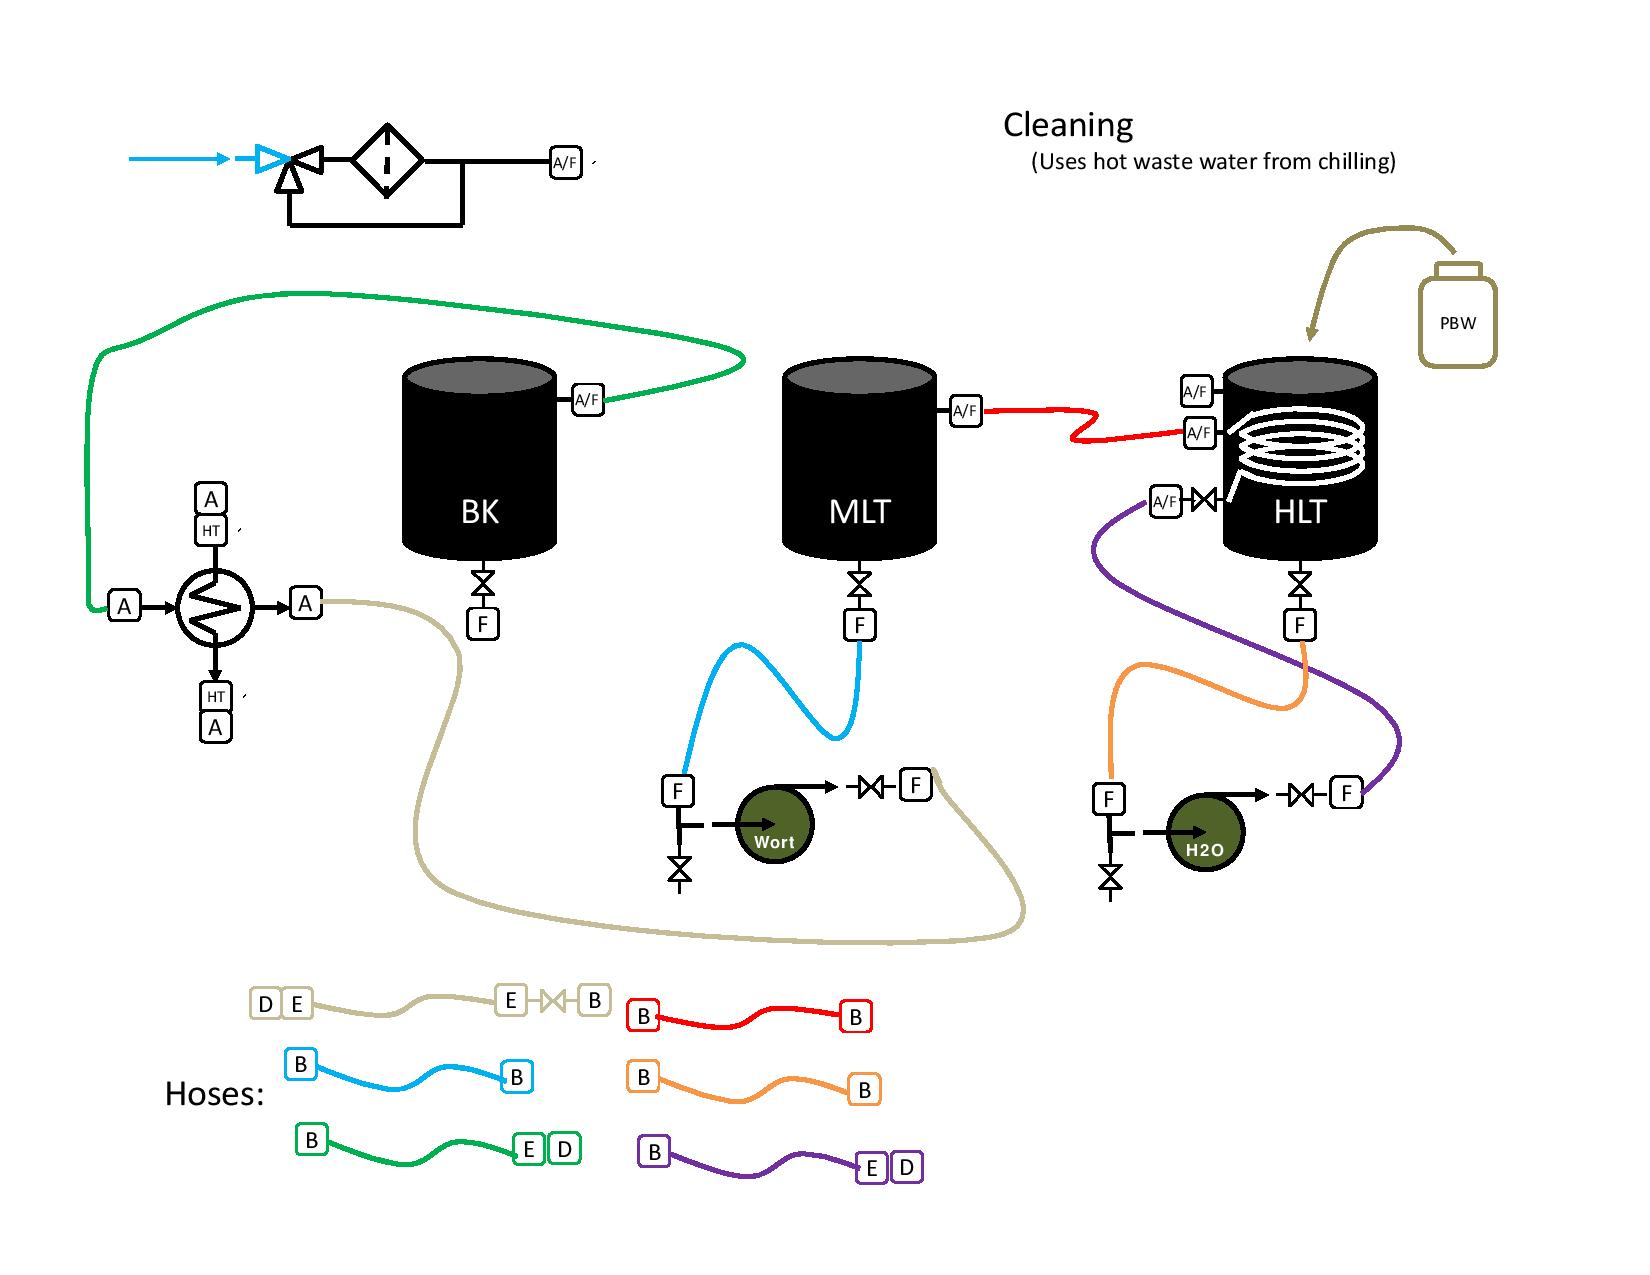
All the fittings and connections are stainless steel cam-locks, and the hoses are all ½” silicone – both from BrewHardware.com. The hoses are top quality and should hold up to temperatures well while still allowing you to visually confirm flow. The cam locks are the perfect solution for quick, easy interchanges between various configurations – though I’ve heard rumor they can get hot – I haven’t brewed with them yet. With two pumps and three vessels, I have developed 8 steps that I could foresee needing during the entire brew / clean process. I think I can accomplish everything with 6 hoses. I have attached the various configurations I plan to use during the process. If there are any questions or concerns, let me know. The first slide is a general overview slide of all the components.

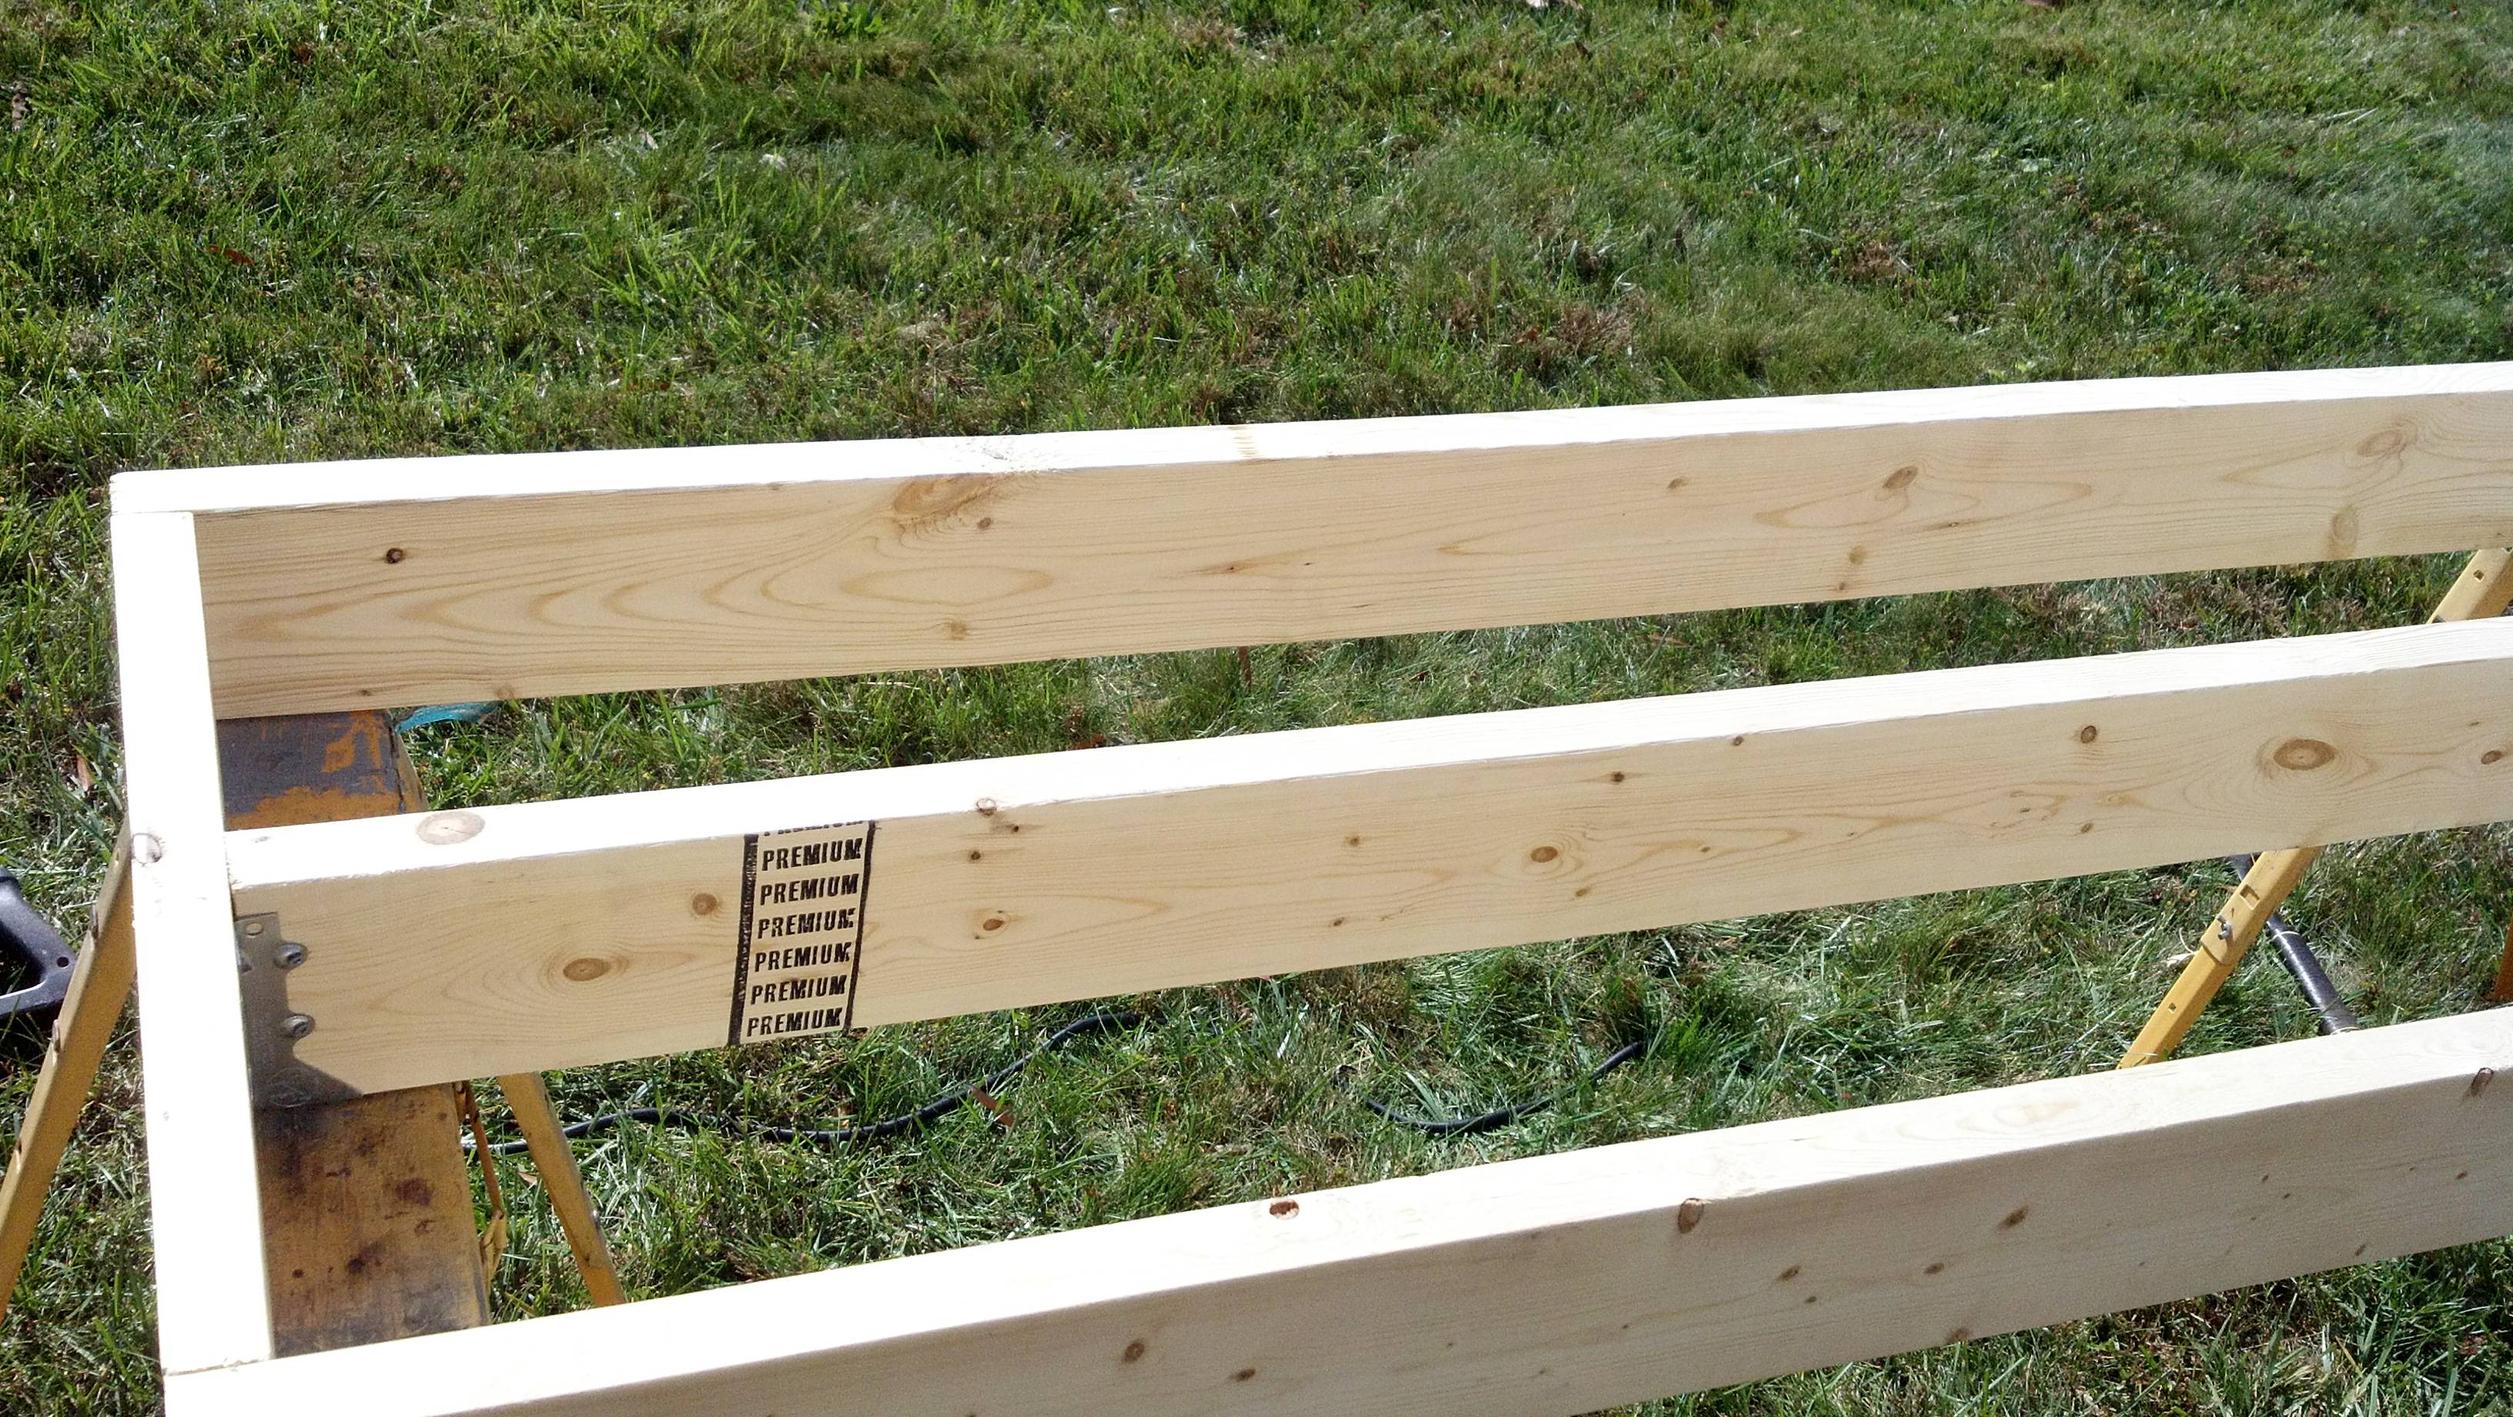
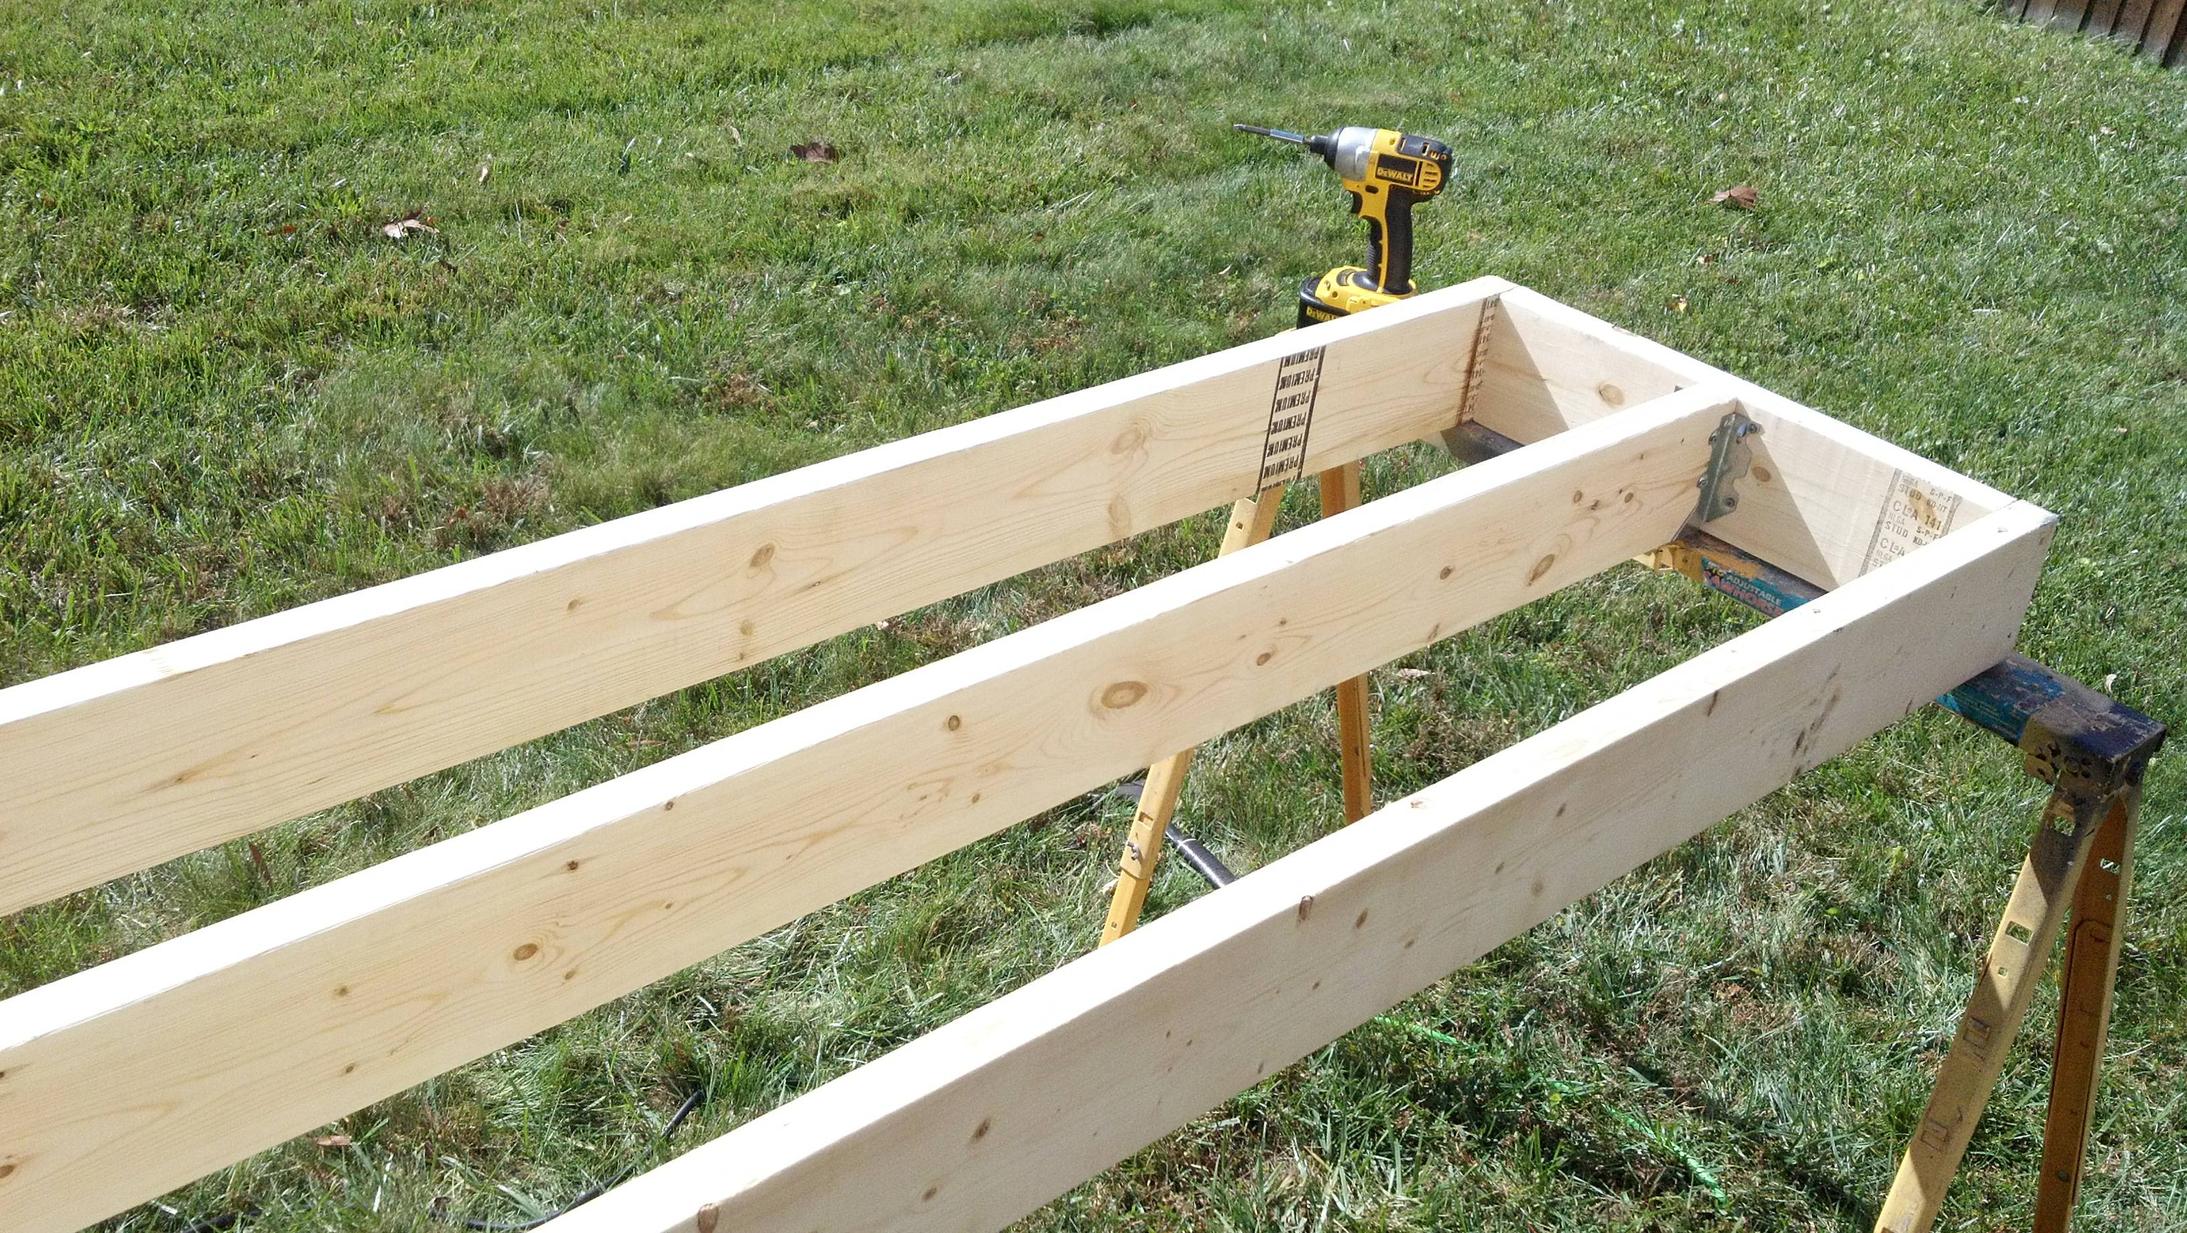
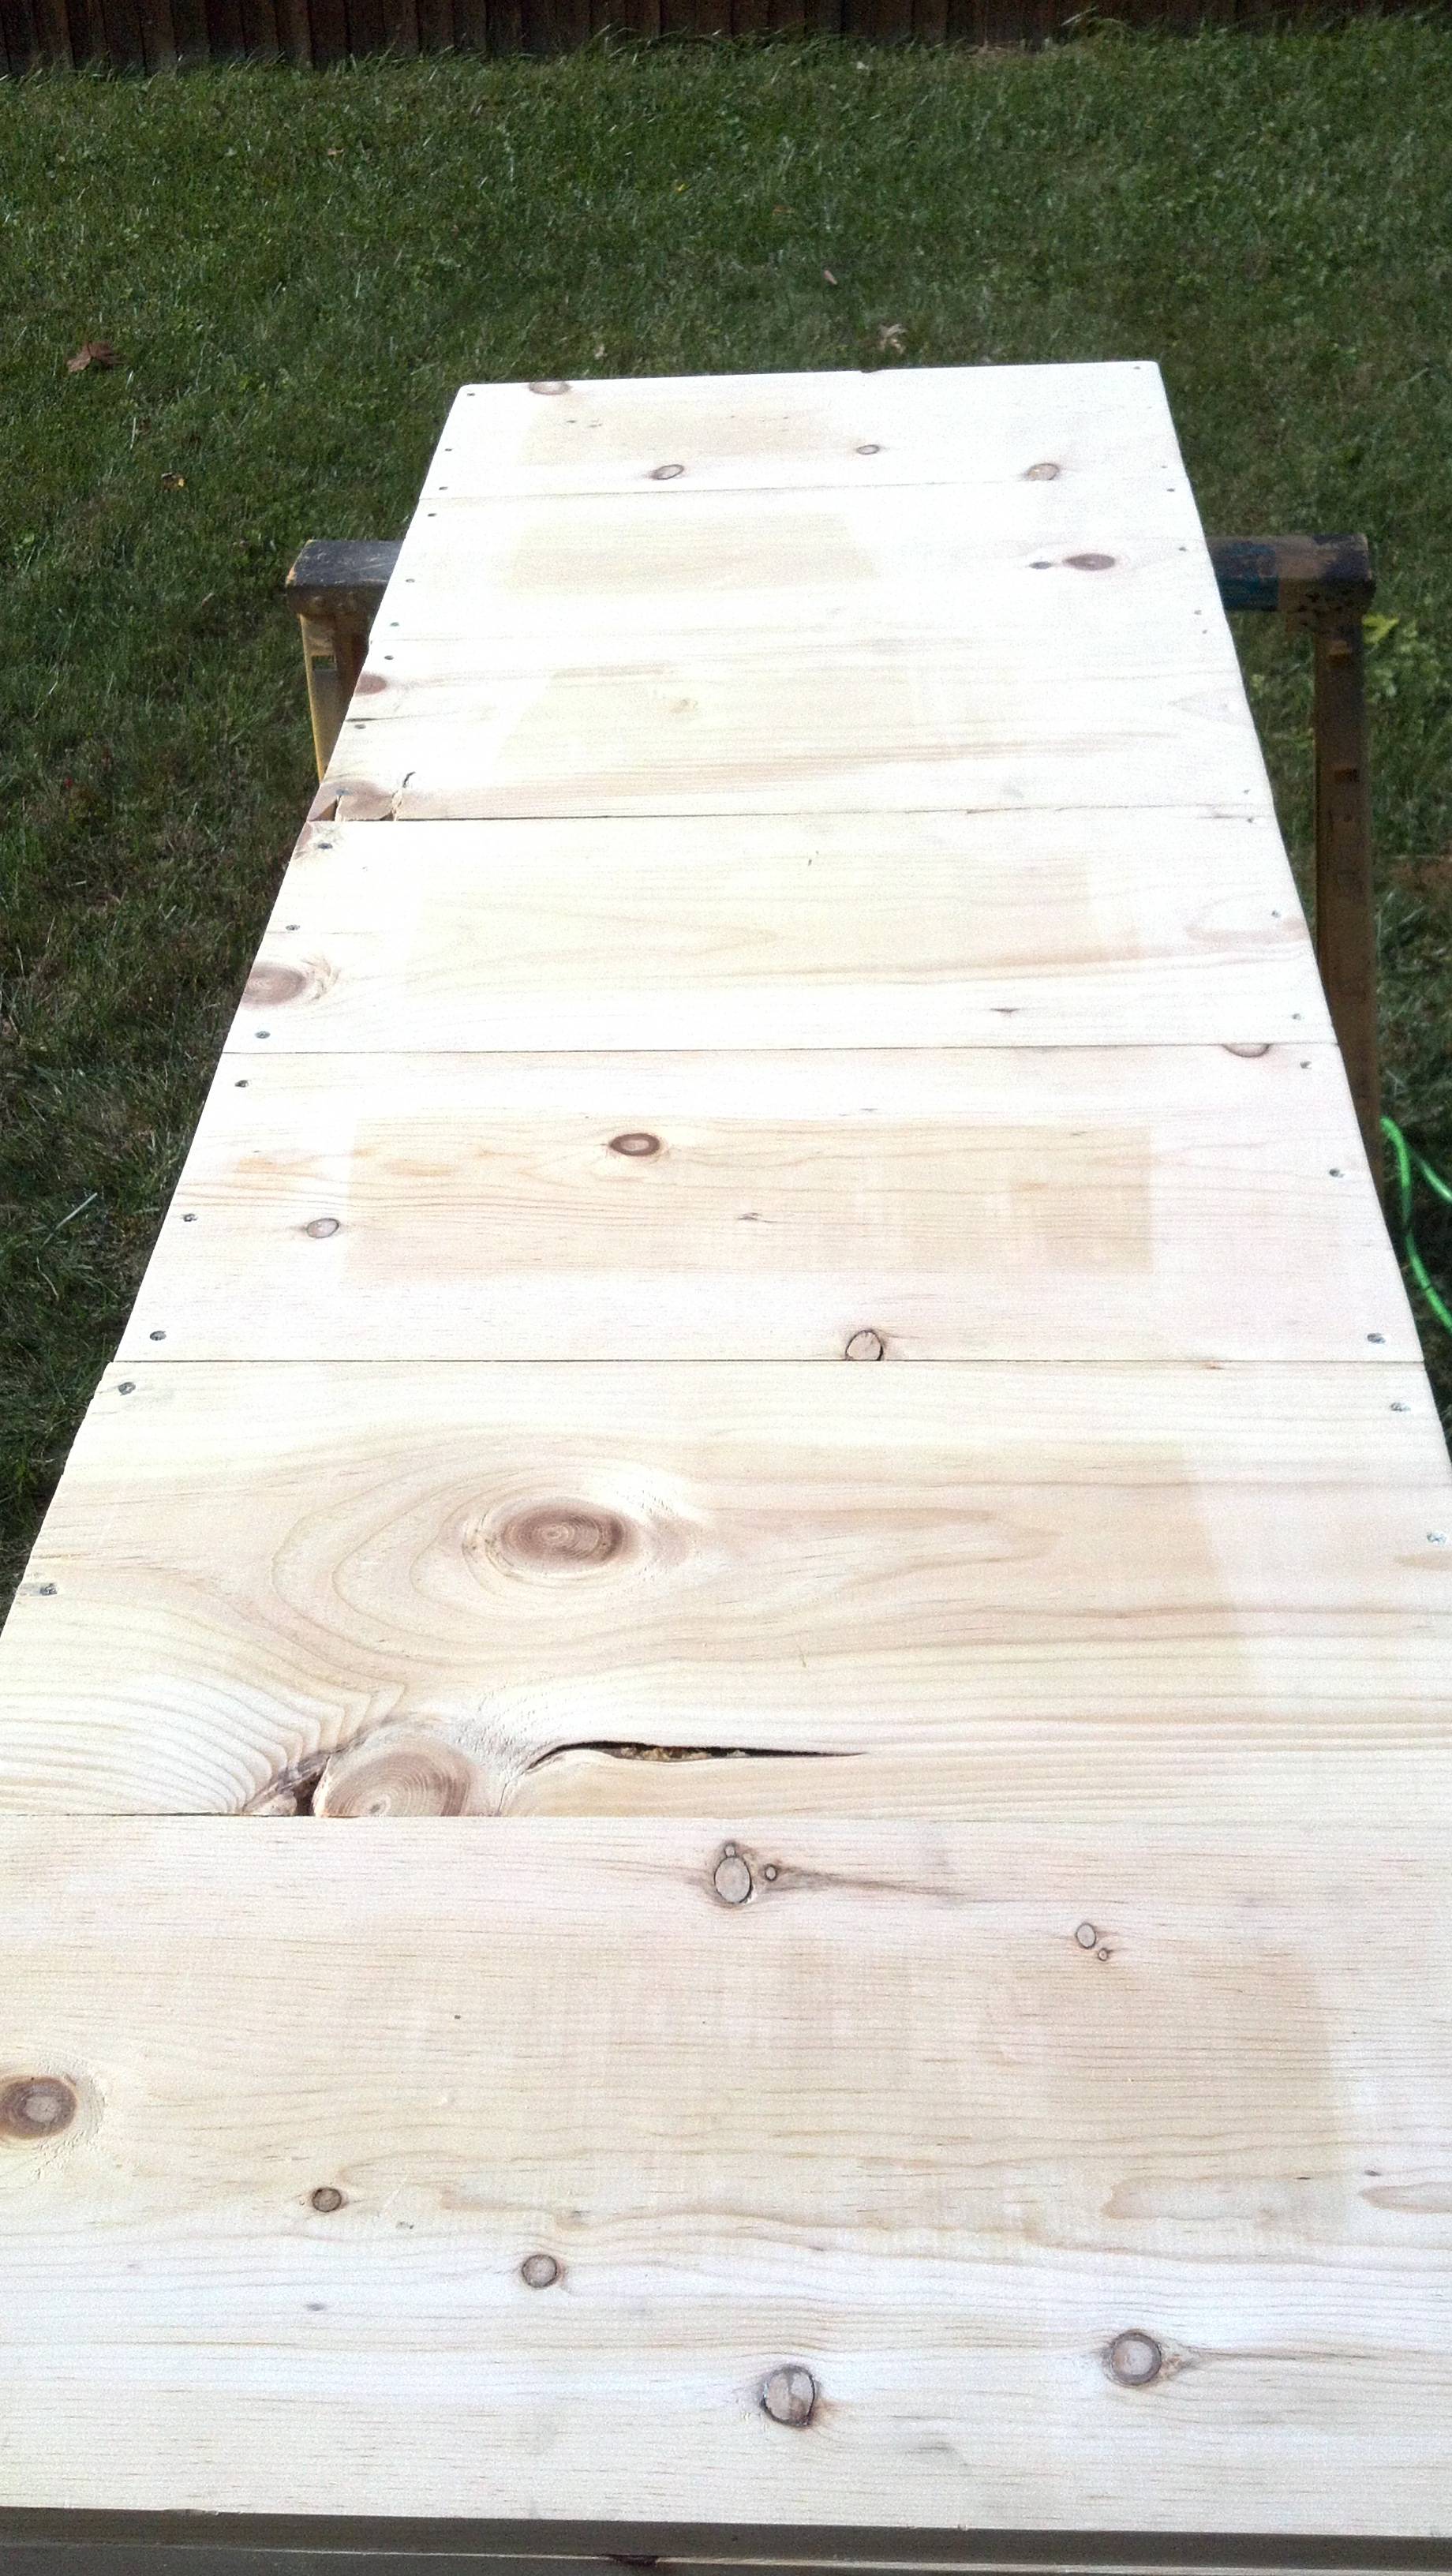
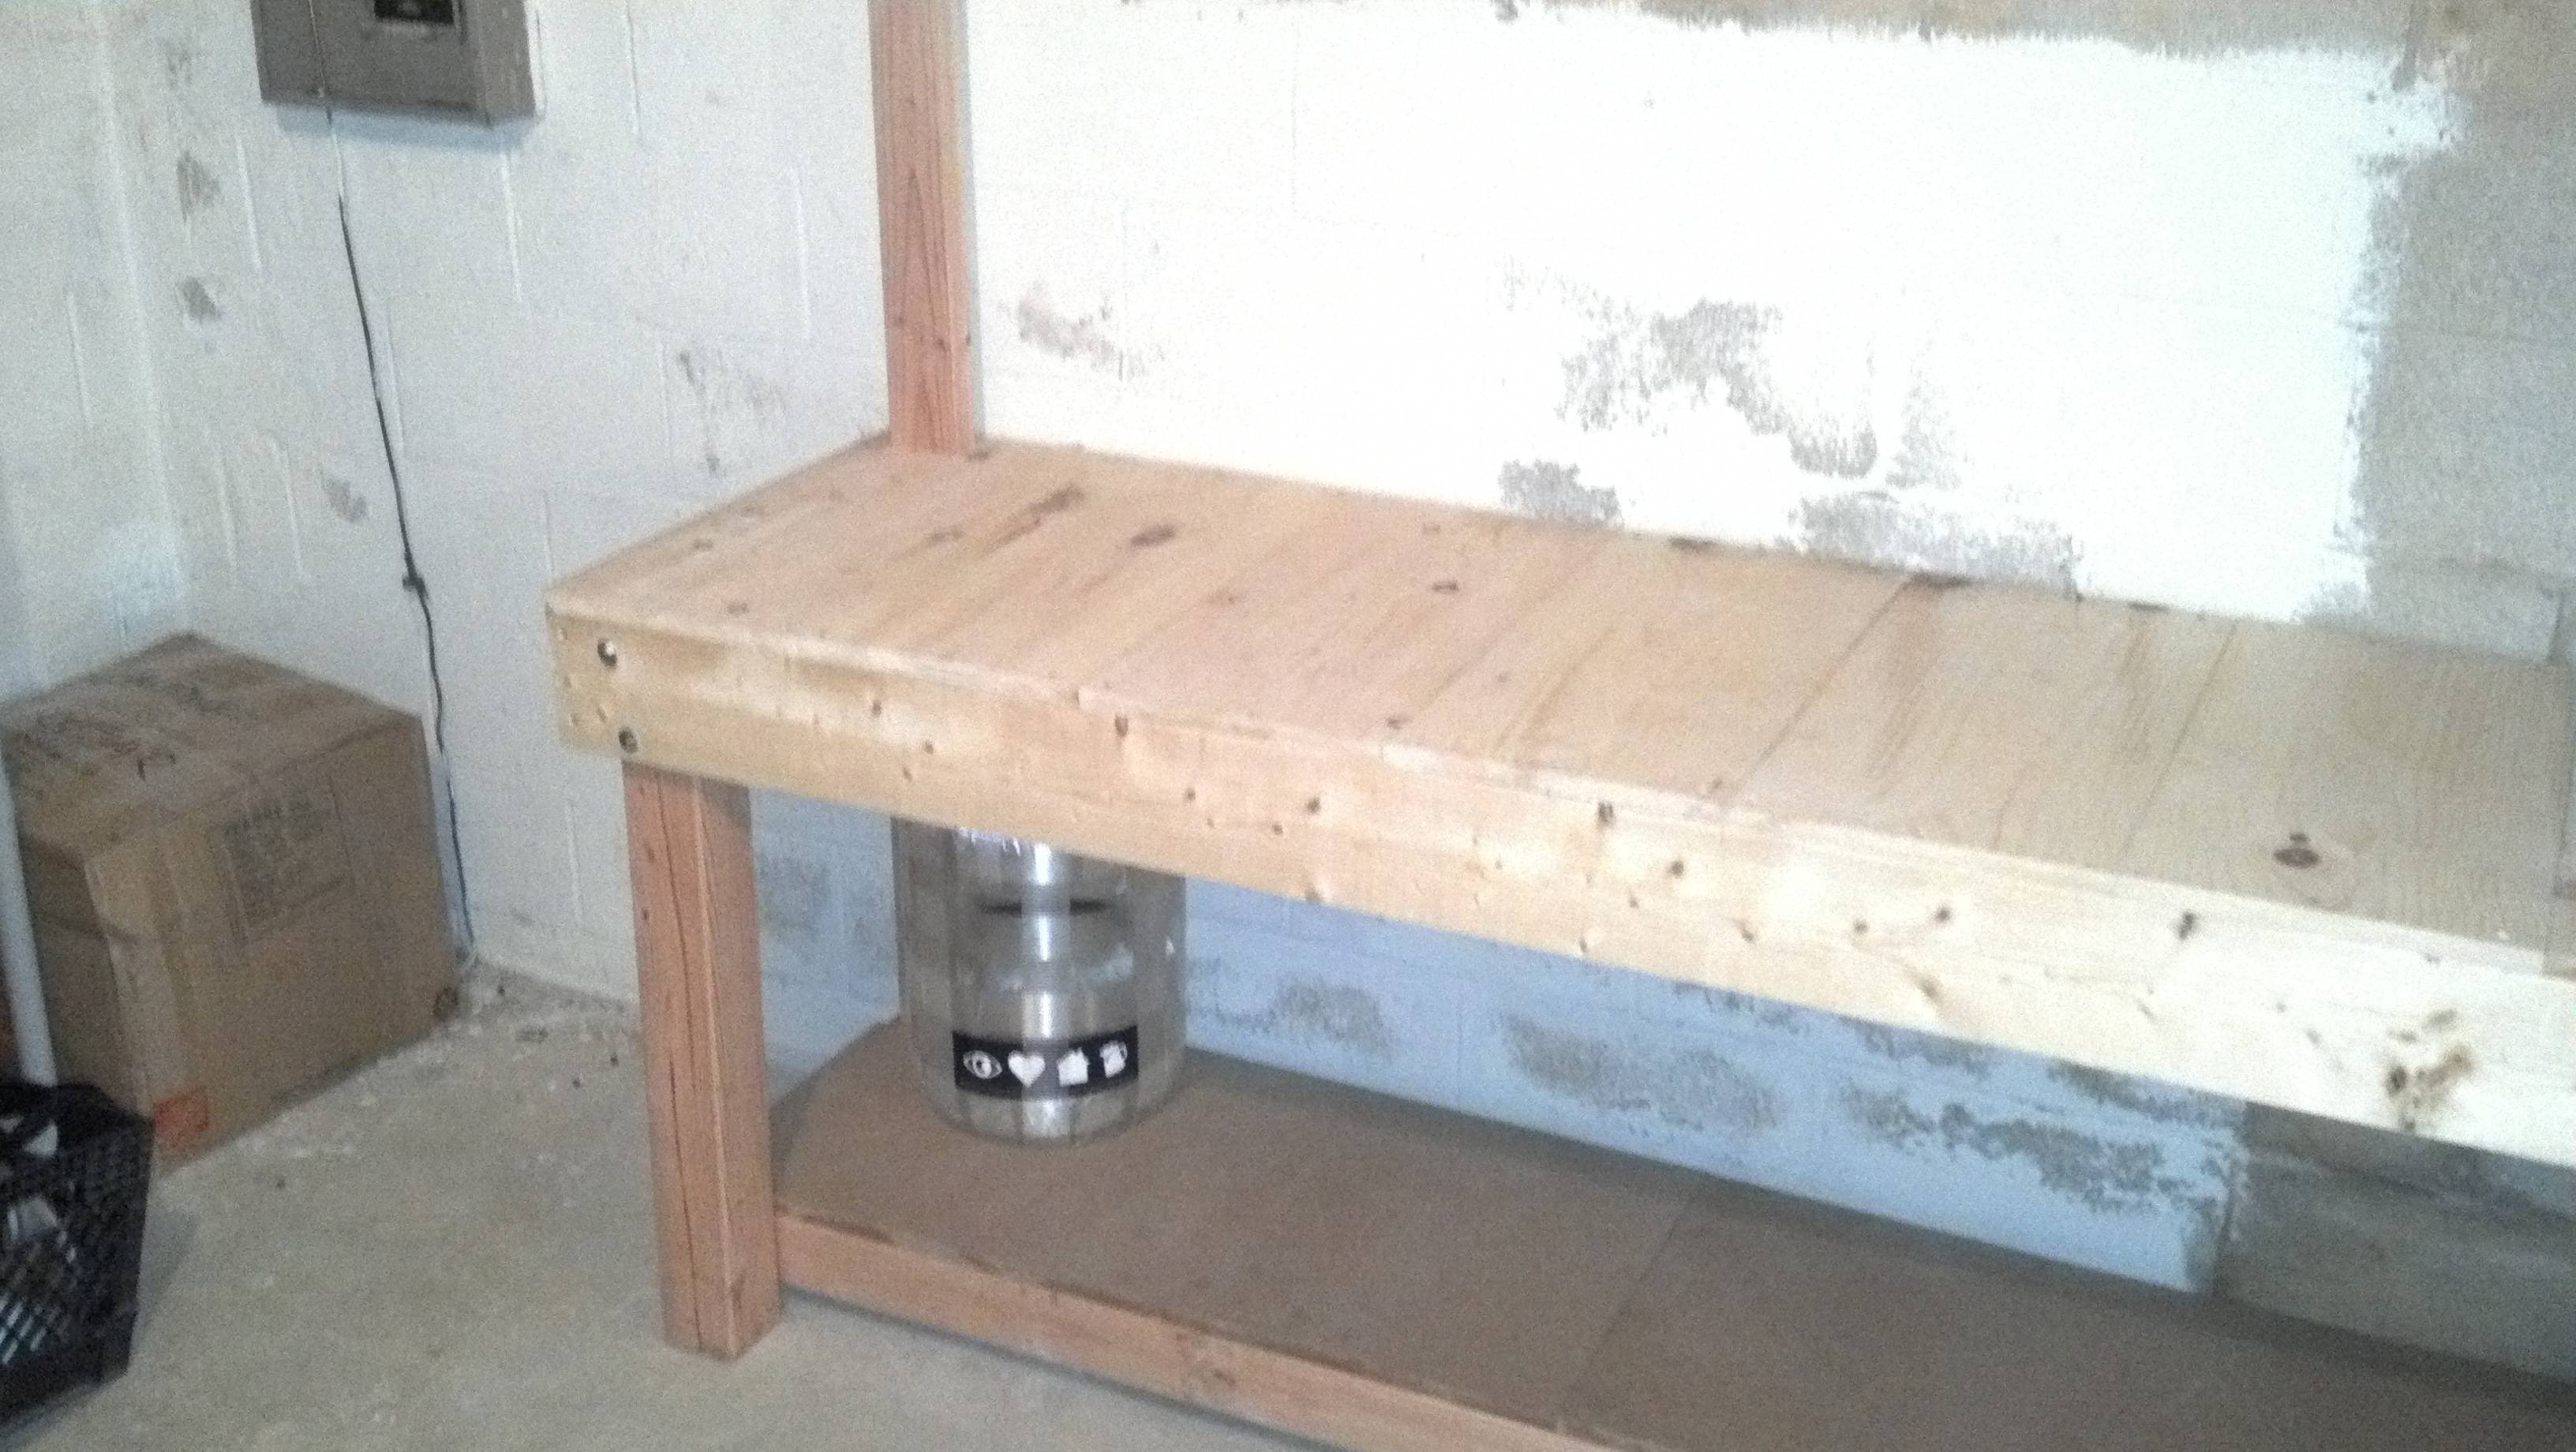
The brew stand was built in an afternoon for right around $100. The top is comprised of three 2x6 boards length wise and 2x6 ends. I bought two ‘utility shelves’ that were roughly 1x12 and pretty cheap, and chopped those up to use as boards for the top. The table is 24” wide by 78.75” long – the length was adjusted to be exactly long enough to fit a whole number of the 1x12 boards, thus the odd fraction, but saved me the effort of ripping a board or having unsupported overhangs.
The bottom shelf was recessed to allow me to stand against the table without banging my shins. It’s built nearly identical to the top shelf, only with 2x4s and some ¾” press board I had sitting around.
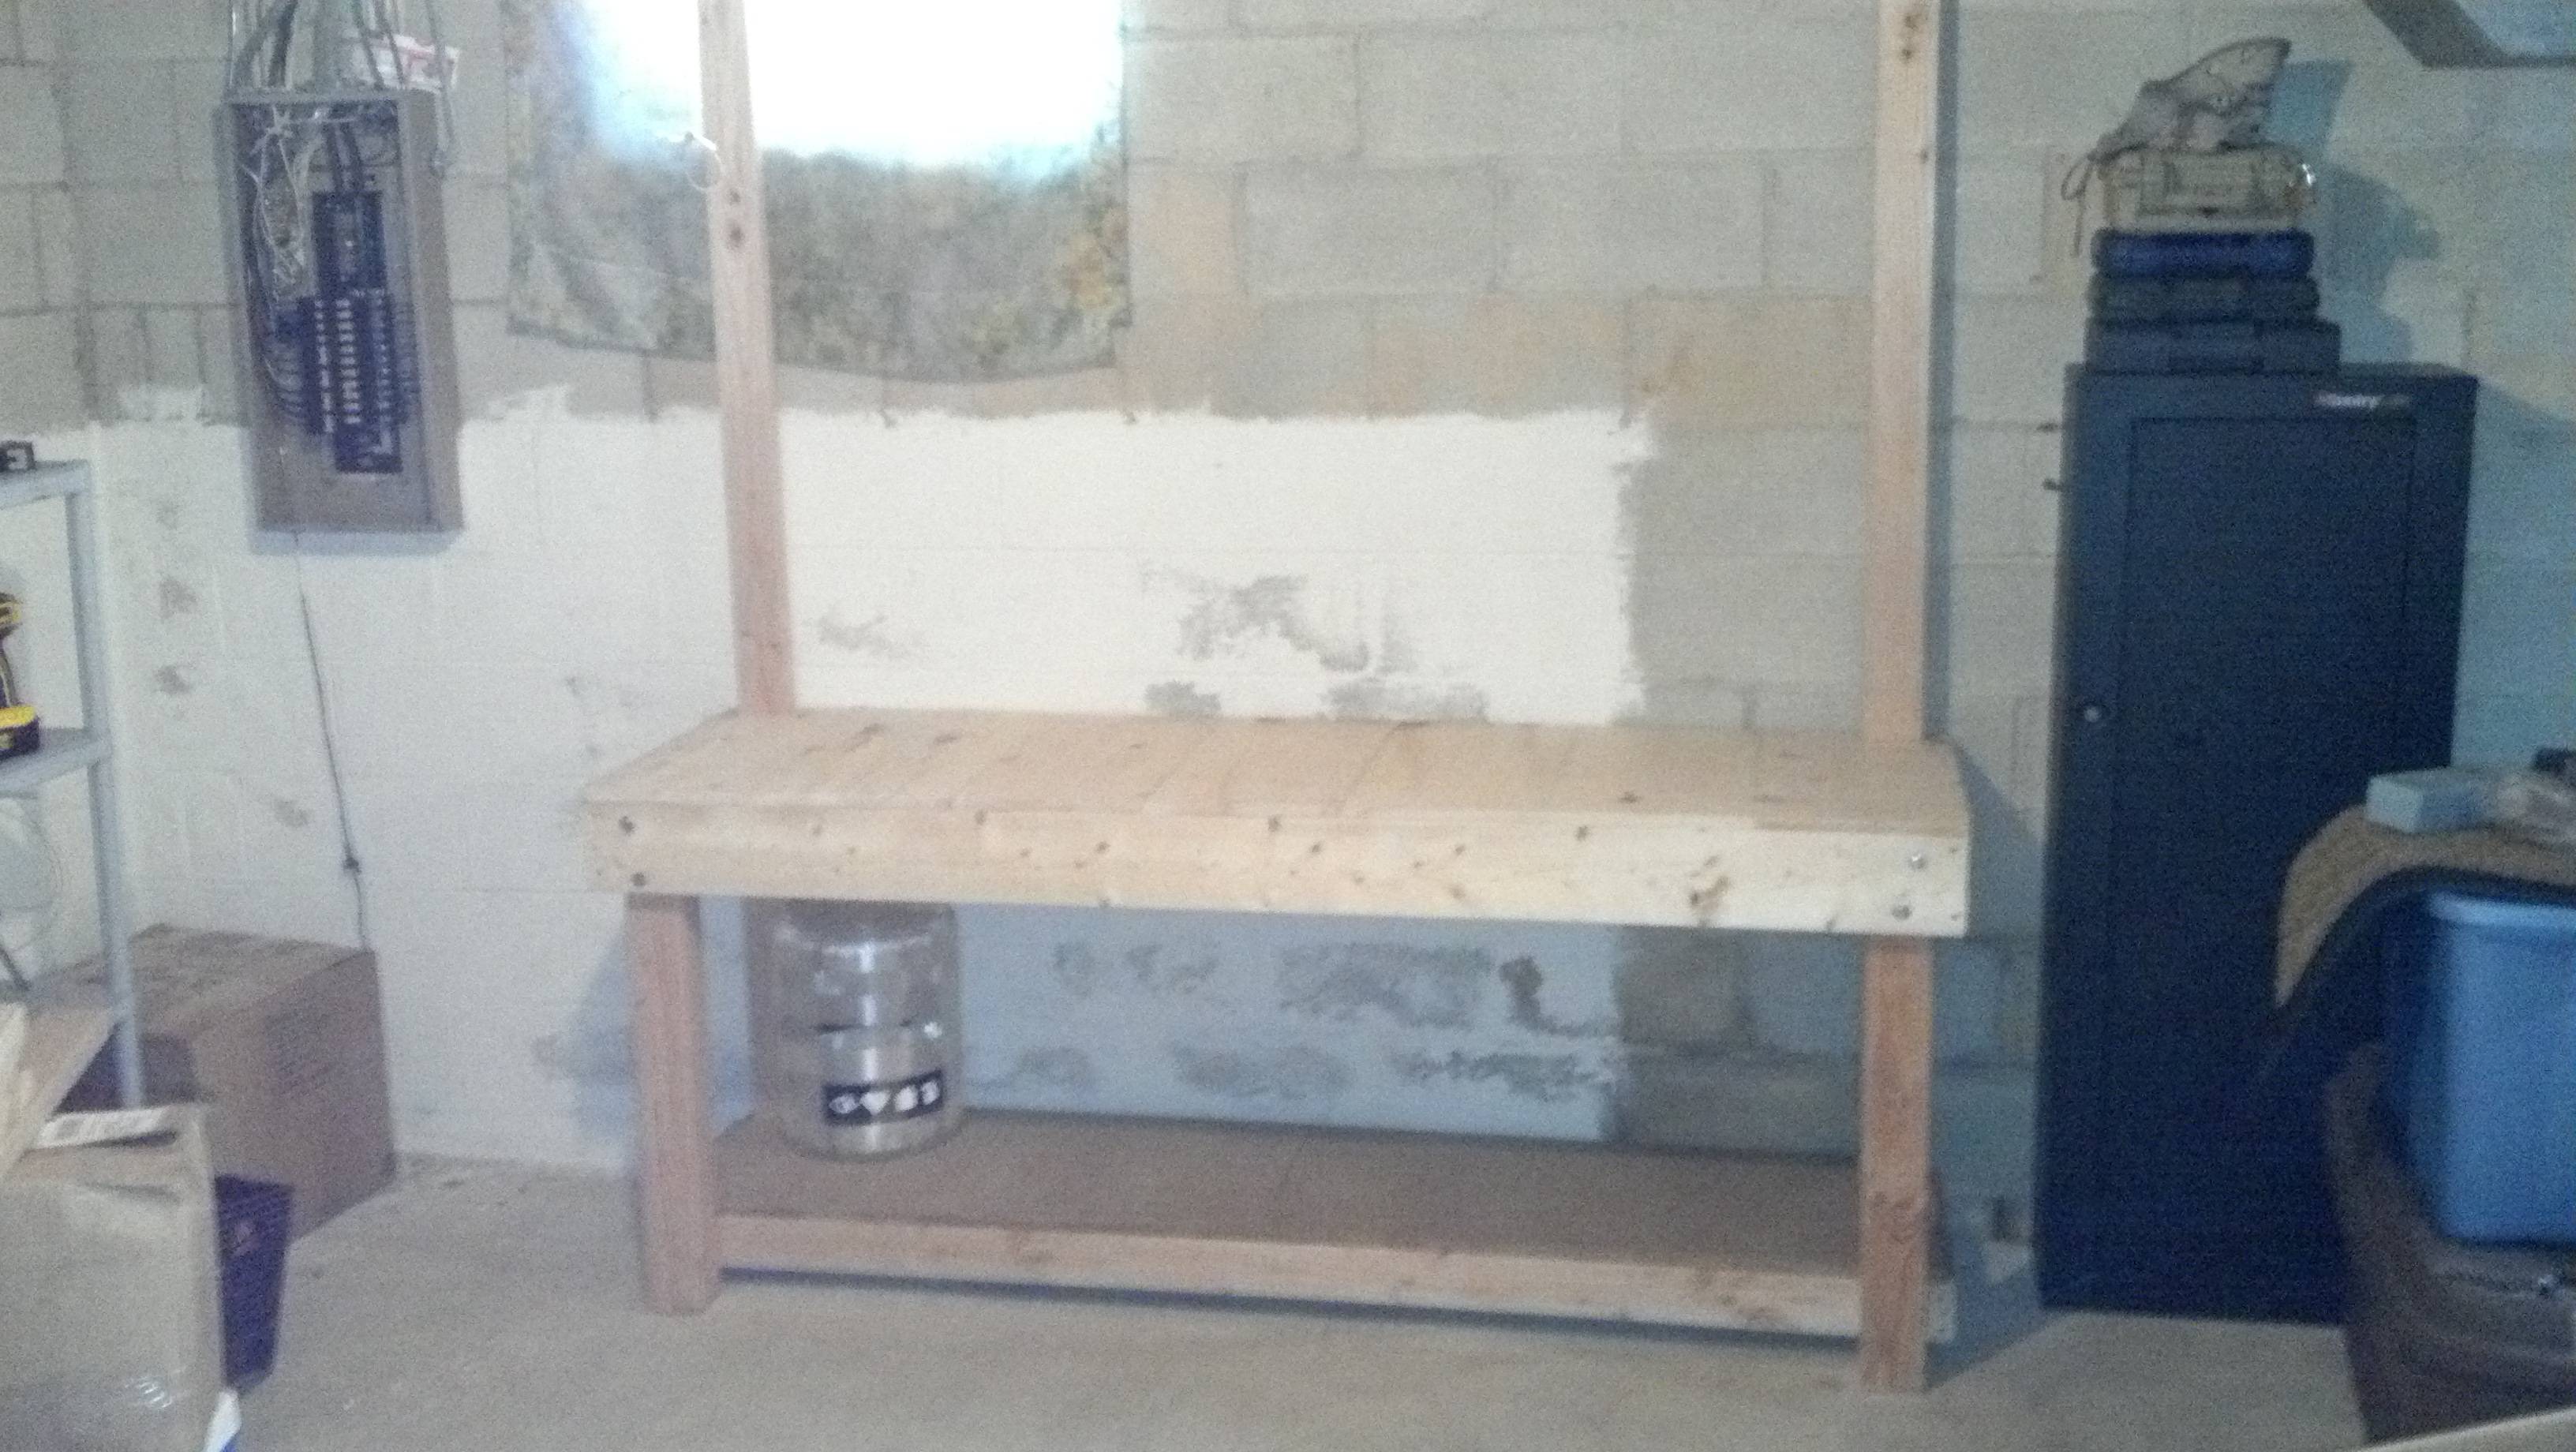
The front supports are 4x4s and in the back I used two 2x4s scabbed together and run through the bottom shelf. One of the 2x4s stops at the top shelf and the other continues up. This will be used to mount my ventilation hood. Running the 2x4s through the selves was an interesting task and made assembly quite difficult by myself in the basement, but I think it looks nice and will function well.
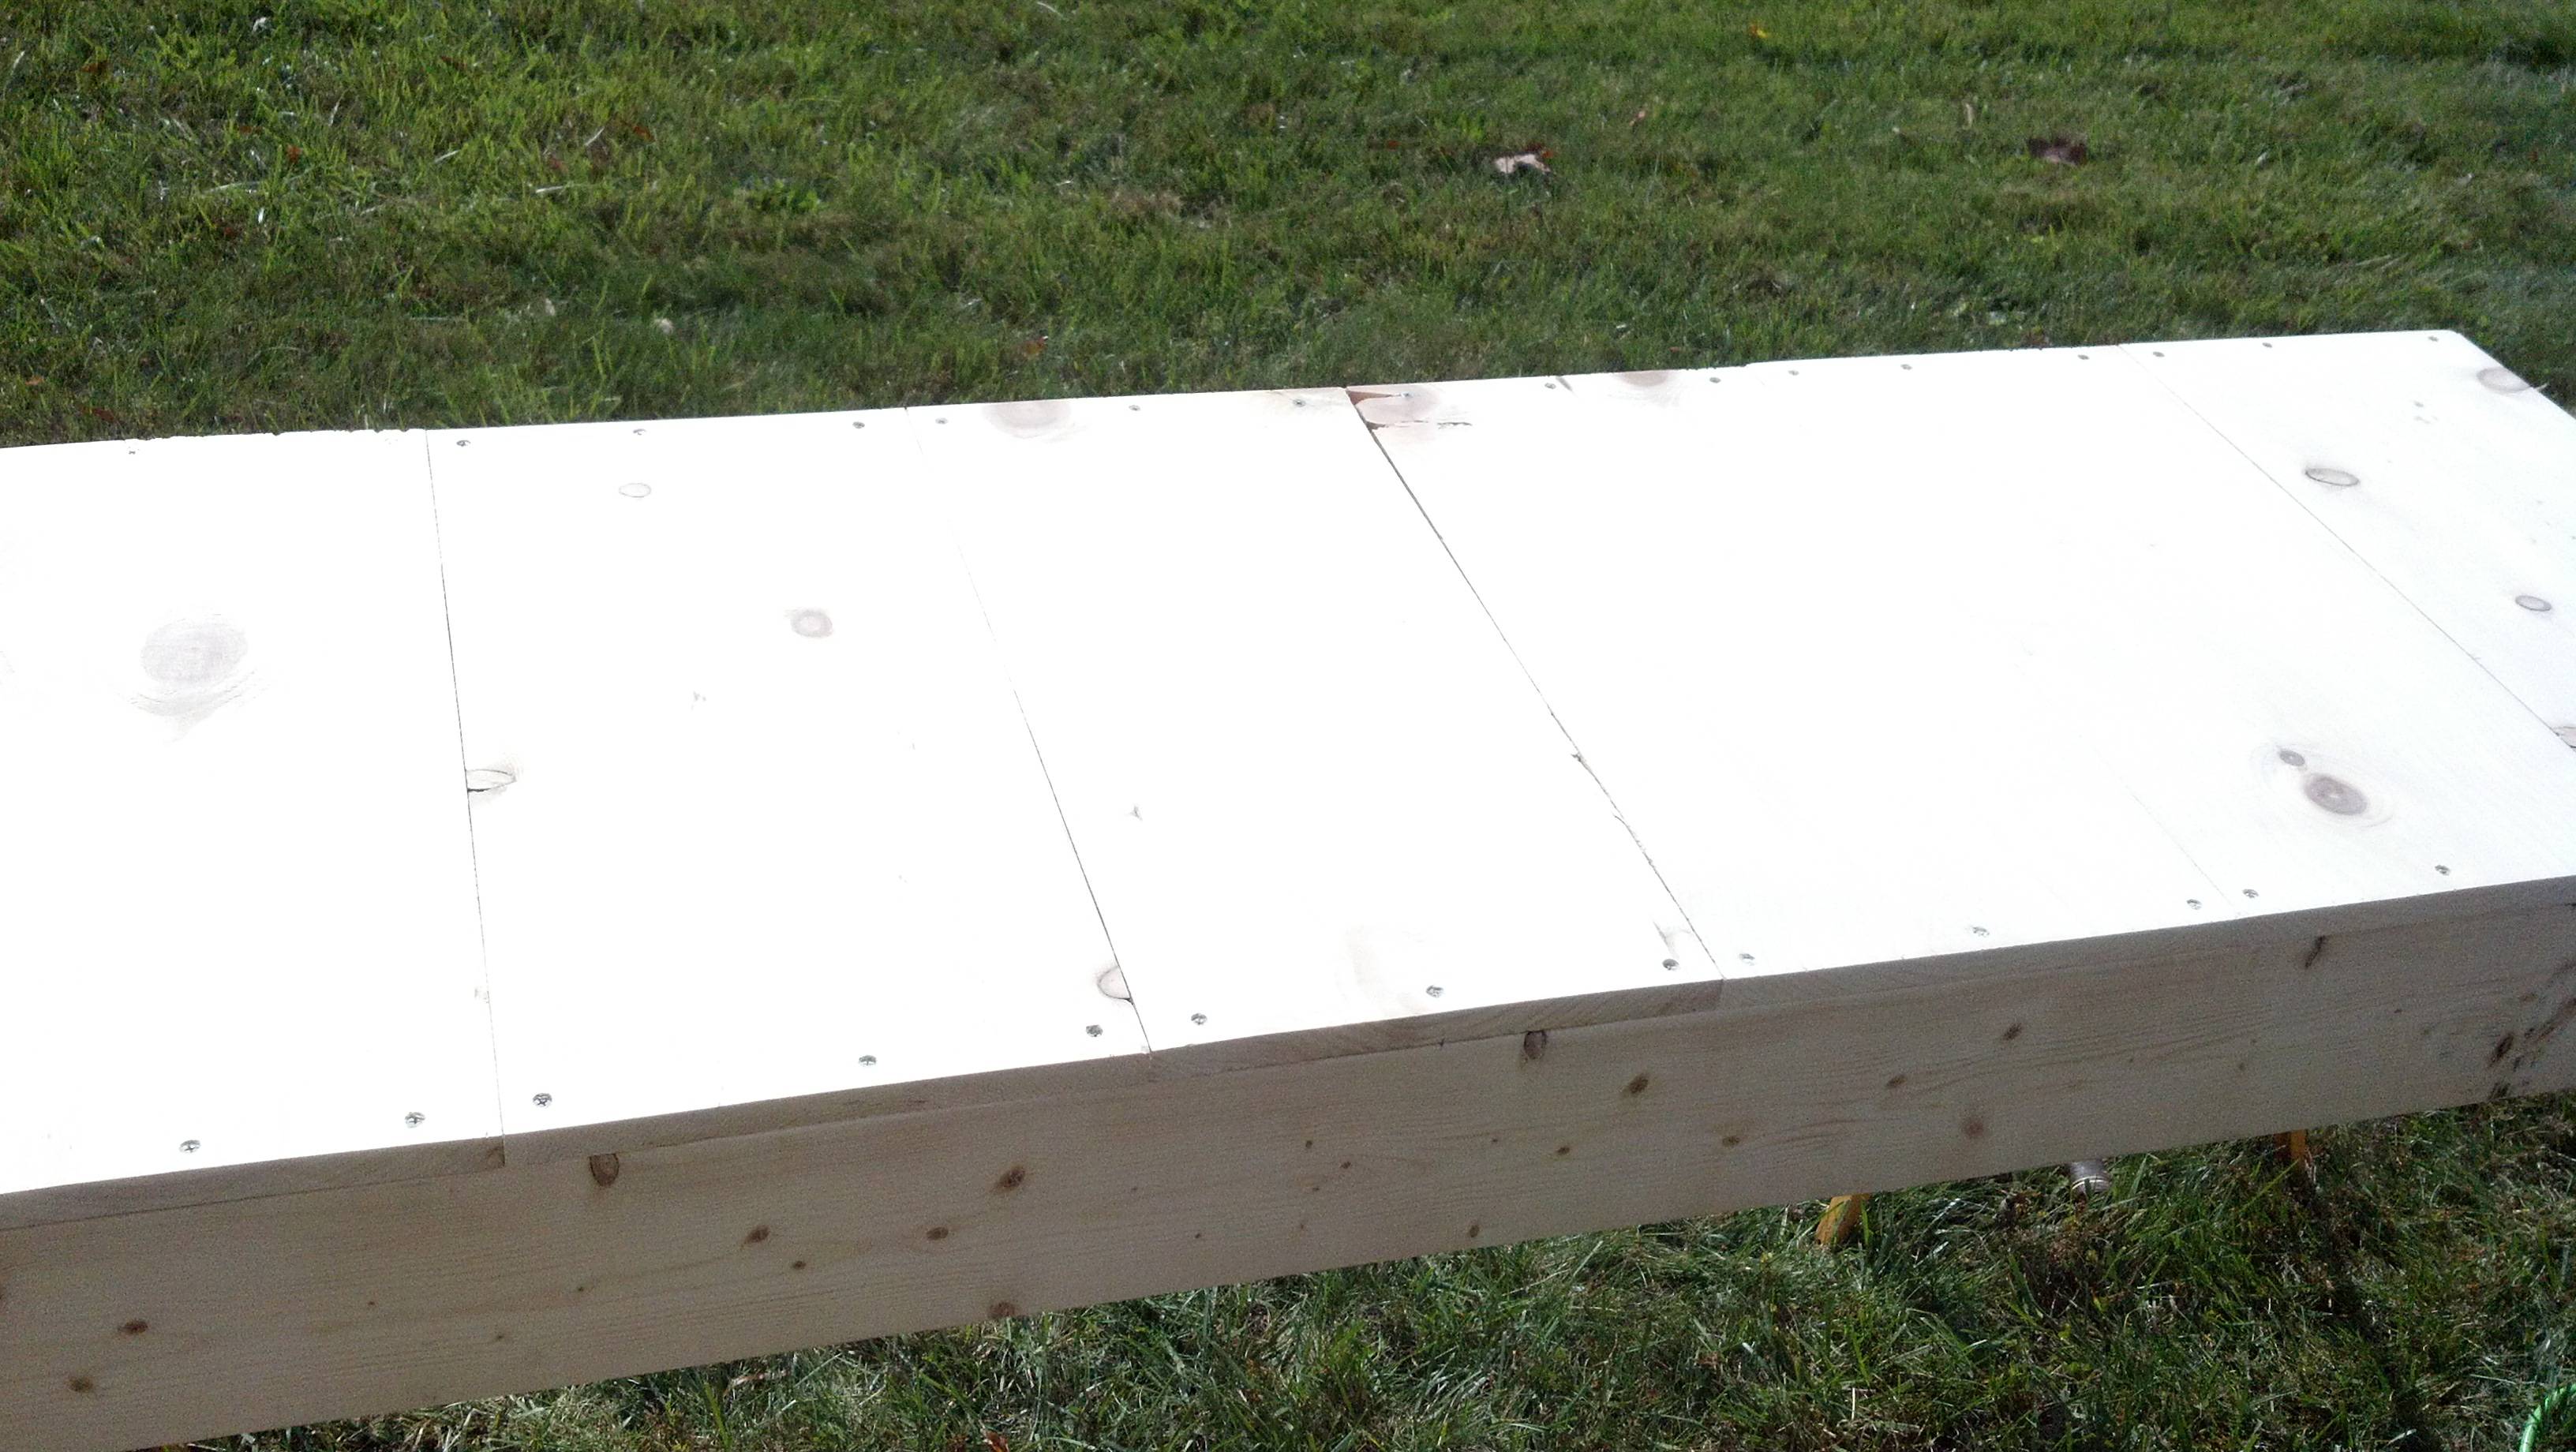
All the top boards are secured down with 1.75” deck screws. The structural lumber is held together with 2.5” deck screws to build the frame, and then secured to the vertical supports with 3” 5/16” lag bolts. The table is strong, as I jumped up on it and tried to shake it after I finished and it didn’t budge – I’m 6’4” 220#, so I think it’ll hold my brew setup fine.
Height – I made mine about 32” to the top shelf. It’s up to each person how tall to make it. My 5’4” girlfriend will have a hard time looking in the tops of the kettles, but she doesn’t do the brewing. Too much lower and I would have been hunched over – too much higher and I would have had a hard time looking in. Figure out the height of your table based on the height of your tallest kettle and how high you want the opening. I ended up going around the house putting my keggle on various tables and counter tops until I found one that was about where I wanted and measured off that – can’t beat a real world example.
The final step was a few coats of spray-applied polyurethane. I figure there’s a good chance that this will get splashed from time to time, so I want some degree of water resistance. I didn’t do a super thick coat or spend a lot of time on this one because I don’t plan on soaking it. I opted to not stain or paint because I liked the wood look (and I wanted to focus on building, not painting), but to each their own.
-Kevin
I opted for two pumps as I wanted a single tier brew stand and I like to show gravity that I don’t always have to follow his ‘laws’! I previously used a March 809 with no problems but the pricing on the Chugger with the stainless heads was hard to beat (BrewHardware.com). I opted for the in-line head as the pumps will be mounted on the lower shelf of the stand and I don’t want to deal with hoses or fittings jutting out and hitting my shins.
I have put a tee on the intake side of the pump. One leg of the tee goes to the pump and the other to a 2-part valve that then goes to a short flexible hose. I will use the valve to prime the pump by bleeding out the air, and also can use it to pull samples of the wort to take measurements during the lautering stage or really whenever I feel like it. It also helps with the cleaning process. There are numerous methods for priming the pumps, but this one has never failed for me in the past.
All the fittings and connections are stainless steel cam-locks, and the hoses are all ½” silicone – both from BrewHardware.com. The hoses are top quality and should hold up to temperatures well while still allowing you to visually confirm flow. The cam locks are the perfect solution for quick, easy interchanges between various configurations – though I’ve heard rumor they can get hot – I haven’t brewed with them yet. With two pumps and three vessels, I have developed 8 steps that I could foresee needing during the entire brew / clean process. I think I can accomplish everything with 6 hoses. I have attached the various configurations I plan to use during the process. If there are any questions or concerns, let me know. The first slide is a general overview slide of all the components.
The brew stand was built in an afternoon for right around $100. The top is comprised of three 2x6 boards length wise and 2x6 ends. I bought two ‘utility shelves’ that were roughly 1x12 and pretty cheap, and chopped those up to use as boards for the top. The table is 24” wide by 78.75” long – the length was adjusted to be exactly long enough to fit a whole number of the 1x12 boards, thus the odd fraction, but saved me the effort of ripping a board or having unsupported overhangs.
The bottom shelf was recessed to allow me to stand against the table without banging my shins. It’s built nearly identical to the top shelf, only with 2x4s and some ¾” press board I had sitting around.
The front supports are 4x4s and in the back I used two 2x4s scabbed together and run through the bottom shelf. One of the 2x4s stops at the top shelf and the other continues up. This will be used to mount my ventilation hood. Running the 2x4s through the selves was an interesting task and made assembly quite difficult by myself in the basement, but I think it looks nice and will function well.
All the top boards are secured down with 1.75” deck screws. The structural lumber is held together with 2.5” deck screws to build the frame, and then secured to the vertical supports with 3” 5/16” lag bolts. The table is strong, as I jumped up on it and tried to shake it after I finished and it didn’t budge – I’m 6’4” 220#, so I think it’ll hold my brew setup fine.
Height – I made mine about 32” to the top shelf. It’s up to each person how tall to make it. My 5’4” girlfriend will have a hard time looking in the tops of the kettles, but she doesn’t do the brewing. Too much lower and I would have been hunched over – too much higher and I would have had a hard time looking in. Figure out the height of your table based on the height of your tallest kettle and how high you want the opening. I ended up going around the house putting my keggle on various tables and counter tops until I found one that was about where I wanted and measured off that – can’t beat a real world example.
The final step was a few coats of spray-applied polyurethane. I figure there’s a good chance that this will get splashed from time to time, so I want some degree of water resistance. I didn’t do a super thick coat or spend a lot of time on this one because I don’t plan on soaking it. I opted to not stain or paint because I liked the wood look (and I wanted to focus on building, not painting), but to each their own.
-Kevin
