Another Keezer Thread - GE 7.0cf

Homebrew Talk - Beer, Wine, Mead, & Cider Brewing Discussion Forum

Help Support Homebrew Talk - Beer, Wine, Mead, & Cider Brewing Discussion Forum:

This site may earn a commission from merchant affiliate links, including eBay, Amazon, and others.
Joined
Jan 5, 2010
Messages
20
Reaction score
2
Location
Southeastern MI
Hey all!

Kinda new here, kinda not. Had an account for a while, lurked for quite some time, been homebrewing for a couple years now. I just recently jumped into kegging my stuff. Figured I would start a new thread to chronicle my adventures into Keezer Creation territory! Home Despot is selling the GE 7.0 cu. ft. freezer for $198 with free delivery. Got a raft of Home Depot gift cards for Christmas and thought there would be no better way to burn through them than the purchase of a brand-new chest freezer! Who needs the new bathroom completed, there's beer to brew dammit! :mug:

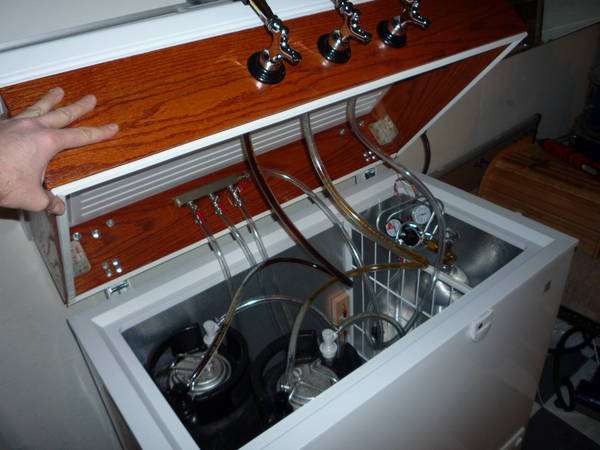
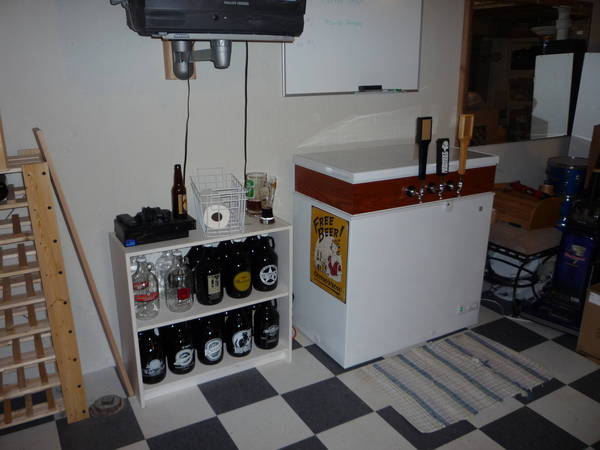
The freezer just got delivered Saturday. It's very nice and very quiet while running. It looks like it will fit 3 of my ball-lock Cornies comfortably. Here's some pics:
Keezer11.jpg


Keezer22.jpg


The internal dimensions of the fridge are 15" wide by 31 3/8" (24" to the hump)
Keezer41.jpg


Keezer51.jpg


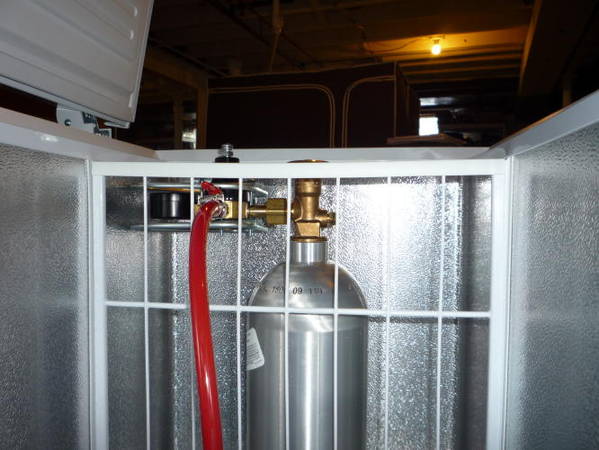
The 5-lb CO2 tank will sit on the ledge with no problem once I install the 6-inch collar. Without the collar, the lid won't close.
Keezer61.jpg


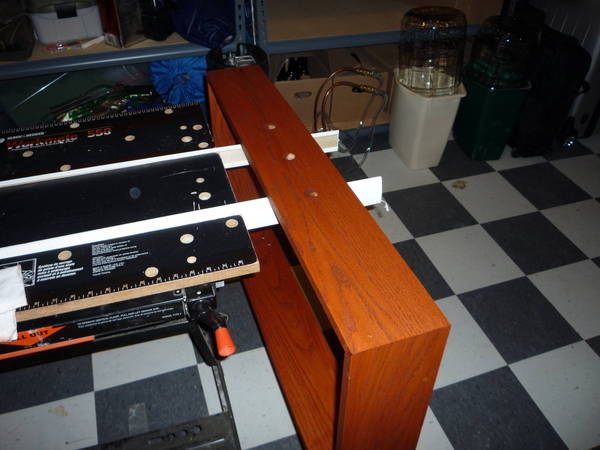
I considered building the collar out of cheaper wood and putting diamond plate or aluminum sheet over it, but vetoed that idea when I saw the price of diamond plate at the Depot and couldn't find a decent-looking scratch-free piece of aluminum. I settled on quality 1x6 red oak and some light stain. I love the look of red oak anyway, so this should work just fine.

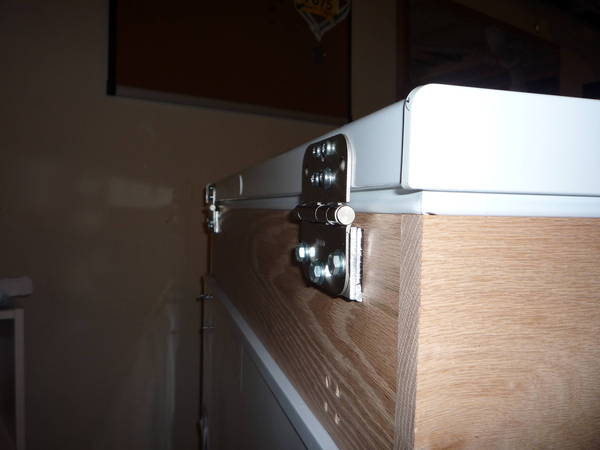
Ive also decided to use the one-hinge setup, relocating the original hinges up 6 inches and using double-sided foam tape to adhere the collar to the fridge body. I don't want to use glue or screws to fix the collar to the freezer, as I don't want to permanently damage the freezer in case I want to upgrade sometime in the future.

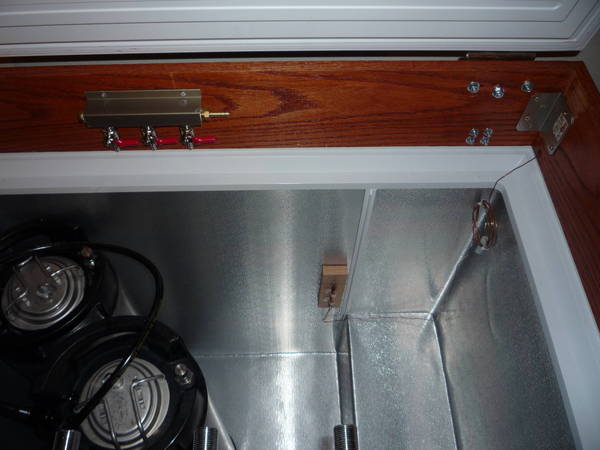
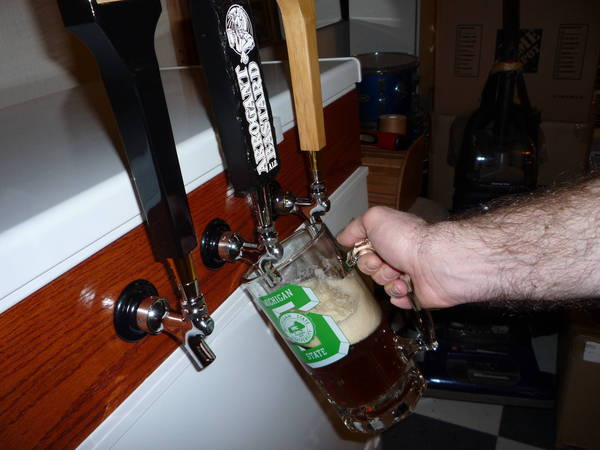
Bought a Johnson Controls temp controller along with a bunch of other stuff (faucets, shanks, seals, nuts, handles, clamps, etc) from Northern Brewer. I'm also using a 1-into-3 manifold to run all 3 kegs from my 5-lb CO2 tank. Later I may add 3 additional regulators so that I can force-carbonate while keeping serving pressure in the other kegs.

I also had to break down and get my favorite (current) tap handle; Stone's Arrogant Bastard Ale. Love that handle!
large-tap-aba.jpg


I also have a soft-spot for this handle:
schlitzantiquetap.jpg

One of the first beers I ever had! I like this handle, but it's sure not worth the prices I've been seeing for it ($70-$80).

So, this is the start of the build! I'll keep adding posts as I progress.
 
Got it from the Stone online store. Was a bit pricey ($45) and I'm sure I could have gotten it cheaper if I searched around, but didn't want to spend the time.
 
Just built a keezer from a Holiday 7cuft and it looks identical from your photos. I'd bet you can cram 4 ball locks on the floor and a fifth on the hump if you build a collar.
 
Just built a keezer from a Holiday 7cuft and it looks identical from your photos. I'd bet you can cram 4 ball locks on the floor and a fifth on the hump if you build a collar.

Yup....I have this same chest freezer and with a 10" collar you can fit 5 kegs in it.
 
OK! Finished the Keezer over the weekend! Here's the step-by-step of what it took:

1) Make a collar out of 1x6 premium red oak.
- I mitred the two front corners and did straight cuts on the rear.
- All corners are glued, and bracing brackets were added as additional structure

2) Drill your shank holes in the front piece
- I laid my 3 holes out in a 10-inch span; one dead-center, and the other two 5" away from the center hole in either direction.
P1000678.JPG


3) Using basic door hinges, mark the freezer lid hole pattern on the hinge and drill 4 through-holes.

4) Mount the hinges to the freezer lid using the existing freezer bracket bolts

5) Cut and drill shims for the freezer lid brackets and the collar brackets.
- When assembled, the collar will be offset from the freezer and the freezer lid by about 1/4". I bought a piece of 1/8" thick aluminum strip at Home Depot and cut my shims to bracket-size. Each bracket location needs 2 shims to get the needed 1/4", which means a total of 8 shims are needed; 4 long shims for the lid brackets and 4 short shims for the existing freezer lid brackets that will be used for the collar.

6) Line the shims up to the brackets, mark the through-hole locations, and drill through-holes
P1000681.JPG


7) Temporarily lay your collar seal onto the freezer ledge and place the collar on top of it. Center the collar to the freezer, then place the lid on top of the collar. Mark your freezer bracket locations using the existing freezer brackets.
- You need to accommodate the standoff for whatever type of seal you will be using on the collar to the freezer itself. I used a double-channel door weatherstrip which I temporarily laid between the collar and the freezer when I marked my bracket locations. If you do not accommodate this gap, your collar will not sit flush on your freezer.

8) Flip the lid upside down and place it on the ground. Place the collar upside-down on top of the freezer lid and center it to the seal. Mark your lid bracket through-hole locations on the collar.
- Putting the weight of the collar on the lid will ensure that your freezer lid seal gets the proper compression to fully seal your keezer lid.

9) Drill your bracket through-holes in the collar itself using an oversized bit.
- I used 1/4" hardware on all my brackets, so I sized my through-holes to accomodate.

10) Pick locations for your temp control unit and your manifold. Mark the mounting screw locations and drill pre-holes for the mounting screws.

11) Drill a hole to run your temperature probe into your freezer.

12) Pick a location for mounting your temp probe.
- I mounted the probe to a piece of wood and used some all-weather double-backed foam tape to mount it to the wall about halfway up the side of the freezer wall.
- Some folks put the probe into a water bottle and fill it full of ice-pak gel, but I didn't get this complicated with my setup.
P1000689.JPG


13) If you want, stain and seal your collar
- I picked a gunstock stain and one coat of gloss urethane.=, which looks really, really good on premium red oak!
P1000685.JPG


14) After everything is dry, apply the weatherseal to the collar between the collar and the freezer itself.
- I reccommend sticking it to the collar itself. Sliding against plastic is a litte easier on the seal than sliding against wood.

15) Flip the freezer lid upside down, lay the collar on it, and bolt your brackets to it.

16) Lay the collar/lid assembly on the freezer and bolt the existing freezer brackets to the collar
- To get the proper compression of the seal, I laid a 2x4 across the collar and put a 15-lb weight on it, making sure the seal was properly compressed all the way around.
- I used longer #10 machine bolts, washers, and nuts from Home Depot to attach the existing brackets to the collars.

17) Mount your manifold and temp control module to the collar.

18) Route your temp probe through the collar and mount it inside the freezer in the location of your choosing

19) Install your faucet shanks and tail-pieces

20) Install your faucets and tap handles

21) Run your gas and service lines
P1000695.JPG


22) Leak-test the system using StarSan solution sprayed at each joint location.

Here's some finished images of my handiwork. I'm quite proud of how this all turned out!
P1000696.JPG

P1000691.JPG


First pour! House Amber (MMmmm!) in a Michigan State University mug (BOOOooo!! It's my fiancee's mug, not mine!).
P1000698.JPG


A few lessons I learned:
- Get self-closing faucets!!! When I hooked up the beverage service, I wound up with a bunch of stout on my pants because the faucet was left open. Also, my cats like to jump up and rub on the taps, which spills lots of beer on the ground.
- Use proper-length (i.e. long!!) and proper ID (i.e. small!) service lines. I've currently got it set up with 3' of 1/4" ID tubing on each of my kegs, and it foams like crazy when I pour. There's a lot of info on this site about how to keep the foam down, so either use at least 10' of 3/16" ID tubing as your beverage service, or use one of the keg-side flow mixers as mentioned in a few threads on homebrewtalk.

So that's that! I'm going to install the new 10' 3/16" ID beverage service lines this coming weekend and will let you know the result.
 
OK, so I got impatient and really wanted to get the keg updated with new taps and the longer length / smaller ID hose. I went to a local homebrew store, Adventures in Homebrewing, and picked up three 6-foot sections of 3/16" ID hose and three self-closing taps. I got them all hooked up tonight and took it for a test-run.

The foaming is much more under control. I still had more foam than I want, but I think I overcarbed a bit when I force-carbonated. I'm discharging the cornies every 12 hours or so until I get the proper level of carbing in my beer. I don't think I am going to force-carb again unless I need to.

The self-closing faucets are great! No more accidental spills, no more cat-inspired keg dumpings!

I think for now I am done with my project! Now it's time to focus on getting beer on the 3rd tap!
 
Great thread, great pictures, clear steps on what you did.

You need to get an empty fridge now so you can fill and store all those empty growlers!
 
Could you have tilted the co2 and got the lid to close without adding a collar? Looks like the kegs clear. I may go this route if it will fit through my pantry door instead of getting another refrigerator, but I do not want to modify it. Need to keep it looking like a freezer. I saw your inside dimensions...can you give me the out to out dimensions on the short side?
 
Could you have tilted the co2 and got the lid to close without adding a collar?

Yeah, if you turn the regulator array so the gauges are horizontal you can store the tank upright on the hump. When I twisted the regulator unit, the lid would close but the regulator set-screw still contacted the lid a little bit. With a little more manipulation, I'm sure it would have fit.

Looks like the kegs clear. I may go this route if it will fit through my pantry door instead of getting another refrigerator, but I do not want to modify it. Need to keep it looking like a freezer. I saw your inside dimensions...can you give me the out to out dimensions on the short side?

Actually, the dimensions listed on Home Depot's website are the external ones. You'd think they would provide the internal ones too, but they don't!

I made absolutely no permanent changes to the freezer itself in making this keezer. No new holes, no attaching points, used all the original hardware too. It can be converted right back into a freezer in about 30 minutes time.
 
Excellent tutuorial! I'm thinking real hard about getting this same freezer from HD and using the same gift certificates!


thanks:mug:
 
Looks good.

I'll forgive you on the Michigan State mug. But if I see an OSU mug in any other shots, I might just have to repossess that kegerator.
 
Looks very good.

So you think the glue and braces will hold the wood without a problem? The wood looks great with no nails or screws.
 
awesome thread - thanks dude.

I just ordered my GE 7.0 from HD.com can't wait to get started! I was going to do a remote location set-up, but it looks like this is a cheaper/easier solution for the near term and then i can end up modifying it later.
 
I also have the exact same GE 7.0 freezer, and this is making it really hard for me NOT to build a collar for it. Thanks for the pictures and write up.
 
FWIW I went with 5' lines. Force carb'd a Pale and it's taken 3 weeks to get the foam vs carbonation to the right level. Primed a Cream Stout in the keg and it poured with no problems after 3 weeks. I will not force carb again! :D
 
I'll forgive you on the Michigan State mug. But if I see an OSU mug in any other shots, I might just have to repossess that kegerator.

Ha! Yeah, I don't have a U of M mug and I needed a big glass to fill. Hope that a State mug being the recipient of the first pour doesn't curse my keezer for good!

So you think the glue and braces will hold the wood without a problem? The wood looks great with no nails or screws.

It should. The braces each have eight 3/4" screws, so I don't think the collar is going anywhere anytime soon. My goal was to avoid fasteners visible from the sides and the front when everything is closed.

FWIW I went with 5' lines. Force carb'd a Pale and it's taken 3 weeks to get the foam vs carbonation to the right level. Primed a Cream Stout in the keg and it poured with no problems after 3 weeks. I will not force carb again! :D

Yeah, me neither. I'll either prime from now on, or set the regulator to serving pressure and let it sit for an additional 1-2 weeks.
 
Thanks for the post, info and pics...very nice.

I have the same freezer arriving May 28 and stumbled across this thread...exactly what I had in mind. I'm going to make a frame with swivel casters and rubber wheels so it is mobile for the garage...and parties.
 
For this setup, what did you find was a good gas line and beer line length? I am tentatively thinking about 3 feet for 5/16" gas lines and 5 feet for 3/16" beer lines.

Thanks in advance!


Jeff
 
For this setup, what did you find was a good gas line and beer line length? I am tentatively thinking about 3 feet for 5/16" gas lines and 5 feet for 3/16" beer lines.

Thanks in advance!
Jeff

In my opinion, if you're starting out from scratch, go with 10' beer lines. You can always cut a little off here and there to get them how you want them. I started with 5 footers and always had to fiddle with pressures and temps to get my pours perfect. I could always get them flowing great, but I had to tinker to do it. I recently swapped out both lines to 10', and she pours like a dream right out of the gate. I usually run around 10 psi at 34-38 deg F.
 
For this setup, what did you find was a good gas line and beer line length? I am tentatively thinking about 3 feet for 5/16" gas lines and 5 feet for 3/16" beer lines.

Keep in mind that I am just new to kegging (a week old) and I am using a picnic faucet while the collar is being built, but I'd suggest either starting with 10 ft lines or using the epoxy mixers from McMasters in your keg as suggested in another thread.

I currently have a pilsner in one keg with 5ft of beer line and the epoxy mixer to slow things down. Its been ~7 days at 10psi (40F), and the pour is fine - no extra foam. I can get the amount of head I want by tilting the glass accordingly.

OTOH, I have a hefewiezen and dunkel at 20psi (I want them at 3-3.4 level carbonation) for ~10 days and 40F with 10 feet beer lines and no epoxy mixer. They are now starting to foam quite a bit while pouring. I need to reduce the pressure while pouring to get that under control (then remember to bring the level back).
 
Thanks for the replies guys; I'll get at least ten feet per tap and see how it works.

BTW, what diameter lines and tailpiece are you using?
 
Isn't this the model that will hold 4 on the ground with a 6in collar and two more on the hump with a bigger collar? There are plenty of these builds with 4 packed in.

I am planning on ordering this one soon and wanted to make sure it holds 4. Going to put in 3 co2 and 1 nitro tap.
 
Isn't this the model that will hold 4 on the ground with a 6in collar and two more on the hump with a bigger collar? There are plenty of these builds with 4 packed in.

I am planning on ordering this one soon and wanted to make sure it holds 4. Going to put in 3 co2 and 1 nitro tap.

This is the one I have, and I also thought it was supposed to hold 4 on ground with a 6in collar. I took the measurements by cutting out a cardboard corresponding to the keg footprint. But either I cut the cardboard wrong, or the ball-lock kegs are slightly thinner at the base, but I could fit only three on the ground. By that time, I'd already built a 6" collar! So if you want to fit 4, better build a 8" collar or more.

But there is a lot of spare area between the kegs where I store bottled beer, glasses etc.
 
I have this freezer and I think I am going to convert but had a question about fitting 5 kegs in with the 8" collar.

Has anyone done this and can show what it looks like? It seems to me like if you take out the rack you could fit 4 in but not sure how 5 are able to fit?

Any feedback is appreciated!
 
Check out my link. Different but same freezer. If you keep the CO2 outside you can put four kegs on the floor and a fifth on the compressor step.
 
Great thread, I did same thing to my GE freezer after reading your post and love the results.

One question to you or anyone who has done this... how do you get the top lid to not fall back when opening both the lid and the collar?

It isn't a huge deal for me since I can always rest this on a wall but I was wondering if there was an easy solution so that you could lock the top lid to the collar or something.

Thanks again!
 
I incorporated safety straps on mine, but then again, I also build a cabinet around the freezer, put an oversized top on it, and have a coffin. My top weighs a ton with all of the cement board, tile, lumber, logs, etc. If I didn't incorporate safety straps to stop the travel of the lid, it would rip the hinges off. Worked like a charm. I'm sure you could come up with something secured inside of the freezer if you don't have a cabinet around yours. Check out Page 12 of "knotty pine and cedar log keezer" build thread and you will get a better idea about what I'm talking about. Jester had a phenomenal idea of incorporating linear actuators to motorize the lifting and closing of the lid, but I blew my budget out of the water on this thing, so that's a later project for me. Good luck! :mug:
 
.....oh, nice work by the way LTownGarageBrewery! Very well organized thread with great information. Where are you located in SE Michigan....I'm up in Oxford/Ortoville area. I've been down to Adventures in Homebrewing.... great place, but a little too far for me. Hoppmann's Beer and Wine Making Supply in Waterford is an awesome place as well. The staff is phenomenal and they always have fresh products. Later :mug:
 
Thanks for the tips Hoppopotomus, I think I have found a solution but it needs to be tested. Since I used a standard door hinge I think I could use one or 2 of these to stop the hinge from ripping off.
4a819f4c7d7d9_114037n.jpg


Do you know of any home brew places in the Royal Oak area? I seem to have to drive to 21 and Garfield (Cap n Cork) or down to Taylor (Adventures in Homebrewing) if I want to get anything.
 
Boy I don't know if they would work or not. If I were to go that approach, I would certainly use one on each hinge. I have the same ones on several doors in my house and when the kids open a door too hard, they dent the hell out of the door casing, because there is such a small point of contact. I was carrying water softener salt down to the basement and used my foot to open the door, opening it too hard and it snapped the one on that door in two. Like I said, they may work, but you are dealing with quite a bit of weight in the lid of your keezer. Granted you don't have a big 'ole coffin on top with cement board and tile like I do, but still there is a decent amount of weight your dealing with. Most of the weight is now situated to the front of the collar with the addition of the shanks, faucets, lines, etc. This means that the majority of your weight happens to be located the furthest distance from the axis of rotation of the hinges, which creates quite a bit of torque on the hinges with that long of a lever arm. They may work out fine, but you won't know until you test it out. Good luck! :mug:
 
Oops...didn't see the bottom of your post. I don't know of anything in RO. I get all of my supplies at Hoppmann's in Waterford. I have been to both of the places you mentioned, but Hoppmann's is closer for me and they do a fantastic job over there. I'll ask around to a few people. I have a couple of patients right now, a husband and wife, that are avid home brewers and they live in Ferndale. I'll ask them and let you know.
 
I think you are right Hopp, I have some on my doors at home and they work for light jobs but probably not going to cut it if I drop my entire collar and lid back on accident.

Let me know if you hear of anything, I have been brewing for a year and there has been a place that opened up in Southfield but its kind of worthless. Thanks!
 

Latest posts

Back
Top