Fermentation Temp Control - On the Cheap

Homebrew Talk - Beer, Wine, Mead, & Cider Brewing Discussion Forum

Help Support Homebrew Talk - Beer, Wine, Mead, & Cider Brewing Discussion Forum:

This site may earn a commission from merchant affiliate links, including eBay, Amazon, and others.
Joined
Feb 24, 2013
Messages
1,860
Reaction score
2,209
Location
New Brighton
So, I'm about 9 months into this brewing thing, and having a blast!

I'm about ready to try to conquer fermentation temp control. I've been using a rubbermaid tote or a chest cooler filled with water. I throw in a frozen water bottle when the temp in my basement isn't conducive. This obviously leads to swings in temperature and some high temps when I'm away at work.

I've been pondering different ways to move up to the next level. I've contemplated taking apart an old fridge or dehumidifier, but the intimidation factor of working with freon or it's modern equivalent has me worried.

I like the idea of the carboy being in the water bath. I think that provides some temperature stability. So I had this idea:

Keep the chest cooler and water setup, then run a line with a low GPM pump into my kegerator or refrigerator, through a copper coil, and back into the fermentation chamber. Put the pump on a temp controller, and I'm all set!

A variation would be to run the cooling coil into an adjacent cooler of ice. There is probably a way of doing the engineering on this to see if it's practical, but like all things DIY it will be funner just to try.

I've got a $12.99 ebay temp controller on the way. I picked up a 80 gph water pump from Harbor Freight for $5.99. I have a 1/4 copper line on hand, and I'll need a little rubber tubing and some clamps. I figure I should be able to get the whole thing done for under $25!

The temp controller is on the slow boat from China, so it will be a couple weeks. I'll keep you posted on how it works.

If anybody has tried this or has any suggestions, please let me know.

Wish me luck!
 
If you can score a used $50-60 fridge or freezer on Craigslist, that would work great using the STC-1000 it sounds like you ordered.

I'm a big DIY guy that has lots of brew stuff which has been "re-purposed" from scrap parts, etc., but in this situation, I like already-built.
 
Yeah, I tried the Craigslist thing. I was looking for a cheap freezer to turn into a fridge. I found a really nice keezer that was already built and done quite well. Taps and all. Instead of my $50 freezer I ended up with a multi-hundred investment in kegging gear! lol.

Now I'm not so sure the wife will let "another" freezer into the house.

Still, your point is well taken. It's ready made and pretty cheap if you can find a decent one. I'll always keep my eyes open for a good deal to be had. In the mean time...I'll putter around.
 
Keep the chest cooler and water setup, then run a line with a low GPM pump into my kegerator or refrigerator, through a copper coil, and back into the fermentation chamber. Put the pump on a temp controller, and I'm all set!

I am very interested to see how this turns out! I also came up with this idea when I was trying to figure out how I could get consistent and precise temp control while continuing to use my keezer for finished beer. :mug: I think it is a great solution! I havn't put this all together yet because I havn't bought an additional temp control unit. The only thing that I would have to suggest is to put the copper coil in a bucket of water. I was unclear if that is what you meant, but I'm sure you can imagine that having the copper in a cold water bath would be more effective than just having the copper dangling in the kegerator. But I havn't tried the setup yet so I am not speaking from experience on that point.

Please keep us posted on this! Can you put a link to the temp control unit and pump that you bought? I was originally planning on using my march pump for this but shoot, for 5 bucks why not get one of those?
 
I was going to not worry about temperature control, but my office is moving and getting rid of their old fridge, which I have kindly offered to acquire. Hooray!

I find, living in a college town, if you simply combine Craigslist with patience, you can get refrigerators and freezers dirt cheap. That's probably your best bet.
 
if the system is in a closed loop you're going to need a way to pressurize the water and purge air from it so that the pump functions properly.
 
You may be suprised how fast the slow boat from china is lol I ordered a 2 relay board for 4 bucks free shipping and a knock off development board for 10 bucks both shipped from shanghai via ChinaPost and only took 5 days to indiana.
 
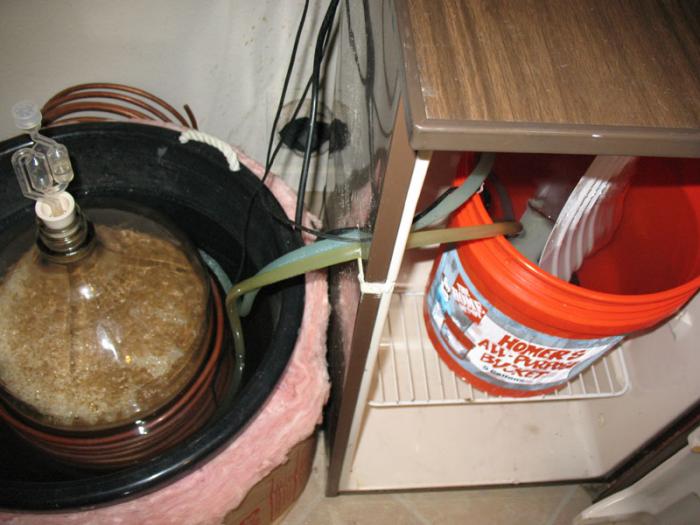
This works, but not with a lot of excess capacity. At max krausen the compressor runs about 70% of the time. With the evaporator coil in air instead of water, the compressor runs all the time and won’t keep up. I had to add 2 half-liter frozen water bottles every 12 hrs. Still way better than the 8 bottles it took with an igloo cooler as the ice bucket.

A stronger ‘fridge might work with a bucket in air. I’m just letting you know that you need a lot of BTU’s to make this work.

I started with ice bottles in a water tub and I much prefer it to air. With a ‘fridge I felt like I was guessing, plus it’s so slow and inefficient.

3297.jpg
 
This works, but not with a lot of excess capacity. At max krausen the compressor runs about 70% of the time. With the evaporator coil in air instead of water, the compressor runs all the time and won’t keep up. I had to add 2 half-liter frozen water bottles every 12 hrs. Still way better than the 8 bottles it took with an igloo cooler as the ice bucket.

A stronger ‘fridge might work with a bucket in air. I’m just letting you know that you need a lot of BTU’s to make this work.

I started with ice bottles in a water tub and I much prefer it to air. With a ‘fridge I felt like I was guessing, plus it’s so slow and inefficient.
This is a pretty similar setup to what the OP described except the copper coil is opposite. What the reason for having the copper coil around the carboy rather than having the carboy just sit in a bucket of water and having the coil in the fridge?
 
Good question. I designed the system with the immersion chiller around the carboy, I haven’t tried it the other way. My thinking was that to stir things up thermally in the carboy I should feed the IC coil from the top. The conduction is pretty fast, cooling the carboy and the water simultaneously. The pump actually runs 15-20 seconds on and 18-20 minutes off, on the average.

Before the fermentation gets going there is a lot of temperature stratification, from top to bottom, about 5F. Say the bottom is 60F, then the top is 65F. The bottom is the one I care about, I think that’s where most of the work gets done. Once the fermentation gets rockin’, it mixes pretty quickly. You don’t have much time to get rid of all that extra heat, in the bucket and the tub. Fortunately I have four gallons of 40F water in the bucket, and a really efficient thermal transfer system.
 
Wynne-R said:
Good question. I designed the system with the immersion chiller around the carboy, I haven’t tried it the other way. My thinking was that to stir things up thermally in the carboy I should feed the IC coil from the top. The conduction is pretty fast, cooling the carboy and the water simultaneously. The pump actually runs 15-20 seconds on and 18-20 minutes off, on the average.

Before the fermentation gets going there is a lot of temperature stratification, from top to bottom, about 5F. Say the bottom is 60F, then the top is 65F. The bottom is the one I care about, I think that’s where most of the work gets done. Once the fermentation gets rockin’, it mixes pretty quickly. You don’t have much time to get rid of all that extra heat, in the bucket and the tub. Fortunately I have four gallons of 40F water in the bucket, and a really efficient thermal transfer system.

I think you got a great system going! It seems to mimic a glycol cooling jacket that a professional brewery would have. Water has great thermal transferring properties so I wonder if the coil plus the water surrounding the fermenter would be overkill? Would the coil be better suited in the fridge to dump excess heat from fermentation into the water you there? Have you ever measured the spread of temperature of the water or wort throughout fermentation?
 
Redbeard, thanks for the compliment. I don’t know what you mean by ‘overkill’. Also, I can’t think of any reason to switch the coil and the pump.

The glycol band the commercial breweries use is placed near the top of the fermentor to cause circulation in the beer. That’s the same reason I feed my coil from the top. If the thermal conductivity was great we wouldn’t need to do that. The thermal conductivity of water is on the order of .6 which is way better than air at .025 but is pretty poor compared to copper at 390.
 
Wynne-R, what I meant by "overkill" is that water would do a good enough job cooling down the wort given that the temperature of the water surrounding the carboy is below your target fermentation temp. The way I think of it is that the copper coil's superior thermal conductivity would be better suited to offload heat into the water bucket that's in the fridge. I dunno but thanks for posting your setup and experience because I had not thought of doing it your way.
 
Wynne-R. This is pretty much all the basics that I was thinking about. What you have is probably way more substantial in terms of the thermal mass you have to work with. I'll probably still try mine with the coil in the cooler to see how that works.

The only comment I might make on yours would be that a slower pump might actually work better. If you are charging the system with only 15-20 seconds of cold water, I would think that would tend to bounce the temperature a lot. My little pump only has a 1/4" outlet. This should take more time to transfer and help with short cycling.

Looks like you have more experience with me at this. I can always re-arrange and upsize things if I need to.

Thanks for sharing. At least I know I'm not completely nuts! This might actually work.
 
...The way I think of it is that the copper coil's superior thermal conductivity would be better suited to offload heat into the water bucket that's in the fridge.

When I think about it in terms of efficiency. It would probably just be more efficient to have two buckets of water and exchange water between them. It would just need to be gravity fed one direction or have some more advanced water level control.
 
When I think about it in terms of efficiency. It would probably just be more efficient to have two buckets of water and exchange water between them. It would just need to be gravity fed one direction or have some more advanced water level control.

Are you saying that you would get rid of the copper coil then? I'm not 100% sure what you mean here.
 
Are you saying that you would get rid of the copper coil then? I'm not 100% sure what you mean here.

I'm not sure it's a practical thing. I was just brainstorming.

My thinking was that if the heat sink is a bucket of water in the fridge, and the carboy is sitting in water in the ferment chamber, why pass the heat through a copper coil? Just exchange the water between the two vessels. i.e. pump cold water from the fridge bucket into the fermenter bucket, then pump water from the fermenter bucket back into the fridge bucket to re-cool it. This would theoretically increase efficiency, but would require a more complex system to keep the water in the two buckets at the right level.
 
I really like those little foam fermentation chambers. I think it's a brilliant idea. My solution was to get mini fridges off craigslist. I got one for free for hauling it off and one for $20. I added an ST-1000 to each. When you include the wire and plugs I had to buy I spent 30 on each ST-1000 setup. So I have two fermentation fridges for a total of $80. I stack one on top of the other so they take up about the same amount of room as a thin refrigerator. The catch is that it took me over a month to get the first fridge and another 2 to get the second. I just kept checking craigslist for good deals and jumped on them when I saw them. I used a swamp cooler before this and it worked OK, but not NEARLY as good as the fermentation fridges have. My beer improved more when I started using the fridges than any other change I ever made. I went from making good beer with the occasional great batch to making great beer consistently. My worst beers now are the quality of my best swamp cooler beers. I think you are making the most important move you can by getting your temp control sorted. Best of luck to you!
 
So, I'm about 9 months into this brewing thing, and having a blast!

I'm about ready to try to conquer fermentation temp control. I've been using a rubbermaid tote or a chest cooler filled with water. I throw in a frozen water bottle when the temp in my basement isn't conducive. This obviously leads to swings in temperature and some high temps when I'm away at work.

I've been pondering different ways to move up to the next level. I've contemplated taking apart an old fridge or dehumidifier, but the intimidation factor of working with freon or it's modern equivalent has me worried.

I like the idea of the carboy being in the water bath. I think that provides some temperature stability. So I had this idea:

Keep the chest cooler and water setup, then run a line with a low GPM pump into my kegerator or refrigerator, through a copper coil, and back into the fermentation chamber. Put the pump on a temp controller, and I'm all set!

A variation would be to run the cooling coil into an adjacent cooler of ice. There is probably a way of doing the engineering on this to see if it's practical, but like all things DIY it will be funner just to try.

I've got a $12.99 ebay temp controller on the way. I picked up a 80 gph water pump from Harbor Freight for $5.99. I have a 1/4 copper line on hand, and I'll need a little rubber tubing and some clamps. I figure I should be able to get the whole thing done for under $25!

The temp controller is on the slow boat from China, so it will be a couple weeks. I'll keep you posted on how it works.

If anybody has tried this or has any suggestions, please let me know.

Wish me luck!

That is exactly what I do and it works great!! Ice goes in an old cooler along with my old IC. The best part is that with the Ebay temp controller you can easily heat(aquarium heater) and cool( pump) the water bath. I keep my temps within .3 degrees C. The only time it takes a little more work is if it is really hot outside..then I have to switch out frozen water bottles a few times a day. Usually it is just once in the morning though (if that)
 
That is exactly what I do and it works great!! Ice goes in an old cooler along with my old IC. The best part is that with the Ebay temp controller you can easily heat(aquarium heater) and cool( pump) the water bath. I keep my temps within .3 degrees C. The only time it takes a little more work is if it is really hot outside..then I have to switch out frozen water bottles a few times a day. Usually it is just once in the morning though (if that)

Can you give more details about what kind of pump, temp controller etc, other specifics? Im trying to figure out how exactly I'm gonna do my setup.
 
Can you give more details about what kind of pump, temp controller etc, other specifics? Im trying to figure out how exactly I'm gonna do my setup.

Well the water bath is just that....a fermentor sitting in a bucket of water. I built one of those ebay STC-1000 controllers. Since it is a dual stage controller one side controls the heating, which just an aquarium heater in a the water bath. The cooling stage controls a pump. I just use a cheap 20 dollar pond pump from Harbor Freight. You don't need anything fancy..you are just recirculating the cooling water. The nice thing about the pump is that it has a threaded discharge opening. I bought a 24" sprinkler riser and garden hose fitting...that threads into the discharge. I use my old copper IC which sits in a ice bath in an old cooler. I hook the pump discharge to one side of the IC, the water flows through (cools), and discharges on the outlet of IC and back into the water bath via some tubing. The temperature sensor on the controller is water proof and it just sits in the water. This system works great and is somewhat similar to professional glycol systems.....at least in theory.
 
Finally the temp controller arrived! ...and it's not working right. :mad:

The temp sensor and settings all work right. When it hits set point there is an audible click like the relay is working correctly. But there is no voltage at the load terminals. Hopefully my eBay seller can help me out.

In the mean time I've fabbed up the cooling coil from 1/4" copper tubing. I'll run some tests to see if I need to float that in a bucket of water or if air exchange in my kegerator is enough.

I'll keep you posted.
 
The STC-1000 is not jumped internally, the output is switched.

The input to 1-2 just lights it up. That part is working. 5-6 (heat) and 7-8 (cool) are switches. Your loads need to tie all the neutrals together and jump the hots.
 
The STC-1000 is not jumped internally, the output is switched.

The input to 1-2 just lights it up. That part is working. 5-6 (heat) and 7-8 (cool) are switches. Your loads need to tie all the neutrals together and jump the hots.

Wynne-R...you are my idol. :D

So that is what that cryptic diagram meant! It took me a few tries to decode it for my electrically challenged brain. But it is now working!

Hopefully I'll find some time to hook up the whole apparatus soon and test it out.

For those that are interested, this version of the STC-1000 that I got for $13 on eBay does not have heating AND cooling. It has heating OR cooling. There is only once set of contacts for the load. It is switched to heating or cooling from the menu.
 
The experiment has begun!

I have it mocked up running with a 25' long x 1/4" copper coil hanging in my keezer and 2 gallons of water in a cooler. I'm just testing things out to see what kind of performance I can get. So far after an hour of running it dropped 2.7 degrees.

I'll take another reading or two tonight on the hours, then let it run overnight to see how low it can go. I'm guessing I'm not going to get much below 10 degrees below ambient. (72)

I'll run some tests and then give a full report in a few days. Thinking of brewing this weekend, so that will be the real test.
 
So, I've brewed up a batch of Scottish 80/s. It's been nicely cooled to 67 degrees since yesterday thanks to this new system!

I've had to do some tinkering to get things working, but I'm going to say this is a qualified success. I still have a ways to go with tweaking, but it's far enough along that I can say that the system is viable.

One thing I'll say, to the credit of some commenters early on, is that I'm rapidly approaching the cost of a small chest freezer off of Craigslist and I still have some components left to buy/build. On the plus side, I have what looks like pretty good temp control that I'm guessing is pretty energy efficient and leverages my investment in my keezer.

There is still some tweaking to do to make things work better:

I chose to upgrade my cooling coil to 50' of 1/4 copper in lie of the 10' I was testing before. This gives a lot more contact time, but required that I upgrade the pump from a 92 gallon/hr to a 264 gal/hr. Even this flows pretty slowly by the time it pushes through 10' of vinyl hose and 50' of copper.

I started cooling this batch with the coil wrapped around an empty corny keg in my keezer. (relying on air contact for cooling) After a couple hours that was not making much progress on taking things down from the 78 degree temp my beer started at. I took the copper and put it in a 3 gallon bucket of water in the keezer. That did the trick and as soon as that water cooled down the system began to drop the chamber temp.

At this point my fermentation chamber is an old box shaped camping cooler about 2/3 filled with water and the carboy sitting in it. Since the lid does not shut I have a blanket wrapped around the top as best I can. The chamber is certainly the weak point in the system. Right now I'm only working with ambient air of 72 degrees. I doubt if I had very high ambient it would keep up. (One thing to note for those of you that might try this, the side walls of a keezer are where it rejects heat. I've managed to put my fermentation chamber in one of the warmest spots in my basement! A foot or so of space seemed to help.)

Changes I'm considering are:
Cutting the copper coil down to 25'
Building either a cooler cover or a whole separate chamber for cooling
I still need to mount the controller and receptacle in some kind of housing

Costs so far:
50' of copper coil - $28
Vinyl tubing $5
264 gal/hr pump $17 (Harbor Freight again)
Temp controller $12 (eBay)
110 v receptacle $1
110 v Lamp chord $2
Total to date: $65

If I only count half the copper as I'm planning on cutting it down that gets me down to about $50. If I spend another $50 on a cooler or supplies to build a chamber I'm up over $100. Which as I said, puts me in the range of a Craigslist buy + my temp controller.

Is this a success? You can be the judge. What I do know is that I've yet again found a way to make beer and tinkering around fun. You always learn a thing or two in the process.
 
Is this a success? You can be the judge.

I would say if it does what you wanted it to and you enjoyed the journey then it is a success! Is it a cost effective solution? Maybe not. Does that matter? Maybe not. It really comes down to your goals for this hobby. All hobbies and projects cost money, but can be extremely rewarding to complete. Some brewers enjoy making the best possible solution for the least possible money. They are proud of their success and find it very rewarding to stretch every penny. Some brewers enjoy getting beautiful shiny new equipment and the latest and greatest stuff. To them spending more money is worth results. Some brewers enjoy automating their brew day as much as possible and to the finest degree of control. All of these approaches have merit depending on what you enjoy. You may also find that your goals change as your experience grows. Just do it your own way and enjoy it, that's all it takes to succeed in any hobby IMO.

Also, I have found that I have been able to reuse some things I bought early on. My first immersion chiller is becoming a HERMS coil. Your pump could be used to recirc ice water through an immersion chiller at the end of the boil to get temps down in the summer. The temp controller will work to control a fridge fermentation chamber. You also gained experience and knowledge during the project, which is probably the most valuable piece of all.
 
Apilowski, thanks again for posting about this project. I think that this system has a few different advantages over a converted chest freezer. The first is that your system is smaller. Not everybody has space for a keezer. The second thing is that with water around your carboy it is less susceptible to fluctuations in temperature. To me, since I already have a keezer, using this system would allow me to have a fermentation chamber that can run simultaneously to the kegerator function. This is the biggest advantage that I can think of for somebody like me. You cant have 38F and 65F at the same time with one keezer! I hate having to wait till one batch was all drank up before brewing the next one. Anyway I will be implementing your system now and I'm excited to get it going!
 
RedBeardBrewer, I'm glad I could help! Good luck with your build!

It's been going for a couple days now and still working well. I actually have noticed a little bit of temperature bounce. In order to more accurately measure the beer temp I have the temp sensor taped to the side of the carboy above the water line. I covered it with some foam rubber pipe insulation so that it's a little closer to the temp inside the carboy.

I think this leads to a little bit of bouncing in the temp since the water will pump until the temp change makes it all the way into the beer, then must have a little extra chill that evens out between the water and the beer.

It seems to be within a couple of degrees of my target all the time. I found a setting that I think sets the range from 2 degrees to 1, so hopefully that will tighten it up even more.
 
Consider putting the probe in the water, at the bottom. When you run the pump, the cold water goes to the bottom. This will give you shorter more frequent cycles.

In my system the water is at the level of the beer and the probe is near the top between the second and third coils, poking out into the water. The water temperature is constant within ± .1°C. The beer temperature difference would be half that as my water bath is about six gallons.

The STC-1000 differential goes down to .3°C. I’m getting much much less than that with creative probe placement. My thermometers read to .1°C and they don’t move.

Have fun, glad you got it working.
 
Since active fermentation is almost done it has settled into within about 1°F below my set point of 67°F of my set point. That's not too bad.

I'll try the probe in the water for a few days. Since I don't have other sensitive thermometers I'll probably not know the difference. I've been using the readout on the STC 1000 to determine the fermenter temperature. My only other option without opening it and sticking a mercury thermometer in (which I'm not going to do) is a stick on thermometer on the side of the carboy which is not accurate enough.
 
Necessity is the mother of invention.

Yesterday I took a peek into the water bath to see how things were working. There was a giant dead centipede stewing in the cool water. I'm not a squeamish guy, but I HATE those things!

So I came up with what looks like a way better way to do this. The equipment is all about the same, but I don't have a water bath for the fermenter.

The basic concept:
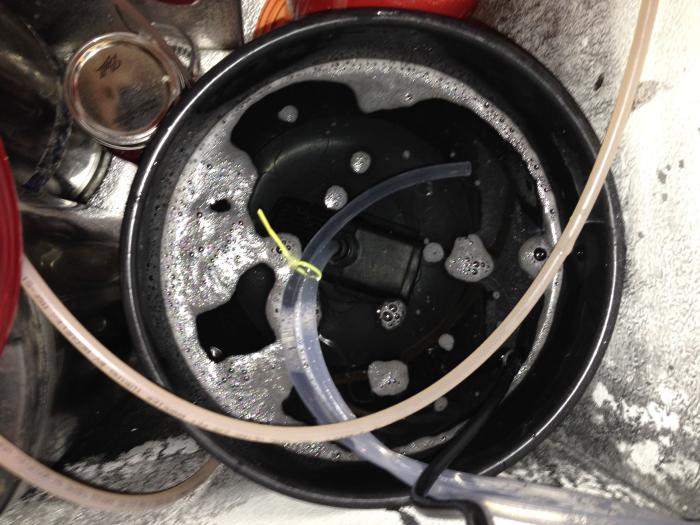
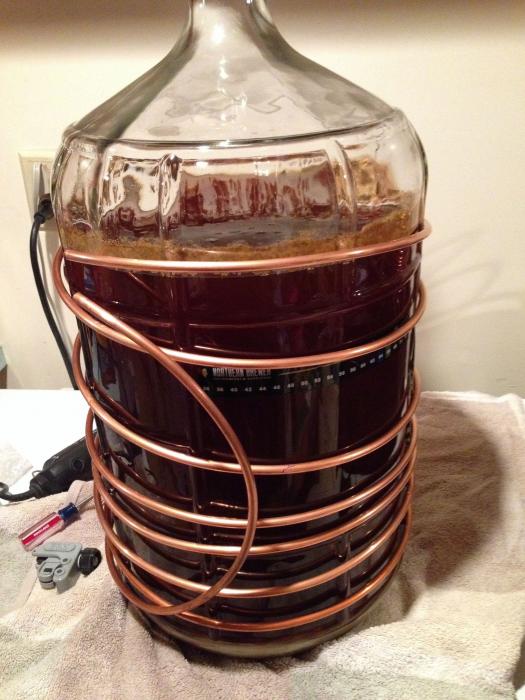
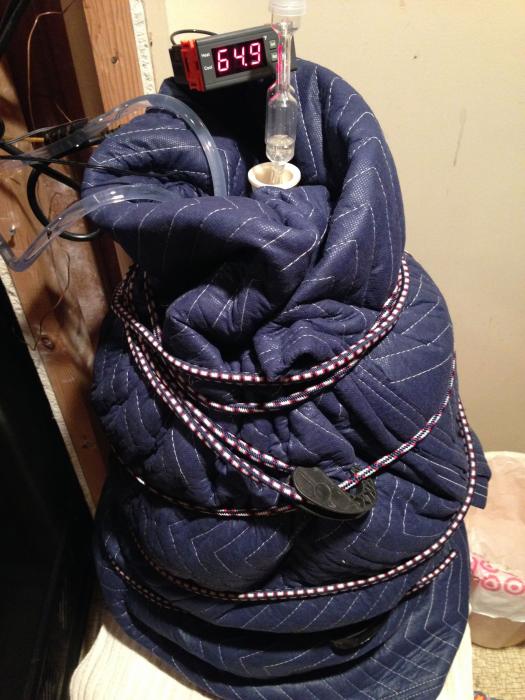
Wrap about 25' of the 1/4" copper line around the fermenter, wrap that in a blanket for insulation, then put the pump in the reservoir of cold water inside the keezer.

I've only been running it about a half hour, but it seems to be quite responsive and took a degree off of the temp just in the time it took me to get it set up. This is way more compact and less monkey business than the cooler full of water.

I took a few shots to show the setup.

IMG_0259.jpg


IMG_0251.jpg


IMG_0254.jpg


IMG_0256.jpg
 
I think I have one last improvement to make for next time. I'd like to get the reservoir in the keezer to be sealed up so it doesn't introduce so much humidity. I thought about the idea of using a corny keg, but I'm not sure I want to start contaminating them with non-beer. Something that is about that diameter would be good so it doesn't take up too much space would be nice. I'll have to experiment a little with how much quantity it needs to work. I'll either find a small bucket with a lid, or maybe build a chamber out of a 6" or 8" pvc pipe. Metal would be nice, but it looks like I only need that kind of efficiency when I'm cooling things down. When holding a temp it only seems to run for a minute or two.

Eventually a purpose shaped insulated blanket would be a nice touch too. I suspect my Harbor Freight $6 packing blanket is not a very good insulator.
 
I am sure you realize this but a drawback of your fermentation control system is that you are fermenting in glass. Glass is a poor conductor but excellent insulator of heat. In other words when your fermentation is cranking it harder to get the "heat" out of the carboy and the "cool" into it. I ferment using a very similar set up except I use stainless kegs as carboys. My thinking is that the stainless is better conductor so it can react quicker to temperature changes.
 
Phunhog said:
I am sure you realize this but a drawback of your fermentation control system is that you are fermenting in glass. Glass is a poor conductor but excellent insulator of heat. In other words when your fermentation is cranking it harder to get the "heat" out of the carboy and the "cool" into it. I ferment using a very similar set up except I use stainless kegs as carboys. My thinking is that the stainless is better conductor so it can react quicker to temperature changes.

That goes without saying. There are a lot of inefficiencies in this system. The whole exercise has been about getting it good enough to work without spending a lot.
 
Actually the thermal conductivity of glass is about 1.0, greater than water at .6. A bucket is slightly less at about .4. I don’t think it’s a big deal in either case. My pump runs for 15 seconds about three times an hour so obviously the heat transfer is more than adequate.

If glass were a good insulator I wouldn’t have to use a koozy on my glass. Styrofoam is an excellent insulator at .04.

Thanks for the info!! Do you know what the thermal conductivity of a stainless keg would be? One of the reasons why I assumed stainless works so well in this set up is that the water bath temperature would pass through to the keg and vice versa much quicker.
 

Latest posts

Back
Top