I measured and ciphered it out, and I couldn't fit a tank w/double regulator and two cornies in our 4912 without removing the door. The tank was 17" tall and 5.25" diameter; the regulator made the total space required 17 x 17 x 5.25" total. The bottom part of the Sanyo is 19 x 13, IIRC. A corny is about 8" across. The door sticks into the fridge about 2".
13 - 2 (door) - 8+ (keg) - 5+ (tank) = not enough space.
However, if you build a shelf above the drain you pick up 1-2 inches. If you remove the door guts, you get another two inches back. That means you will have enough room to jam your double-reg tank and two cornies in there. Make sure you have nice flexible hoses, though.
I took a 1/2" sheet of plywood and screwed two 2 x 4's about 8" tall into it at right angles, and wired the tank to some holes I put in them. It's nice and secure and won't tip over anymore. I didn't need any legs for the shelf because I cut it to fit the bottom shelf slots. There isn't a lot of extra space (using 1 x ? lumber with some right-angle brackets could have saved space on the shelf, or having a smaller regulator setup), but the door closes securely, the innards of the tap tower clear the cornies, and I can just reach over the kegs to adjust the gas pressure on the regulators.
We weren't able to re-use the original screws that came with the door because they were a little too short. I picked up a pack of 8 x 3/4" pan head screws and used those instead.
If you're using the whiteboard/melamine paneling, I recommend using the old door as a template to mark your screw holes, and pre-drill them. Even with a sharp drill bit, you'll tear up the particleboard unless you put something solid behind it (like a scrap 2 x 4). You can get the door to fit inside the gasket, but when you screw it all together be careful not to overtighten the screws or you'll force the gasket out from between the door and paneling.
I recommend Buford's livejournal page for suggestions:
http://community.livejournal.com/homebrewing/413981.html
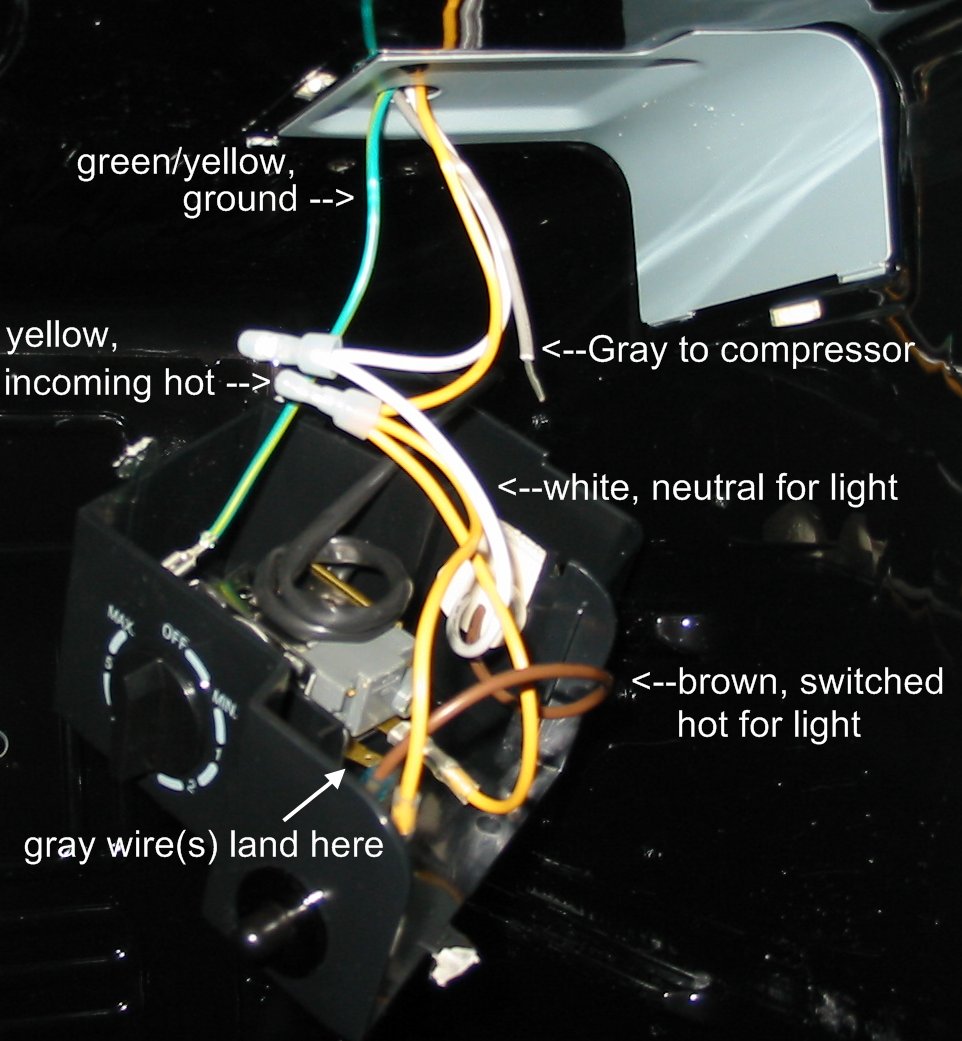
I took things one step further for a cooling system for the tower and tore apart the electrical business to get some 120VAC inside the fridge without a wire to the outside. Pull out the one screw up next to the light, then slide the light and thermostat forward to reveal the fridge wiring. I don't remember exactly which color wires they were, but I took the hot wire going from the thermostat to the compressor (gray) and tapped into that. There's a common neutral (white) up in that box as well. If you need to, pop the cover off the junction box for the compressor on the lower-left of the fridge if you're facing the back to match colors. The end result is when the thermostat switch makes and powers up the compressor, the fan also gets power to circulate some air.
I used the new power tap for a power supply I built (you could cut a regular wall wart apart if you had an extra, or you could pay the $20 Radio Shack wants if you didn't want to make one) for a 12 V fan. I used a small 2" fan, but it doesn't move enough air for the ridged flex duct I used. I'll replace one of those with something else when I get time.
Edit 4/1/08--no foolin'!: I found a picture. The yellow wire coming into the wiring box inside the fridge is the unswitched hot. The gray wire is the output from the thermostat going back to the compressor. Wire your power supply (or wall wart) across the gray and white wires.