waffle's brewery build

Homebrew Talk - Beer, Wine, Mead, & Cider Brewing Discussion Forum

Help Support Homebrew Talk - Beer, Wine, Mead, & Cider Brewing Discussion Forum:

This site may earn a commission from merchant affiliate links, including eBay, Amazon, and others.
Since you're using DIN rails, I suggest getting some "DIN-Rail Mount High-Amp Distribution Blocks" from McMaster-Carr. I bought some 6367T22's from them. I used them for taking the big 6-gauge wires which were the power inputs for my panel and splitting those into four 10-gauge wires as power outputs, which ran to other sections of the control panel.

They take up a lot less space than the old-fashioned terminal blocks.

Nice ;) I'm starting to seriously consider ditching the distribution blocks and going with the modular setup similar to what BadNews did. This is quickly moving to a full-on DIN set up. Hopefully I can get it all before the weekend and have it mounted up. I'm getting antsy to brew another Pliny Clone thanks to the tailgate this weekend that demolished the last one!
 
Rather than one switch with both functions, why not one each for high water and low water levels. A little stainless steel pipe, and these can be at whatever height you want. http://www.sourcingmap.com/tank-water-level-sensor-stainless-steel-float-switch-p-139200.html

That'd be a great idea for what philipot is looking for. It looks just like the floats that are the ones being sold by Auber but at a discounted price. Wire one as a NC connection and the other as a NO connection and then the SSR only fires when the right combo's there. Sounds like money in the bank if thats what you're looking for.
 
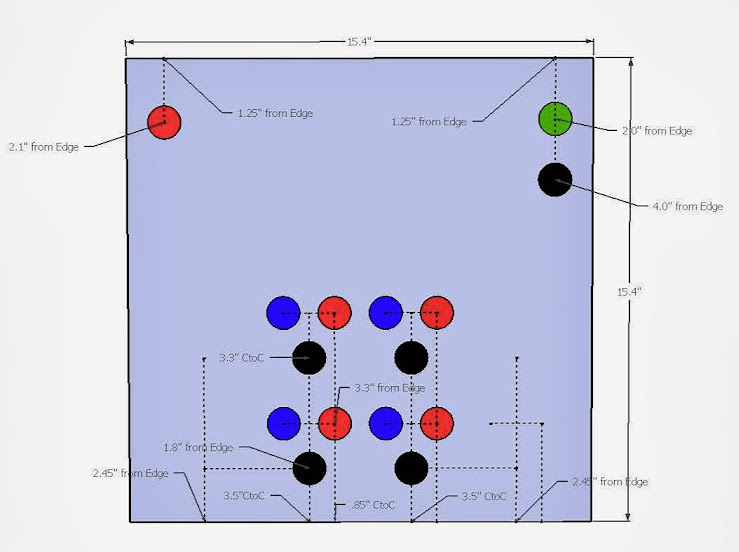
Here's what the control panel will look like. I decided to measure it out and sketch it up before drilling holes because I'm not buying a second one ;) Also, I wanted to give the ability to expand to another set of switches is why the outside bottom lines exist. There is a method to my madness!!! Oh I also worked in tenths of inches because thats the rule I have :)

Control+Panel+Front.jpg
 
Had to move in the power light, keyed switch and emergency stop button in to 2" from the edge as it would hit the door seal and I wasnt cutting through that. So, here is the lay out and the dry fit after the holes were drilled.

20131024_202125


20131024_221559
 
There's about a 1/2" gap between the two so I think I'm good, but I definitely appreciate the concern because I thought I had planned for everything. Going to hit the panel with sandpaper to knock all the texture off the box for the vinyl to adhere better. The layout is coming very shortly and I'm getting super excited. It feels like a long, long work in progress.
 
I ran into an issue. I can't seem to pull the locking mechanism off the enclosure. It looks like its almost glued down. Does anyone have any suggestions? If not, I'm considering cutting it off and ordering one off Granger to replace it with.
 
I ran into an issue. I can't seem to pull the locking mechanism off the enclosure. It looks like its almost glued down. Does anyone have any suggestions? If not, I'm considering cutting it off and ordering one off Granger to replace it with.

Give us a close-up pic of the inside door.
 
Yes I did get too aggressive in spots with a sander, but I've never been the best with patience and this project has been a true test of that.
 
The knurled ring on the back of the lock thing unscrews and the whole thing comes off. You can see it in your 2nd picture.
 
The knurled ring on the back of the lock thing unscrews and the whole thing comes off. You can see it in your 2nd picture.

Yeah I found that out when I finally took a step back to think about it. When I have power tools, I tend to be very 1 tracked :) Its off and the box has gotten primer!! :ban: That means tonight/tomorrow can start the wiring... I think.
 
Wiring did not happen last night. Forgot I cut off the ground post to install one of the lights... oh well. Got the ground post back installed using the kal method. I keep getting excited and then having to stop to do little things. Plan, plan, plan if you're doing a build like this. There are so many oh I forgot moments its ridiculous. I think the wiring is going to be the easy part now!
 
My BCS & DIN users.... has anyone checked out the DIN Adapter? Is it convienent, does it work, is there an advantage over just sticking the BCS against the wall?

Here's what I'm talking about.
BCSAdapter1_0.JPG
 
Ok I'm stuck in wiring... I can't figure out the 3 position switch wiring based on PJ's design. My 3 position only has 4 posts and I'm not sure how to wire it correctly. Could someone give me some help?
 
Ok I'm stuck in wiring... I can't figure out the 3 position switch wiring based on PJ's design. My 3 position only has 4 posts and I'm not sure how to wire it correctly. Could someone give me some help?
You need to order extra terminal blocks that you would install on each switch as needed. If you ordered the switches from Auber Instruments, they carry the necessary modules. Selector Switch, 3-Position Maintained 2 NO, 22mm and the Extra Teminal Blocks


Hope this helps.
 
Ok I was slowly progressing and happily tinkering when I had time. Last night, fired up the control panel, no bangs, no magic smoke, lights lit up like they were supposed to and I was happy. This morning I punched the holes in the keggles and became SUPER frustrated because I can't get the nut to grab the threads and tighten down. I'm using the pre-built kits from kal as I was given them for christmas :) Any help/tips would be soooo appreciated.
 
Look back at Kal's instructions... Do you still have the black rubber washer on the element? I think you have to remove that when using his setup as the silicon O-ring is used instead. Not sure the kit is exactly the same as his guide but check this page....

http://www.theelectricbrewery.com/heating-elements?page=3

I thought that too, but it's already removed. I'm worried that the keggle is too thick for the elements.
 
Ok, I'm having an issue with this not providing power to my BCS... The BCS powers up when I plug it into the wall but when its pluged into the 110v I get nothing :/ Any suggestions?
 
I'm back at it and I've run into another snag... I can get the bk to fire when I have it in manual, but when I go to bcs it fires as if its in manual mode... even when the SSR isn't firing, the contactor is... any suggestions?
 
I tried to troubleshoot the issue and tested the hlt setup as well. Even when the SSR isn't on, the contactor provides the full 240 to the plug. I'm really confused how this is possible since shouldn't this cut one of the power legs and not proved the full power? This is over my head and is super frustrating.
 
Can you repost your latest wiring diagram and maybe some pictures of the contactor and ssr wiring progress. Will be really hard to troubleshoot without knowing more.
 
Using this, I've rewired the box exactly as shown.

BCS-460-wiring-2-4-c.jpg


I'm having the issue where I can hear the contactor fire whether the BCS or manual. The SSR is working correctly as far as I've tested. Its weird like theres 240 regardless of wheter the 240's on or not.
 
the contactor IS suppose to close when its in manual OR auto. I think you are seeing voltage leak across the ssr. I assume you dont have anything plugged in, but if you had an element plugged in it should work as intended.
 
I didn't think of that! Thanks so much, I'll test it out with an element and see what happens.

Sent from my SCH-I545 using Home Brew mobile app
 
remember do not dry fire your element or you will fry it

Amen!!! Oh and THANK YOU THANK YOU THANK YOU THANK YOU. That was exactly it!! The SSR leakage was tripping me out for almost 3 months... I've already congregated the troops for a brew session in the next couple of weekends.:ban::rockin::mug:
 
How did you make out mounting the heating elements to the Keggles? What was the issue when mounting the heat elements? This is what I plan to do for my system as I already have the keggles on hand. Thanks!
 
How did you make out mounting the heating elements to the Keggles? What was the issue when mounting the heat elements? This is what I plan to do for my system as I already have the keggles on hand. Thanks!

I ended up getting a couple of welding spuds and silver soldering them on... it makes it a very nice tight seal!!! Check out Bobby_M's site... here they are http://brewhardware.com/fittings-75/120-spuds
 
Thanks a lot waffle, I was just looking at his site. Good luck with your Brewing session! I'm looking forward to hearing how it goes.
 
I ran a *test brew* with some water... mainly hunting for leaks and road bumps I'd run into... found a couple weldless that had to be tightened up, but other than that... it went swimmingly... This weekend, I think were going to test brew a coffee stout which we've made several times and will be able to tell if anything isn't right. Ill try and take some pics of the setup once I get the area cleaned a bit more... I'm really excited and mad at myself for not asking for help earlier!
 
Glad the test run went well!! Looking forward to seeing pictures from the first brew!!🍻


Sent from my iPhone using HBT mobile app
 
Back
Top