What size batch? 5g or 10g
You are using an out of date browser. It may not display this or other websites correctly.
You should upgrade or use an alternative browser.
You should upgrade or use an alternative browser.
Unboxing the Nano from CO Brewing
- Thread starter pretzelb
- Start date

Help Support Homebrew Talk - Beer, Wine, Mead, & Cider Brewing Discussion Forum:
This site may earn a commission from merchant affiliate
links, including eBay, Amazon, and others.
- Joined
- Feb 29, 2016
- Messages
- 502
- Reaction score
- 316
What size batch? 5g or 10g
5 gallon which was 21lbs of grain, would have done 10 but didn't think 40+ of grain was doable.
The wort looked and smelled fantastic
pretzelb
Well-Known Member
5 gallon which was 21lbs of grain, would have done 10 but didn't think 40+ of grain was doable.
The wort looked and smelled fantastic
Good info. I'm a long way from replenishing my supply but I was looking at some recipes and I have a wheat wine with 20 lbs of grain that I'm debating. The 5g stout I brewed tastes great but I'm not sure if I can do a 10g batch. To be safe my next batch will probably be a simple pale ale. The 10g limits is just another variable to test someday.
Just a few hours away from my first run on this system. I did my 'wet test' yesterday and plan on mashing in on a "Calibration Ale" (basic pale ale) at about 5:30. Hoping things will go smoothly!
30Bones
Well-Known Member
Yeah I am curious after some time to know how big I can go for a 10 gallon batch. Hoping 1.065~ is possibleGood info. I'm a long way from replenishing my supply but I was looking at some recipes and I have a wheat wine with 20 lbs of grain that I'm debating. The 5g stout I brewed tastes great but I'm not sure if I can do a 10g batch. To be safe my next batch will probably be a simple pale ale. The 10g limits is just another variable to test someday.
- Joined
- Feb 29, 2016
- Messages
- 502
- Reaction score
- 316
Just a few hours away from my first run on this system. I did my 'wet test' yesterday and plan on mashing in on a "Calibration Ale" (basic pale ale) at about 5:30. Hoping things will go smoothly!
Good luck! Can't wait to hear how it goes.
I haven't gotten that far into things, but I've got to imagine that it's possible. Especially if you consider the options of topping up the kettle after the mash or doing a small sparge after raising the mash basket.
- Joined
- Feb 29, 2016
- Messages
- 502
- Reaction score
- 316
Yeah I am curious after some time to know how big I can go for a 10 gallon batch. Hoping 1.065~ is possible
View attachment ImageUploadedByHome Brew1464040967.916021.jpg
This was a 10 gallon SMASH I did. Started drinking it over the weekend. I don't think I could go any higher than that
30Bones
Well-Known Member
I am fine with that. I can easily brew some big saisons with this system then.
This thread is a wealth of great information. Thank you so much for sharing your experience, trials, tribulations, and tidbits of wisdom. 
pretzelb and jready (and anyone else using the Nano), I'm curious to know what your brewday times are like on this system. I know everyone's process is slightly different, but from starting to fill the kettle, to pitching the yeast, about how long are we talking? Thanks.
pretzelb and jready (and anyone else using the Nano), I'm curious to know what your brewday times are like on this system. I know everyone's process is slightly different, but from starting to fill the kettle, to pitching the yeast, about how long are we talking? Thanks.
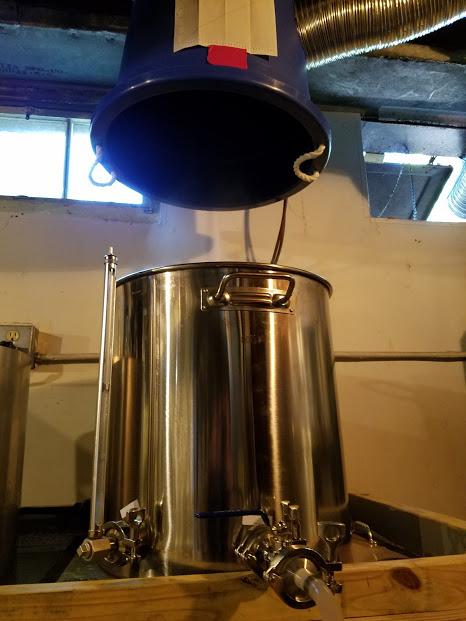
Just got my system in! Getting things set up and hopefully going to brew on it this weekend. I had a trolley added to my 20g system just to make removing the basket a little easier. Can't wait to get it up and running
That trolley addition looks very convenient. May I ask how much they charged for that additional feature?
That trolley addition looks very convenient. May I ask how much they charged for that additional feature?
I'd have to go back a look to find out. It did come in handy during my first brew session, however I need to either put some bags of concrete on the base or anchor it some other way. Once you extend that basket out the stand wants to tip forward a little bit. I could see if you weren't careful that you could tip everything over.
pretzelb
Well-Known Member
This thread is a wealth of great information. Thank you so much for sharing your experience, trials, tribulations, and tidbits of wisdom.
pretzelb and jready (and anyone else using the Nano), I'm curious to know what your brewday times are like on this system. I know everyone's process is slightly different, but from starting to fill the kettle, to pitching the yeast, about how long are we talking? Thanks.
My brew time is still not great. The main issue is learning how best to clean. Now that I can attach the chiller hose into the pump and wort side, things did get better but I've only done that once. Before that I was flushing the entire loop several times. I'm also starting to treat my water before I brew and this takes more time. I am going to start doing this before brew day. The mill changes have also taken time that I can save once done.
I can say the time to heat had dropped a bunch. So much so that I had to change my steps. No more waiting a long time for water to heat.
One thing that is hard to count is the clean cycles. If I run PBW for 20 minutes, then flush with water for 20, then flush with StarSan for 20, it can look like a long time on the clock but I'm not really busy that entire time. In the past once my kettle was cleaned by hand that was it. Now I clean by hand and run this cycle. I might change that someday.
DarkStormBrewing
Well-Known Member
Ordered the nano home kettle almost 8 weeks ago, no communication from them since order placed $750ish. I checked the order status on their site and it says work order created a few days after ordered. They said about 5-6 weeks lead. I did have some minor customizations. Think I may call Friday as that's 8weeks out. I know they are swamped, but that's a pretty long wait, with no contact about my customizations.
If you email they are really good about responding the same day.
andrewmaixner
Well-Known Member
I noticed that the site has been updated for commercial Conicals, and also that the block and tackle / pulley on the nano systems is now shown as auto-locking. Now I know what pulley to buy for my setup!
30Bones
Well-Known Member
I am in a similar boat only it hasn't been that long, but $1800 out of my account makes me wish I had some progress updates is all. Not going to sweat it for a few more weeks.Ordered the nano home kettle almost 8 weeks ago, no communication from them since order placed $750ish. I checked the order status on their site and it says work order created a few days after ordered. They said about 5-6 weeks lead. I did have some minor customizations. Think I may call Friday as that's 8weeks out. I know they are swamped, but that's a pretty long wait, with no contact about my customizations.
jlongstreet
Well-Known Member
- Joined
- Feb 2, 2014
- Messages
- 55
- Reaction score
- 10
It took about 9 weeks for my order. I think they're really backed up.
- Joined
- Feb 29, 2016
- Messages
- 502
- Reaction score
- 316
This thread is a wealth of great information. Thank you so much for sharing your experience, trials, tribulations, and tidbits of wisdom.
pretzelb and jready (and anyone else using the Nano), I'm curious to know what your brewday times are like on this system. I know everyone's process is slightly different, but from starting to fill the kettle, to pitching the yeast, about how long are we talking? Thanks.
My brew times are getting shorter. I have had issues with the counter flow chiller I ordered so I am retuning it and going with a plate chiller. Surprisingly with a couple of bags of ice my bme cronicals can take a batch from 180 ish to pitching temps in 30-40 min. With those issues aside, my brew days have gotten pretty efficient.
The 240 volt system heats to mash temps in 25-30 min and after dough in usually start my 60 min mash by the 50 min mark another 10 to get it stabilized for mash out then 10 min there. So at about 2 hours and 10 min I am raising the basket, it takes roughly 20 min to drain and it's been my experience that I reach boiling temps 10-15 min after that so by 2:45 I'm boiling. I usually have grains dumped and basket rinsed by the 30 min mark of the boil.
The last three recipes I have done were two IPAs with tons of hops and a breakfast stout with chocolate and coffee so there was a lot of crud. I whirlpool for 20 min then transfer to my fermentor so guessing that is done by 3:30. Then it's clean up. I have found it easiest to dump and rinse the kettle out back then reassemble everything heat up PBW to 120 and run it through the pumps that whole process is about an hour after a good rinse. So right at 5:30 total and I'm pitching.
Active time out of that 5:30 is maybe 1:30-2:00 hours. I love that I don't have to babysit this system like I did my old 3 tier propane one. The rest of the time can be spent doing honey dos which makes everyone more happy.
Howhownow
Well-Known Member
By this weekend I should have some data points to add to the mix. I was planning on getting going a couple of weeks ago, but I got pulled into best-manning a wedding and just decided to put it on the back burner and come back when I'm not over stressed and I can concentrate on what I am doing.
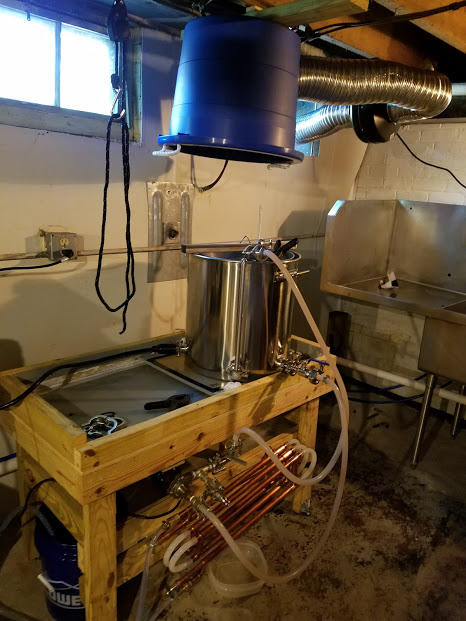
I finalized my pump mount last night. All that is left is to run the ventilation and fix the pulley for the mash. Then on to testing.
Initial water test (at mash temps, no boil) went well. Only small leak was from the bottom of sight glass. Anyone else have this issue?
I may get some pics up in the meantime, but if not, hopefully a full report over the weekend!
- Joined
- Feb 29, 2016
- Messages
- 502
- Reaction score
- 316
By this weekend I should have some data points to add to the mix. I was planning on getting going a couple of weeks ago, but I got pulled into best-manning a wedding and just decided to put it on the back burner and come back when I'm not over stressed and I can concentrate on what I am doing.
I finalized my pump mount last night. All that is left is to run the ventilation and fix the pulley for the mash. Then on to testing.
Initial water test (at mash temps, no boil) went well. Only small leak was from the bottom of sight glass. Anyone else have this issue?
I may get some pics up in the meantime, but if not, hopefully a full report over the weekend!
Keep us posted I have picked up a bunch of tips from folks on here nice to share our "learning curve".
I am in a similar boat only it hasn't been that long, but $1800 out of my account makes me wish I had some progress updates is all. Not going to sweat it for a few more weeks.
at 2 weeks...I suddenly am sad. LOL. I don't want them to rush it or anything though. Im hoping to have it by August. My brewing really picks up during football season.
30Bones
Well-Known Member
Mine will pick up once I get this ") I haven't brewed yet this year and my supply is dwindling
I haven't brewed yet this year and my supply is dwindling
I haven't brewed yet this year and my supply is dwindlingSo I brewed for the first time on my Nano Brewer Pro this past Monday and came away with a lot of notes. Going into it I thought “this will be super simple…I won’t run into any problems!”. I was wrong, but the problems I ran into are all process based and can easily be ironed out. I wasn’t sure the best way to share this info, so what I’ll do is bullet point the issues I came across and add notes to them.
1. Mash Recirculation - Well…Now I understand what others were talking about with recirculation issues. I did a 10g batch, so the mash basket was just about full. Initially I could not get a solid recirculation, however after fiddling with the position of the recirc arm I was able to achieve a slow steady recirculation. I did find that I had to throttle back on the pump in order to keep from pulling too fast from inside the kettle. Too fast and the level between the kettle and the mash basket would drop quick and the mash basket would come close to overflowing. I had to chase this around a lot because my mash would settle out quickly underneath the recirculation arm and the mash would seemingly stop draining into the kettle. I have a feeling that a change to my crush setting will improve this. Especially considering that CBS has recently put out that notice about not crushing finer than .45 mill.
2. Volumes - Just a note on the volume. My preboil volume was a bit lower than expected (by about 3/4s of a gallon). It seems that the grain absorption was a bit higher than I calculated for.
3. Chilling - I ran into major issues when I began chilling. I have a new Counter Flow Chiller that I was using and I just couldn’t get the wort to whirlpool. Initially I was trying to push through the chiller and back into the kettle. After fighting this for a while I swapped the hoses so that the pump was actually pulling wort through the chiller instead. This seemed to work better. I’ll have to play around with this to find out what works best.
4. Temps - What I experienced above brought me to another realization. I was chilling wort with a slow whirlpool and thought I was on point. The probe was reading 83 degrees and I was well on my way to pumping into the fermenter. I placed my hand on the kettle and OUCH! F@$%!! It was very hot. I gave the kettle a stir and the temp probe shot up to 140! So, during the whirlpool the temp probe was reading the temp of the wort exiting the chiller and reentering the kettle (since the probe is right next to the whirlpool fitting) and not getting a true reading on the overall temp. So…I’m going to play around with the whirlpool speed. Perhaps getting a better whirlpool will help with this. Otherwise I might move the temp probe over to where the element is…or turn the whirlpool fitting so that it goes the opposite direction. This also made me wonder about the mash temp…am I seeing the mash temp? is the temp under the basket an accurate temp for what’s inside the mash??
All in all, despite those issues I still had a much more enjoyable brew day than my old 3 tier system. I think all of these issues can easily be worked out. I’m brewing again this weekend, so I’ll see if I’m able to remedy any of these hiccups. Cheers!!
- Joined
- Feb 29, 2016
- Messages
- 502
- Reaction score
- 316
Great recap! Thanks for sharing. Based on what I have seen mash temp seems accurate
Good info! Thanks! I have a hydra immersion chiller I plan to use IF I can manage to build some feet for it that will keep it from resting on the element. Its always seemed to me that plate and counterflow etc was just a PITA by comparison. As for the recirc I think as I sit and wait for mine that's the part that I will have to learn the most. I haven't seen it mentioned yet but CBS also recommends of you are using wheat or other grains that you give them a rest at 120 I think it was. I haven't seen that mentioned I don't think here. (to prevent stuck mash). I have always used rice hulls in my grist and don't plan to stop now. For those having issues it may be worth a try if you haven't been doing so.
Good info! Thanks! I have a hydra immersion chiller I plan to use IF I can manage to build some feet for it that will keep it from resting on the element.
If it were me, I wouldn't worry about the feet. You know how things weigh less in water? Well, the same principle will prevent the chiller from putting hardly any weight on the element.
If that doesn't convince you, put the chiller in a container full of water, fill the chiller with water too. Weigh the chiller with something like a luggage scale. Should be just a few pounds, if that. Plus, the water you're circulating through the chiller on brew day is less dense than the wort, making the chiller excerpt even less pressure on the element.
Or you just clip the pulley for the mash basket to the hydra and let it to hang in the wort!
Or you just clip the pulley for the mash basket to the hydra and let it to hang in the wort!
I had considered this as well so yes its a good idea! When considering it though I will want to make sure that the connections hang outside the kettle. I use quick disconnects on them and they often leak at least some. LOL
If it were me, I wouldn't worry about the feet. You know how things weigh less in water? Well, the same principle will prevent the chiller from putting hardly any weight on the element.
If that doesn't convince you, put the chiller in a container full of water, fill the chiller with water too. Weigh the chiller with something like a luggage scale. Should be just a few pounds, if that. Plus, the water you're circulating through the chiller on brew day is less dense than the wort, making the chiller excerpt even less pressure on the element.
I actually hadn't considered that!!
I had considered this as well so yes its a good idea! When considering it though I will want to make sure that the connections hang outside the kettle. I use quick disconnects on them and they often leak at least some. LOL
I know what you mean. I had a hydra and experienced the same thing. I'm just kicking myself that I let my hydra go with my previous system when I sold it. That chiller rocks!!
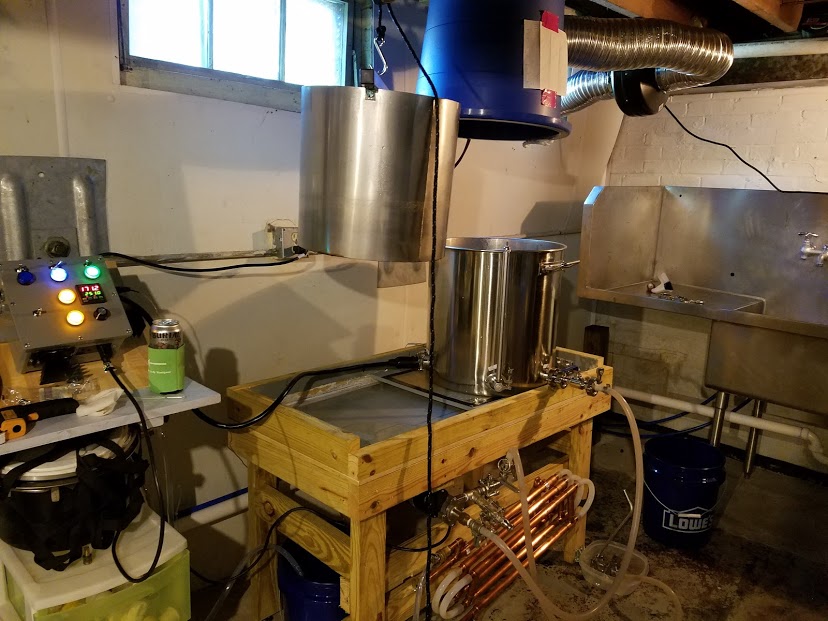
Not sure if this helps but here is what mine look like.
I still have a while before mine comes in but am having some heat pumps installed this coming week so thought I'd wire up the outlets that I'll need. On CObrewing documentation it says:
'Step 7: Install your main power plug. On 208/240V control panels the system ships without the power plug on the panel to allow you to match the plug to your outlet. On our Nano Brewer Home system the panel will require a 4 prong plug. On pro models a 3 prong plug is required as we do not need the neutral wire, however a separate 120V GFCI outlet is required for control circuit power. Refer to your plugs documentation for proper wiring.'
Wondering why you have a 4-prong plug on the pro level system? Is the extra prong just not wired? I picked up the 30 amp GFCI breaker and planed to get a nema 6-50 outlet as I have the same outlet in the garage for my ev charger. Thought if I ever decided to brew in the garage I'd already have the outlet.
- Joined
- Feb 29, 2016
- Messages
- 502
- Reaction score
- 316
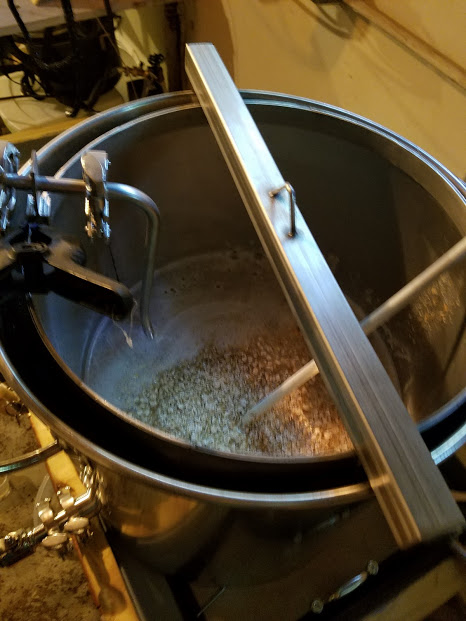
I am up early here in Nashville to start my blackberry kettle sour. I took the advice from Tim and did a 20 min rest at 118 as my recipe is 50/50 Pils wheat.
Up to mash temp now and have a good recirc going valve is probably 3/4 open.
This will be a great test of why I wanted an electric system. Will be mashing for 90 min then drain. Boil for 5-10 min cool to 110 and add the lacto. From there it'll sit at 110 for 3 days then check ph shooting for 3.4. Boil for another 30 adding a minimum amount of hops then cool and ferment as regular. Add blackberrys after a week then keg after another week. A nice summer beer and a crowd pleaser.
Anybody else brewing this weekend?
Cheers!
andrewmaixner
Well-Known Member
I am up early here in Nashville to start my blackberry kettle sour. I took the advice from Tim and did a 20 min rest at 118 as my recipe is 50/50 Pils wheat.
Up to mash temp now and have a good recirc going valve is probably 3/4 open.
This will be a great test of why I wanted an electric system. Will be mashing for 90 min then drain. Boil for 5-10 min cool to 110 and add the lacto. From there it'll sit at 110 for 3 days then check ph shooting for 3.4. Boil for another 30 adding a minimum amount of hops then cool and ferment as regular. Add blackberrys after a week then keg after another week. A nice summer beer and a crowd pleaser.
Anybody else brewing this weekend?
Cheers!
sounds good! you didn't mention purging with C02 and sealing the vessel against oxygen; do you not bother with preventing 02 contactand pre-acidifying when pitching a commercial clean lacto culture into a boiled wort?
- Joined
- Feb 29, 2016
- Messages
- 502
- Reaction score
- 316
I will! Thanks for the reminder! I will seal the lid with Saran Wrap then quick blast of co2
Howhownow
Well-Known Member
First day brew notes are in!
Overall impression: wow. Easier, more efficient, and faster than I've ever brewed before. I swear I've had tougher times with extract batches! Keep in mind I didn't get the full nano system- just the kettle and recirc fitting.
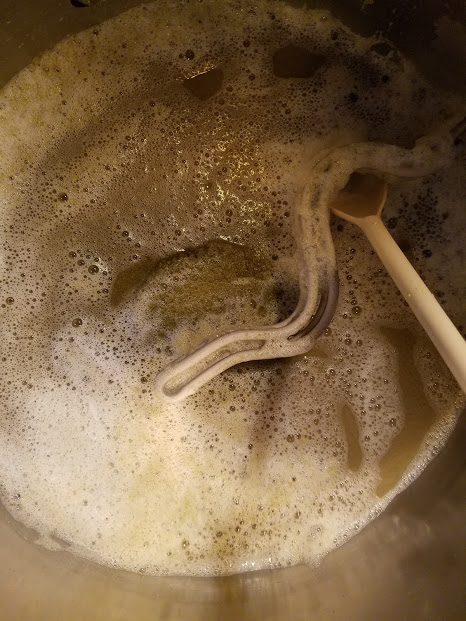
First note- this was a wit with 50% flaked wheat. The LHBS forgot the rice hulls. I also just milled to their standard setting (did not get exact specs). That said, I had no recirculation issues at all. 3/4 throttle for most of the hour. I also achieved ~70% brewhouse effeciency, which I am very happy with. The grains still definitely had a lot of sweet wort, so I may do a simple pour sparge next time.
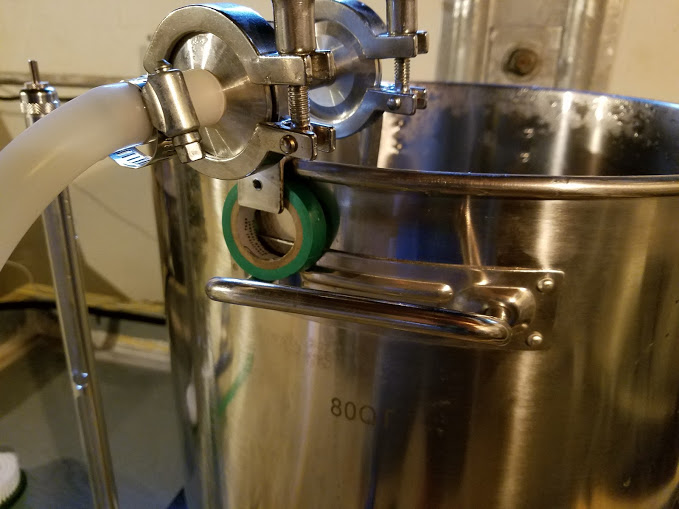
Second- The only complaint I have about the whole CBS system was the mounting of the recirc fitting. It's just not a very 'elegant' connection. I eventually found a roll of electrical tape jammed in there did the job. I'll figure something out for the future.
Third: I think I had an above average brew day length before, but today was SIGNIFICANTLY shortened. Times, as per my notes (5 gallon batch):
1:50- Start heating strike
2:25- Mash in (could have been sooner, fiddling with PID and probe)
3:27- Hoist basket
3:35- Start beating for boil
3:47- Boil achieved
4:47- Kill boil and start chill
4:54- 150* 5:08- 80*
5:14- carboy in fridge
6:34- all clean
This timetable is lightning speed compared to what I'm used to. Brewing was absolutely an all day affair. Between shortened setup, breakdown, cleaning, and heating, I shaved an easy 3 hours off. There are probably 30 minutes in there of me fiddling in figuring things out. This speed (and accompanying effiency) is the part I'm happiest about.
All in all couldn't be more pleased. Not only am I done sooner, I used to be absolutely BEAT after brewing. Today was tough work, but nowhere near what I'm used to, and it'll only get easier.
Now for some pics!
Mash (recirc fitting holder V1)
"Sparge"
Boil
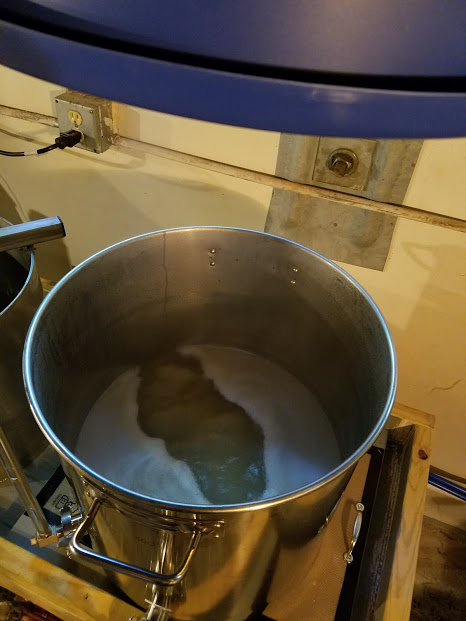
Chill
(recirc holder V2)
(Bro check my trub cone)
Oh yeah- it's hard to tell from that last pic but the pickup tube gets pretty much everything. I used .75 gal equipment loss and it was spot on, including what was left in the CFC.
Overall impression: wow. Easier, more efficient, and faster than I've ever brewed before. I swear I've had tougher times with extract batches! Keep in mind I didn't get the full nano system- just the kettle and recirc fitting.
First note- this was a wit with 50% flaked wheat. The LHBS forgot the rice hulls. I also just milled to their standard setting (did not get exact specs). That said, I had no recirculation issues at all. 3/4 throttle for most of the hour. I also achieved ~70% brewhouse effeciency, which I am very happy with. The grains still definitely had a lot of sweet wort, so I may do a simple pour sparge next time.
Second- The only complaint I have about the whole CBS system was the mounting of the recirc fitting. It's just not a very 'elegant' connection. I eventually found a roll of electrical tape jammed in there did the job. I'll figure something out for the future.
Third: I think I had an above average brew day length before, but today was SIGNIFICANTLY shortened. Times, as per my notes (5 gallon batch):
1:50- Start heating strike
2:25- Mash in (could have been sooner, fiddling with PID and probe)
3:27- Hoist basket
3:35- Start beating for boil
3:47- Boil achieved
4:47- Kill boil and start chill
4:54- 150* 5:08- 80*
5:14- carboy in fridge
6:34- all clean
This timetable is lightning speed compared to what I'm used to. Brewing was absolutely an all day affair. Between shortened setup, breakdown, cleaning, and heating, I shaved an easy 3 hours off. There are probably 30 minutes in there of me fiddling in figuring things out. This speed (and accompanying effiency) is the part I'm happiest about.
All in all couldn't be more pleased. Not only am I done sooner, I used to be absolutely BEAT after brewing. Today was tough work, but nowhere near what I'm used to, and it'll only get easier.
Now for some pics!
Mash (recirc fitting holder V1)
"Sparge"
Boil
Chill
(recirc holder V2)
(Bro check my trub cone)
Oh yeah- it's hard to tell from that last pic but the pickup tube gets pretty much everything. I used .75 gal equipment loss and it was spot on, including what was left in the CFC.
- Joined
- Feb 29, 2016
- Messages
- 502
- Reaction score
- 316
First day brew notes are in!
Overall impression: wow. Easier, more efficient, and faster than I've ever brewed before. I swear I've had tougher times with extract batches! Keep in mind I didn't get the full nano system- just the kettle and recirc fitting.
First note- this was a wit with 50% flaked wheat. The LHBS forgot the rice hulls. I also just milled to their standard setting (did not get exact specs). That said, I had no recirculation issues at all. 3/4 throttle for most of the hour. I also achieved ~70% brewhouse effeciency, which I am very happy with. The grains still definitely had a lot of sweet wort, so I may do a simple pour sparge next time.
Second- The only complaint I have about the whole CBS system was the mounting of the recirc fitting. It's just not a very 'elegant' connection. I eventually found a roll of electrical tape jammed in there did the job. I'll figure something out for the future.
Third: I think I had an above average brew day length before, but today was SIGNIFICANTLY shortened. Times, as per my notes (5 gallon batch):
1:50- Start heating strike
2:25- Mash in (could have been sooner, fiddling with PID and probe)
3:27- Hoist basket
3:35- Start beating for boil
3:47- Boil achieved
4:47- Kill boil and start chill
4:54- 150* 5:08- 80*
5:14- carboy in fridge
6:34- all clean
This timetable is lightning speed compared to what I'm used to. Brewing was absolutely an all day affair. Between shortened setup, breakdown, cleaning, and heating, I shaved an easy 3 hours off. There are probably 30 minutes in there of me fiddling in figuring things out. This speed (and accompanying effiency) is the part I'm happiest about.
All in all couldn't be more pleased. Not only am I done sooner, I used to be absolutely BEAT after brewing. Today was tough work, but nowhere near what I'm used to, and it'll only get easier.
Now for some pics!
Mash (recirc fitting holder V1)
"Sparge"
Boil
Chill
(recirc holder V2)
(Bro check my trub cone)
Oh yeah- it's hard to tell from that last pic but the pickup tube gets pretty much everything. I used .75 gal equipment loss and it was spot on, including what was left in the CFC.
Nice!!
View attachment ImageUploadedByHome Brew1464541495.617126.jpg
Just tapped my Tired Hands Hop Hands clone best one yet!!
what are you guys using to chill? I was just running some more wet tests getting ready for my brew session tomorrow morning and the pump really struggles to whirlpool through my counter flow chiller. I'm starting to regret getting rid of my Hydra immersion chiller. I can get a pretty rocking whirlpool with no chiller, but as soon as I attach the counter flow the whirlpool drops pretty dramatically.
Similar threads
- Replies
- 23
- Views
- 1K
- Replies
- 4
- Views
- 635
