
I started homebrewing about 2 years ago, before I got started with my first batch I spent about a year gathering equipment & knowledge from YouTube videos, books, and here on HomeBrewTalk. I researched all of my equipment, bought a chest freezer and a Johnson Control before I even got started. I felt fairly ready by the time I started my first batch, but as I soon figured out there are many things that are only learned through experience.
Lesson 1 - Listen to Charlie P. *"RDWHAHB"
I worried many times about, "Did I somehow contaminate my beer?" or "OH NO! I missed my mash temperature!" ,or "It's been X number of hours and there's no airlock activity, what's wrong?!?". In the end all or these worries have been needless. I have yet to have an infection, or a beer I could not stand to drink. In fact one of these beers recently placed second in a local competition! Don't worry so much, this is a hobby and it is meant to be fun! Just because your chiller sprays hose water in your batch, or you accidentally stuck that un-sanitized thermometer or spoon in your freshly chilled wort doesn't mean your batch is ruined, in fact it's likely fine. Even if it isn't, only time will tell & there's likely not much to be done about it at this point, but wait and see.
Lesson 2 - Use a Blow off Tube
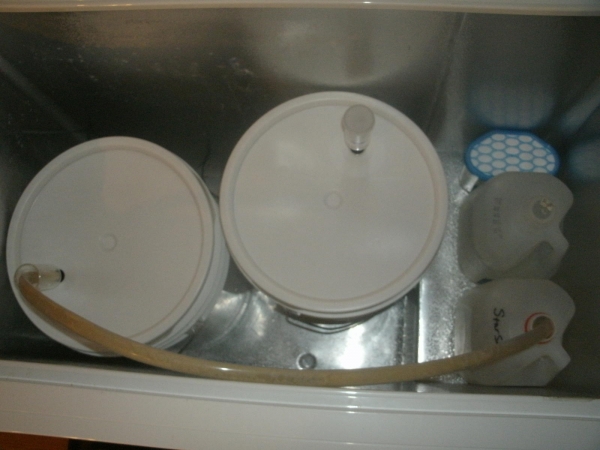
After cleaning up some major messes I have learned the importance of a blow off tube even when using a bucket as I do. Some yeast and high gravity beers produce some monster krausen and just because you ferment in a bucket don't think you are immune! If you are like me then you sometimes come up high on volume and add more to the fermenter than you should, and a blow off will help here too. A blow off can be rigged up on a bucket by using a 3 piece airlock & 5/8"OD X 1/2" ID tubing Like so:

Lesson 3 - Be Attentive to Your Beer
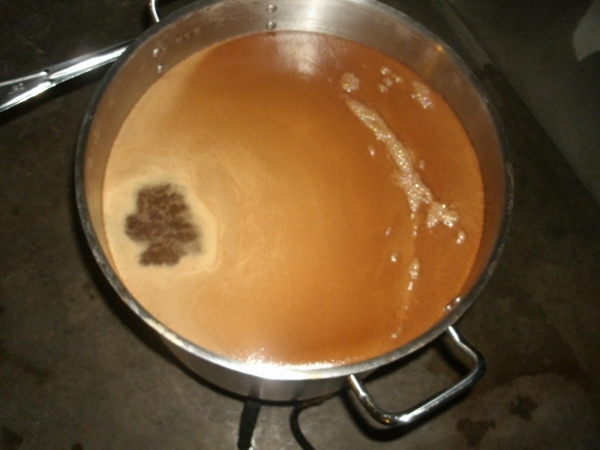
After a couple boil overs, and an entire batch dumped on the floor because of an open bottling spigot, I've learned to be attentive and don't leave your beer unattended during critical processes like racking, or bringing wort to a boil. Periodically check on things if not stand there the whole time whenever there is a chance something could go wrong because it likely will, while you aren't around.
A quick story I brewed a lovely smelling IPA about 6 months ago, I say smelling because it poured out the open spigot of my bottling bucket while I sanitized bottles in the next room. Had I at the very least periodically checked on it this would not have happened, and I would be able to describe the flavor of that IPA, but alas this was not to be.
Lesson 4 - Pitch Enough Yeast
If you want your fermentation to get going with the smallest amount of lag (and you do) it is important to pitch enough yeast. My first couple of experiences with liquid yeast I directly pitched the yeast without a starter and had to deal with long lag times and headaches because of it (see lesson 1). After investing in some DME and a Erlenmeyer flask I have noticed my fermentations take off in a couple of hours instead of a day or two. This greatly reduces chances of infection (and my headaches).
Lesson 5 - Chill Your Wort To or Below Pitching Temperature
My first couple of batches had some fusel alcohol hotness to them because I would chill to about 75 or so, pitch my yeast and put it in my chest freezer thinking it would bring it down into the proper temp just fine. It is much easier for your ferm chamber to keep the beer cool during fermentation if it starts out that way and doesn't have to battle the heat created by fermentation plus the heat already in your freshly brewed wort. The yeast can take that temperature you pitched at and run with it taking it way higher than you anticipated if you pitch too warm. A great way to chill your wort quickly is to use a submersible pond fountain pump to recirculate ice water through your immersion chiller.

We are lucky enough to be a part of a great hobby and a great online community here at HomeBrewTalk. No matter what your skill level, what kind of brewing you prefer (extract, PM, AG) there are plenty of other brewers here willing to answer all of your questions. No matter how many times they have to answer that "Is my batch infected?" thread. I have never been a part of a hobby where I felt like there were so many people willing to help.
After 20 batches I feel as though I have learned so much and I know there is much more to learn, and many more beers to drink! I look forward to my next 20 batches and all of the lessons that will come with them. This is a great hobby and what better way to learn a lesson then with a tasty homebrew in my hand.

Cheers!
* Relax, Don't Worry, Have a HomeBrew

Lesson 1 - Listen to Charlie P. *"RDWHAHB"
I worried many times about, "Did I somehow contaminate my beer?" or "OH NO! I missed my mash temperature!" ,or "It's been X number of hours and there's no airlock activity, what's wrong?!?". In the end all or these worries have been needless. I have yet to have an infection, or a beer I could not stand to drink. In fact one of these beers recently placed second in a local competition! Don't worry so much, this is a hobby and it is meant to be fun! Just because your chiller sprays hose water in your batch, or you accidentally stuck that un-sanitized thermometer or spoon in your freshly chilled wort doesn't mean your batch is ruined, in fact it's likely fine. Even if it isn't, only time will tell & there's likely not much to be done about it at this point, but wait and see.
Lesson 2 - Use a Blow off Tube
After cleaning up some major messes I have learned the importance of a blow off tube even when using a bucket as I do. Some yeast and high gravity beers produce some monster krausen and just because you ferment in a bucket don't think you are immune! If you are like me then you sometimes come up high on volume and add more to the fermenter than you should, and a blow off will help here too. A blow off can be rigged up on a bucket by using a 3 piece airlock & 5/8"OD X 1/2" ID tubing Like so:
Lesson 3 - Be Attentive to Your Beer
After a couple boil overs, and an entire batch dumped on the floor because of an open bottling spigot, I've learned to be attentive and don't leave your beer unattended during critical processes like racking, or bringing wort to a boil. Periodically check on things if not stand there the whole time whenever there is a chance something could go wrong because it likely will, while you aren't around.
A quick story I brewed a lovely smelling IPA about 6 months ago, I say smelling because it poured out the open spigot of my bottling bucket while I sanitized bottles in the next room. Had I at the very least periodically checked on it this would not have happened, and I would be able to describe the flavor of that IPA, but alas this was not to be.
Lesson 4 - Pitch Enough Yeast
If you want your fermentation to get going with the smallest amount of lag (and you do) it is important to pitch enough yeast. My first couple of experiences with liquid yeast I directly pitched the yeast without a starter and had to deal with long lag times and headaches because of it (see lesson 1). After investing in some DME and a Erlenmeyer flask I have noticed my fermentations take off in a couple of hours instead of a day or two. This greatly reduces chances of infection (and my headaches).
Lesson 5 - Chill Your Wort To or Below Pitching Temperature
My first couple of batches had some fusel alcohol hotness to them because I would chill to about 75 or so, pitch my yeast and put it in my chest freezer thinking it would bring it down into the proper temp just fine. It is much easier for your ferm chamber to keep the beer cool during fermentation if it starts out that way and doesn't have to battle the heat created by fermentation plus the heat already in your freshly brewed wort. The yeast can take that temperature you pitched at and run with it taking it way higher than you anticipated if you pitch too warm. A great way to chill your wort quickly is to use a submersible pond fountain pump to recirculate ice water through your immersion chiller.
We are lucky enough to be a part of a great hobby and a great online community here at HomeBrewTalk. No matter what your skill level, what kind of brewing you prefer (extract, PM, AG) there are plenty of other brewers here willing to answer all of your questions. No matter how many times they have to answer that "Is my batch infected?" thread. I have never been a part of a hobby where I felt like there were so many people willing to help.
After 20 batches I feel as though I have learned so much and I know there is much more to learn, and many more beers to drink! I look forward to my next 20 batches and all of the lessons that will come with them. This is a great hobby and what better way to learn a lesson then with a tasty homebrew in my hand.
Cheers!
* Relax, Don't Worry, Have a HomeBrew
") So much more is learned from brewing that first batch than anything else.
So much more is learned from brewing that first batch than anything else.