
I've seen a couple issues come up lately where people have found pinhole leaks coming from under the rubber on their kegs. This can be somewhat distressing if you're not sure how to tackle it. Most of the time leaks come from a damaged o-ring, an unseated lid, or a worn poppet. These are easily fixable with little investment, but a leak that can't be repaired by way of replacement is risky business.
When I purchased my kegs, they all held pressure and so I thought all of them would be fine. When I cleaned them up for the first time, the gas post on this one was really stuck and I had a really hard time getting it off. I had to lay the keg on its side and really crank the wrench to get it to budge. I think that part of it was that the first time I laid it on its side, and I accidentally cranked the wrench the wrong way and tightened it even more. Thinking back, I that may have been the cause of the leak, because when I got it cleaned and put it back together, it started hissing. My leak turned out to be between the post nipple and the keg wall. It must have been a really tiny pinhole, because I could never actually see it exactly. I took a mirror and examined the interior of the post hole, but couldn't locate a hole or crack or anything there either.
I had initially just trimmed away some of the rubber around the base of the nipple and hit it with some JB Weld. For all the amazing things that JB Weld has done for people, it has done very little for me. People seem to have this idea that JB Weld will fix everything. I don't even remember why I bought the stuff, but 9 times out of 10 it has failed to impress me. I presume that it is not designed to hold pressure because, well, it didn't. I left the keg alone for almost two years before I finally decided to do something about it.
In the meantime, I had acquired a vintage fridge that I replaced the insulation in. I apparently wasn't as careful with removing the evaporator as I thought I was, because I got it all back together and turned it on and a week or so later it wasn't holding temperature. That's lame. After contemplating what I should do with the largest paperweight in the house, I received some direction on how to fix it from a guy that does HVAC professionally. Again I had tried JB Weld and failed. Some people never learn. He guffawed at my attempted fix and told me that since it was aluminum, it wouldn't hold up to brazing temperatures, (Good thing I didn't go out and buy solder and a torch) but that I was on the right track by trying epoxy. He recommended Supco RedEpoxy. He was even kind enough to refill my fridge with R12 once I'd made the repair.
This Red Epoxy is interesting stuff. You mix it up and gently heat the surface it needs applied to. It's thick and pasty, but almost melts onto the heated metal surface. You can let it cure overnight and it will stay red, or you can heat it to cure instantly, and it will turn a golden color. It is recommended to apply in thin layers and to heat each layer to cure. It worked very well on the evaporator and so I thought if it will hold that kind of pressure, I might as well give it a shot on my keg.
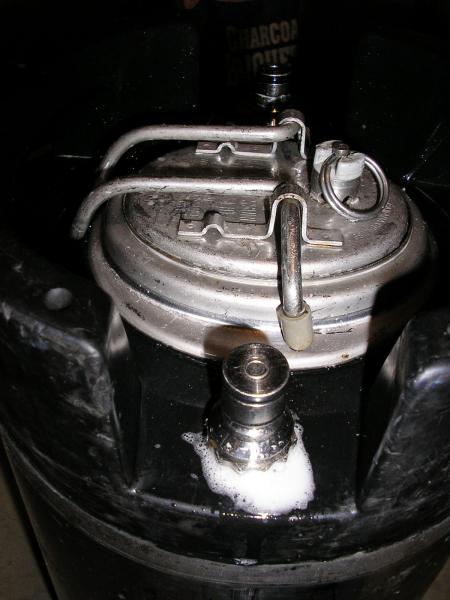
Here is my keg leak in action, in all its bubbling glory. I thought about trading someone who would want to use it as a fermenter, but I didn't know if the pinhole leak would even be suitable for that purpose.
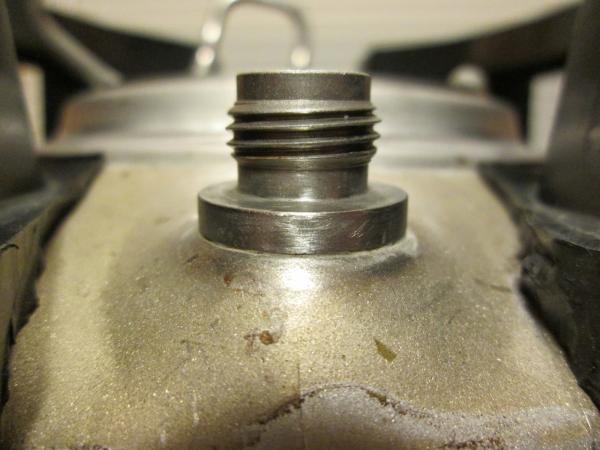
To fix, I started by trimming away the rubber with a razor blade. Around the posts it's surprisingly easy to peel away. Even with a clear view all the way around, I could only locate the leak with a soapy solution. Its location is somewhere in the yellow area here. I didn't trust any of this gunk around the nipple, so I cleaned up the immediate area with some medium to fine grit sandpaper.

Notice how the base of the nipple now has a shiny, brushed appearance.
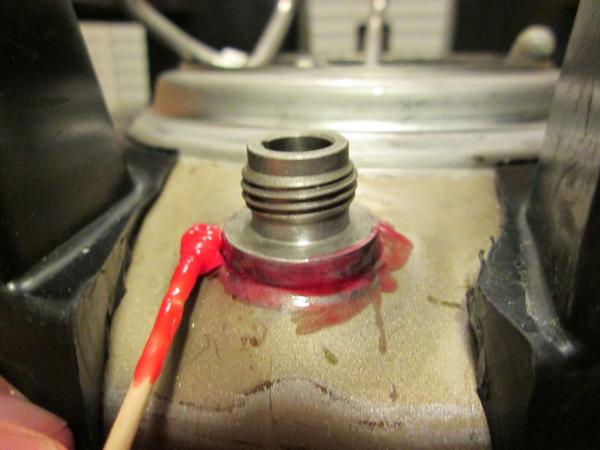
Mix up the Red Epoxy as directed. (I have a mini gram scale which worked well to get equal parts by weight.) Next I hit it with a butane torch lighter, which seemed a fire hazard to do and photograph at the same time, sorry. After heating, you can see the epoxy just kind of melts right on there, like butter on hot toast, only redder and much less appetizing.
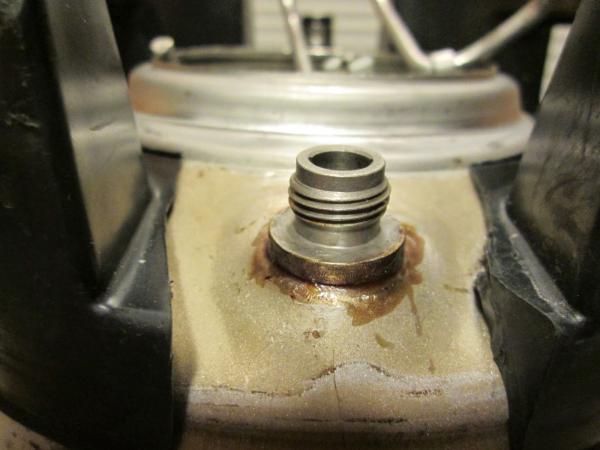
After an (almost) even, thin layer, I hit it with the lighter again. You want it turn gold, but if it starts to bubble and turn black, then according to the directions, you have failed miserably and you must scrape it off and start over. Luckily there was no "Game Over" for me and it gilded right up.
After that it was time for round two, this time covering more area just to be safe.
I would show you how I heated it again and applied a third coat, but there's nothing more to see that hasn't been shown already. After three coats, I decided it was time to test it out and it did indeed hold pressure. No bubbles. Again, there's nothing more to see that hasn't already been shown. A non-leaking keg looks the same as any other corny, so it was not photo worthy. At that point I used the remaining epoxy to re-adhere the rubber portions I had trimmed away so my scarred keg wouldn't feel self-conscious about being seen in public. (It hates explaining the nature of the surgery. It particularly tries to avoid the word "nipple" in civilized conversation.) There are probably better suited adhesives for this, but it was already mixed up, and what did I have to lose at this point. This time I didn't heat it and instead I taped it down with some packing tape to be sure it would stay put as it cured. It cured in 24 hours. Now it looks like a normal corny, you have to look closely to see that it has had some work done, but I try not to stare because that's rude.
And there you have it, a fixed keg.
I do occasionally wonder if the JB Weld would have worked if I had done the same prep work as before, but oh, well.

When I purchased my kegs, they all held pressure and so I thought all of them would be fine. When I cleaned them up for the first time, the gas post on this one was really stuck and I had a really hard time getting it off. I had to lay the keg on its side and really crank the wrench to get it to budge. I think that part of it was that the first time I laid it on its side, and I accidentally cranked the wrench the wrong way and tightened it even more. Thinking back, I that may have been the cause of the leak, because when I got it cleaned and put it back together, it started hissing. My leak turned out to be between the post nipple and the keg wall. It must have been a really tiny pinhole, because I could never actually see it exactly. I took a mirror and examined the interior of the post hole, but couldn't locate a hole or crack or anything there either.
I had initially just trimmed away some of the rubber around the base of the nipple and hit it with some JB Weld. For all the amazing things that JB Weld has done for people, it has done very little for me. People seem to have this idea that JB Weld will fix everything. I don't even remember why I bought the stuff, but 9 times out of 10 it has failed to impress me. I presume that it is not designed to hold pressure because, well, it didn't. I left the keg alone for almost two years before I finally decided to do something about it.
In the meantime, I had acquired a vintage fridge that I replaced the insulation in. I apparently wasn't as careful with removing the evaporator as I thought I was, because I got it all back together and turned it on and a week or so later it wasn't holding temperature. That's lame. After contemplating what I should do with the largest paperweight in the house, I received some direction on how to fix it from a guy that does HVAC professionally. Again I had tried JB Weld and failed. Some people never learn. He guffawed at my attempted fix and told me that since it was aluminum, it wouldn't hold up to brazing temperatures, (Good thing I didn't go out and buy solder and a torch) but that I was on the right track by trying epoxy. He recommended Supco RedEpoxy. He was even kind enough to refill my fridge with R12 once I'd made the repair.
This Red Epoxy is interesting stuff. You mix it up and gently heat the surface it needs applied to. It's thick and pasty, but almost melts onto the heated metal surface. You can let it cure overnight and it will stay red, or you can heat it to cure instantly, and it will turn a golden color. It is recommended to apply in thin layers and to heat each layer to cure. It worked very well on the evaporator and so I thought if it will hold that kind of pressure, I might as well give it a shot on my keg.
Here is my keg leak in action, in all its bubbling glory. I thought about trading someone who would want to use it as a fermenter, but I didn't know if the pinhole leak would even be suitable for that purpose.
To fix, I started by trimming away the rubber with a razor blade. Around the posts it's surprisingly easy to peel away. Even with a clear view all the way around, I could only locate the leak with a soapy solution. Its location is somewhere in the yellow area here. I didn't trust any of this gunk around the nipple, so I cleaned up the immediate area with some medium to fine grit sandpaper.
Notice how the base of the nipple now has a shiny, brushed appearance.
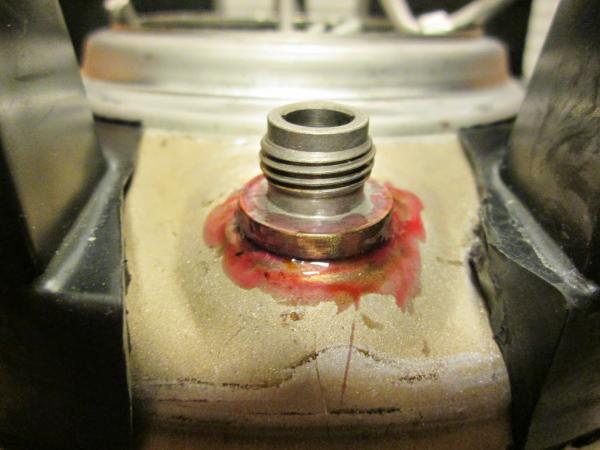
Mix up the Red Epoxy as directed. (I have a mini gram scale which worked well to get equal parts by weight.) Next I hit it with a butane torch lighter, which seemed a fire hazard to do and photograph at the same time, sorry. After heating, you can see the epoxy just kind of melts right on there, like butter on hot toast, only redder and much less appetizing.
After an (almost) even, thin layer, I hit it with the lighter again. You want it turn gold, but if it starts to bubble and turn black, then according to the directions, you have failed miserably and you must scrape it off and start over. Luckily there was no "Game Over" for me and it gilded right up.
After that it was time for round two, this time covering more area just to be safe.
I would show you how I heated it again and applied a third coat, but there's nothing more to see that hasn't been shown already. After three coats, I decided it was time to test it out and it did indeed hold pressure. No bubbles. Again, there's nothing more to see that hasn't already been shown. A non-leaking keg looks the same as any other corny, so it was not photo worthy. At that point I used the remaining epoxy to re-adhere the rubber portions I had trimmed away so my scarred keg wouldn't feel self-conscious about being seen in public. (It hates explaining the nature of the surgery. It particularly tries to avoid the word "nipple" in civilized conversation.) There are probably better suited adhesives for this, but it was already mixed up, and what did I have to lose at this point. This time I didn't heat it and instead I taped it down with some packing tape to be sure it would stay put as it cured. It cured in 24 hours. Now it looks like a normal corny, you have to look closely to see that it has had some work done, but I try not to stare because that's rude.
And there you have it, a fixed keg.
I do occasionally wonder if the JB Weld would have worked if I had done the same prep work as before, but oh, well.
