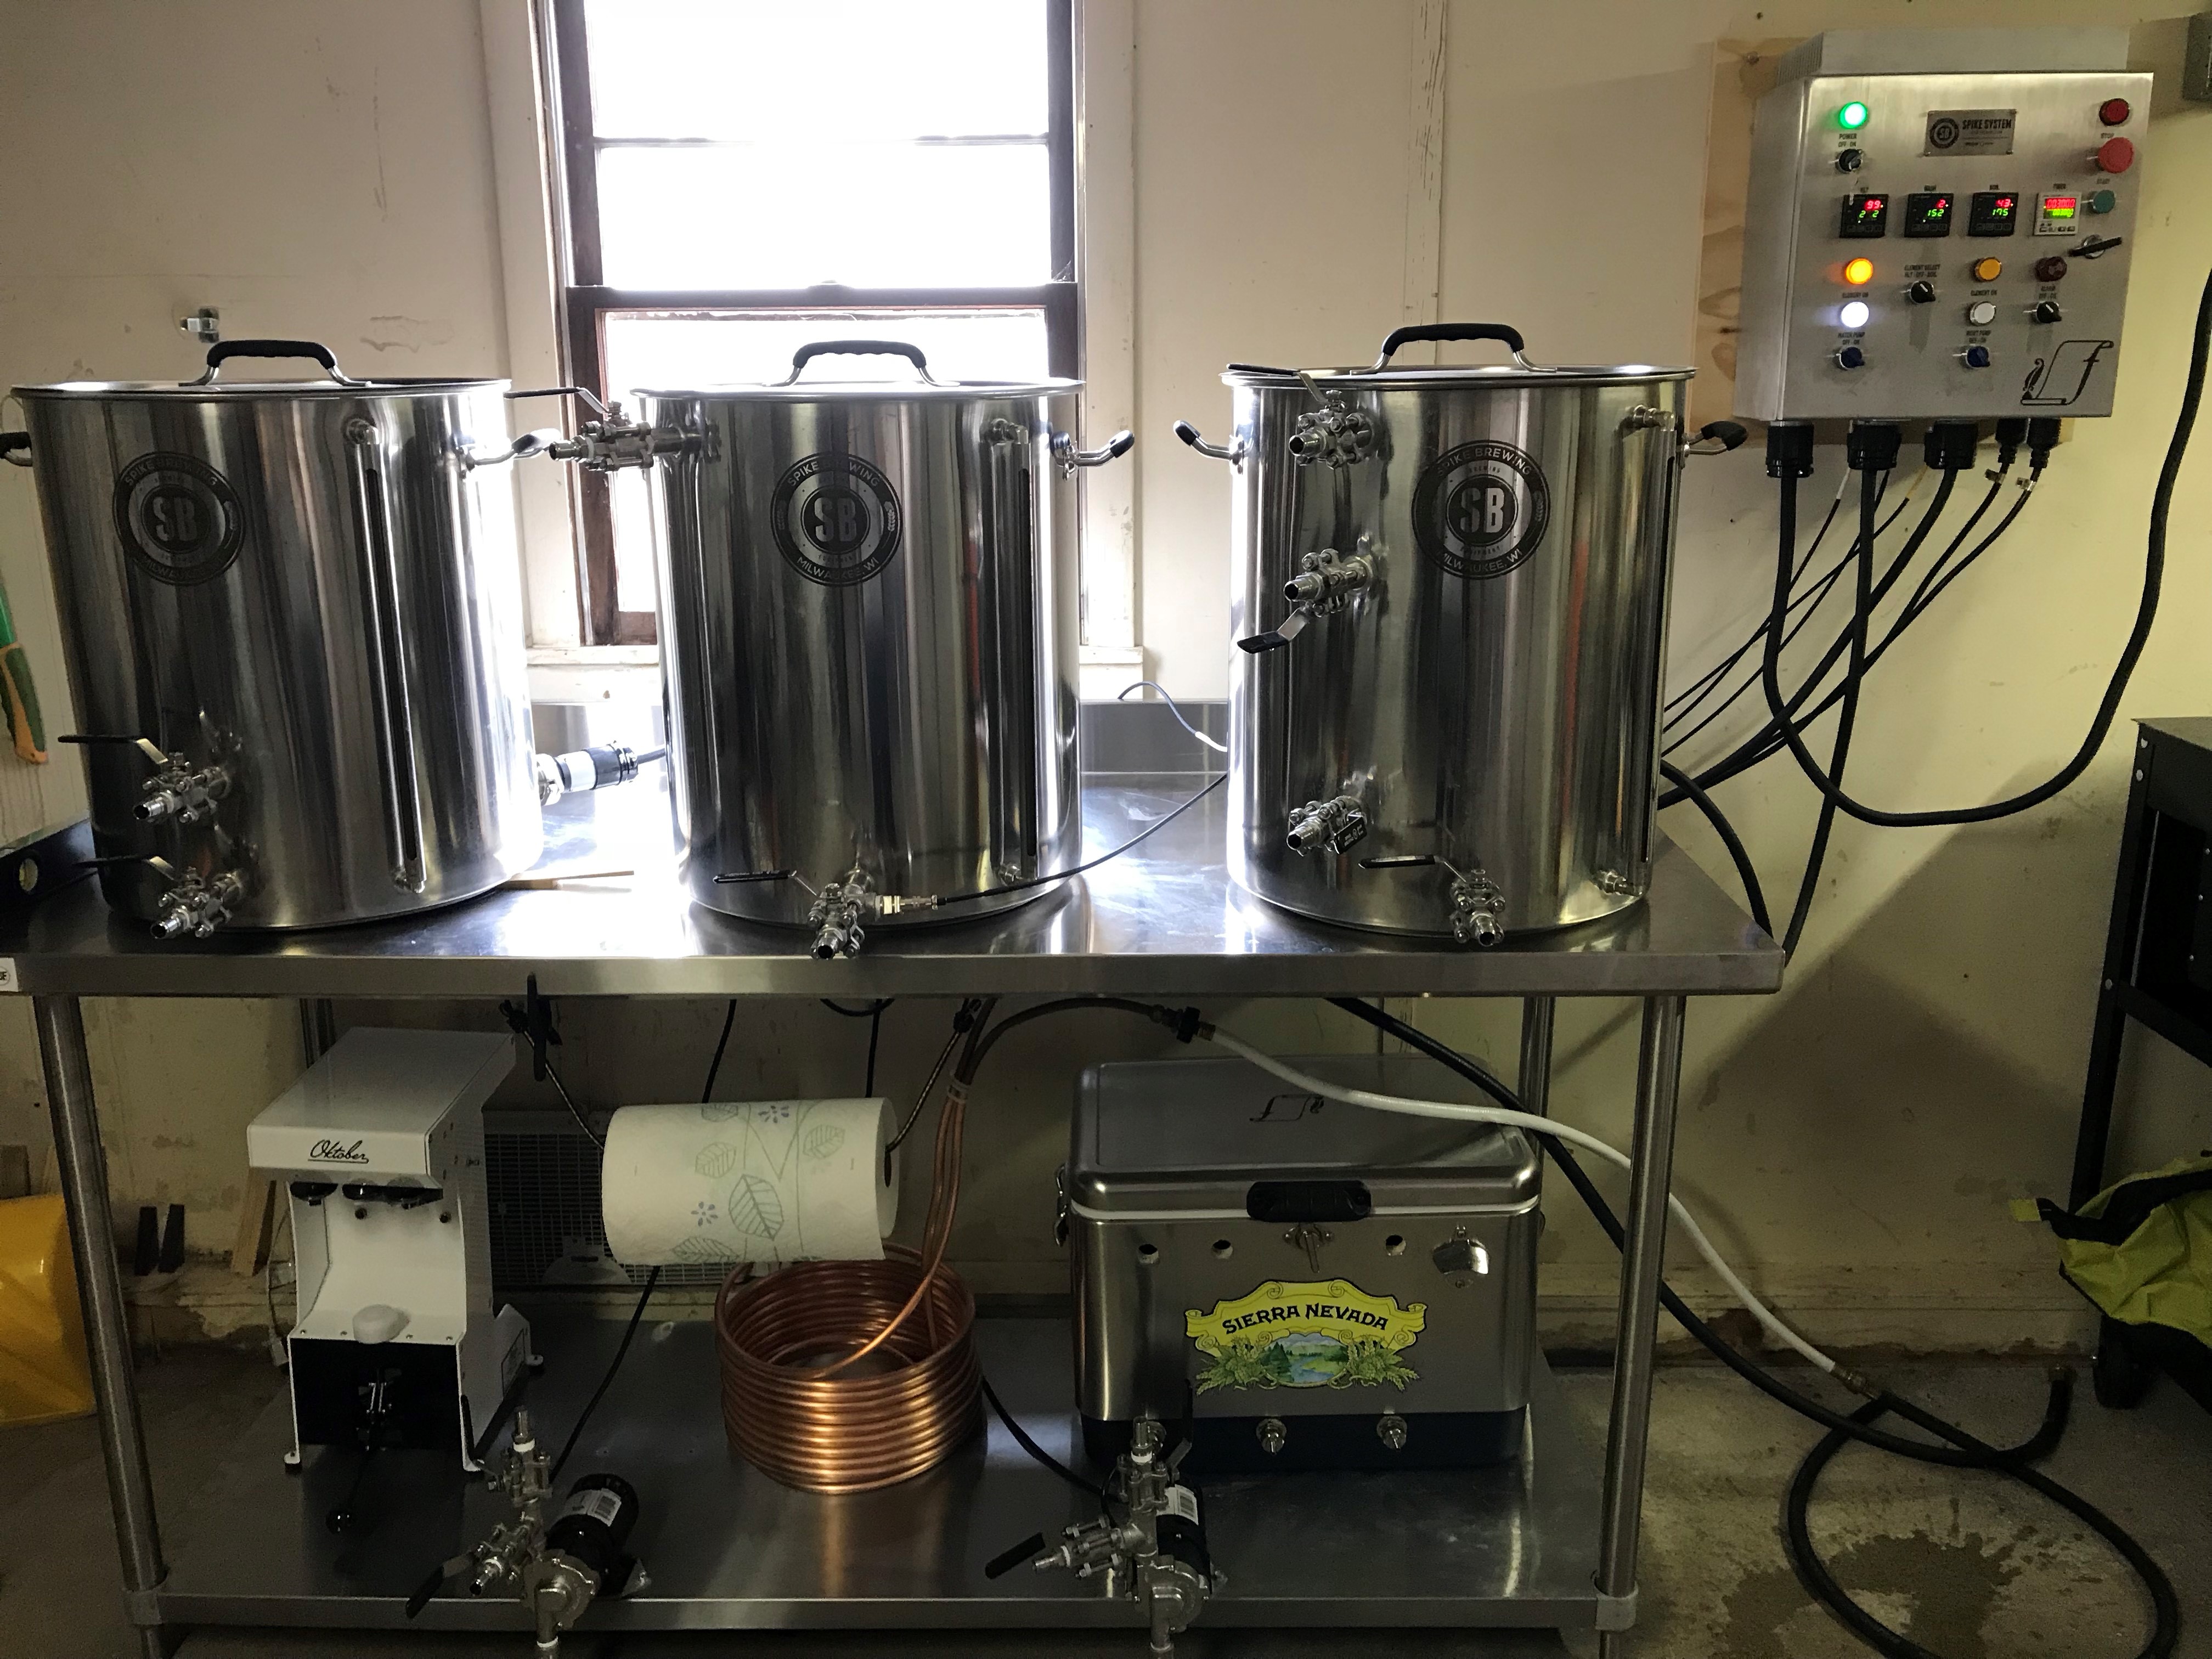
Hi all, I'm bringing back this thread because I've had this 20 gallon system for a few months now and have done 6 or 7 brews on it (I went from your typical home depot cooler gravity system. Long story short is that it's amazing and I highly recommend it - it's absolutely worth the money, but it takes A LOT of getting used to if you want it to be extremely accurate as advertised (I was always mid-80s in terms of mash efficiency on my gravity system and I've only gotten there once on this system so far - please note that this is my own fault as I continue to dial in the system - it is completely capable of achieving very high efficiency). Here is a list of things I've learned (my BK, MLT, and HLT are positioned left, center, right, respectively with the panel on the far right next to the HLT):
1. Very convenient to read temps now by looking at the control panel - no more bringing out the thermopen for every readying.
2. I use the immersion chiller still and start up the whirlpool to increase the chilling effect (as opposed to the CFC they advertise) - it works well, but I've never used a CFC, so I can't compare. To save water I pump the first hotter 20 gal of waste chilling water into the MLT and the 2nd less hot 20 gallons into the HLT and discard the rest. MLT first since it can't be directly heated - if it is still to cold and needs to be heated to the recommended 160F for PBW I recirculate in the HERMS (I bring the HLT that contains the HERMS to a boil). HLT doesn't need PBW since it's just water. PBW cleans MLT then move it to boil kettle. Move boiling water in HLT to MLT to boil kettle. So, all-in-all to clean I move PBW thru followed by a boiling water rinse. They say it's all CIP - I haven't found this to be true. I find before I do any of the above I need to completely clean all the spent grain out of the MLT (obvious) and all of the trub and hop debris out of the boil kettle. I tried doing the CIP while leaving all that crap in the boil kettle and it just made a mess.
3. I did the bargain cave deal to save a lot of money and the kettle etchings for volumes were missing (why it was so cheap) - I knew this going into it and didn't care because the sight glasses take care of volumes. I wanted to make sure they were accurate so I added in known volumes to the boil kettle (heating element and dip tubes displace negligible amounts of water, so they don't really affect measurements if you were wondering) - leveled the kettle and found that 5 gallons was accurate, 10 gallons measured as 10.2 gallons and 15 gallons measured as 15.4 gallons (so a 0.2 increase in reading for every 5 gallons after the initial 5). This will probably be the same for all 20 gallon spike systems, but I'd recommend doing it yourself for your own sanity.
4. Boil off rates vary for me since I'm in a garage with the rolling doors open - cooler windy days more boils off and hotter, humid, mild days much less. Theelectricbrewery, which also has a 20 gallon HERMS system boasts a 1.9 gallon / hour boil off rate, but Kal has a hood for proper ventilation and is indoors in a basement where the atmosphere is constant, so I'm sure it's the same everytime if you have a proper indoor setup. I've had anywhere from 1 gal / hr to 1.7 gal / hr (usually around 1.3-1.4 gal/hr).
5. If I did it over I'd go for a more powerful panel that has the option of powering 2 elements at once - this would save me a lot of time in getting cleanup water ready during the boil rather than having to wait until I start chilling. I could also do back-to-back batches much easier with this convenience. I have the 30 amp panel and can only power one element at a time. It may be hard to picture if you have gone through it, but it is something I would really do differently.
6. Their SS table they offer is very expensive. I found a much cheaper, but equivalent table (same size and gauge) on the webstaurant website. I also chose an option with a nice back-splash! The caster option SEEMS nice, so I got those, but don't bother - when 40-60 gallons of liquid is resting on that table it becomes FAR too wobbly when on wheels. I switched back to the sturdy bullet feet that came with it and it's super sturdy now.
7. Thoroughly read Kal's "Step-by-step brewday" on theelectricbrewery.com if you haven't - it's EXTREMELY useful in both making your brewday on this system very efficient time-wise (first brew day on this system was 12 hrs including cleaning - now I'm around 8 hrs) as well as achieving high mash efficiency. I've followed his methods here and got up to 86%, but then down to 70% the next time (again, still learning and dialing in this system). Anyway, the point here is he's very experienced, very bright, and has a 20 gallon electric HERMS system - pretty much the exact system we're talking about, so it's worth the read since nearly everything is applicable.
8. Boil kettle dead space is 1-7/8 gallons, probably around 2 gallons if you consider hoses, pumps, etc. MLT dead space below false bottom is 1/2 gallon and that in HERMS coil and hoses is probably another 1/4 to 1/2 gallon, so I say 3/4 to 1 gallon total. Some people say MLT dead space is when the wort stops coming out of the drain (if this is the case it's the same as the boil kettle at 2 gallons), but I think MLT dead space is the wort that is not in contact with the grain (below false bottom and in hoses, HERMS coil, and pump) and really only impacts your mash ratio.
9. I've been filling my HLT to the near top with about 20 gallons of water since I've found that not immersing the HERMS coil completely changes things with MLT temp ramp speeds. I want consistency, so I keep the whole thing immersed every time now. I put the strike water in my boil kettle to heat it up to above strike temp and transfer that to the MLT (since HLT is full of water as mentioned above and I want to keep it that way for thermal mass). In the summer months I've found that the temp drops 5F to 10F when transferred from the boil kettle to the MLT, so keep in mind when heating your strike water that it should be probably ~10F above your initial strike temp (cooler months this differential will probably be greater - again, I'm in a garage). Then add grain and it will drop yet again to your mash temp per the equations. Kal moves some of his HLT water to the MLT in lieu of what I do (I don't for the reason mentioned above), but you can dial in anything with enough repetition. As they say in the Spike Brewing Youtube video there is a temperature lag between the HLT and MLT of about 3F-4F - I have found this to be generally accurate, but haven't completely yet gotten the hang of it.
10. Both Ebrewsupply (who makes the panel) and Spike Brewing have been extremely helpful. My water pump blue LED toggle came loose and I couldn't get it to engage, so Ryan at Ebrewsupply not only told me how to fix it, but sent me two new ones for free! He's the owner and answered the phone directly - so, that says something about service. One of the o-rings inside a push-to-connect fitting (see the spike brewing youtube video about the spike system if you don't know what these fittings are) broke - inevitable since o-rings don't last forever, so I called Spike Brewing and they sent me a bag of 18 of them for free! At this time the o-rings weren't on the website, but after my call they said they'd be putting them up there, so they should be available now.
11. Installing all the fittings to the kettles for the first time not only took an entire roll of teflon, but probably 4-5 hrs total (multiple nights after work). With my cleaning method above it has been extremely clean and I have not had to take the fittings apart at all yet (I probably will after about 10 brews... and I dread that day).
12. Every person I've shown this system to has become aroused (myself included). Well... maybe not my wife (she only focused on the $$ spent).
13. I mounted the pumps with Morebeer!'s pump brackets (
https://www.morebeer.com/products/pump-mounting-bracket-stainless.html) and they are perfect for this (and look sexy with all the stainless). I first mounted them "horizontally" in the middle of the lower shelf of the table - by horizontally I mean the inlet and outlet of the pump are to the left and right of the center of the pump. This led to pooling of wort and water in the shelf, so I've moved the pumps and the brackets to the front of the lower shelf (so the inlet and outlet are hanging over the edge) and rotated the pump head so the inlet and outlet are in the "vertical" position - this has worked MUCH better. No pooling, bleeder valve is on the top for purging air, inlet on the bottom, outlet on the top. Spike Brewing shows a cool bracket mounted to the leg of the table - I couldn't find this one, so I didn't buy it and can't compare to it, but I do know that the lower the pumps are the better, so I think I prefer my method personally.
I'm sure there's more I've picked up on, but that's all I can think of for now. I'll post more as I learn and I hope others that have this system will contribute as well because it's a lot to learn coming from a gravity system (I would have killed to see this post or something like it before I made the plunge). Also, feel free to correct me if you've noticed something different in your experiences with it - I always want to learn more and I'm still a novice myself!!!