Semi-unique 3-vessel single tier brewery

Homebrew Talk - Beer, Wine, Mead, & Cider Brewing Discussion Forum

Help Support Homebrew Talk - Beer, Wine, Mead, & Cider Brewing Discussion Forum:

This site may earn a commission from merchant affiliate links, including eBay, Amazon, and others.

aangel

Well-Known Member
Joined
Oct 18, 2010
Messages
568
Reaction score
65
Location
Toronto
This design is the culmination of all the know how I've gained from spending a frankly irresponsible amount of time in this board. Big thanks for inspiration go to Kal, BlackHeart, JonW, AugieDoggy, and several others. I can't claim any real originality here - I've just ripped off the best ideas I've found throughout the board.

I got so excited that I couldn't hold back. This post is premature as I'm not done building it yet. I'll be adding pictures as it comes together.

Basic stats and design goals:
  • 3 bottom draining keggles - can clean in place
  • liquid control via hard-plumbed manifold - no swapping hoses for sparging
  • fueled by natural gas - no swapping propane tanks
  • portal heat stick and sous-vide controller - precise mash control without expensive electrical work
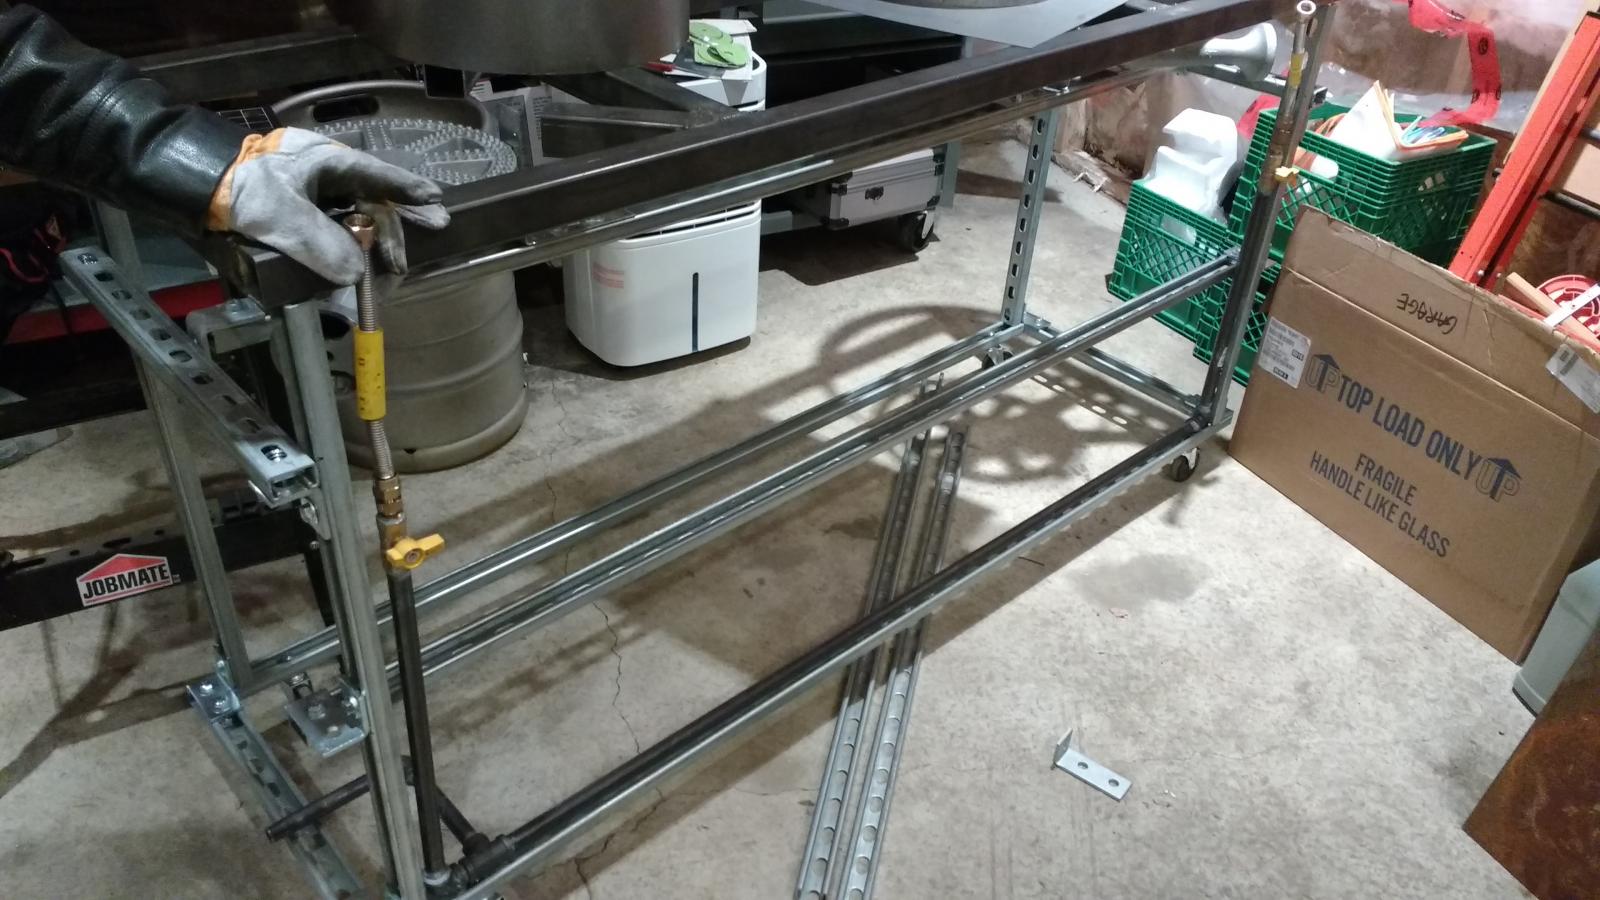
  • single tier channel strut stand, approx 3' tall - no bending or crouching to control valves, and can store keggles securely within the structure for transport
  • water source "built-in" via the chiller coil - no more lifting buckets of water
  • liquid flow logic so simple, it is clean on a 2D drawing (so close!)

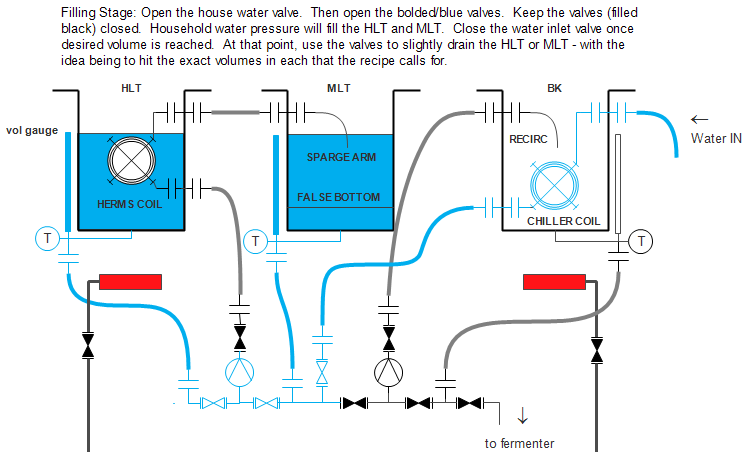
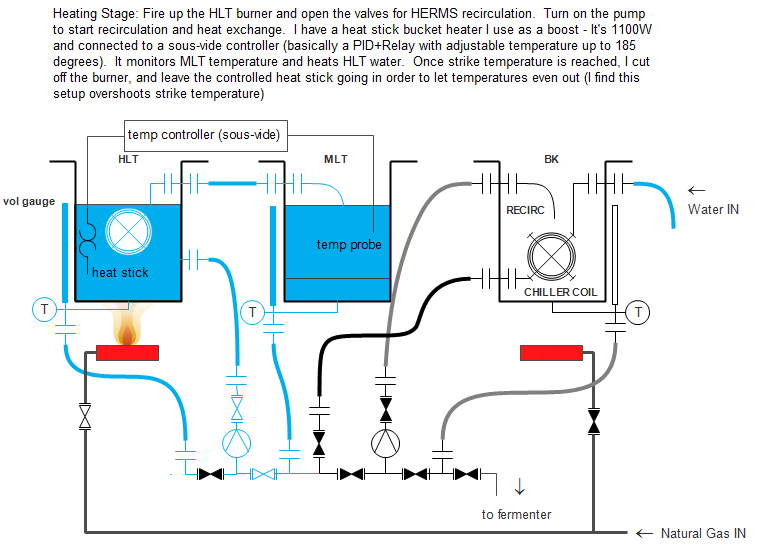
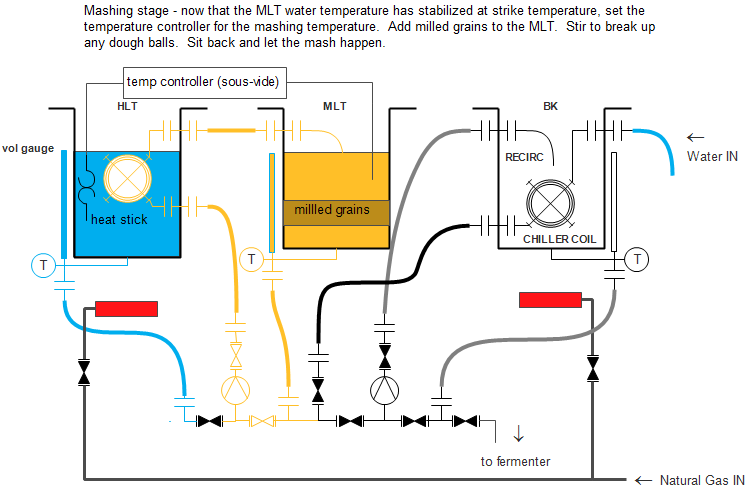
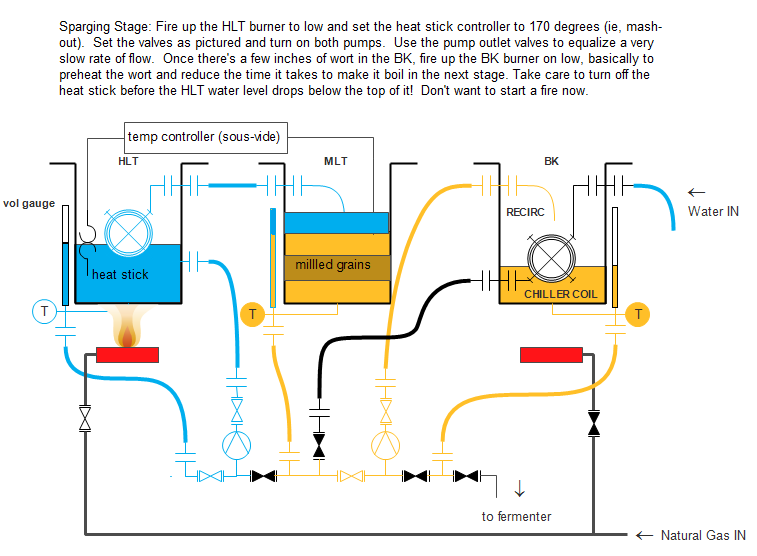
Update: attached the plumbing diagram and various stages.
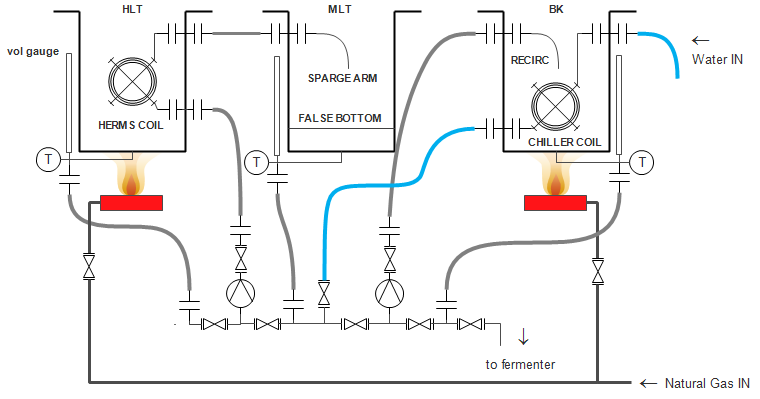
basic plumbing.png


fill stage.png


heating to strike.png


mash.png


sparge.png


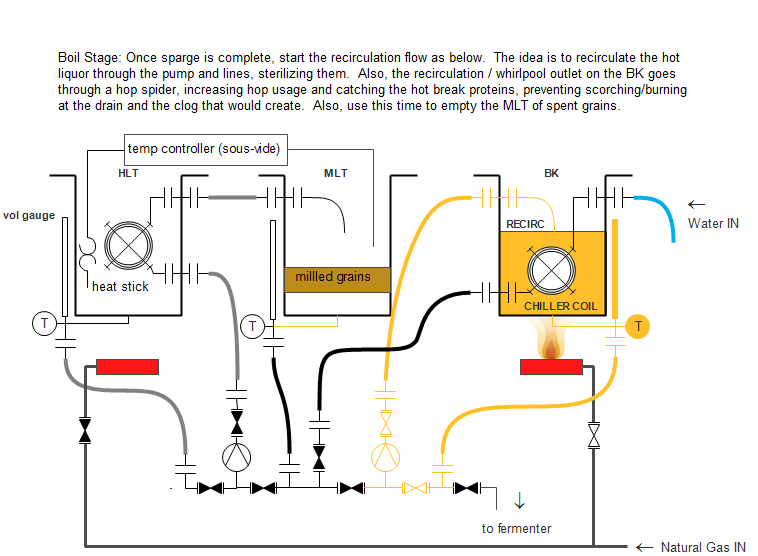
boil.png


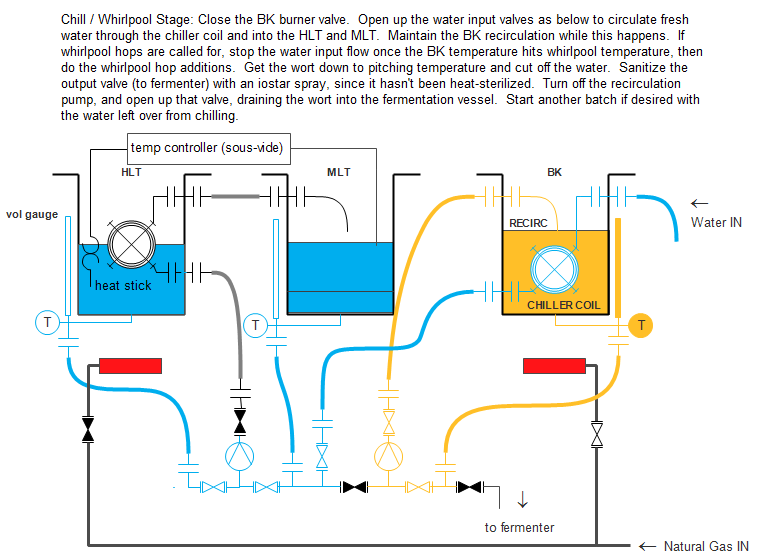
chill.png
 
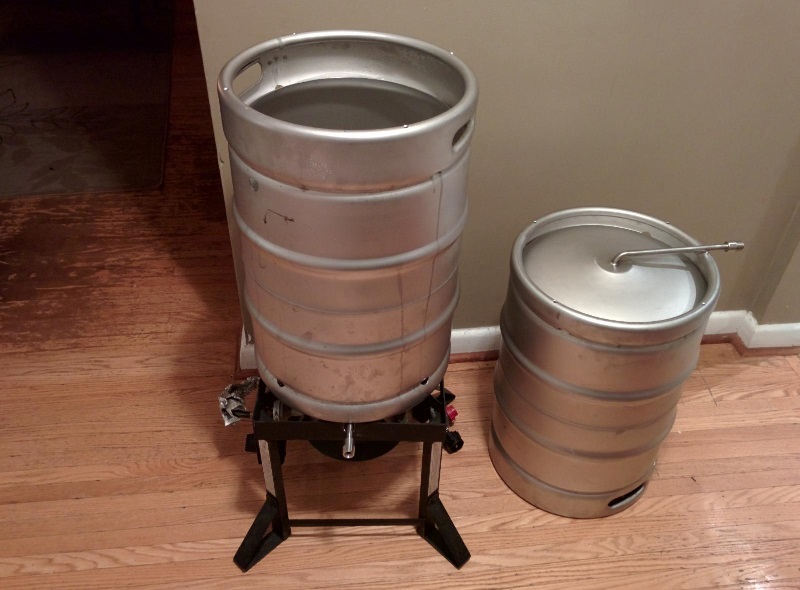
Why bottom draining HLT and BK? Is that really going to work well over a gas burner?

Bottom drain means I don't have to take it apart to clean, and also means that mash tun dead space isn't a thing. After brewing, I run water, pbw solution, water again, then star san or iostar, and let drip dry thanks to the bottom outlet.

I've had mixed results with the boil kettle so far - I think hot break and hops have been clogging the drain. I plan to constantly circulate the wort during boil, with the whirlpool outlet going through a nylon hop blocker bag, in the hopes of increasing hop usage and catching all the trub that would normally get stuck in the drain pipe.
 
Are you hard plumbing the bottom drain to a remote valve or is your valve directly attached to the bottom drain? Got a link for those valves?
 
I'm not automating, all the valves are generic 2-piece 1/2" full bore ball valves. All my plumbing is 1/2" pipe threaded stuff. I would've gone with triclamp but it's prohibitively expensive for me.

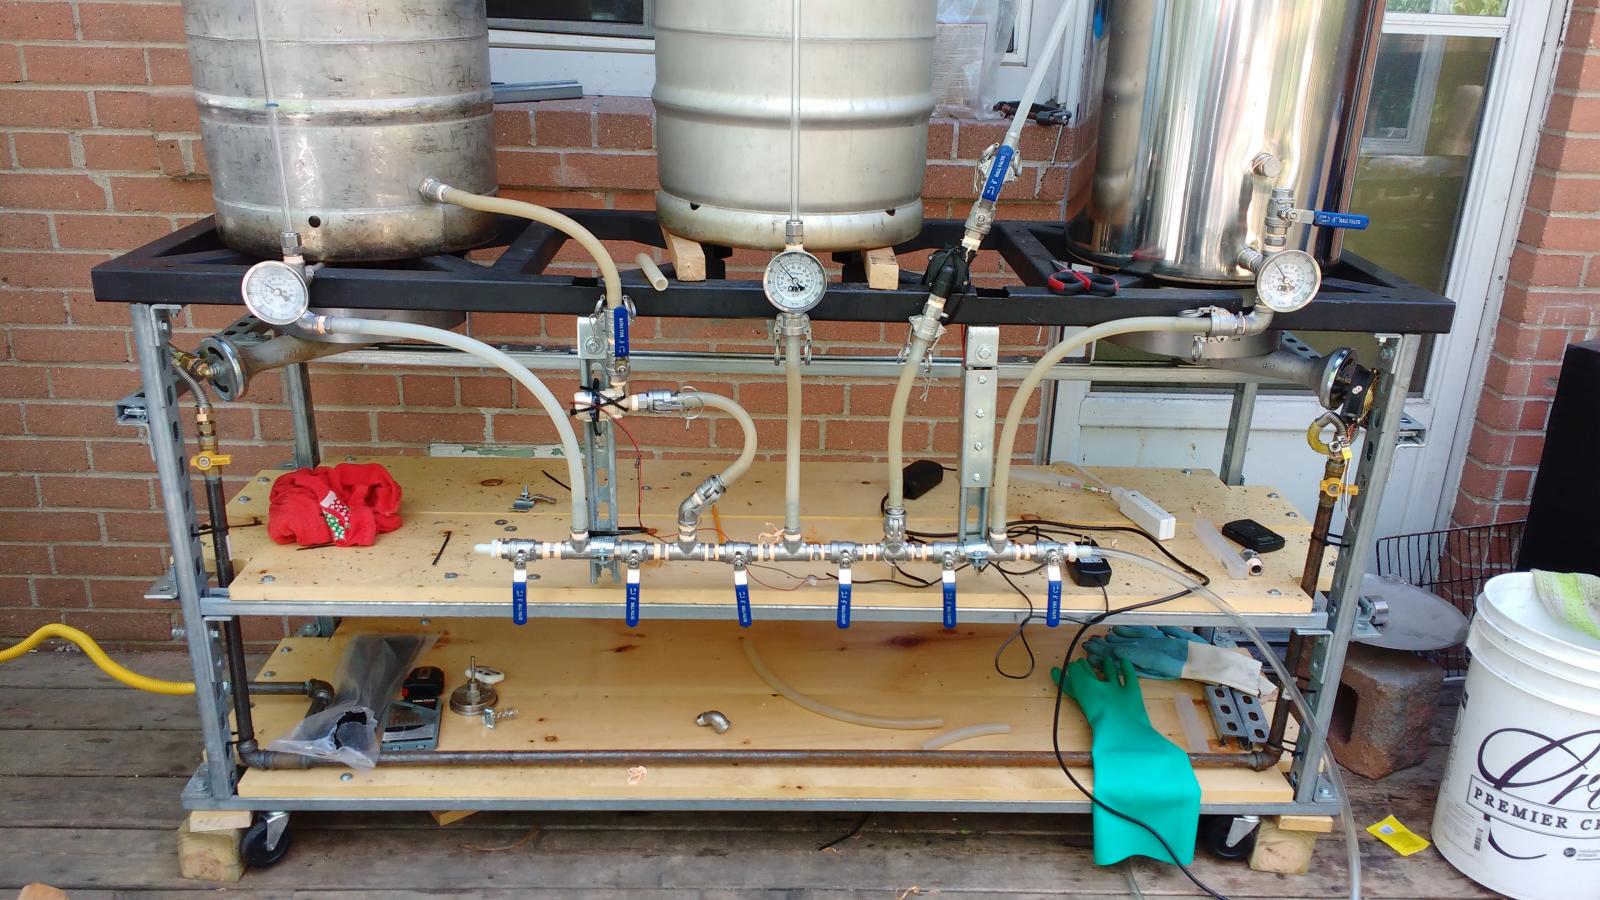
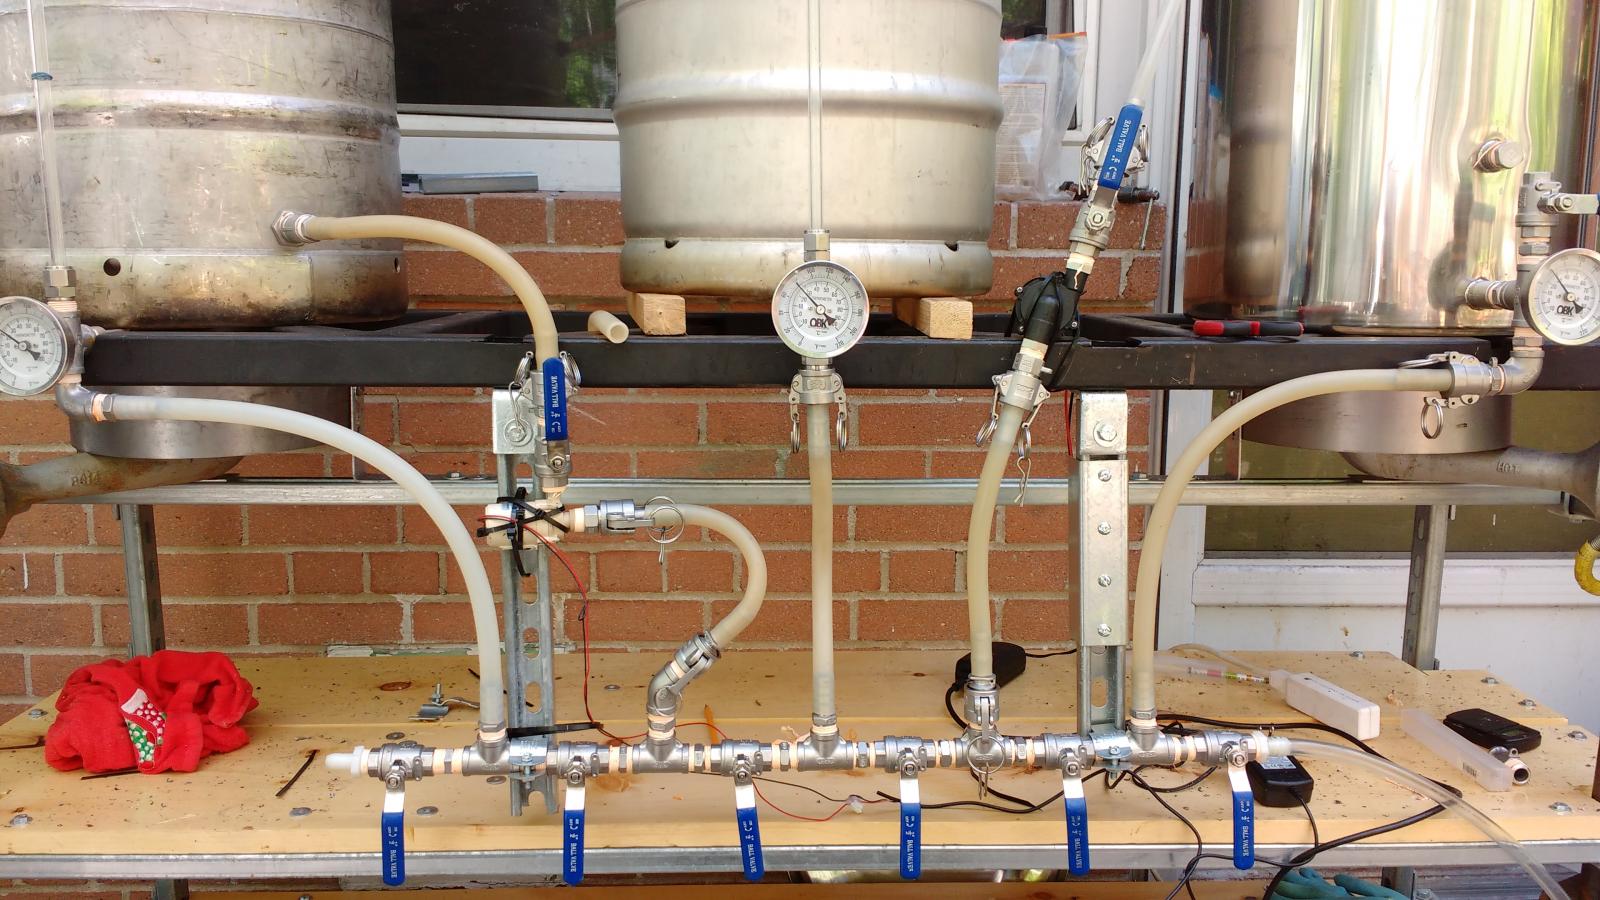
In the above picture, the line coming off the bottom of the pots IS the drain pipe. It terminates at a cross, to which I've attached a volume gauge tube upwards, a temperature gauge forwards, and a camlock disconnect downwards. The thick curved lines are silicone tubes.
 
Update: finished the flow diagrams for the various stages (fill, strike, mash, sparge, boil, chill). Cutting the strut this week and constructing the stand next week!
 
I'm not automating, all the valves are generic 2-piece 1/2" full bore ball valves. All my plumbing is 1/2" pipe threaded stuff. I would've gone with triclamp but it's prohibitively expensive for me.

In the above picture, the line coming off the bottom of the pots IS the drain pipe. It terminates at a cross, to which I've attached a volume gauge tube upwards, a temperature gauge forwards, and a camlock disconnect downwards. The thick curved lines are silicone tubes.

I would spend the extra money and get 3-piece valves. I have to pull mine apart and clean every couple months.
 
Not without removing other piping if it is hard piped.

The threads themselves pick up a lot of gunk - I'll be fully disassembling once a season for that reason. Truly ideal would be a fully triclamp setup, but that is outside my means.
 
Are you planning to solder a bottom drain into your kegs? The 2" TC approach won't work well on top of a gas burner.
 
The threads themselves pick up a lot of gunk - I'll be fully disassembling once a season for that reason. Truly ideal would be a fully triclamp setup, but that is outside my means.

Yes yes, but when you can get a 3 piece valve for $3 more than a 2 piece like on BargainFittings, the extra money is more than worth the time savings.

http://www.bargainfittings.com/index.php?route=product/category&path=36_57

Another bonus is that if your anal like most of us are about having your ball valve handles on top it makes it way easier. With 2 piece valves your stuck aligning your valve by adding/removing thread tape and its a giant PITA to get the right amount so that you dont leak and that your handle is aligned. With 3 piece i screw it on as tight as possible while keeping the bolt pattern parallel with the ground, unbolt the entire front of the valve, turn it so that my handle is on top and bolt it back together.
 
Oh, how I wish I were buying from the states. Our options in Canada are $18 for 2-piece vs $30 for those 3-piecers. My cheapest option actually is to buy some stainless union fittings and use those to line up the valves.
 
...I'm bookmarking that link, thank you VERY much.

Going full automation won't be for some time. Probably not until I'm a home owner. If and when...I'll probably end up with a full electric system from Stout Tanks, running most likely on a BCS or Brewtroller.
 
I have a several of them on my glycol coolant system.... If you are going to be buying more than 10 or so manual valves for the brewing system you may be able to find a cheaper deal on ali or somewhere to get them shipped directly to you from China.
 
Love the drawings. I'll be incorporating this HLT burner + heat stick design into my brew stand build soon. Do you have a link for the heat stick? Thanks
 
This is the electric heat stick I bought.

Be careful - note how it's only two prong. I'm not using a GFCI outlet either - definitely something you might want to do.
 
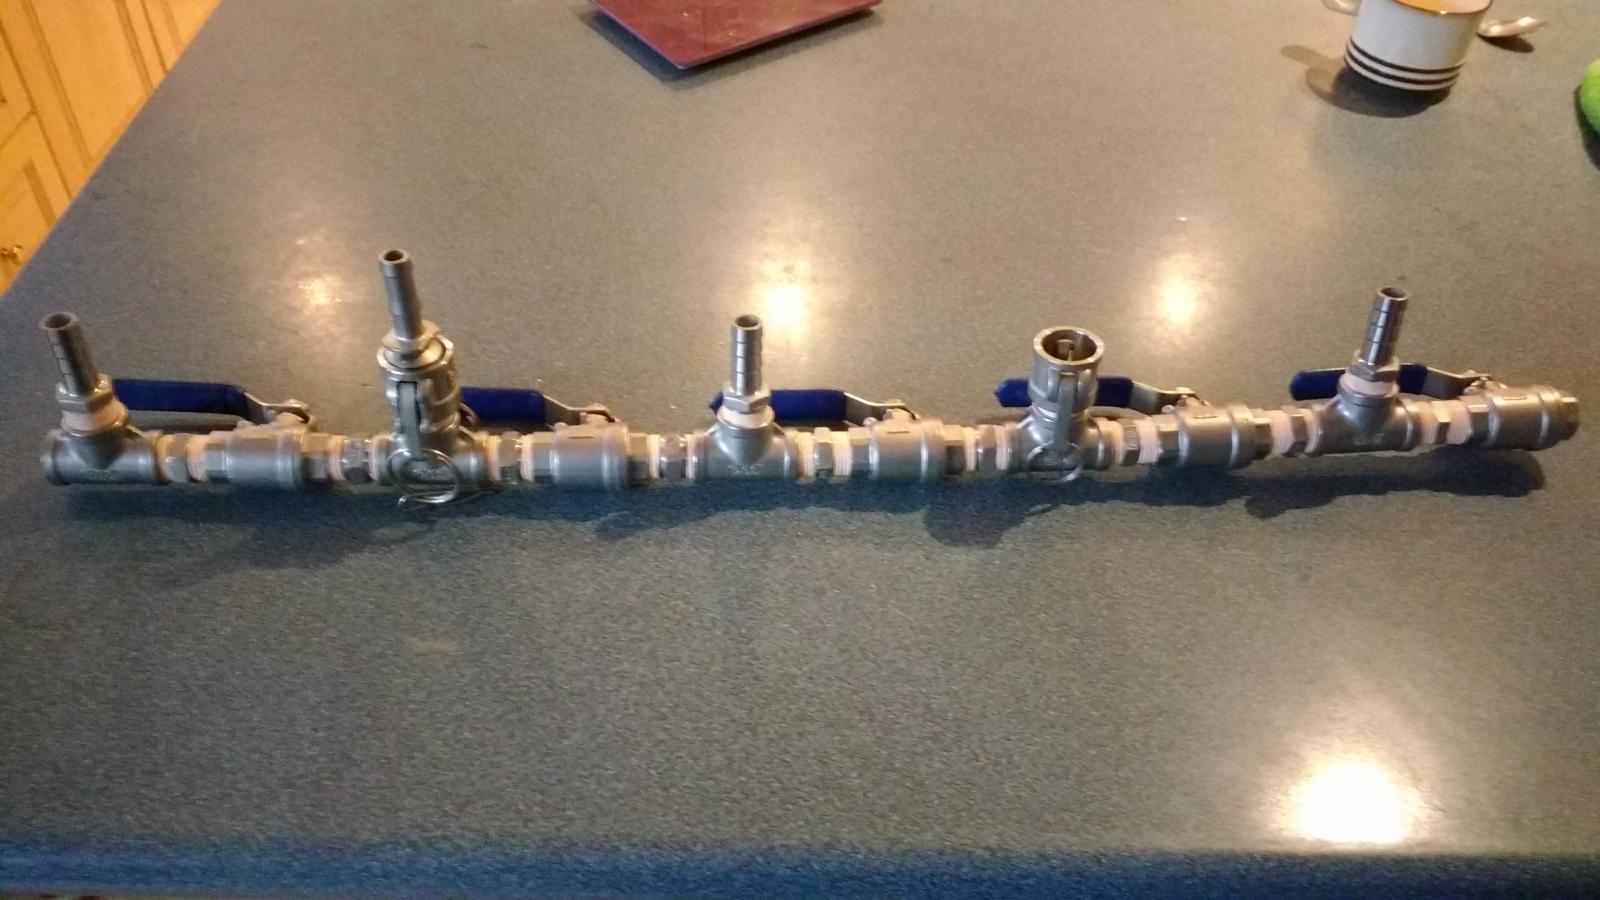
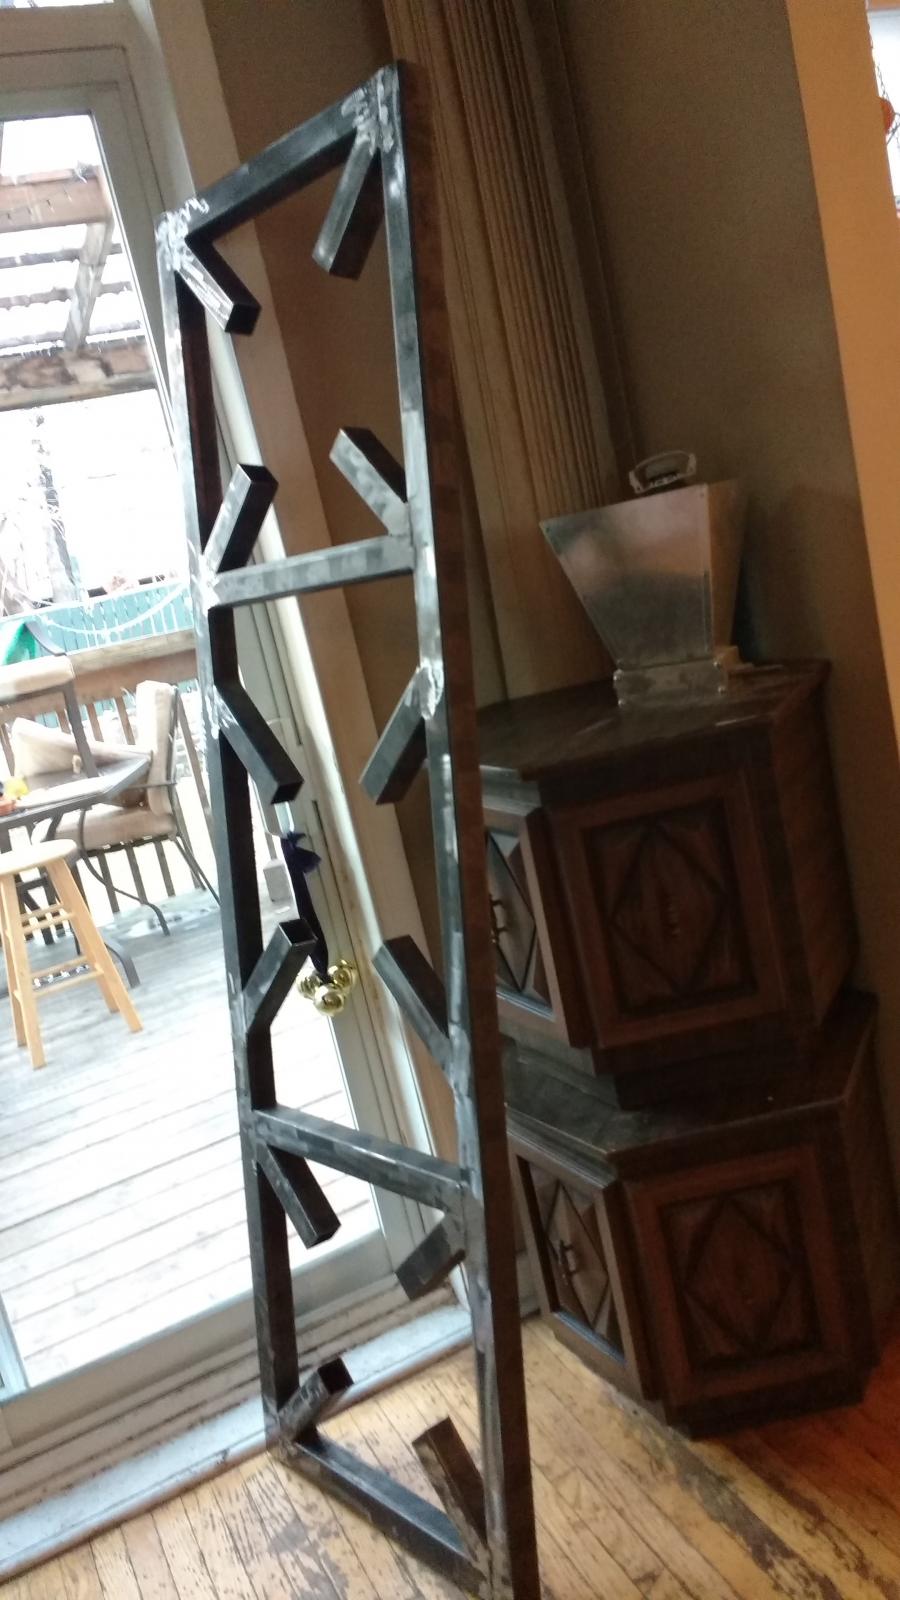
Moar! Liquid manifold complete. Gas piping complete. Stand top is welded and will be in a chemical treatment bath tonight to remove mill scale and prepare for painting.

IMG_20160323_224233355.jpg


IMG_20160325_190210066.jpg


IMG_20160325_190142221.jpg
 
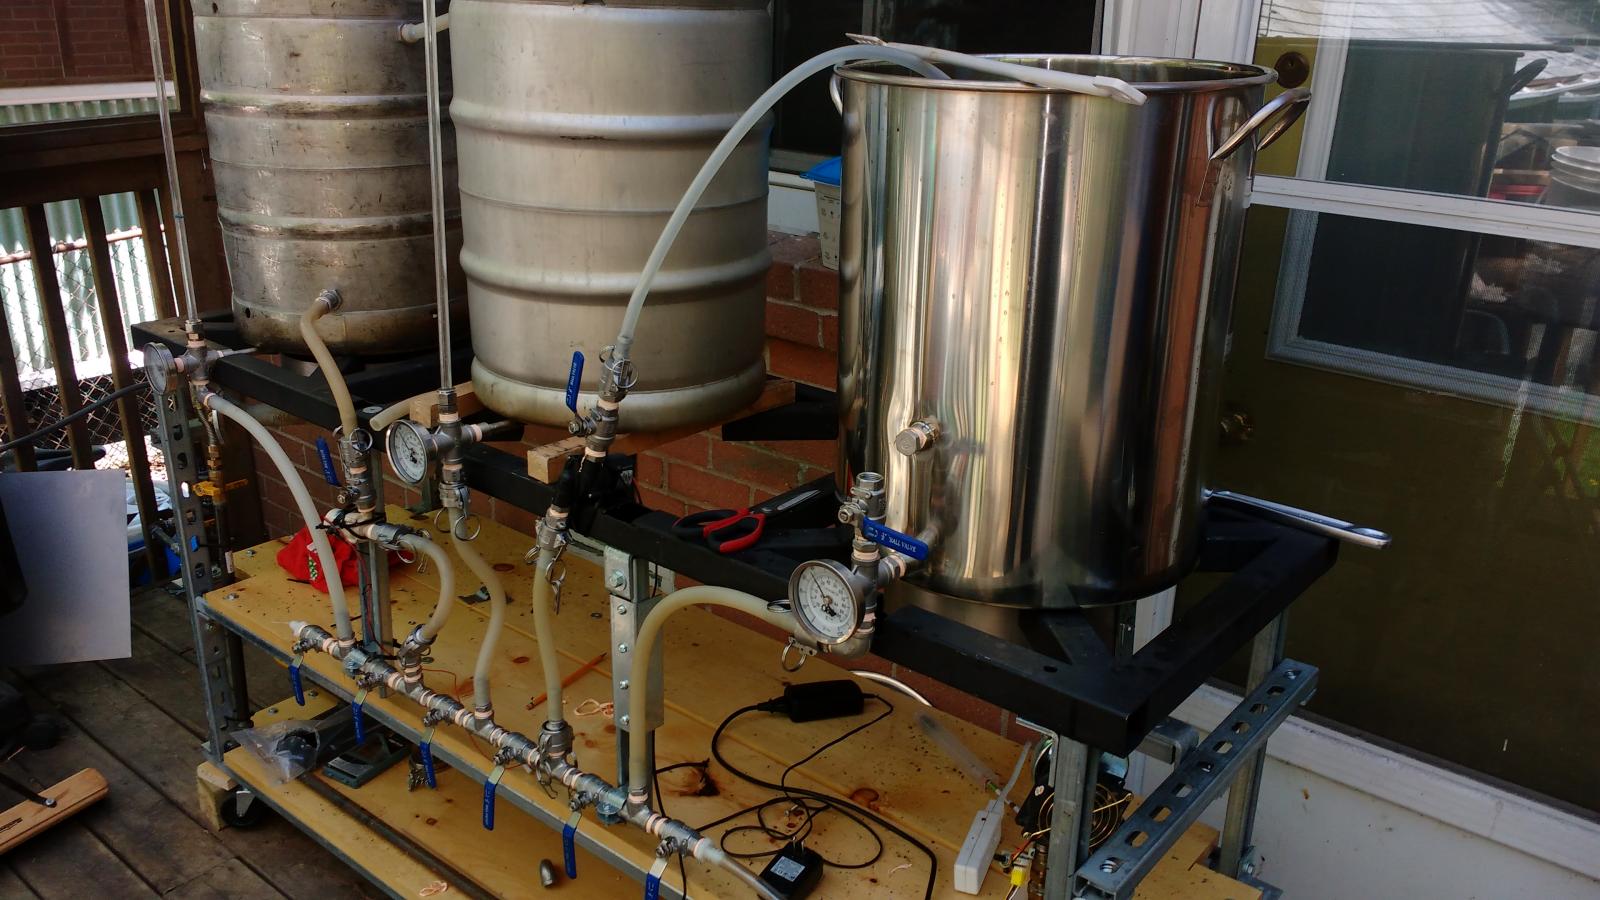
Update: it's alive and working. Had to swap out a regular kettle for the bottom drain keggle. I'll have to make the kettle tippy dump as well to achieve my CIP goal.

Gonna be splicing the stand into my kitchen cold water line and sink drain line as well.

Finally, a sad development. My sous vide controller died...so automated mash temp control is gone for now. I think I'll take a new tack: PID control of the mash/sparge pump. The HLT burner will be lit on low throughout the mash, and the pump will fire up to recirculate whenever the mash tun temp dips low.

1463766631533-800110586.jpg


1463766660572408554670.jpg


14637666863531666759859.jpg


1463766714872-62512097.jpg
 
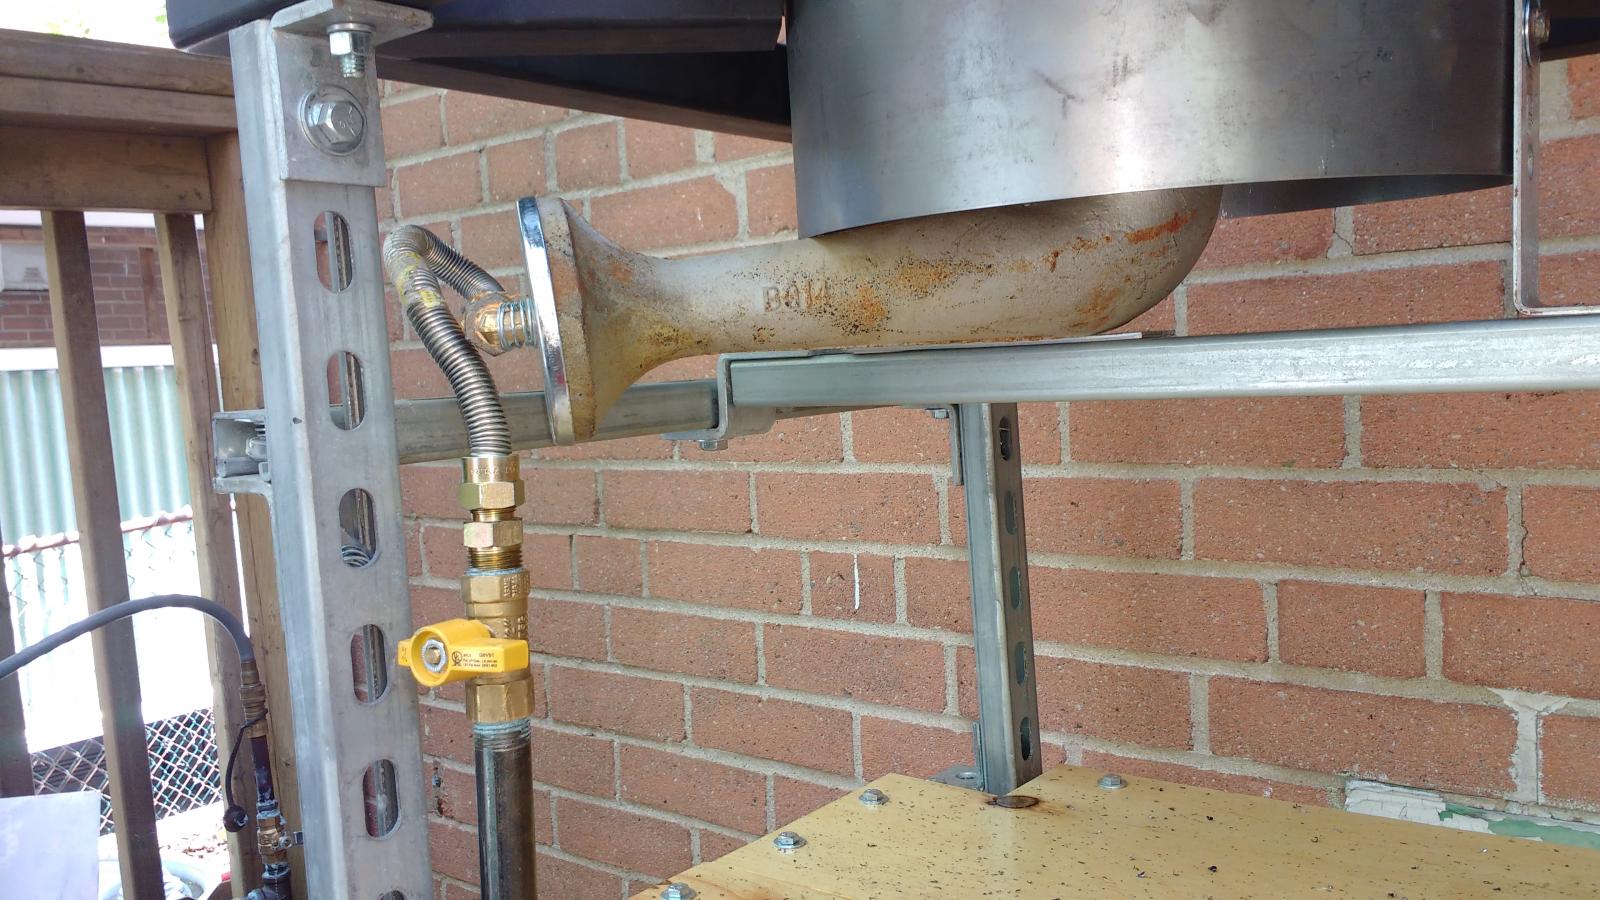
It's been a semi productive day. Installed electric ignitors, and discovered that the mounting holes on the banjo burners SUCK. As in "the thread will almost effortlessly strip off and be useless" suck, sadly.
 
Back
Top